|
The SD-WorkDiary
Improvements in ServiceDesk are fast and
furious. Not all releases are announced here (many involve mere
incremental tweaks and fixes). This blog mentions only releases that
involve significant enhancements. It's so you can
know about and take advantage of them. New entries are placed at top, so reading downward takes you back in time (like
digging ever deeper at an archeological site). To initiate a textual
search, hit Ctrl-F on your keyboard.
|
4.8.66 (7/31/18) -- And All Subsequent New
Entries!!!!!
New Rossware Website:
rossware.com:
Many months ago, we finally "bit the bullet" and paid
the ransom for the domain name "rossware.com" (it had been long
held by persons that claim title to a domain name in the hope of making big
bucks by selling it to the party that really wants it). In the meantime,
our newest resident genius, Alex, was at work building an entirely new Rossware
(and terrifically modernized) website.
That new website is now published under the
rossware.com domain name (specifically, the url for it is
https://rossware.com, but if you
merely type "rossware.com in your web browser's address bar, it will
take you there).
Pretty soon, we'll re-direct this website url (http://rossware.net)
to the new rossware.com.
In the meantime, we are no longer actively
making new SD-WorkDiary entries in this old venue. Instead, all
new entries are going exclusively to the SD-WorkDiary that's present in
the new site.
Please click
here to be linked to that new and current SD-WorkDiary.
THIS IS THE LAST ENTRY HERE !!!!!!!!!!!!
4.8.65 (7/19/18):
Barcode-Scanner Enabled Check-Offs in the
PartsPick Form:
This is another item for which we must credit Tony
Tyrell in Maryland.
Tony runs a big operation. His people have
a ton of mouse-clicking to do, within the PartsPick form, as they click
to indicate a particular expected item is being placed in the tote to go
outward to a tech, and or as they click to indicate another particular
item has appropriately come back from him.
They have so many items that, even though simple
mouse clicks are quick and easy, the time consumption overall can still
be quite large.
Even worse, because they are going through so
many items, errors happen all too frequently. As an example, it's
pretty easy to click on a wrong item to indicate -- and perhaps
erroneously -- that it's been moved to or from the tech.
Tony wanted a method that would be both faster
and more accurate.
Accordingly, if you look in the PartsPick
form (shortcut is Shift-Ctrl/F8) when running with this
new release, you'll see three new little squares:
If you float your mousepointer over any of the
three, you'll see a Tooltip appears, to inform you of the purpose in
those little squares.
The purpose, simply, is you may click on any
such little square to toggle its list section into barcode-scanner
mode. And, when you do, you'll see a bit of visual transformation,
as shown here:
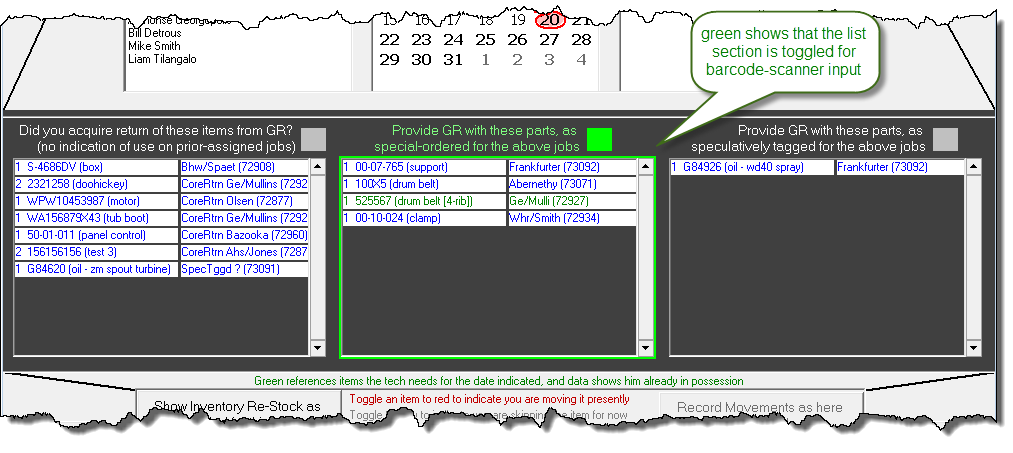
The purpose of this transformation is to make it
visually obvious that the applicable list section is in "active mode" to
receive barcode-scanner input.
Thus, if (with a list section in that
mode) you "zap" a part-number-containing barcode, ServiceDesk will
instantly look within the list for matching part number. Upon
finding a match, it will instantly react just the same as if that item
had been mouse-clicked.
Based on this, we think it should now be super
fast and accurate to move items to and fro, between your
central location and your techs.
. . .
As a BTW, if you're interested in acquiring one
or more wireless barcode scanners, we recently acquired
this Bluetooth one, and find it quite nice ($50 at full retail, but
if you find it on sale it can be cheaper).
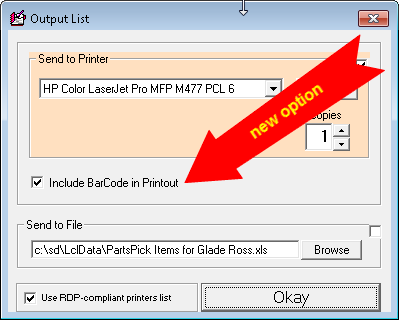
New
"With-Barcodes" Printing Option:
In the same PartsPick form as above
discussed, there has long been an option to print any particular technician's "PartsPick"
list. Now, when you choose to print and are presented with the "Select
Printer" dialog box, you'll see there is a new option checkbox that, if checked,
will cause the printout to include barcodes:
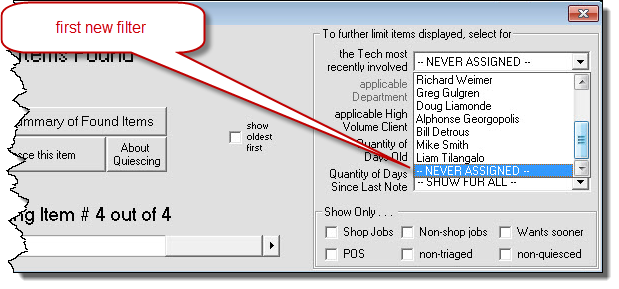
New Filters in
JobsPerusal Form:
If you did not know, the keyboard shortcut for this
form is Shift-F7. This interface is used when you
want to review pending jobs that fit within any of several particular
categories (e.g., waiting for parts, needing to be scheduled, etc.).
As time goes by, we continue to receive requests from clients for new
bases by which to "filter" the particular set of jobs that are shown.
Recently, we accepted two new requests.
First, while the
JobsPerusal form has long had ability to show only such jobs as are
most-recently associated with a particular technician, it has not had
ability to show only such jobs as have no association with any tech at
all. So, that's the first new filtering option that is now added:
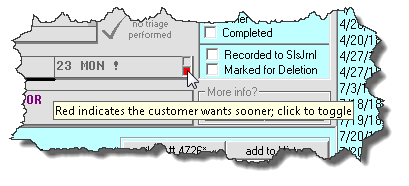
Second, there is now a
filter for Wants Sooner:
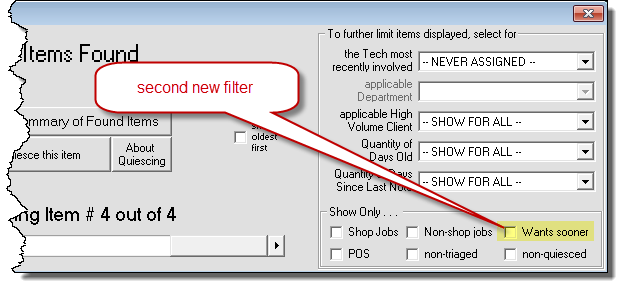
For context, several years ago we added a colored
toggle box to the appointment sections (applicable in both Callsheets
and JobRecords) which you can toggle to red to indicate the customer
wants the appointment changed to a sooner date, should opportunity arise
within your schedule. Here is the toggle box:
Simultaneously, we added a function in the
DispatchMap where you can display the locations of each pending
appointment (regardless of whether the appointment is for the displayed
date) that is toggled for Wants Sooner. By this means,
you can look at any particular day where capacity has opened up, and see
what Wants-Sooner appointments are convenient to where techs are already
driving.
Regardless of that existing capability, a particular
user thought it would be nice to be able to also review Wants-Sooner
requests from the perspective of the JobsPerusal form, so that capacity
is likewise now added.
New "Inventory
Import" Feature:
I am not sure why this happens, but from time to time
we are contacted by a client who, having decided to finally to begin
using ServiceDesk's inventory control system (it's a function that many
users initially put off), began in the effort by laboriously entering
all of their inventory into an Excel spreadsheet. I don't think
this path generally makes sense because, absent certain narrow
exceptions, it's far easier to enter inventory directly into ServiceDesk
from the get go.
Regardless, if you have basic and reasonably accurate
inventory data in an Excel spreadsheet, you naturally hope for a way by
which to import it into ServiceDesk's inventory system. Prior to
now, there was no mechanism in ServiceDesk by which to do this.
It's somewhat of a complicated matter, because everyone ends up
arranging inventory data in their spreadsheets differently. So,
when contacted by a client wanting to import such data, I have in each
instance written custom program code, tailored for the particular data
as arranged in the client's spreadsheet. There was also in each
instance a fee for this custom work.
Well . . . that's not needed anymore.
I've created a system that allows you to describe how
the data is laid out within your Excel spreadsheet and -- on the basis
of your description -- ServiceDesk will perfectly import that data for
you.
By way of disclaimer, I have not invested so much as
would be needed to make this system as beautiful as it could
be. In particular, an optimal method for describing the layout of
your spreadsheet data would involve an interface where you can point to
actual columns from your spreadsheet and tell ServiceDesk (simply by
picking from a dropdown in regard to each such column): "Okay, this
column contains part numbers; this column contains descriptions; this
one indicates what we paid for each part, etc." Instead of
investing to make that kind of more optimum interface, I've taken a
shortcut via which you provide ServiceDesk with needed details via a
back-and-forth dialog (e.g., it asks which column number contains part
numbers, and you answer).
Regardless, it works. The method for invoking
the dialog (and of course for proceeding with an actual import as the
dialog completes) is to use the keyboard shortcut Ctrl-I
from within your F10 Inventory Control form (the "I" is
for Import).
FYI, the import is designed to add to
whatever such Inventory and MasterPlan data as already exists in your
system. For such reason, if you want it to replace
existing Inventory and/or MasterPlan data, you should delete applicable
files first (our support team can of course assist).
4.8.62 (5/29/18):
Technician-Specific Settings Now Available for
Controlling Technician Duties and Rights in SD-Mobile:
A reader may think this entry should be in the
SD-Mobile WorkDiary, since it
directly pertains to that system. However, ServiceDesk is in fact the place
where these new settings capabilities will be managed, so it makes very good
sense to describe the new wherewithal here (don't worry; we'll also mention it
in the SD-Mobile WorkDiary).
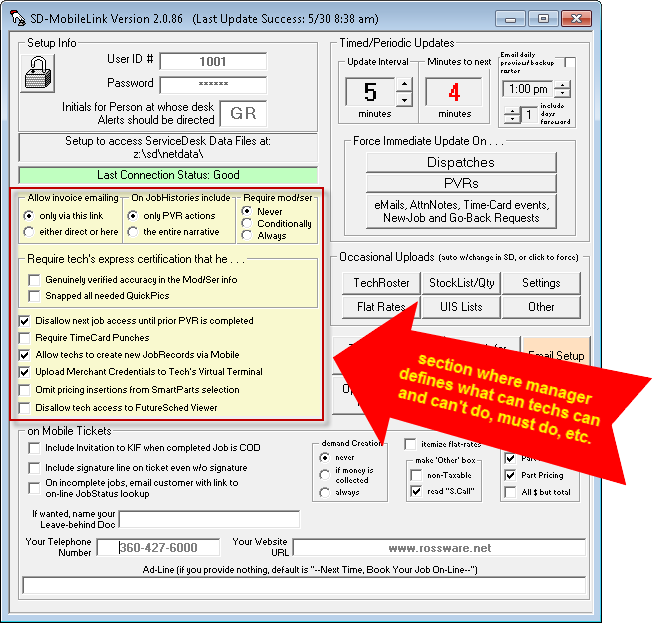
For context, over the years the SD-Mobile system
has accumulated a plethora of options whereby a manager may, according
to preference, specify a bunch of different elements of interaction that
govern what the company's techs can and/or must do within the Mobile
environment. These options are all set from within a particular
section of the SD-MobileLink program, as shown here:
A particular thing to note about such settings
as shown above is that whatever is set by the manager is going to apply
to each and every technician in the company. There is no ability,
for example, to turn on PVR enforcement for one or more technicians that
particularly need it, while leaving that disciplinary feature turned off
for technicians that need no such discipline.
Now we have changed that.
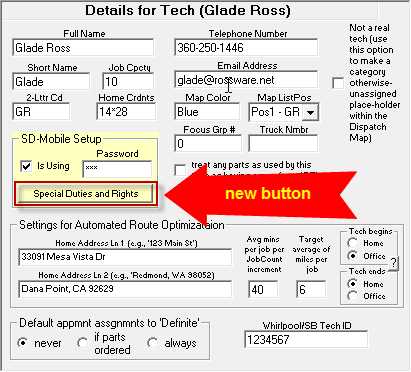
In particular, please go into the ServiceDesk
Settings form (Ctrl-F1 is the shortcut) and click on any
particular technician's name (within the roster of technicians) so as to
expose that tech's Properties window. Upon so doing,
you'll see there is a new button in the section of the
Properties window that pertains to SD-Mobile usage:
Now, please click on the new button as shown
above, and you'll see this new interface:
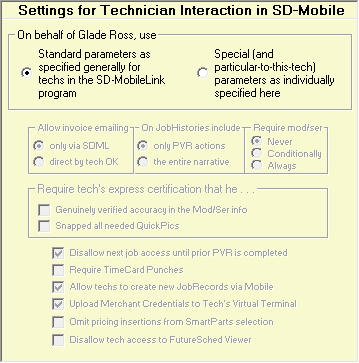
As you can see, the main body in this new
interface looks very much like that section as above shown from within
SD-MobileLink, and you have the option, in regard to any particular
tech, of deferring to such general settings as are there specified, or
to set specially and specifically for the selected technician (if you
switch to that option, all "borrowed-from-SD-MobileLink" options become
enabled so that you can set per specific preference).
If you're wondering, yes, if set with the first
option this interface will display with such settings as you have
specified in SD-MobileLink. If changing to set specially for a
particular tech, it will first show with those same settings, and you
can change from there as desired.
Caveats:
-
If your settings in SD-MobileLink are other
than original/standard default, the "defer-to-standard" mode in this
new interface will not show your particular general settings until
and unless you have updated SD-MobileLink to Ver. 2.0.86 or above,
and allowed it to cycle at least once (otherwise it will show
original/standard defaults).
-
You must likewise have your SD-MobileLink
updated to Ver. 2.0.86 or above in order for it to see any such
particular-to-tech settings as you have created, and for it to port
this information outward to each involved tech's system.
-
For techs using the Windows version of
SD-Mobile (aka SDM-w), they must be updated to Ver. 2.1.8 or above
(older versions are not coded to get and use the new and specialized
information).
-
For techs using the iOS version of SD-Mobile
(aka SDM-i), we are still working to upgrade some background
processes that will enable their interfaces to get and use the new
information (ETA on that is later this week).
Gender Neutrality:
Are all of your technicians male?
If yes, this will not have been a concern for
you.
To be sure, right within this WorkDiary, I often
use male pronouns when referring to technicians. It's easy that
way, and it fits, likely, 99 percent of the time.
But not all of the time.
Fred's Appliance in Ohio happens to employ an
excellent female technician. Adam (from Fred's ) pointed out to me
how certain language in the appointment confirmation process comes
across very poorly for appointments that are scheduled for this female
tech, especially where Fred's has configured so that their
confirmation-request emails include a picture of the assigned
technician, and in this case the picture very obviously shows a woman.
Imagine seeing such a picture, with text just below such as:
"We estimate he'll
be arriving . . ."
and
"He's
scheduled to work on the following . . ."
Imagine the customer clicks on the link to
confirm, in the resulting online interface does confirm, and in response
receives an automated email that includes:
"We appreciate you confirming your
appointment. It allows us to dispatch the technician with
increased confidence that when he
arrives at your doorstep, there will be a successful connection."
To address this issue, we've added a new field
that may be used in configuring this text. The default text has
already been configured to use the new field. If you're using
customized text, you can update your customized text to use it as well
(yes, the
customizing-text manual has also been updated to show potential use
of the new field).
The new field references, simply, the applicable
technician's first name, and allows for a change from such
examples as shown above to the following instead:
"We estimate Corina will be
arriving . . ."
and
"Corina is expecting to
work on the following . . ."
Besides the fact this change avoids the gender
pronoun difficulty, I like that it also makes the language more direct
and personal.
In regard to the email that's sent by
SD-CyberLink after the customer completes confirmation, applicable
language there has simply been changed from what's shown above to this
instead:
"We appreciate you confirming your
appointment.
It allow us to dispatch the technician with increased confidence
that, when arriving at your doorstep, a successful connection will be
made."
This change in the SD-CyberOffice-sent email
will require updating to its Ver. 4.5.62 or above.
Update Grid Reference Tool Available in
Current-JobRecords Form:
If, in a current-JobRecord form (F7 is the shortuct),
you do a Ctrl/Right-Click within a customer's address box, you will now see
something new.
Specifically, you will see the StreetList
dropdown appear, similar to when you are typing a street name into a
Callsheet.
We made this function to make transition easier
whenever a user updates to a re-designed map wherein the old grid system
is no longer controlling, and, thus, presently in-use references need to
be changed so as to match the new system. It might be useful in a
few other contexts, as well.
When you pick the applicable street from the
dropdown, the system will insert its coordinates. Simultaneously,
it will look for any pending appointments, and offer to update such
coordinates as attached to them, as well.
4.8.58 (4/16/18):
EMV-Compatible
Credit Card Processing
-- In Other Words, You May Now Use "Chip Readers":
Rossware has done the coding and been certified for its
Windows-based Virtual Terminal to work via Cayan's
Genius Mini.
The "Mini" is a beautiful little cordless device
(connects via Bluetooth) which can easily fit in a tech's pocket or be
carried on a neck lanyard. Besides allowing card insertion for
chip reading, it also allows a traditional swipe. Even better , it
allows NFC proximity reading (i.e., reading via card taps, for any card
that is so configured).
Also, the device is inexpensive (only $59 per
unit).
The one drawback is that Cayan imposes a monthly
$9.95 fee on use of the device. That's potentially offset by the
fact that, by switching to the Genius system, you may eliminate your
annual PCI compliance fee.
Here are instructions for switching into use of
this device:
-
Acquire a device for
each person/place you want it to be used.
-
Work with Cayan to
assure your Cayan gateway profile is on the platform which allows
EMV processing (it's a particular "First Data" platform, I believe).
-
Assure each person
is operating in a version of SD or SDM that's been updated to use
the device (all Window's-system releases from 4/19/18 onward have
the capability; SDM-i is likely still a month away).
-
For use in Windows
platforms, you'll need to download and install the Genius
Application (this application works as an agent that is called
to do certain processing by Rossware's Virtual Terminal; if you have
not otherwise installed it, the Virtual Terminal will prompt you and
provide a link).
-
From within the
Virtual Terminal interface, click on the "Device Setup" button, and
select as shown here:
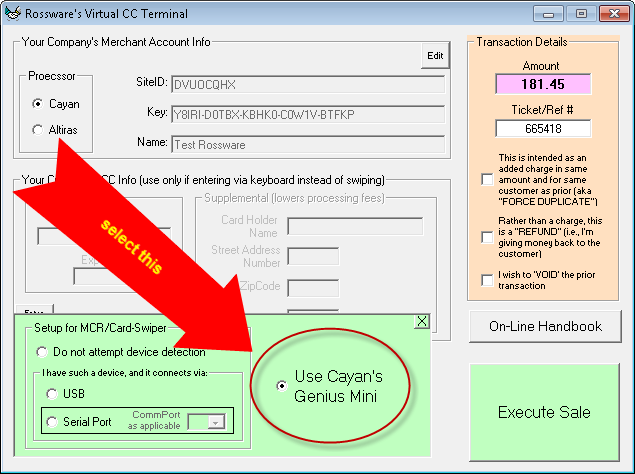
With the above done, you should be able to run
perfect transactions using the Mini in any of its modes.
4.8.56 (4/11/18):
New Option for Sending a
StartOfJob Communique When Creating New Jobs:
In June of last year (see item several entries below
pertaining to Rel. 4.8.29) we enabled User-defined Email- and SMS-Templates
(in a nutshell, you can create and contextually deploy your own "form-letter"
setups for emailing or SMS-messaging your customers).
Recently, Matt Parker suggested a context where
you might want to use a special-purpose such template.
That purpose is where you have first scheduled a new job with a
customer. Perhaps you want to send an email thanking the customer,
advising of general policies and what to expect, etc.
It seemed like a great idea.
To make it effective, we obviously needed
something more than to simply rely on a CSR to volitionally think
of sending such a missive in each instance. We needing for the
sending to be more automated, and definite.
Matt's idea was to optionally incorporate this
sending event right into SD's Job/Sale transition. So,
that's what we've done, via a new option as seen here:
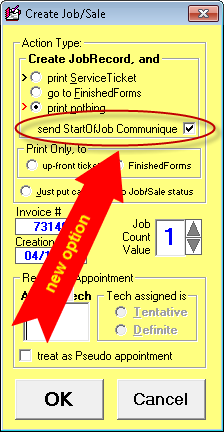
As you can see, we are calling our new and
special kind of missive the "StartOfJob Communique."
The option to pick its use is (or, at least, we think it should be)
self-evident.
Regardless, I'll explain.
Assuming you leave that new box checked,
ServiceDesk will automatically send (in conjunction with job-creation)
the particular User-defined Template that you have designated for this
purpose.
Please note this new option will automatically
activate and insert a checkmark if in a suitable situation (e.g., the
Callsheet that you're transitioning from is setup for COD work and
includes a consumer email address, plus you have setup your system
overall with a suitable template for the COD situation). Thus, the
default for any applicable situation is "on," and it's only by
deliberate user action (un-checking that box) that sending will not be
inclusive to the Job/Sale transition.
In regard to designation of a template for this
purpose, it's done by the title you give to the underlying file that
contains the template, and you can in fact designate two different
templates: one for COD jobs and one for third-party-payer jobs
(presumably, suitable language is different for those different
situations). Complete instructions have been added as the last
page in our
User-Defined-Templates Handbook.
4.8.55 (3/19/18):
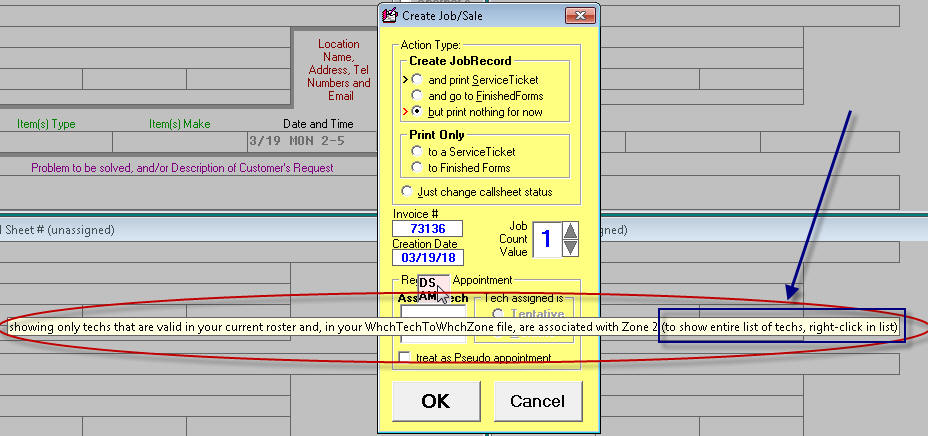
Assistance for Assigning
Technician in Multiple-Zone Situations:
If you have a larger operation and it covers a
significantly large territory, odds are good that you use the ZoneScheduler
system to divide your area into separate zones, and that you have particular
techs working within particular zones.
If the above is true, you'll be interested in
this new feature.
In a nutshell, you may now indicate which techs
you wish to have associated with which zones, and the system will use
that information to limit the list of suggested technicians for
assignment to an appointment during the Job/Sale transition from a
Callsheet.
To use this new system, you need to create a
very simple file. It's probably easiest if you use Excel or
similar to create the file. The file needs to have one line item
for each of your zones, and just two columns in each line. In the
first column you should place the zone number that is applicable to that
line. In the second column, you should simply list the
two-character abbreviation for each tech that you wish to have
associated with that zone (and with each separated by a comma).
Thus, it might look something like this:
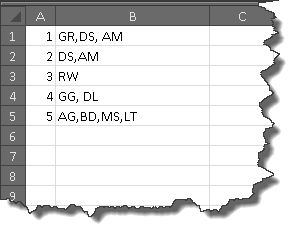
Please note there is no reason why any
particular tech cannot be associated with more than one zone (depending
on your situation, this may indeed in many cases be very apt).
This file must be saved in .CSV format (that
extension specifies a structure that is comma-delimited), saved with the
precise filename WhchTechToWhchZone.CSV,
and placed into the same sd\Netdata folder that contains your
other primary ServiceDesk data.
What happens is, when you engage in the Job/Sale
transition from a Callsheet, the system looks for presence (or not) of
the above-described file. If it's there, and if there is a zone
assigned to the new job, the system looks in that file for a line that
has the applicable zone indicator in its first column. Upon
finding such a line, it looks in the second column for an indication of
associated technicians. Upon finding those (and verifying that
each is a currently valid tecnician), it places each in the dropdown
from which you may select, for assignment to the new appointment.
In other words, instead of seeing the full list
of technicians, like this:
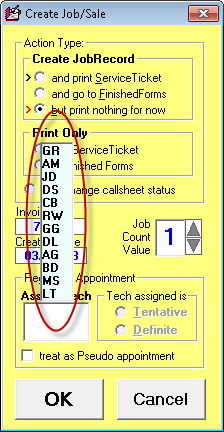
You'll see a list that's limited to just the
zone-associated technicians, like this:
Please note we've configured so there is a
different background color in this dropdown list, depending on if it has
been populated on a limited-to-zone-associated-techs basis, or if it's a
more traditional showing of your entire roster of techs (rose-colored
for the new/optional mode, blue-colored for traditional).
Please note further if you float your
mousepointer over the dropdown listing in either mode, the system will
display a ToolTip that describes the mode and suggests how you may
toggle to the opposite mode, if desired . . . as seen for one mode here:
Assuming that this is something you want, please
don't be intimidated by the need to setup the underlying file.
It's really super easy, and our support staff will be delighted to
assist, if you wish.
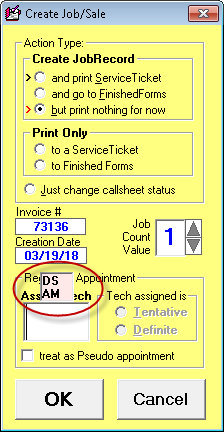
Designation of
"Pseudo" Appointment Via the Job/Sale Transition:
To remind, in ServiceDesk we have real
appointments, pseudo appointments and fake
appointments. The meaning of a real appointment is obvious.
A pseudo appointment is for a real customer and is attached to a real
JobRecord, but the tech is not expected to actually go to the customer's
home (instead, he's expected to do some element of follow-through on the
job, during the allotted appointment time). A fake appointment, on
the other hand, is not in any manner attached to a customer or
JobRecord. It might be for something, as an example, like "Get an
oil change."
Until now, designation of an appointment
into pseudo status was done from the F6 ScheduleList form, by
there unchecking the little checkbox that otherwise is by default
checked to indicate the appointment is real. A particular client
wanted ability to make that designation when an appointment is created
simultaneous with Job/Sale transition from a Callsheet, so that now
exists, as seen here:
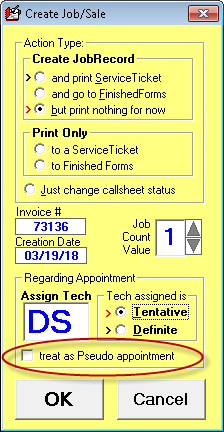
Absent this new option (if for whatever reason
you wanted that initial appointment to be classified as pseudo), you
would have had to go into the F6 form after the Job/Sale transition, to
there uncheck the checkbox. Now you don't have to do that.
4.8.54 (2/28/18):
You Control Quantity of
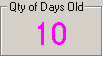
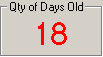
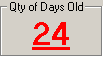
Days for Warning re Recent Prior Work on Same Machine:
If you check the last entry in the posting just below
(i.e., the posting that concerns release of Ver. 4.8.51), you'll see where we
describe a new feature, where a user will be warned, when doing a Job/Sale
transition, if there was a prior job completed on the same machine Type and at
the same address, less than 60 days prior.
Of course, that 60-day warning period did not
suit everyone.
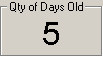
So, we've made it so you can set the warning
period to preference (it will still default at 60 days).
To do so, bring up your Callsheet "Cheat-Sheet"
(just right click on any otherwise non-operable place on the face of a
Callsheet). Look for the following in the resulting Cheat-Sheet
display, and click on it:
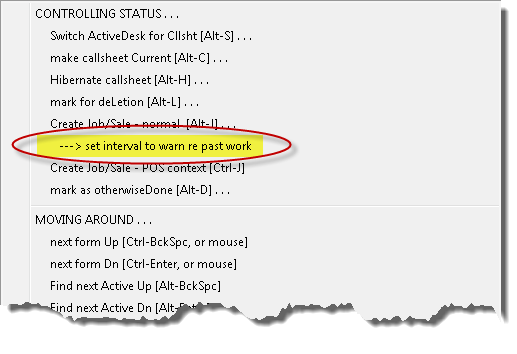
When you click on that item, you'll be presented
with a dialog that allows you to set the warning period to a quantity of
days other than 60.
4.8.51 (2/18/18):
For Improved Speed and
Performance, Automated Segmentation of Files as Contained in the HLinks
Folder:
If you did not know, any drag-and-drop hyperlinks that
you create are stored in your \sd\HLinks folder. A few other kinds of
hyperlinked files may be stored there as well. Over
time, you may accumulate a large quantity of files there.
This may be a problem because Windows is sometimes extremely slow when accessing
contents within a folder that contains too many
files. In consequence, if you're wanting to open a hyperlink in ServiceDesk (or create
a new one), you may find there is an atrocious delay.
Obviously, delay is bad!
The simple solution is to distribute any such
large quantity of files, as may presently exist at the root level of
your \sd\HLinks folder, into a set of subfolders, with each containing a
more manageable quantity of files. Believe it or not, this fully
solves the issue. However, you may not think to do it, you may not
know how to do it, and you may not want to be involved in such work.
We have a solution.
Now, ServiceDesk watches to see how long it
takes when Windows is asked to access contents within your HLinks folder.
If it detects Windows taking more than a second, it will inform you that is
too long, and will offer to run a routine that will automatically go
through all those files in your HLinks folder, parceling each into a
subfolder that corresponds with the month in which it was created.
Thus, instead of having, say, 60,000-plus files
in the root-level of \sd\HLinks, you'll end up with a bunch of
subfolders, each containing a much smaller quantity of files. This
enables Windows to do the needed file access, without being slow.
You may also, if you wish, access this new
function directly, as shown here:
Catch the TimeCard
Scoundrel:
I received a call from a particular client.
He has a CSR who is terrific in almost every way, except this person
routinely arrives late (often, many minutes late). Curiously, this
person's ServiceDesk TimeCard nevertheless shows her as, supposedly,
always arriving on time.
How can this be?
Our client's suspicion is that this otherwise
terrific CSR is just crafty enough to reset her computer's system clock
(to falsely indicate correctly-expected arrival time) before "punching
in," then she resets it back to the correct time afterwards.
Aside from admiring the cleverness (while
perhaps also despairing over the fiendishness), how do you catch that?
In answer, we have created an added element of
behind-the-scenes management, as a person uses ServiceDesk to punch in or
out. Essentially, the system simultaneously does a little query via the internet,
asking an external time source what is the true and honest time.
If the true and honest time is more than three minutes different from
the time on the computer's system clock, ServiceDesk writes to a secret
file, providing details on the event.
We are not going to indicate here what is the
name or location of that secret file. After all, if an employee that
wants to engage in this practice knew where to find the file, he or she
might open and edit it to hide the evidence. Assuming that, as an
owner or top-level manager, you wish to make use of this file, please
contact our support team (email
support@rossware.net, call or open a support connection), identify
yourself as a person in an authorized role, and we'll provide
instructions on how to locate the file. We do not want to provide
such information to mere employees.
Automated Alert
If Having Worked on Same Machine Within 60 Days:
The concern is as follows:
You've received a request to perform
service on a machine. The person who is doing the Job/Sale transition
fails to realize that prior work was done less than 60 days ago. If that
fact was realized, there are certain things that would have been done
differently, in setting up the job. Because it was not realized, those
things are not done differently.
Now, ServiceDesk watches for you.
When the Job/Sale button is activated from a
Callsheet, ServiceDesk looks to see if there was a same-address and
same-Type-Description job, completed less than 60 day prior. If
so, there will be a little popup like this:
Response by the user is obvious.
Zone Identifier Now
In PartsLabels as Applicable to S/O Parts:
Speaks for itself, I think.
4.8.49 (1/17/18):
Auto-Dialing and
Caller-ID, Turn-Key Integration with Service Company Solutions
Telephony Systems:
Service Company Solutions (SCS) is the same company that
brings you "The Blue Book." Over the years, this company has
developed many superb supplemental systems that are targeted, primarily, toward
assisting appliance repair companies. A relative newcomer, in their
array of services, is provisioning and support of complete and robust telephone
systems.
This is good because, obviously, Rossware
clients need good telephone systems.
More fully, Rossware clients would like
to have telephone systems wherein it is very easy to do direct
integration.
One purpose of such integration is
auto-dialing. Put simply, you see a
telephone number in ServiceDesk and want to dial it. Just click,
and the dialing is done for you. It's beautiful.
Another purpose is
Caller-ID.
The phone rings.
Maybe you'd like to know real stuff
about the caller before picking up the line (e.g., the circumstance of
any job or jobs that may be pending for that person, any history of past
jobs, etc.). Maybe you'd like to simply use the Caller-ID number
and name as basis to easily and accurately insert into a Callsheet.
Integration with Caller-ID makes all the above
into reality.
As the phone rings (and if in ServiceDesk it is
the first vacant Callsheet that is selected or turned to), ServiceDesk
will place the caller's telephone number into a little window next to
the Callsheet's first telephone number box. All you must do is
click on that little window, and the number inserts for you.
Besides the fact this accurately places the number into the box, it
simultaneously triggers a search in your ServiceDesk Customer Database
on that telephone number. Thus, you'll instantly see references to
all such present and past jobs as had any involvement with that
telephone number.
Similarly, ServiceDesk will place the caller's
name into a little window next to the Callsheet's CustomerName box.
All you must do is click in that window, and, again, ServiceDesk will
insert the contents into the Callsheet's adjoining box. This
likewise triggers a relevant search in the Customer Database -- though
in this case showing results based on the name, as opposed to on the
telephone number.
Imagine picking up the phone and saying:
"Hello Mrs. Johnson. I bet you're
calling about your washing machine repair. I see, in fact, we just
get parts in for it, and we were about to call you."
Or, at the very least, being more prepared, than
otherwise, to provide relevant and excellent assistance. Your
customers will be very impressed.
Such functionality has been offered in
ServiceDesk for a very long time. However (and sadly, we feel),
most users have failed to take advantage. A large reason for this
is that not all telephone systems can participate in such communication
as is needed to make these integrations work. Even for those
systems that in theory can so communicate, morevoer, it is sometimes
precipitously challenging to complete the needed setup.
That's why this new cooperation is so great!
Working together, Rossware and SCS have
configured elements on both sides so that, if you are a SCS
telephone-system client, it becomes virtually a "piece of cake" to have
full, perfect and robust auto-dialing and Caller-ID functionality within
ServiceDesk.
It's a super-powerful thing, and now you can
have it easily, along with getting into a wonderful telephone system to
boot.
To learn more, your first step will be to
explore with SCS what are the particular telephone system solutions they offer. Here is a
link.
4.8.46 (1/7/18):
New Intelligence When
Confirming Multiple Appointments that are Each Connected to the Same
Customer, Appointment Date/Time and Assigned Tech:
We thank Tim Koyonen for pointing out the need for this
improvement. He explained how it's pretty common for customers to request
simultaneous repairs on more than one machine. Because the Mobile system
is designed to connect to a single machine per JobRecord and appointment, the
office will place each of a particular customer's machine requests into its own
JobRecord, and make individual appointments as connected to each (all
appointments targeted for the same date and time frame, but nevertheless each as
its own individual record).
The issue that arises in this circumstance is,
when requesting that the system send out
appointment-reminder/confirmation-requests, it sends one request for
each unique appointment and machine-to-be-serviced. Beyond the
fact that your customer may be annoyed by these multiple requests, they
may also be confused when they see the first request referencing one
particular machine to be serviced, when knowing they requested work on
that machine, and one or more others, too.
We've solved that.
With a combination of this ServiceDesk release
and the current release of SD-CyberLink (Ver. 4.5.48), the system will
be considerably smarter in handling this kind of situation. In
particular, where you have multiple appointments, each connected to a
different JobRecord, but each for the same customer, assigned to the
same tech and for the same date and time frame -- where all that is true
-- the system will note the fact and create a single
reminder/confirmation-request to cover the entire set.
In fact, in each context where the
reminder/confirmation process is poised to remind the customer of what
kind of machine is being serviced, the system will intelligently create
a combined description. Suppose, for example, there are
appointments to service a Whirlpool Washer, a Maytag Range and a
Kitchenaid Dishwasher. Formerly, there would have been individual
descriptions for each (and each in its own particular reminder/request).
Now, the single combined request will reference such objects of service
in this manner:
"Washer, Range and Dishwasher"
Obviously, that's much more enlightening (and
less confusing) to your customer.
Another benefit of this new intelligence is,
when your customer confirms or cancels on the single combined request,
the result flows back into each involved appointment and each involved
JobRecord.
Please don't forget. You also have to
update SD-CyberLink so as to enable this new intelligence.
New "Restore
Defaults" Function in the Security Form:
The ServiceDesk Security form
(Shift/F11) is, of course, where you indicate which actions are going to
be password protected, which are not, whose passwords will unlock which
door, and so on.
One challenge in regard to using this system is
that, often, because new users don't have a good understanding of what's
what, they end up somewhat foolishly putting locks on doors that don't
really need them, and removing locks on doors that really should have
them. We've structured the defaults (which doors initially have
locks versus not) in a manner we think is optimum for most users.
Where a user has, well, created something of a "which doors
are locked and which are not" mess, it's possible they'll realize
they just want to return to defaults, then adjust to particular
preference (more carefully this time) from there.
Until now, we did not have a function for this.
Now we do. When in the Security form you display
Actions (this is the mode in which you see each door that may
potentially possess a lock or not, and set each according to
preference), a new little button appears, as shown here:
If you click on it, you'll get a dialog that
asks if you truly wish to restore defaults. If you respond "Yes,"
that is of course exactly what happens.
Warning, in the
Security Form, Against Locking Whole Buildings, While Simultaneously and
Also Locking Doors Within:
At Rossware, we very much want for all our users
to enjoy maximum ease, delight and smoothness-of-flow as they use our
systems. Given this, we find ourselves feeling greatly frustrated
when, as we're assisting on some issue, we see that a client must endure
not just one, but two password challenges before they are
permitted to display a particular report.
Why does that happen?
In a nutshell, we've structured the Security
system to give you a lot of flexibility. In regard to the various
reports that are available from within the Reports form, as an
example, it's possible you don't want your employees, generally, to be
able to access anything from within that area of functionality. If
so, you can put a lock on access to the entire form (a lock that may be
opened with authorized passwords, of course, but a lock nonetheless).
Contrariwise, it's possible you don't mind if employees have access in
this area generally, but there are one or two particular reports you
consider sensitive, and do not want just anyone having access to.
If so, you may forego having a lock on the context overall, while
nevertheless putting locks on the particular individual reports that
concern you.
So, we give you that flexibility, and . . . what
happens in consequence?
Yes, many of you choose to put a lock on the
entire context, and on individual reports within the context as
well. Thus, there you are, having to endure one password challenge
just to get into the context, then another to run a particular report
within it.
Because we don't want you to be endlessly
enduring this kind of unneeded and senseless frustration, there are now
mechanisms to help keep you away (as you configure your Security
settings) from making such a mistake.
In particular, where you choose to activate
password protection in a whole-context area that also has potential
password protections within (there are, incidentally, other such
contexts, besides the Reports form), the system will look to
see if you have activated password protection on one or more of the
sub-areas. If so, it will suggest you should not have both layers,
and will offer to delete one or the other. Conversely, where you
are activating password protection on any potentially applicable
sub-area, the system will look to see if whole-context password
protection is activated in a manner that already covers that item.
If so, it will again present a warning and similar options.
A Couple of New
Password-Protection Options:
First, you may now password protect against
editing a formerly-saved purchase invoice number in the PartsProcess
(F8) form. Evidently, some users were finding that some of their
employees sometimes inadvertently changed that number. This
password protection defaults as turned on.
Second, you may now differentially distinguish,
in password protection, between zone-overbooking that results from
changing an existing appointment, as opposed to creating a completely
new appointment. Formerly, a single password protection applied to
either situation, but we found some people wanted a password challenge
to exist for the new appointment situation, while not for a mere change.
This addition allows you to so distinguish. It also
defaults as turned on.
4.8.44 (1/4/18):
New "Systems-Sentry"
Feature:
Many people have asked for this.
You've learned to rely on one or more automated
systems. Maybe it's SD-MobileLink, which (assuming you
are using the Mobile system) must be running to keep your techs
updated with live information regarding work they are supposed to do.
Maybe it's SD-CyberLink, which (assuming you are using
SD-CyberOffice functions) must be running to provide live service
to your customers who are seeking to book jobs online. Maybe it's
SB-DispatchLink, which (assuming you wish to have live
integration with ServiceBench) must be running to keep
ServiceBench informed of your availability for scheduling, informed of
the status of each job they have prior dispatched to you, and to
download new dispatches they create for you.
It might be one or more of these utilities, or,
potentially, any of several others. The point is, these systems
need to be kept running, for, if they are not, needed
communication processes will not be occurring in real time, as they need
to occur.
In some instances a user at a station where such
a utility is running may inadvertently close it. In others, the
computer itself might shutdown. In still others, the utility might
have encountered an issue that internally prevents it from continuing in
performance of its work.
Regardless of cause, when any such utility is
not doing its work, it's possible you, your employees and/or your
customers might suffer frustration, prior to realizing and addressing
the cause.
That's what this new system is designed to
address.
In particular, it allows you to specify the
systems that you are depending on and want to have watched. Based
on that specification, it watches for you, and will proactively inform
you if/when it detects that any such utility is not actively performing
its work.
The heart of this new system is a new interface
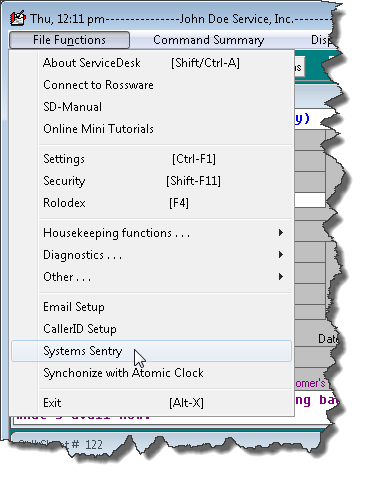
in ServiceDesk that we call the "Systems-Sentry" form. To
access it, click on File Functions in the ServiceDesk Main
Menu, as shown here, then on a new menu item:
This (or at least something rather similar) is
what you will then see:
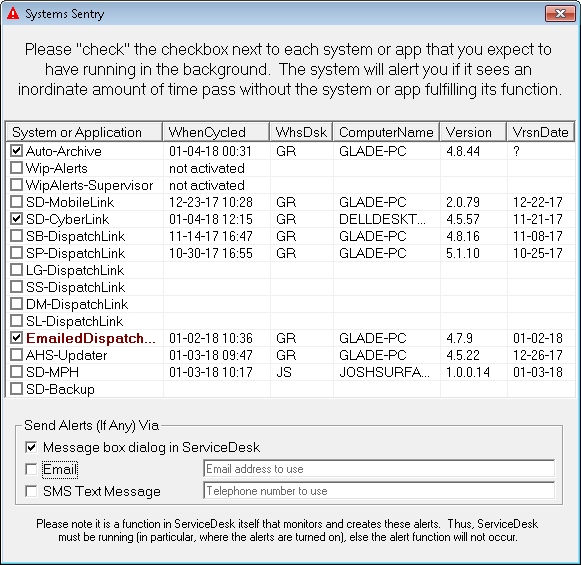
As you can see, the interface lists each of the
automated-functions and/or separate utilities you might want to have
monitored (an item will show in red if its
box is checked and if the amount of time since its last cycle is
excessive). You may simply check the box next to each/any item
that you wish to have actively monitored. In the section
immediately below the selection area, you may further indicate the
method (or methods) that you wish for the system to use when alerting
you.
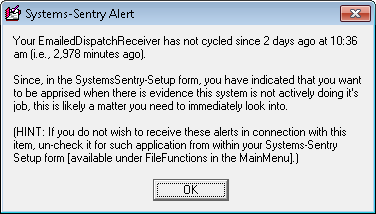
If you choose to be alerted via a message dialog
box within ServiceDesk itself, you'll see a message that looks similar
to this:
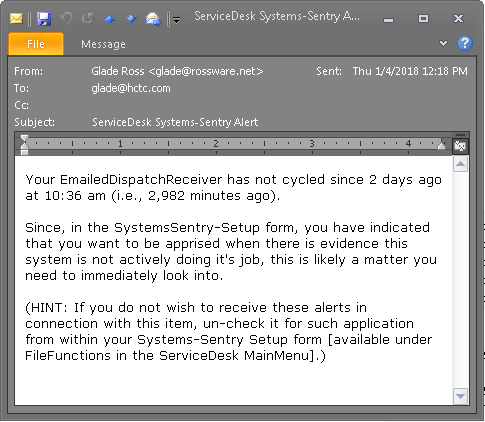
If you choose to be alerted via an email, you'll
receive an email that looks similar to this:
If you choose to be alerted via a text message,
you'll receive a text that looks similar to this:
To be more precise, you'll receive such an alert
if/when any item that's been activated for monitoring fails to show
ongoing timely work. In particular, it will happen when a subject
utility does not show active work for one hour or more, or when an
activated and automated system in ServiceDesk (such as, for example, the
Auto-Archive system) does not show active work for 24 hours or more.
Direct and auto-linked
search into ARsRetired data:
Accounts Receivable records (aka A/Rs) records
are not kept (at least they are not kept as such) after they are paid in
full. The purpose of any such item is to show you have an
outstanding expectation for payment. Thus, once such an item is
satisfied, there is no longer any direct need for it. Regardless,
it's nice to have a log that maintains information regarding such
records as did exist, prior to their demise.
That is the purpose that has until now been
behind-the-scenes served via an otherwise obscure file called
ARsRetired.txt. The thing is, there has been no direct-provided
access to the data in this file. When and if you encountered the
odd-situation need for its information, you'd need to independently
locate and open it, when search within its data for the item of your
interest.
Now we've re-structured that file (it's now
called ARsRetired.csv), and made its contents directly available from
within ServiceDesk. In particular, in any action where you've
requested to see any such A/R records as are connected with a particular
job, the system will offer to further look into this data store.
Thus (and as an example), you could receive information that an A/R
record for Inv # 12345 was retired as fully paid on XYZ date, and with
inclusion of such notes as existed in the record prior to its
retirement, its total amount, etc.
Miscellaneous
Improvements:
-
In the A/Rs Review form (F3), added ability
to search on basis of A/R amount.
-
When you're composing an SMS text message in
the SD-Mail interface, the system will now warn if you're
approaching or exceeding the 160-character maximum.
-
Made it so pseudo-appointments now default
to a JobCount value of zero (formerly they defaulted to a JobCount
of 1, just as with standard appointments).
-
Made it so the Notes sections in the Rolodex
(in particular, as applicable to Companies and Persons) will not
automatically save user edits (the need arose because sometimes
people were inadvertently making changes). Rather, the system
will resist saving with any such change absent user confirmation
that saving is wanted.
-
Made it so you won't be pestered about
overbooking a zone pocket when editing an existing appointment, if
that edit does not move the appointment to a different scheduling
pocket, and if the pocket that it's in was already overburdened
(formerly, any change in the timeframe would result in potentially
being pestered).
-
Corrected the unintended (and formerly not
known) fact that appointments as present in Hibernated Callsheets
were not being counted against availability. Thanks to Paul
Manning at Sharper Electronics for bringing this matter to our
attention.
4.8.41 (11/21/17):
Powerful Hyperlinking
Ability Now in SD-Mails:
This one is especially important for
triage.
Slightly less than a month ago (scroll downward
to see the third of "Four Very Big Items" in the
10/26/17 entry below) we announced our addition of a new
online triage center.
Part of the concept in this new interface is it's a piece of cake for
anyone anywhere, when given appropriate credentials, to provide triaging
service for you. Then of course the question arises, after someone
has done needed triaging via that interface, how does the triaging
information (that they've produced) get back into the office.
Very simply, it's done via SD-Mails. You
designate who it is, within the office, that you want to have processing
parts requests that the triage person has indicated are wanted.
Triage information is conveyed to that person via SD-Mails that
appropriately list each such part, along with any such added notes as
may have been provided.
The new trick we've added is for the purpose of
facilitating this office person's work.
Imagine he or she is looking at a SD-Mail that
says so-and-so, as a triage person, has requested, say, these three
parts should be ordered to go out with the tech on a particular
appointment. Each part is shown as a line-item in the SD-Mail.
You can imagine it's a bit of work if this office person must look
within the SD-Mail, notice what is the JobRecord number involved, hit F7
to bring up the JobRecord form, hit "i" to begin an invoice number
search, type in the number, then hit Enter to search -- then, once the
correct JobRecord is shown, click on its "Order Parts" button. Of
course, work is still not done because, absent automation otherwise,
this operator still has to type appropriate information into the
PartsRequest form.
What's the solution?
We've made it so this operator may simply
double-click on a part-request
line-item as present in one of these triage-request SD-Mails, and the
system will instantly link to and open the JobRecord involved. It
will likewise click on that JobRecord's "Order Parts" button and fully
fill-in the PartsRequest form which then displays. Thus, a single
double-click sets up the entire thing.
You may wonder why we have not made the system
simply create the PartsProcess request directly, without an office
person needing to be involved at all. It's possible we'll indeed
do that in the future. However, for now our thinking is that you
may want to keep an office person in the loop, thereby withholding from
outside triage persons such absolute power as would be involved if their
actions were permitted to directly create orders within your
PartsProcess system.
Aside from this double-click to create
internal part request in the triage situation hyperlink, we've
created a couple of other hyperlink opportunities there. These can
especially be useful if via ServiceDesk you've sent
out an SMS text message and received back a reply. That
reply will always indicate the smartphone number the reply came from.
If applicable, it will also indicate the JobRecord number that the
communication concerns.
As you look at your customer's reply, odds are
high that you're going to want to locate any such JobRecord as is
relevant. That's where this added hyperlinking ability comes into
play.
Just double-click
on the indication of JobRecord number, if present, and ServiceDesk will
instantly display that JobRecord for you. If there is no such
indication, double-click instead on the indication of
smartphone number the reply was sent from. This will cause
ServiceDesk to open the JobRecords form and self-initiate a search on
the telephone number in question. Thus, via that means it will
instantly open the JobRecord of interest.
Improved Analytics
for Insight Into Which Parts Are Sensible for Pre-Ordering in Triage,
and Which Ones Are Not:
Tony Lott takes the credit for this one.
He called to describe the huge burden his
operation endures in special-ordering parts for triage purposes, with a
high percent ending up as having missed the mark, and then having to be
returned to the vendor.
Tony wondered if there might be a way to
identify parts that have a particularly high "miss" rate in triage.
If so identified, there could be a warning -- when in triage a person is
about to order such a part -- to say "Hey, maybe you shouldn't . . .
this part has succeeded when ordered in triage only 5 percent of the
time" (or something like that).
To fulfill this need, we've added two columns to
the export that is available in conjunction with running a Usage
Analysis report (shortcut sequence to get there is Ctrl-F8-->U,
indicate your date range, let the report run and display to your screen,
then click on the "Send this Report to Excel" button).
The two new columns are on the extreme right of
the export. One indicates the quantity of each item that was
ordered but not used. The other indicates the percent of items
actually used, as compared to total quantity ordered overall.
The general thinking is that, when loaded into
Excel, you sort on that last column. Thus, at the bottom of the
sorted stack you'll see items that have scored very well, in terms of
hitting the target of need. At the top of the sorted stack, you'll
see those that have scored badly.
Given such visibility into items that have
scored badly, you can use your judgment in deciding which items you want
to add into your PartsHotList, and with appropriate notes accompanying.
If you are not familiar with use of the
PartsHotList, it's simply a file you maintain with part numbers that, if
someone is about to order such a part, they are alerted with whatever
note it is that you want them to see. Facility for this was added
9/25/06 with release of Ver. 4.2.23 (search here on that "4.3.23" string
and you'll instantly find the entry that announces the feature, and
includes instructions on how to use it).
We hope, via use of this mechanism, you will
have enhanced visibility by which to intelligently curtail triage
pre-orders that are unlikely to succeed.
New Filter Option
in JobsPerusal Interface:
There has long been an option in this interface
(Shift/F7) to show only ShopJobs. Now there is an option to show
only non-ShopJobs:
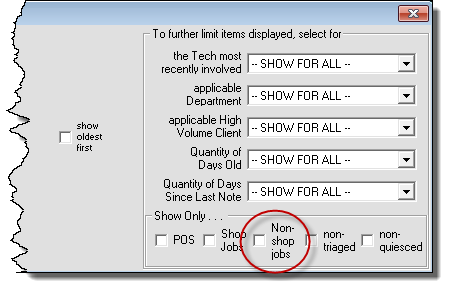
It's that simple.
4.8.40 (11/17/17):
Text Replies Now Go Where
Text Replies Should Go:
It's been a couple of years since we first introduced
SMS-based text-messaging as an alternate form of communication between you and
your customers. Naturally, we keep expanding the options for its use and
effectiveness. Regardless, there is one element of limitation that has
until now persisted on the ServiceDesk side of SMS use. It is that, if
your SMS recipient chooses to reply, we have had no mechanism by which to assure
the reply goes specifically back to the office person who sent out the
initiating text (instead, it's gone as an SD-Mail to the person that is
designated within SD-CyberLink as general recipient for SD-Mails).
By way of comparison, this limitation has not
existed in SD-Mobile. In particular, if the tech uses SMS as the
method for a "call-ahead," and if the recipient replies, that reply has
appropriately gone right back (as, obviously, it should) to the sending
tech.
Now, the same "how-it-really-should-be"
functionality works in ServiceDesk as well. It will be the actual
sender who receives, as an SD-Mail, any text-reply from a SMS-text
recipient. This should enable practices within ServiceDesk that
are much closer to real-time, person-to-person texting (only with the
office-side person working from within ServiceDesk, of course, as
opposed to from a smartphone).
It's important to know, BTW, success in this
improvement depends on updating both ServiceDesk (to this version or
above) and SD-CyberLink (to Ver. 4.5.55 or above).
Improved Function
and Definition for Initiating Auto-Dialing, SMS-Texting, Plain-Emails
and/or User-Defined-Template-Based Emails and Texts:
While working on the above, we discovered that,
as various features have over time been added in regard to what can be
done via a telephone number and/or email address as present in a
ServiceDesk Callsheet or JobRecord, we'd somewhat "mucked up" the set of
keyboard and mouse actions that are available, and their results.
In other words, there was not very good across-the-board consistency,
agreement and uniformity. We decided a wholesale alignment
of functionality was needed, and have now accomplished that.
In fact, we have created a new section in the
Callsheet "Cheat-Sheet" to specifically describe each such
potential action (in particular, as presently aligned for perfect and
reliable consistency in every applicable context). If you do not
recall what a Cheat-Sheet is, it's a listing of otherwise-hidden actions
that you can do in a particular operating context. In each
applicable context, you may display its Cheat-Sheet by doing a simple
right-click on any point of the applicable form that is not otherwise
functional.
Thus, if you right-click in any portion of a
Callsheet that is not otherwise functional, you'll see the Cheat-Sheet
that's applicable to Callsheets. In particular, you'll see it now
includes a new section that looks like this:
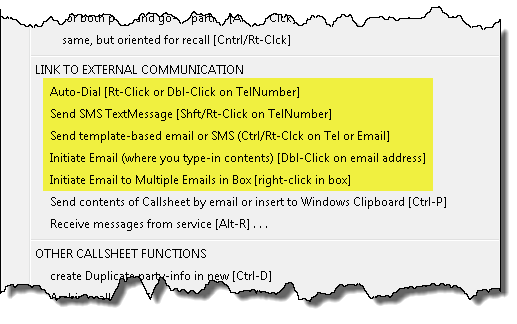
Please note the second item among those
above-highlighted -- in particular, the action to initiate a SMS
text-message via a clicked-upon telephone number. Though that
function is not new with this release, the present method is now
different, as compared to what was prior specified. The reason is
because, on doing this re-alignment, we discovered we'd inadvertently
commandeered the same method (Ctrl/Rt-Click) -- as had formerly been
specified for this action -- for the newer "Send template-based
email or SMS" function (which you'll see as the item just below it,
above). Obviously, you can't have the same method triggering
different functions, so we had to move one of the functions to a new
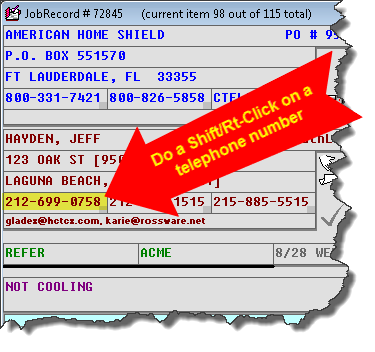
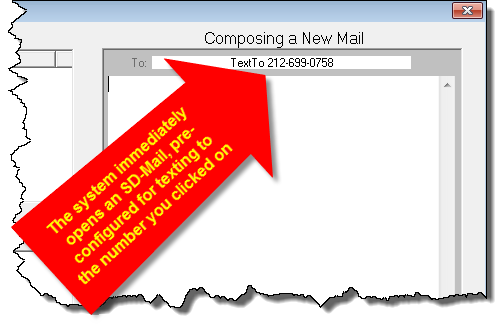
method. Thus, the "Send-SMS" function has been moved from Ctrl/Rt-Click
to Shift/Rt-Click.
Please also note there is now clear
differentiation between such action as is needed to initiate an email to
each of multiple email addresses (as might be present in an
email box), versus targeting a single email address. The general
notion is you should be able to instantly and effortlessly (even
intuitively, once you are in habit of using these methods) initiate any
of these communicative methods via any particular telephone number or
email address target, as already present in either a Callsheet or
JobRecord.
Yes, the same actions will work precisely the
same from either a current or archived JobRecord. Regardless, the
above-shown Cheat-Sheet reminders are found exclusively in the Callsheet
Cheat-Sheet (in fact, the two JobRecord forms do not have their own
Cheat-Sheet).
Dedicated Handbook
to Guide Customization of Automated and Semi-Automated Communication
Scripts:
As
contrasted from the above methods (which involve initiating otherwise
non-automated communications), Rossware systems offer a great variety of
communications that are either fully or semi-automated. These may
be initiated by ServiceDesk itself, SD-CyberOffice or SD-Mobile, and may
proceed from either your office or, in the case of Tech "Call-Aheads,"
from technicians' mobile platforms. Likewise, they may (depending
on circumstances) be via email, RoboCall or text-messaging.
For each context of such automated communication, we have made what you
might call "canned" scripts. In a
nutshell, we have composed default language that we believe is
generally optimized for best effectiveness.
Regardless, users have often wanted to substitute with their own text.
For such reason, we have built mechanisms, for customization of such
scripts, in many places.
Just recently, we added facility
by which you may customize the "Call-Ahead" scripts that are used from
within SD-Mobile. Naturally, we needed to provide instruction on
how to do this new customization. Until now, virtually all our
script-customization instructions had resided in the SD-CyberOffice
Handbook. Initially this had made perfect sense, since it was
initially SD-CyberOffice functions where such customization options were
added. Regardless, as we'd later added some customization options
for some emails that are sent by SD-MobileLink, we'd tucked those
instructions into there as well (not a perfect fit, but it kept
related-subject-matter instructions together). With need now to
add even more instructions that are not related to SD-CyberOffice, we
decided all our script-customization instructions needed their own
dedicated home.
Accordingly, such instructions as were
formerly in the SD-CyberOffice handbook have all been removed, combined
with the needed new instructions, with all now established as its own
handbook on the dedicated topic of customizing scripts. At
appropriate points, both the SD-CyberOffice Handbook and SD-Mobile
Handbook now have hyperlinks to this separate document.
Here is your hyperlink, likewise, by which you can access from here.
Fix for Old
Telephone Numbers in Non-Standard Format:
As an otherwise un-announced improvement, we
recently made it so that, post-editing, Callsheet and JobRecord
telephone number boxes positively enforce standard telephone-number
format (e.g., either XXX-XXXX or XXX-XXX-XXXX). Thus, if the text
that you've placed into such a box was not in such standard format, but
can be appropriately re-formatted, upon completion of any edit it will
be. For some users, this has created an issue. It's because
until now, they've been using a different-than-standard format (e.g.,
XXX.XXX.XXXX or XXX XXX XXXX). The reason it's an issue is
because, with the system now enforcing the standard format, they end up
with a portion of their data in standard and a portion not.
Another matter that sometimes arises is, back in
the day, some service companies would not bother with inclusion of the
area code where the applicable code was the same as their own.
However, as telephone numbers have proliferated, it has become
increasingly intolerable to assume any particular area code, so
all-cases inclusion of the area code is now much more typically the
practice. But, what do you do about all the older items in you
data, in which the area code was omitted?
This new feature is designed to address both
issues. The path to its access is deliberately obscure (it's not
something you'll likely need to access more than once). Basically,
from the archived JobRecord interface, press Shift/Ctrl/Alt/Right-Click.
Then, just follow the dialog. It's self-explanatory from there.
BTW, the fact of having different formatting in
telephone numbers now, as compared to older items in the data, is
primarily cosmetic. A particular client thought it was much worse
than that. In particular, they'd been using the dot-separator
versus hyphen-separator format. So now they thought, with some
telephone numbers in one format and some in the other, the only path by
which to exhaustively do an as-you-type database search was to type once
in the dot-separator format and again in the hyphen-separator format.
That is not actually true.
In fact, when typing in a telephone number in
any of the as-you-type database search contexts, it's best to type the
number with no separating characters at all. When you do this, the
system finds any and all telephone number matches, regardless of format
they are in.
4.8.35 (10/26/17):
Dramatically Enhanced
Performance in Many Operations:
As databases grow larger, methods that once worked well
sometimes no longer do. In particular regard to archived-PartsProcess
records, some of our larger and very-long-term clients have accumulated hundreds
of thousands of records. In a number of ServiceDesk functions, these very
large files were resulting in unacceptable compromise. In particular,
operations were either taking much too long or were
searching less deeply into applicable history than would otherwise be optimum.
The problem is now solved.
To give you some idea of how bad was the issue
and how effective is the solution, a particular client reported that one
report was taking nine hours to complete!
Yes, that's very terrible.
With the new solution deployed, that same report
now completes in seven minutes. (Yes, seven
minutes is still a long time; however, it's an extraordinarily
comprehensive report, and running it is not part of any ordinary daily
operation.)
Even more happily, you'll find many ordinary and
routine operations (indeed, the majority of any such operations that
might have formerly consumed a second or two or three) are now dramatically faster. This is particularly and
absolutely true for any operation that was slow because you have a large quantity of archived-PartsProcess
records. All such operations will now
search not only quickly, but also exhaustively (i.e., within the entire
database).
SB-DispatchLink
Now Explicitly Accommodates Multiple Instances:
It's a funny industry. For some time, AIG and Assurant
have both been sending dispatches via ServicePower. More recently, both began
sending some of their dispatches via ServiceBench as well. It
makes for a somewhat messy situation
Regardless, we have you covered.
As one needed element to address, there are now
QET designations covering both of these entities in each brand of clothing
(i.e., as connected to a ServicePower dispatch, and as connected to a
ServiceBench dispatch).
As another complication, we needed to deal with
the fact some servicers are now finding themselves in a situation where one or more
third-party-administrator clients cannot be managed under a single ServiceBench account
(thus, you end up needing to have more than one ServiceBench account).
Since each instance of SB-DispatchLink has a single account designation,
the only way to effectively accommodate this is by
running a different instance for each such account. This could be
troublesome if you wanted each such instance to run from the same
desktop, because each would save (and read) its settings from the same
location.
We've now solved this issue. Instruction on
how to use the solution is
provided here. (There is also a new button in the
SB-DispatchLink utility itself, that will open the instruction for you.
Plan to use it in the future, as a more convenient place to get the
instruction, as compared to coming back to here.)
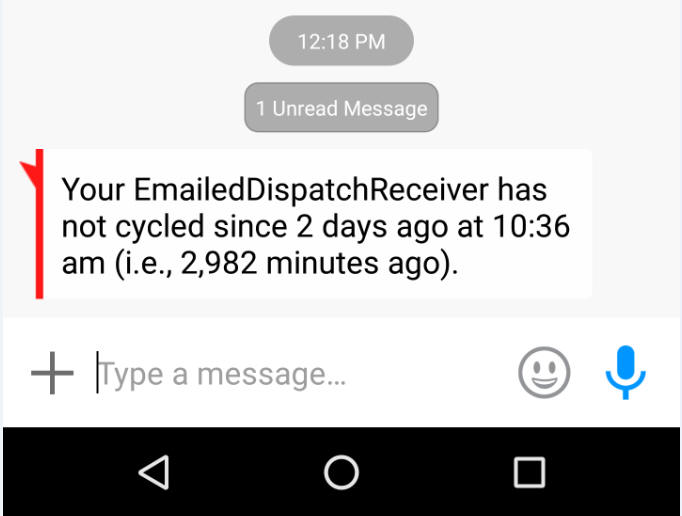
The same solution works, BTW, in the
EmailedDispatchReciever utility (another place where we found users
needing to run with multiple simultaneous instances).
Four Very Big
Items:
These items are being described in detail in an
email blast that will go out shortly. For completeness here, we'll
just briefly mention them.
-
We again have a super competent in-house iOS
developer, so development of Apple-side products (in particular and
especially the iPad version of SD-Mobile) will again be proceeding
at a good pace.
-
New and awesome method to drive a large
quantity of very positive online reviews (e.g., Yelp, Google
Reviews, etc.) regarding your company (read beginning at Page 14
in the
CyberOffice handbook for details).
-
Browser-based triaging center. It's
done via a
new website:
triage.rossware.net. It should automatically work superbly
for you, so long as you are using SD-Mobile.
-
This one is the biggest!
You can now be a referrer via which your COD customers may
potentially subscribe to Warrantech month-to-month service
contracts. You get a portion of every month's payment premium,
and many other benefits.
Click here to learn more.
Miscellaneous
Fixes and Improvements:
At the NASC convention classes in Virginia, as
always happens, we catalogued several requests for tweaks, additions and
fixes (and thank you again Michael Basich for again keeping notes and
compiling a list for me). Among other completions done from that
list (several others are in SD-Mobile):
A fault in the new Inventory Deployments report
is fixed.
Difficulty in deleting telephone numbers from
the Rolodex is fixed.
System now informs of no match when linking to
A/Rs from a JobRecord.
Improved tooltips in a number of places.
Made internal coding for G.E. claims (as made to
ServicePower) automatically insert the needed Repair Code (i.e., as
applicable whether it's a sealed-system versus normal repair).
Beyond this work, also responded to numerous
email-forwarded error messages, to address any such weaknesses as
allowed errors to arise. When working with one particular
such item, discovered and fixed a systemic weakness in regard to how the
system was managing multiple simultaneous instances of the F10 Inventory
Control form.
New Instruction
Document on Setting Up for the Auto-Dialer:
Auto-dialing is a wonderful feature.
Virtually any place that you see at telephone number in ServiceDesk,
right-click or double-click and -- bada-bing, bada-boom -- ServiceDesk
connects to your phone system and dials for you.
Most people are not using this wonderful
feature. The main impediment has been in knowing how to set it up.
So, we made an instruction document (click
here).
As you'll by reading this short document, setup
positively should be very simple. Check it out.
4.8.32 (9/24/17):
New Filtering Option in
JobsPerusal Form:
ServiceDesk has a dandy built-in system to watch your
back in regard to an expectation that a part may arrive on a date that's too
late to be used on an appointment for which it is needed. In particular,
as a parts-management person is indicating from within the PartsProcess
form (F8) what is the ETA on an ordered part, the system automatically looks
(behind the scenes) to see if there is a pending appointment. If so, it
compares that appointment's date to the part's indicated ETA. If there is
a conflict, the operator is alerted, and several options in solution are offered
(including automated appointment cancellation and automated emailed notice to
the customer, with option for them to online re-schedule on a date that is
conducive to the part's ETA).
That's all cool, but Krystle McConnell at Lake
Appliance Repair wished for another option. In particular, she did
not want her parts management person to be involved in accepting such
automated cancellations as are above described, and instead wanted a
different person (perhaps one that better specializes in human
interactions) to have ability to regularly review each/any job on which
this kind of conflict exists, and to thus call the customer,
explain and discuss, re-schedule, etc.).
So, we made the ability.
In particular, the JobsPerusal form
(Shift-F7) now sports a new sub-option when you select the main filter
category of "Scheduled, Awaiting Dispatch." It's shown
circled here:
We believe usage is obvious.
New "Inventory
Deployments" Report:
When you are appropriately using ServiceDesk's Inventory
Control system, you will periodically be conducting physical inventories -- to
see how actual presence of stock at each location compares to
ServiceDesk-indicated stock, and to then adjust quantities as reckoned by
ServiceDesk to fit what is physically found.
All but inevitably, there will be at least a few
discrepancies, and often they are for near innocent reasons. Maybe
once in a great while, for example, an otherwise excellent tech forgets
to list a minor part that he used (if he doesn't indicate it's use,
obviously, the system cannot know it should decrement the reckoned
quantity). Potentially, the opposite might occur. Less
excellent techs might make such mistakes more often, and more grossly
(i.e., forget to indicate use of major and expensive parts, and with
significant frequency).
Of course, not all cases are innocent at all.
Some may be nefarious indeed, as where a tech is doing his own work
independently, and is using your parts on his jobs! (Most service
company owners who have employed a significant number of techs over a
significant period have seen this happen.)
Besides doing periodic physical inventories,
another process that facilitates registering discrepancies is when a
tech indicates he used a part from stock which the system did not reckon
he had, or when he tells you he has no stock on an item the system
reckons he should have. In either case, the system accommodates
ad hoc adjustment to reckoned inventory, so as to make it equal
what is the evident physical reality.
Regardless of the process for making
adjustments, there is always an entry recorded to reflect the fact it
was required (it's made to the "Journal of Inventory Movements").
One of our notions in such connection has been, if you suspect a tech of
potentially having been overly careless (or perhaps even nefarious) in
regard to such inventory items as are entrusted to him, you may review
such adjustments as have been required. On that basis, you can
make a judgment as to what is probable in such regard.
The problem is, it's a bit painstaking to review
these journal entries for the purpose of forming a coherent picture.
It's more painstaking, still, if you want compare between and among your
techs. So, we made a new report that places perfect information
right in front of you (try to ignore the date range and actual numbers
as shown; such wierdness is in consequence of the fact I am still using
old data, from my former service company, for development and testing):
In the above you can see both the nature of such
data as this new report provides, and the path (from within the F11
Reports form) that is needed to produce the report.
Option to Make the
"Merchandise" Category of Sale Non-Taxable:
In general, ServiceDesk contemplates that for any sale
situation there will be a tax rate that's applicable to materials and one that's
applicable to labor. In any SalesJournal entry, there are two columns that
are considered to be subject to the materials rate (Merchandise and Parts) and
two columns that are considered to be subject to the labor rate (S.Call and
Labor).
With the above as backdrop, some folks have
elected to use the Merchandise column for things such as mileage,
handling charges, etc. Likewise, for some such folks, these are
categories that in their jurisdictions are not taxable. So, it was
requested that we add an option to make the Merchandise category
non-taxable. That option now exists.
To select the option, simply go to your
Settings form (Ctrl-F11), and activate the new checkbox option as
shown here:
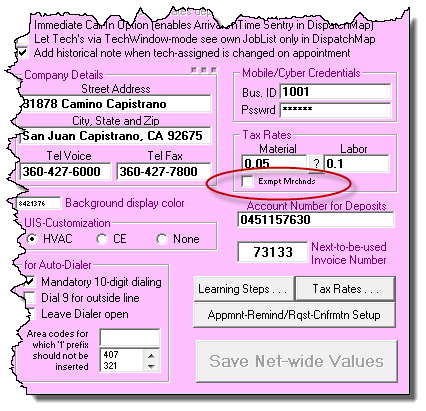
Finished-Form Emailed
Tickets Now in .PDF Format:
For a number of reason that we find compelling,
e-tickets as sent by SD-Mobile (and/or as sent by SD-MobileLink) are sent in
.PNG format. It's a strategy we presently intend to maintain.
When you're working directly in
ServiceDesk, by contrast, and it's your intent to email an invoice from
within the FinishedForms context, we believe the dynamic is different.
In particular, we believe for this context dynamics may weigh in favor
of using .PDF.
Thus, we have modified the system so that, in
this particular context, the system now sends a .PDF attachment rather
than a .PNG attachment.
4.8.31 (9/8/17):
Expected Core-Returns Now
Included in PartsPick Form:
We thank Jeff Miceli from Appliance Tec for pointing out
a very major faux pas.
We built the PartsPick form
(Shift/Ctrl-F8) to provide a super-efficient venue in which to see (and
check-off appropriate movement) of each item that needs to be provided
to a tech for his day's roster of jobs, and each item that needs to be
retrieved back, because previously provided and not used (whether it was
a special-order or spec-tagged item).
It's really a super system. However, there
is something it was not doing that positively it should have
been doing.
Besides showing items needing retrieval that are
in the special-order or spec-tagged category, this venue obviously
should have also been showing expected core-return items.
Honestly, until Jeff pointed it out, we did not realize we'd omitted
such an obvious element of functionality.
However, it's there now.
So long as, on any special-order item, you have
appropriately created the expected core-return daughter band (which
positively should be created when you know the primary item has
a core-return fee), when the tech has indicated use of the primary item,
the PartsPick form will list an expectation for return of the core.
As with other expected return items, you should only check-off the item
when and if you get that core back.
(As a side note, the next item on our agenda in
regard to core management will be to extend it to inventory items;
presently, express core-return management applies only to special-order
parts.)
Enhanced Export to
QuickBooks:
We've had an Export-to-QuickBooks feature for many
years. In nutshell, you run a SalesSummary report from the Reports
form in ServiceDesk (F11), then click on a button to initiate the export.
The sequence creates a .iif format file (stands for Inuit Interchange Format),
which, when you then import into QuickBooks, creates a series of journal
entries, in QuickBooks, that summarize such accounting processes as ServiceDesk
took responsibility for.
One aspect of this has been slightly less than
favorable. It is that the particular accounting entries -- that
you are about to import into QuickBooks -- are something of a black box,
until after you do the import and see what resulted, by looking within
QuickBooks itself. Technically, you could look in the .iff file to
see, but the formatting of data within that file does not lend itself to
easy decipherment.
So, the system now simultaneously (while
creating the .iif file) also creates a .csv file. When opened in
Excel, this .csv file makes it very easy to see what are the particular
entries (as debits and credits) that will result in QuickBooks when the
corresponding .iif file is imported:
If you are at all familiar with accounting, you
know the first numeric column shows debits and the second shows credits
(you also know the expressions do not simply mean money-in or money-out,
as they do in your checking account ledger).
In addition to this improvement, we also added a
system to alert you if the numbers as tallied indicate a reason to
suspect a problem with such data as was entered to the system.
Option to Indicate
Specific-Purchase-Invoice-Number as Inventory Parts are Used:
The need for this feature arose in conjunction with a
client who does much work for Samsung. Turns out Samsung requires this
client to claim, on each part used, via the same invoice number on the actual
replacement part was purchased. Samsung enforces this requirement by
demanding that the old part be returned in the same bag or box that contained
the replacement part. That bag or box has a label on it (placed there when
Samsung shipped the part) that indicates the invoice on which it was purchased.
If the claimed-upon purchase invoice number does not match the number on the bag
or box in which the old part comes back, there is a rejection of the claim.
Given this, we had to make a system whereby, as
a tech uses each/any part from inventory, he can look at the purchase
invoice number that's on its label, and tell the system that's the one
he is using (this way, the system can then assure that's the one that's
pulled from inventory, and that the same invoice number that
automatically goes into the claim).
If you have need for this same alteration in
functionality, you can toggle to make this the mode by bringing up the
contextual "Cheat-Sheet" from within ServiceDesk's Inventory Control
form (F10 is the shortcut for the form, obtain the Cheat-Sheet by
right-clicking on any otherwise non-functional space within the form).
You'll see the following (circled item), as a new Cheat-Sheet option:
By clicking on it, you may toggle between having
this new option turned off (the default) or turned on. If turned
on, of course, the strategy will override the default strategy, which is
to pull the cheapest instance of an item if it was used on a COD job, or
the most expensive if it was used on a warranty job.
If the feature is in fact turned on, your
technicians in SD-Mobile will see a dialog something like this, when
they are submitting any PVR on which they have indicated use of parts
from inventory:
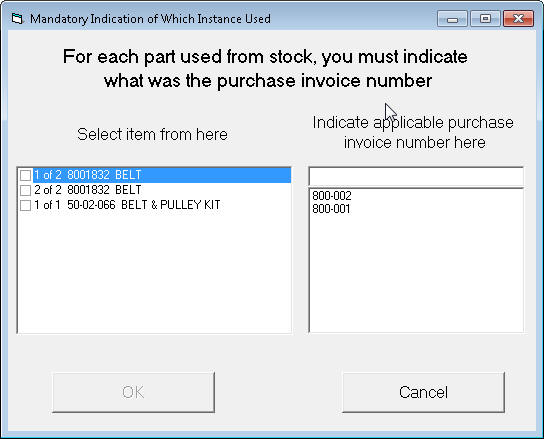
Thus, for each item used, they'll simply
indicate (from the provided list) which of the applicable purchase
invoice numbers (from within your stock overall) was the one involved as
based on the label they see on its bag or box.
BTW, for operability this feature also requires
an update to SD-MobileLink Ver. 2.0.93 or above, and to SD-MobileLink
Ver. 2.0.68 or above.
Also (this is very important),
please note the functionality that uses this has not yet been added into the
iPad version of SD-Mobile (aka SDM-i). Please do not at this time turn on
the feature if you have techs using that platform. Those techs will have
no provision to indicate the invoice number on which each item they used was
purchased, and, in that absence, your option to turn on the feature will really
throw a wrench into workings of the system.
4.8.30 (7/19/17):
Default-Restored to
Continuously Chime when Indicating Un-Read SD-Mails, But with New Option
to Single-Chime:
Two updates back we were pleased to announce that we'd
removed the super-annoying constant chiming that occurs when the system is
urging you to view an un-read SD-Mail item. We changed it so that instead
the system gives you a single chime.
Wouldn't you know it. We received calls
from a number of users who want the constant chiming back.
So, it's back.
However, there is also an option (if such is
your preference) to go to the single-chime method instead. It's
in the green section of the settings form (hence, it's a setting that's
particular to each user) as shown here:
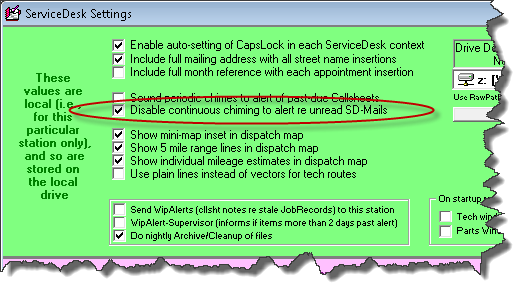
Thus, each user may select per preference.
Mouse-Click
Initiate-Communication-With-Tech Options:
We have "jillions" of features to facilitate automated
and semi-automated communication, whether it's between you and your customers or
between and among staff persons within your business. In particular (for
communication between staff persons) we have both SD-Mobile (which automatically
communicates standard job info outward to the techs and standard
performance/completion info back to the office) and the SD-Mail system (among
other tools).
Regardless, even if wanting to send a particular
tech an SD-Mail, more than a single click (or keyboard stroke) is
required. First, you're going to find the SD-Mail function in the
general menu (via multiple mouse clicks) or use the keyboard shortcut
(Ctrl-F12). Then, you'll either pick the tech of interest (via
another mouse click) or you'll type-in his two-character abbreviation.
Suppose you're already looking at the tech's
listing (i.e., the one you want to contact) within the DispatchMap, in
the Settings form, or in the Create-Job/Sale form. And/or suppose
that, instead of sending him an SD-Mail, you want to call him, send him
a text-message or, perhaps, a standard, internet-based email.
It's for these kinds of interests that our new
feature (suggested by Michael Basich, of Michaelson's Appliance in
Tampa, FL) was created.
From any of the above-identified contexts, you
may now do Shift/Click on a tech's name, and you'll see
something like this:
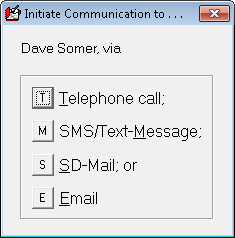
Just pick the option that interests you, and,
instantly, you'll find yourself in a mode to proceed straightforwardly
in the indicated task (if picking the "Telephone call" option, the
system auto-dials the tech's number for you).
In regard to the telephone number that's used
for auto-dialing (or text-messaging), there is a corresponding little
change we've made that here bears description.
Prior to now, if you click on a tech's name in
your listing of technicians in the Settings form (Ctrl-F1 is
the shortcut), and then see the Technician Properties window as
applicable to that tech, you would fail to find any box as provided for
you to indicate the tech's telephone number.
You would, however, see a box provided for you
to indicate the tech's Pager Number.
Yes, that's right: his "Pager Number!"
That is, perhaps, an indication of how far back
Rossware systems were providing automation.
But of course today there is virtually no one
that is still using pagers. In particular, we don't believe a
single Rossware client is now using them as a means to contact their
technicians.
Hence, we have changed the box that formerly was
indicated for provision of a tech's Pager Number. It's now
intended for use of indicating his Telephone Number (probably his cell
number).
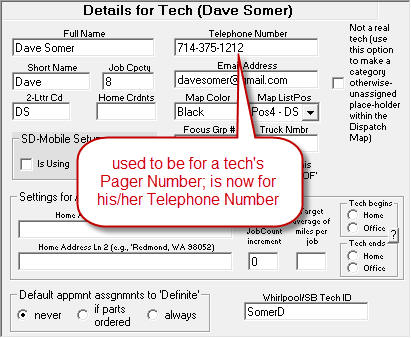
It is this number that will be used by the
system, if you pick the option (as above described) to initiate a
telephone call to an applicable tech, or to text-messsage (this
particular change, BTW, was suggested by JD at Guinco in Fort Worth,
TX).
Default Own-Company
Selection in Rolodex:
Do you use SD's Rolodex (keyboard shortcut if
F4) as the place to keep track of contact info (telephone numbers, email
addresses, etc.) for your own personnel.
That's precisely what we do here at Rossware.
Even though we are not a service-call performing company (obviously), we
nevertheless use a couple of elements within ServiceDesk for our own
operation. We use the Callsheets, for example. And we use
the Rolodex.
In fact, though we have many companies and
persons listed in our Rolodex, I noticed that most of the times when I
go there looking for a listing it's for a person in my own operation.
It thus was beginning to seem a little annoying when I must scroll to
find the company listing of Rossware Computing, Inc., and then find the
person of interest as a sub-category. Hence, the new feature.
If a company listing in the Rolodex is
structured with the company name as a precise match for what you see (as
your company name) in the ServiceDesk About form (keyboard
shortcut is Shift-Ctrl/A), ServiceDesk will now default-select
that company when the Rolodex first displays.
4.8.29 (6/27/17):
User-Created and
User-Based-Subject-Matter Email and SMS Template Usage:
We credit Tony Lott, of Appliance Express in Texas, for
this one.
He emailed me, expressing how much today's
consumers are learning to prefer electronic communication over phone
calls. Of course, his office does too, because emails and text
messages are much more efficient and less taxing of limited personnel
resources.
Rossware systems already offer, of course, a
large number of mechanisms that are designed to accomplish defined
kinds of communication electronically (e.g., initial requests to
schedule, requests to re-schedule after parts arrive, confirming
appointments, etc.). However, there will always be a limit in the
variety of defined communication types that we can reasonably design
for. Tony's office found itself in a situation where they wanted
to define a number of their own communication context types, so they
created (and have been using) "templates" for those.
Tony's suggestion was simple. Why not
create a provision in ServiceDesk where it can "call out" to such
templates, fill in the spaces appropriately, and directly send a perfect
email or text-message, as user-selected for the context.
So, that's what we now offer.
Full instructions are in
this document.
A Clarification Regarding Fees:
Tony made the kind suggestion that building this
feature might be a revenue enhancement for Rossware, via added email and
SMS charges. It raises a matter I wish to clarify:
There is no fee from Rossware -- whatsoever --
as connected with sending emails. There is a fee for
RoboCalls and there is a fee for SMS messages. I would like to
assure everyone understands the difference.
In regard to any of these methods, ServiceDesk may be
thought of as the physical telephone in the old-fashioned AT&T
voice-communication network. Since you purchased ServiceDesk and
via support pay for its updates, your "telephone handset" is covered by
that, and there cannot properly be any separate and/or additional charge
in its connection.
Thus, when you send an email (and even when you use
ServiceDesk to do it), Rossware is not equivalent to the old AT&T.
We are not the "carrier" that transmits your email to its recipient.
We only provided the telephone handset (which you've already otherwise
paid for), and nothing more.
When you use ServiceDesk to request a RoboCall or
SMS message, by contrast, Rossware is in that context
equivalent to the old AT&T -- in that we provide, in addition to the
telephone handset itself, actual means of communication. It's
added mechanisms we provide, in other words, that are the "carrier" in
this context. We actually buy these mechanisms at wholesale and
resell to you at retail. That's why there is a fee, and it's
why it makes sense for us to charge separately in this context, but
positively would be wrong and unfair for us to charge for sending
emails. Again, you already bought the handset, and it is not
Rossware-provided instrumentalities that transmit your emails across the
internet.
4.8.28 (6/21/17):
Drag-and-Drop Additions
to QuickPics from Within SD:
QuickPics are great. Techs snap pictures with
their smartphones; resulting images are automatically attached to each
applicable job and machine -- and forever thereafter are immediately available
with a simple contextual click. You may even include descriptive captions.
Meanwhile, you bear no burden of storage and/or organization. It's all
done for you.
But what about when you have a picture file
already in your office (i.e., it's a JPEG file in your computer), and
you want to put this into that magical QuickPics store?
Until now, there's been only one vector of
insertion, and that's by snapping pictures via the provided smartphone
apps.
Now there is another vector.
From within Windows, simply drag-and-drop any
JPEG file onto the camera icon of a ServiceDesk JobRecord (Current or
Archived; it does not matter):
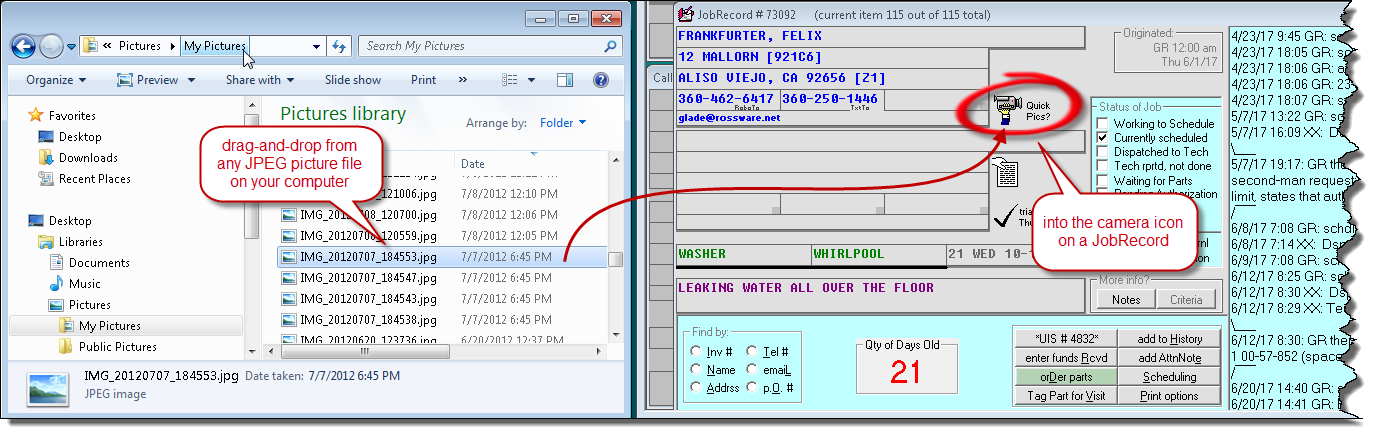
You'll see a little dialog box like this:
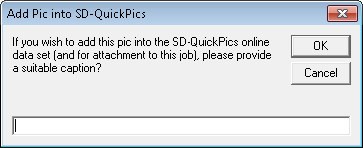
Simply provide some descriptive text, then hit Enter. If
there are one or more UISs connected to the Job, you'll also be asked in regard
to potential attachment to them. Simply proceed with the dialog.
With such simple action and scarcely more than seconds, you'll have the desired
pic forever attached, as wanted.
BTW, the system is just as flexible as is Windows in
regard to where you can drag-and-drop from. Directly from your
desktop is perfectly fine, for example. Or, suppose there are one
or more pics that are attachments in an email. At least assuming
that you are using Outlook or similar, you can drag-and-drop directly
from those, as well.
Peace and Quiet in the
SD-Mail System:
We thank Michael Basich at Michaelson's Appliance for
this one. He told me his office is not using the SD-Mail system,
because they cannot tolerate the chiming that occurs to alert of unread
mail items.
One solution, of course, is to look at unread
mail items. Once you look, they are "checked-off" as read, and the
chiming ceases (well, until the next new SD-Mail arrives).
Regardless, it is not always practical to immediately
look, and in the meantime that constant chiming can be annoying.
(I hear you, Mike, in regard to you hearing this chiming annoyance.)
So, now it is changed. Now, in any given
ServiceDesk session, there will be only a single chiming sound as any
new SD-Mail arrives. When you newly start a ServiceDesk session,
there will likewise be a single chiming sound (within about 20 seconds
of starting) if your SD-Mail InBox contains one of more unread items.
That's it. That should be all the SD-Mail
chiming annoyance going forward.
On the other hand, so long as you have unread SD-Mail
items, flashing at top of the screen (so as to keep you visually
alerted of items) will continue and persist (i.e., just as the sounds
also used to persist).
4.8.27 (5/26/17):
Vastly-Expanded Options
for SMS-Text-Messaging and RoboCalling:
For the longest time, ServiceDesk has offered a plethora
of automated and semi-automated email-based methods by which to accomplish
needed communications with your customers. A few years back, we added
RoboCalling as an optional method for the
appointment-reminder/confirmation-request context. About
sixteen months ago, we added SMS text-messaging as a third option for that
context.
All the above was good, but, in the interim,
we've received many requests to have RoboCalling and/or text-messaging
added as options in other contexts. That's what we introduce now.
-
Text-messaging Replies.
If you've been using text-messaging in the
appointment-reminder/confirmation-request context, you know that
occasionally (even though the text in itself asks your
SMS-correspondent to click on a link so as to confirm the
appointment) the recipient texts back with a verbal confirmation or
other message. You further know we've configured for this
text-reply to be handled via creation of a SD-Mail, which shows you
the text from the customer's reply:
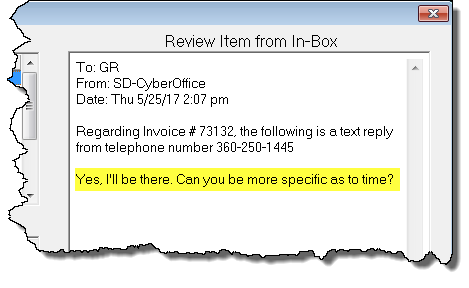
The problem is, there has been no convenient way for you to respond
back via text. Now there is. Specifically, if you are
looking at one of these SD-Mails, just click to Reply.
Automatically, the system will recognize the context, and configure
to send your reply back as a text:
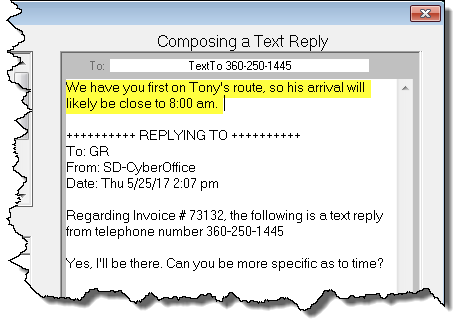
-
On-Demand,
Self-Initiated, Direct Texting. So, you simply want to
initiate a text to a customer (or perhaps to an employee or other
associate), and you want to do it from your desktop rather than from
your smartphone. You have a telephone number that you know
belongs to the intended recipient's smartphone. For this
situation, simply use a new variation we have added to auto-dialing.
The general command to auto-dial (from almost any context where a
telephone number is listed) is to right-click on the number.
If you wish to text instead, simply make it a Shift/Right-click.
This will open the SD-Mail compose window, pre-configured in mode to
text to the number you initiated from:
This variation is currently functional in Callsheets, Current-
and Archived-JobRecords, and in the Rolodex.
Another
way to initiate an on-demand text is: (a) go directly to the SD-Mail
interface; (b) choose "New Mail"; and (c) pick "TextTo" as recipient
from the dropdown list (then type in the number), or simply type (or
copy-and-paste) the target number into the "To:" box to start out
with.
-
Request to Schedule
After Parts Arrive. Whenever you check-in a
special-order part, the system automatically checks to see if more
parts are still on order for the underlying job. If not, it
invokes a dialog. In particular, if it finds that you have an
email address for the customer, it offers to send the customer an
email, informing you have the needed parts in, and requesting that
the customer schedule their completion visit. Now the dialog
offers a more expansive set of options:
| Old Dialog: |
New Dialog: |
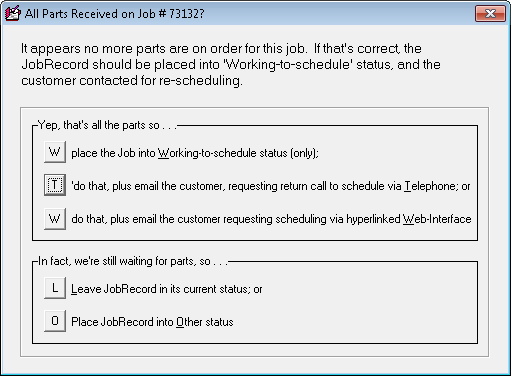 |
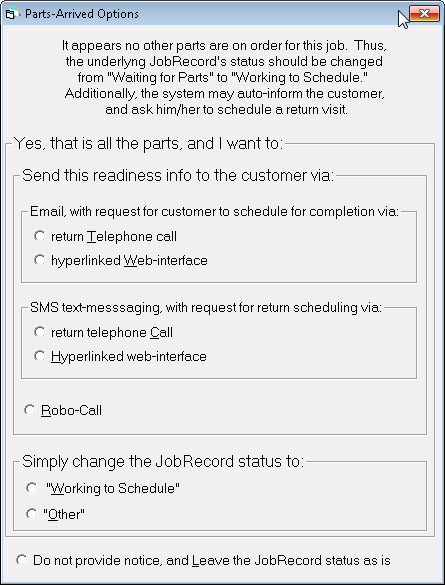 |
Please note that each method category (i.e., email, SMS and
RoboCall) will be enabled only if the underlying JobRecord has a
"target" that is appropriate to that category. For example, if
there is no suitable email target in the underlying JobRecord, the
email category will not be enabled in the above dialog.
Please further note that, when interpreting which strings of
text as present in a JobRecord are suitable as targets for each
category, the system will follow precisely the strategy you have
setup and defined for use in the
appointment-reminder/confirmation-request context.
-
POS-Context, Request to
P/U After Parts Arrive. This is a close parallel to the
above, except the involved communications are asking the customer
simply to pickup their parts, as opposed to asking them to schedule.
The dialog looks like this:
| Old Dialog: |
New Dialog: |
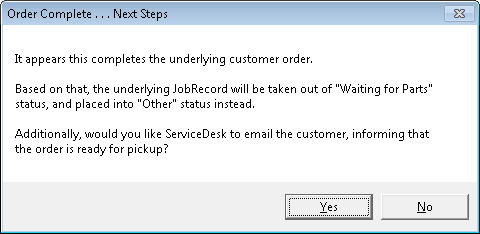 |
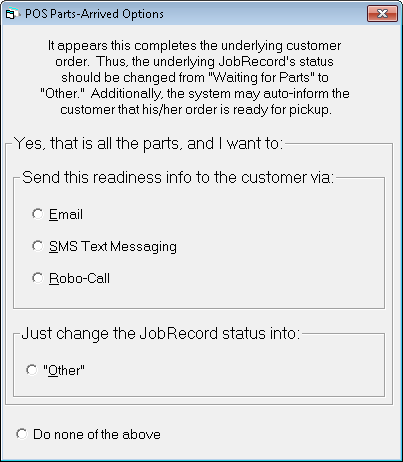 |
-
Other Requests to
Schedule. You get a request from a
home-warranty-company client to contact a consumer to schedule your
visit and perform a repair. Or, you get a request from a
landlord to do similarly in regard to a tenant's location. Or,
you are seeking to try again with a customer that's not responded,
asking again for them to schedule for completion after parts have
arrived. In any such case, it's long been true that you could
right-click on JobRecord's "Scheduling" button to receive
some emailing options in this regard. Now the resulting dialog
is more expansive.
| Old Dialog: |
New Dialog: |
 |
 |
Please bear in mind both RoboCalls and SMSs
carry a small fee (going forward it will be nine cents and three cents
each, respectively . . . reduced from the former price of a dime and
nickel a piece; we thought it best to avoid any claim about "nickel and
diming" our clients).
Integrated
2nd-Man-Required Functionality:
Earlier this month we added a function in SD-Mobile
whereby a tech can directly indicate that a second-man/helper is needed on his
return visit (he simply checks a box to so indicate). When he has so
checked, the system will create an informing AttentionNote in the JobRecord
(this is in parallel to what it does when the tech indicates that his return
appointment should involve any JobCount value above the default of 1).
While an AttentionNote is nice if look at it,
there is (of course) always the chance it will not be noticed.
Thus, as another parallel to how above-1 JobCount requests are handled,
ServiceDesk will now look, when you are scheduling from a JobRecord, to
see if there is a second-man-required AttentionNote. If so, it
will remind you of the circumstance, and even offer to prep entry of the
second appointment for you. Likewise, once you have created the
second-man "Hlpng . . ." appointment, it will delete the AttentionNote.
On-its-Face Indication
from JobRecord of S/O Parts Involvement:
If you want to know at-a-glance if a JobRecord has
special-order parts involved, there is now on-its-face, visual indication:
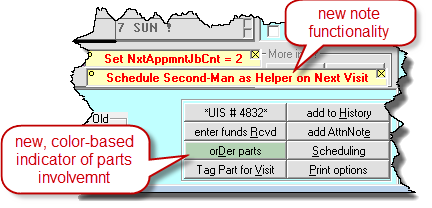
The trick (as illustrated above) is any job that
has s/o parts involved will have its "Order Parts" button rendered in
green.
FundsJournal Entries Now
Fully Editable:
Until now, if you wanted to edit a FundsJournal entry in
any display mode aside from viewing current entries and in a non-search context,
the system would not permit you to do so. Now you are permitted to edit
from any display context, including past entries and search contexts. If
editing past entries, an extra layer of password protection is invoked.
Instant Link to
SalesJournal and A/R Searches:
Imagine yourself in a JobRecord when, for whatever
reason, you wish to know what SalesJournal entries have been made in its
connection. Or, you wish to know what A/Rs (if any) are pending.
Certainly, it's easy to go to the SalesRead form (Shift-F3) to conduct a search,
or go to the A/R form (F3) to conduct search.
However, it's not easy enough.
We already had, within the two JobRecord forms
(Current and Archived), a hotlink to the FundsJournal form (Ctrl-F9),
used so as to instantly see what funds have been collected in connection
with a job. It's accessed by right-clicking on a JobRecord form's
"enter Funds received" button. Now the ToolTip for that
button (obtained by floating your mousepointer over it) indicates
further functionality:

And now, when you indeed right-click on the
button, you get a set of options as follows:
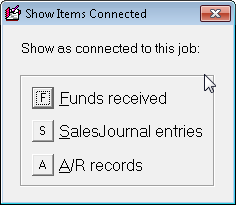
Pick the option desired, and you'll get instant
information accordingly.
Built-in
Summary-of-Nets in SalesJournal Search:
When you search in the SalesJournal for entries
connected to a Job, whether your search is initiated directly from within the
SalesRead form (old-fashioned way) or via the new HotLink (described above),
there is a new connected feature. Specifically, the system will provide
you with a net summary of values involved:

You don't need to do anything special to make
this summary appear. It should just happen, on its own.
Automated
Cancelation of Whirlpool OOW Jobs:
We'd thought this had been taken care of ever since
2010. Turns out our belief was mistaken. The SB-DispatchLink
functionality that was designed to automatically cancel zero-sale referred
dispatches (so you don't have to pay a referral fee) was indeed doing what we'd
been told needed to be done for the purpose. It turns out, however, that
what we'd been told needed to be done was not actually sufficient. Upon so
learning, we determined what would be sufficient, and released a new copy of the
SB-DispatchLink utility (Ver. 4.8.7) that now succeeds in this important
purpose. If you've formerly been doing these cancellations manually, you
should find that, going forward (so long you update to the above-indicated
version or later), there is no longer a need.
4.8.25 (4/23/17):
Two-click Closing of Job
as Zero-Sale:
Some people don't realize this, but it's best for every
JobRecord to be closed via an appropriate entry to the SalesJournal. In
other words, even if there was no charge (e.g., the customer canceled before
your technician got there; it was a recall, etc.), it's best for a real
SalesJournal entry to be made, even if in zero amount.
One reason this is best is because it officially
documents what happened to the job, in terms of its resulting sale
amount. Another reason is because, when eventually you are audited
by the IRS, that nice man or woman is going to be looking for
invoice-number gaps in your SalesJournal (suspecting maybe any such gaps
are cash sales that you kept off-the-books). If you have no such
gaps, you're going to be in much better shape than otherwise.
Still another reason it's best is because, if
you participate in Whirlpool's OOW-referral program, that zero-amount
SalesJournal entry serves as the basis by which the SB-DispatchLink
utility knows to automatically inform ServiceBench that the referred job
was canceled, and to thereby remove it from the list of items on which
you'd otherwise be charged a referral fee.
Prior to now, ServiceDesk has had a means to
automatically make a zero-amount SalesJournal entry for you, in
conjunction with canceling an appointment. Basically, a dialog
asks if just the appointment is being canceled, or if the job is as
well. If you answer the latter, the systems offer to auto-enter a
zero-amount SalesJournal entry for you.
But that circumstances does not always fit, and
where it has not the remaining option has been to make a zero-amount
SalesJournal entry manually.
Now we've made a direct-purpose shortcut.
From any JobRecord that you want to close-out with a zero-sale (and
assuming it does not have an appointment to cancel as a means by which
to accomplish this), just click on its "Recorded to SlsJrnl"
status button. The dialog that's comes up now looks like this:
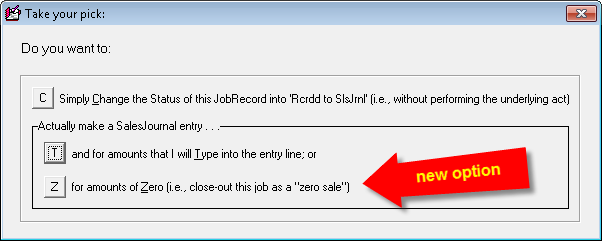
When you pick that option, it opens the
SalesEnter form with the entry line already filled-in for you. You
just hit Enter, and the task is done.
QET Export:
Not sure why, but some people wanted to export data as
applicable to their QuickEntryTemplates. So, there is now a button for
the purpose:
Just click, and follow the prompts.
Overhaul of EDA
Mechanisms:
(1) EDA files are now moved from NetData to a dedicated folder called EdaFiles.
(2) User will now be offered a default filename
that is sensible for the circumstance (e.g., AHS.4P4.EDA where AHS is the
specified payer and AHS is setup as a HVC), or MiscellaneousCustomer.4P4.EDA
where it’s a non-HVC payer). (3) User
will be warned (and guided toward better understanding and action) if using a
new filename that reflects solely the date, credit memo number, or similar.
(4) User will similarly be warned/guided if using a new filename where
one or more files already exist containing the same alpha string (i.e., if I am
making AHS456 and AHS123 already exists, I’ll warned)
Improvement in Connect
for Assistance:
Altered interface so it makes it much more likely user
will make correct choice.
4.8.22 (3/24/17):
Twice as Many Processors
to Pick from when Using Virtual Terminal:
Since we introduced integrated credit-card processing
several years back, our Virtual Terminal has worked with just one merchant
processing company: Cayan (formerly Merchant Warehouse). Sometimes people
wanted a choice. Now you have one.
We are pleased to announce Rossware's
association with a second merchant processing company: Altiras. We
made the very large investment, as needed to make the Virtual Terminal
work with this new company, because we believe they are outstanding.
If you are not presently using Rossware's
Virtual Terminal, you should be. You'll reduce the time and
effort that's involved in running transactions. You'll enhance
accuracy and save money. Better yet, Altiras has setup a
website and dedicated
two human representatives to specially serve the needs of Rossware
clients. If you're not already with Cayan and happy with them, we
highly recommend that you contact Altiras immediately.
You will, BTW, notice a new control within the
Virtual Terminal interface:

As you can see, its simple purpose is to let you
indicate which of the alternate processors you are using. If you
are presently setup with Cayan, don't worry. Presence of the new
option should not affect your operation at all.
Will Soon be
Available for Canadians Too:
That's another major reason we made the
investment to work with this new processor: unlike Cayan, they can do
processing for our beloved Canadian compadres.
That's right. Until now Canadian users of
ServiceDesk could not use our terrific Virtual Terminal. With
Altiras, they will be able to. The one catch is that coding
details as needed for Canadian transactions are a little different, and
we have not yet done that added coding. We expect to have it done
soon.
Enhanced
Comprehensive Searches:
In the last release we announced addition of a new
"comprehensive" search option in the current- and archived-JobRecords.
What we mean by "comprehensive" is the system will search for all text
everywhere, within each JobRecord, for a match to whatever is your search
target. In other words, it will simultaneously look in the name fields,
address fields, telephone number fields, description of symptoms, narrative
histories, ExtraNotes and MoreInfo, etc.
For reminder, this comprehensive search is
invoked by use of the Windows-universal search command: Ctrl-F ("F" is
for "Find"). If you do this from within an archived-JobRecord, the
system assumes it's within archived JobRecords that you wish to search.
If you do it from within a current-JobRecord, the system assumes in a
parallel manner, but, absent finding any match, offers to automatically
extend your search into the archive.
As great as was this addition in its own right,
it lacked something. That something was already present in the
similar comprehensive search that exists in current-Callsheets (invoked
via the same Windows-universal Ctrl-F when in a current Callsheet).
It is simply this:
When ServiceDesk finds an item that includes a
match to your target, it does more than simply display that particular
item (Callsheet or JobRecord). It likewise highlights within that
object the particular text that's the match to your target. That
way your eye can readily see it.
It's much better this way. Try it; you'll
see.
BTW, this improvement was also applied in
archived-Callsheets (formerly, it was only current-Callsheets that had
the feature), so it now applies in all comprehensive-search contexts.
Print for "All-Techs" New
Option in PartsPick Form:
The PartsPick form (Shift/Crtl-F8) was designed
with intent that the person in your office who's responsible for moving parts to
and from the techs can use the interface live, likely via a tablet, as he she
pulls parts from the shelves for each tech, retrieves items back from the tech's
return basket, etc. Regardless, because a number of people still like
paper, there's long been an option to print for each tech the list of items that
should be moved to and fro. But this printing was done individually for
each. In other words, you select the tech then pick to print. If you
have a lot of techs and want a printout for each, the process could be tedious.
Now the same button that's been used to print
for each tech (in the bottom-right corner of the form) behaves a little
differently. If you have no tech selected and click on the button,
it will assume you want to print for all techs, and act accordingly.
If you have a particular tech selected, it will present this dialog:
So, it's pretty simple to get whichever result
you want.
Items Anticipated
for Future-Scheduled-Use Now Show for Retrieval in PartsPick Form:
Your tech was out on a job with one or more
special-ordered (or spec-tagged) parts. For whatever reason, he
did not use one or more such parts. However, the job is not done;
he is scheduled to go back on another visit, and he still anticipates
using such parts on his next visit. Should the system prompt for
you to retrieve such particular parts back from him?
Until now, the system did not so prompt.
Now it does. It however prompts in a special color for the
circumstance (grey) to bring notice to the fact that, depending on your
preference, you may or may not want to insist on getting such parts back
at such time.
4.8.21 (3/12/17):
Direct Emailing of
QuickPics Now Available:
Since we introduced the SD-QuickPics feature a few years
back, we have often been asked how to include these pics in emails. The
answer: it's easy. So long as you have your Windows configuration setup to
open the file type (.jpg) in a competent viewer (Windows Photo and File
Viewer is typical), you can use mechanisms right within that viewer to
email the pic. Honestly, we did not feel enthused to build
internal-to-ServiceDesk mechanisms when it's so easy to do it otherwise.
However, in our class at ASTI last month, some
attendees pointed out this emailing context does not auto-fill email
addresses. Nor does it provide an implicit method by which to
include multiple pics within a single email.
Okay, we were persuaded.
Previously, the listing of pics as attached to a Job
(or UIS or Visit) would look something like this:
Now it looks instead like this:
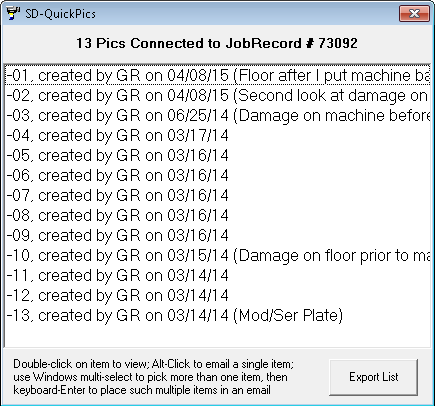
As you can see, it's different, and along the bottom
contains specific instructions on how to select either a single or
multiple items to direct-send via email.
SalesJournal
Lock-Against-Edits Partition, New Options for Automation:
Your ServiceDesk SalesJournal is the official
accounting record of your sales. If entries have been entered
wrongly there, it's fine to edit to correct them, so long as such
entries have not yet been directly relied upon for external purposes
(i.e., in compiling income statements, tax liability reports, etc.).
Once there has been such external reliance, it's important to leave such
entries alone. Instead of editing such an entry if it was in
error, a new entry should instead be made that adjusts for whatever was
wrong in the prior one.
Last year (with release of Ver. 4.7.134) we added a
feature to help you police yourself in such regard. Basically, you
can tell ServiceDesk to lock-against-editing all SalesJournal entries
that precede a particular date (call it a "date-lock partition").
That new feature is accessed through this button in the SalesJournal-Read
form (Shift-F3):
We did not it leave solely up to you to think to
periodically update the location of that partition. In particular,
we simultaneously included programming to make it so, when you complete
an export to QuickBooks, the system auto-prompts with a query asking if
you'd like the date-lock partition to be moved, for you, to the
ending-date of the period you just exported to QuickBooks.
In our class at ASTI, folks requested more options for
automation than this. So, now there are several. In
particular, if now you click on the button as shown in the illustration
above, you'll see this (with new option highlighted in yellow):
If you select that new option, you'll see this:
As you can see, there are many options you can pick
from. Pick the one you want, and ServiceDesk will behave
accordingly.
Comprehensive Search in
JobRecords:
We've always had superb searching options, especially
in regard to JobRecords (both current and archived). We have
index-based searching that is instantaneous as you type (in regard to
customer names, addresses, telephone numbers and emails). We
likewise have search bases where the system looks directly within the
JobRecords, looking for target matches on any of the above, plus things
such as P.O. Numbers. The archived-JobRecord context (Ctrl-F7) has
additionally featured searches on street names and any targeted word or
phrase within narrative histories.
Okay, good foundation . . . what do we have now?
A few years back we added a comprehensive
search into current-Callsheets (one had existed in archived-Callsheets
long before that). With your Windows focus in a Callsheet, just
hit Ctrl-F (it's the universal in-Windows command to invoke a search;
the "F" is for "Find"). Type a textual-search target and hit
Enter. The system will immediately search through all current
Callsheets looking within all text of each (including Extra- and
MoreInfo-Notes) for any instance of text that matches your target.
Upon finding any match, it will show it to you.
One day we realized we really should have the same
kind of ability in JobRecords. So, now it is there.
From within either a current or archived JobRecord,
hit Ctrl-F on your keyboard. Type in whatever text target you are
interested in seeking (yes, universals are permitted; just look at the
prompt), then hit Enter. If the first shown match is not the one
you are seeking, you will see via the prompt you may renew by looking
for the next match, etc.
BTW, a big element of new accessibility via this
search is narrative Job-Histories in current JobRecords.
Until now, there was no search provided for text in that specific
context.
As a slight aside, if you have your Windows focus in a
narrative JobHistory and wish to select the entirety of the text (maybe
to copy to your Clipboard for insertion elsewhere), another tiny
addition is you can now do that using the standard Windows command for
"Select-All." The command is Ctrl-A.
Enhanced Auto-TimeFrame-Estimator:
The DispatchMap has long had a feature that will
insert timeframes for you into a technician's series of appointments,
based on parameters you specify (e.g., length of timeframe, average time
from one stop to the next, etc.). Since it's much easier to
reliably predict when the tech will arrive at his first stop, some
companies like to give each first-stop customer the courtesy of a
smaller timeframe (maybe just an hour or even 30 minutes). The
dialog that's involved in the Auto-TimeFrame-Estimator now has provision
to accommodate this.
4.8.18 (12/27/16):
Option to Disguise Retail
Pricing on Parts Labels:
We're kind of surprised this one did not come up
sooner.
If you have variable pricing on your parts depending
on circumstances, it may be awkward if you have a label on each part
that clearly shows some price other than what you actually charged the
customer. Hence, you may want to disguise the price, much in the
manner that cost has long been an included element on these labels,
though it's disguised in a manner (hidden among other characters) that
makes its value unobvious, unless you are acquainted with the format of
disguise. Anyhow, we now offer the same option in regard to retail
price.
To invoke the option, go to the PartsProcess form's
(F8) Cheat-Sheet (just right click anywhere in the form that is not an
otherwise operational place).
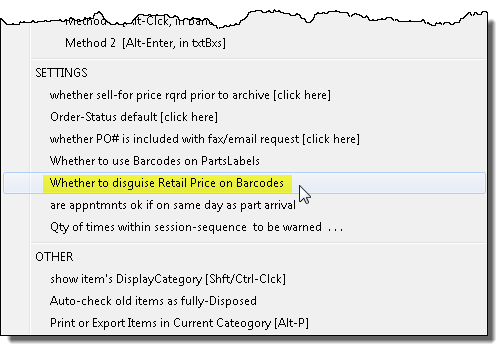
Select the option that's indicated above, and you'll then see
a dialog where you can turn "Disguise Retail Price" on or off.
4.8.13 (11/28/16):
Global Search Characters
Now Functional in Archived-JobRecords P.O. # Search:
This option was long available in the Current-JobRecords
form, but (for whatever reason) we discovered it was not available in
the Archived-JobRecords form. There are various
global-search-character schemes (the general idea is you can put a fake
character in your search target, and a potential match can have anything
at all in that position). Our scheme is simple. Just use can
use an asterisk as a global:
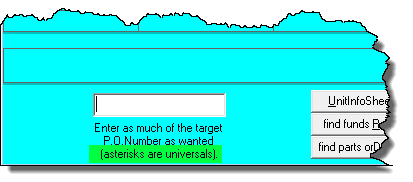
As you can see, the prompt has instructions on this,
in case you forget.
Multi-Select (and Multi-Job
Summaries) Now Available via F12 Search:
Most new features are based on user suggestions (which
are sometimes close to being more like requests, or even demands).
Occasionally, an idea pops into my head independently. Often it's
the kind of thing where, as I am working in an interface (helping a
client or testing functionalities I've just tweaked), it occurs to me
that it "feels" like I should be able to do a particular thing . . .
and, damn it, if your senses tell you that it would be an intuitive
thing to do, really, the interface ought to allow you to do it.
This was one of those instances.
I found myself looking at the results list (references
to jobs) in the F12 form. It occured to me I might want to print
(or email) a summary regarding a particular selection of jobs from that
list. How obviously logical it would be if I could multi-select
the particular references whose job summaries I wanted to include, and
then print or email accordingly?
So, that's what this new feature is. Go to your
F12 CstmrDbase-Search form. Type in any text target. From
among the listings that result, use standard Windows multi-select to
pick the items whose job-summaries you wish to have detailed in an
overall summary, then click on the button to proceed:
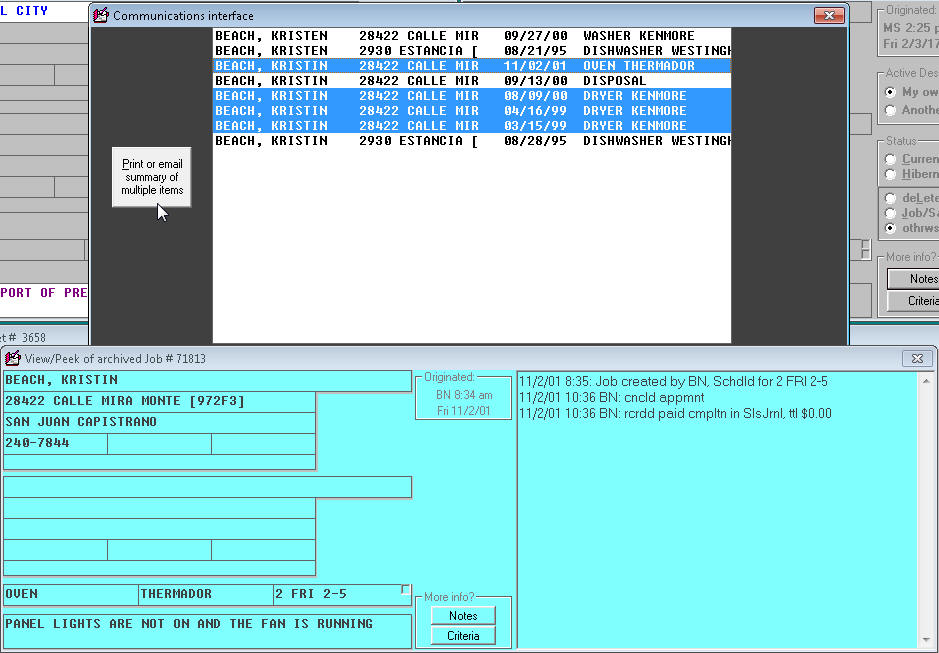
The dialog that follows is where you'll pick to print or
email.
Miscellaneous:
Date-picker calendars have been added to the onscreen
NARDA's date boxes (it means, if the date is not already auto-filled,
you may select as wanted from a calendar, instead of needing to type it
in).
Automated TelNmbr formatting in Current- and
Archived-JobRecord Forms.
Option to make automated mileage calculation
round-trip or one-way (QET-specific); option to make mileage amount
accrue to Merchandise SalesJournal category as opposed to Labor.
When sending emails via the SD-Mail Compose windows,
you may now include multiple attachments.
New field, DateOfPendingAppointment, added to
JobPerusal form's "Print Summary of Found Items" option.
Option to specify QET-specific Leave-Behind
Douments.
4.8.9 (10/17/16):
Updated Zone-Scheduler
Handbook:
Embarrassed to discover this handbook had never been
updated to include description (and instructions on how to use) two
major augmentations (flowing-pipes and
intelligence-augmented-holdbacks). That is now corrected.
The handbook may be conveniently accessed via this button:
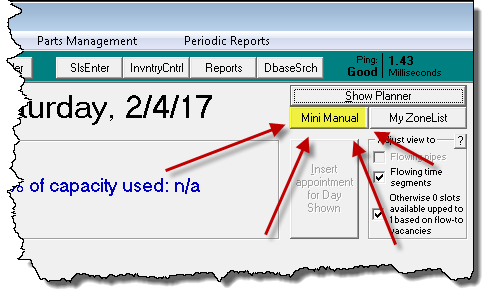
up in the top-right corner if ServiceDesk's
ZonePlanner form (Shift-F5 is the shortcut).
Right-Click to Open
ThisCompanyBulletinBoard.rtf:
That cool Bulletin-Board feature that we announced
with release of Ver.4.7.130?
Well, by it's nature the content of that Board is
something you might want to change with some frequency. So, it
should be more convenient than having to manually navigate in your
system to find the underlying file.
It should be more convenient, and now it is.
Just right-click in the Bulletin Board, and the underlying file will
automatically open, ready for editing.
The EmailedDispatchReceiver
(EDR) Can Now Process for First-American:
If you don't know, this utility automates reception of
dispatches from a number of entities who send their dispatches via
email, e.g., AHS, Old Republic, Fidelity National Home Warranty (also
formerly did Warrantech and NEW via such means when they still depended
on emails). For years, many people asked us to add First American
into the capabilities list. But there was a big impediment.
First American sends their dispatches in a PDF document that shows only
an image of the dispatch text, rather than presenting the dispatch as
text itself. It's much tougher to parse text from an image.
Regardless, we finally cracked that nut. Now the
EDR can do First American too.
Multi-Select Now Available
in SD-Mail:
Many folks don't know about Windows multi-select.
Obviously, when you mouse-click on an item in Windows if becomes
selected. For example, you click on an item to select it and hit
Delete on your keyboard to delete. You can click down on an item
and drag some place else to move it. All this is great, but what
if you want to do the same action to multiple items at once?
That's where Windows multi-select comes in. It's
very simple. If you already have one or more items selected and
you want add another particular item (or remove an item from what's
already selected), simply to a Ctrl-Click on that. If you want to
select a whole range of items, click on the first to select it, then do
a Shift-Click on the last.
It's that simple.
Now that you know what multi-select is, you can know
what is the meaning of this improvement. You can now do
multi-select in your list of SD-Mails:
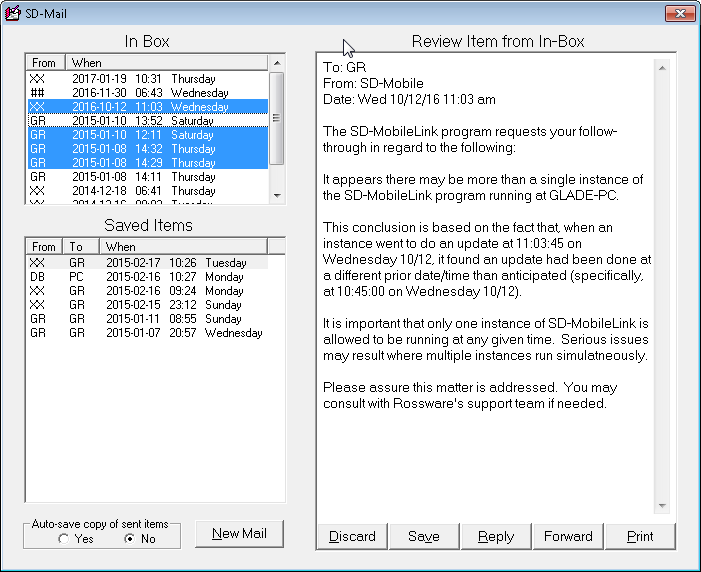
If you want to delete a bunch of items, for example,
select all the ones you want to delete, then click on the Discard button
(much faster than doing each individually).
Option to Email Payroll
Reports:
Historically, payroll and commission reports have been
viewable on-screen, or printable. Now you can email them as well.
4.8.5 (9/5/16):
New Rossware PDF-Writer:
In a number of contexts, folks have wanted to automate
(or at least semi-automate) the process of emailing a PDF document.
An example situation is when emailing a parts-order
request to a parts vendor. A PDF document can be configured as a
"form" that has all relevant request information, and asks your vendor
to fill-in boxes to indicate how he is fulfilling your request (e.g., is
he shipping, back-ordering, did he find the part is NLA, etc.).
Similarly, you may email a PDF document that works as a status inquiry
on prior-ordered parts. Back in the old days (before SD-Mobile)
some companies also liked to email their technicians a PDF image of each
job-ticket/invoice on the current day's roster -- this worked as their
very method of dispatching to their techs, typically with intent that
each tech should print the set of tickets via his home computer.
Anyhow, there is a bit of technological hurdle in
making these processes occur. In general, it's easy to create a
PDF document. You simply install any from among dozens of free PDF
"printers." These install like a regular printer driver (the piece
of software you install in Windows to control a standard physical
printer), but, instead of connecting to a piece of actual hardware (and
to produce paper output), their output is instead a PDF file.
Thus, when you want to make a PDF document from any Windows application,
you simply use its facility to print, then choose an installed PDF
printer (from among the standard Windows list of printers, once you have
one there) as the target print-to location.
The hurdle exists because you want ServiceDesk to
automate creation of an email and you likewise want it to simultaneously
attach a PDF file to that email. ServiceDesk can create an email
for you just fine. It can send input to a PDF printer just fine.
However, it can't attach the file that's produced by the PDF printer to
the email unless it knows what file (i.e., location and name) that PDF
printer produced. That's the difficulty.
We solved it years ago by finding a particular PDF
printer that allows an application (like ServiceDesk) to make a request
directly to it, specifically specifying the particular file that it
should produce. With this ability, ServiceDesk can direct the PDF
printer to create its output with a particular name and location, then
find the result there and attach it to your email.
The name of the program we found to do this is
pdfFactory. It's maker sells it for $50 per install.
Until now, when you first went to do one of the types of emailing that
has depended on that product, you'd be prompted to go to the maker's
website and download it. Now we fixed that. You don't have
to buy pdfFactory any more.
We now provide you with a Rossware-branded PDF
printer. We call it the Rossware PDF-Writer, and the
right to use it is inclusive to your ServiceDesk purchase and/or
support.
From this version forward, instead of being prompted
to install pdfFactory when first wanting to initiate a relevant action,
you will instead be prompted to download and install the Rossware
PDF-Writer (and you'll save $50; yahoo!).
If you already have pdfFactory installed and you want
to switch to use of the Rossware PDF-Writer (yes, we do believe it's
better), or if you simply wish to install the Rossware PDF-Writer
because it's a darned good PDF printer and sometimes you want to print
to a PDF document, you may
directly download it
here.
New PartsProcess
Date-Filters
We had a request to be able to filter by appointment
date when working in the current-PartsProcess form (aka "F8" form).
So, we added it:
The operation is straightforward, but please note
items will not show unless they are connected to a job that has
a pending appointment (and also, of course, where the date is
not excluded by the filter).
4.8.3 (8/28/16):
Raw-Data XML-Attachments
Now Included With DispatchLink-Inserted Dispatches:
It's a common issue. You are using
SB-DispatchLink (SBDL), SP-DispatchLink (SPDL), LG-DispatchLink (LGDL)
or Samsung-DispatchLink (SSDL). The utility pulls a dispatch from
its connected entity and creates a Callsheet for you. You suspect
it did not place in all the available information as perfectly as it
might have. Perhaps you are able to look in the online data and
find stuff there that was not placed in the Callsheet, or perhaps it
reads differently than in the Callsheet.
Is it possible that Rossware's utility did not process
the data as it should have?
The short answer is yes: certainly, it is possible.
However, it's impossible to know if any apparent fault
is in the utility or if it is in such data as the entity (e.g.,
ServiceBench) handed off to the utility -- unless we are able to see
exactly what data was in fact handed off.
That is the purpose of this new feature (i.e., to
allow such visibility). From here forward, we are configuring each
of the utilities to include a raw-data file that will be a precise copy
of such data as was provided by the connecting entity when it
handed off the dispatch. Each Callsheet will include a
hyperlink reference to its respective file:
A simple double-click on that hyperlink will display
the direct, actual data for you:
You may then see and compare, with intent to determine
if there was any information provided that our Rossware utility might
(if better coded) have been able to handle for you in a more beneficial
manner.
If you find yes, you will then be well-equipped to
contact us at Rossware. You can show us the actual data, and how
our utility did not handle it as beneficially as it might have.
We'll then be poised to know exactly what we can do to make it better.
In the alternative, you may find that the underlying
entity (e.g., ServiceBench) is not handing off such data as you need to
have them hand off. If that is the finding, you and we
will then be well-equipped (we often do go to bat for you in situations
like this) to go to that entity, and "hold their feet to the fire."
For context, we have always in the past gone through
the process of analyzing such underlying data on our own (though
sourced from a more difficult to access location), when a a concern has
been brought to our attention. This new feature allows you the
opportunity to examine it on your own first (it likewise provides us
with a much easier source when we wish to examine).
There is a counterpart to all of this. Please
don't expect us to invent data that the entity has failed to
hand off to us. And please don't expect us to present you with
better data than they have handed off to us. This new feature
allows you to see precisely what they have handed off (and in
each specific instance), so that you can judge for yourself.
As of the date of this release, we have so far only
updated SBDL (Ver. 4.8.1) to create the underlying files and connected
Callsheet hyperlinks. We'll plan to have the same new feature
within each next update of the other utilities. Please note you
must update to this 4.8.3 release of ServiceDesk (or higher) for the new
style of hyperlink as is involved to function. If you have not
done so, the response to double-clicking on any such hyperlink will be a
message indicating that the document cannot be found.
4.8.0 (8/15/16):
Automated Insertion of
Mileage-Fee and Quantity in On-Screen Narda Claim:
We owe this one to a new client in Canada (Michael
Moncada of Northern Electronic & Appliance Services, Inc.). He
explained that he has many contracts with third-parties that specify
varying mileage rate schemes, and, absent any method to automate
accurate insertion of the correctly-applicable amount in each instance,
he would likely end up failing to claim for significant amounts of
otherwise collectible sums.
We would not want that to happen.
If with this update you go to your
QuickCommonEntries form (Shift-F1) and choose to edit for any
entry, you'll see some new boxes:
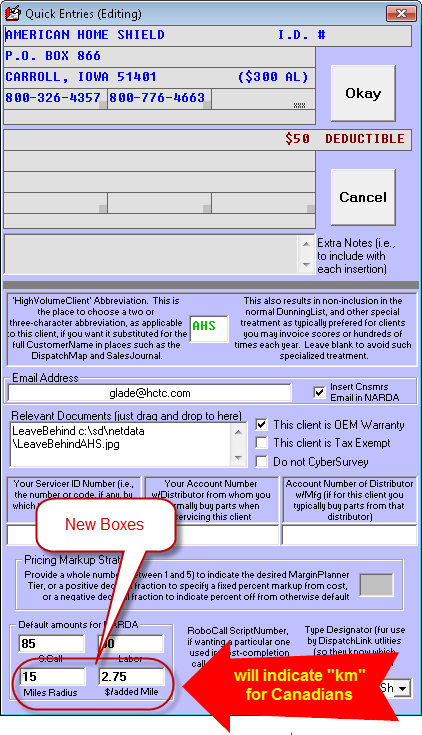
The obvious concept here is, if you have any QCE
client in regard to whom you have an agreed-upon mileage rate, you
should use these two new boxes to put in the non-surcharged unit-radius
and the rate-per-unit that applies beyond that radius (I use the
expression "unit" because it is kilometers that will apply for
Canadians, miles for the rest of us).
Equipped with this new information, something new and
wonderful will happen anytime you import new information into an
on-screen Narda. The system will see the mileage-rate structure
you've setup for the underlying client. It will grab the address
for the underlying service location and it will grab the address for
your service office. It will then make a behind-the-scenes call to
a Google API that will rapidly return a driving-distance figure.
Based on this driving-distance figure (and your underlying values), the
system will look to see if the Google-indicated driving distance exceeds
the indicated radius. If so, it will insert to your on-screen
Narda like this:
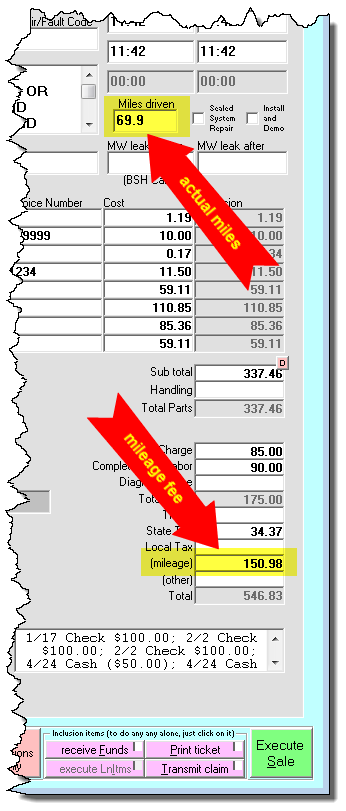
For claims to most entities, we believe this
is exactly the fill-in you will need. However, we know that some
of the underlying third-parties use the applicable fields differently
(i.e., one might expect the mileage-fee to be in one box, while one
might expect it to be in another). If you encounter a situation
where these insertions need to be configured differently for a
particular entity, please let us know and we will alter accordingly.
We do need to provide a little caveat in regard to
this release. You might notice that with this release the
versioning series has gone from 4.7.x to 4.8.x. We reserve such
series changes for instances where there is a significant structural
change in one or more underlying files. In this case, to
accommodate the two added boxes, we had to alter the structure of the
file that contains your QuickCommonEntries data. On first use, the
system will automatically build a new QceFile in the new structure (the
new filename will be QceFile.4P8 as opposed to the old
QceFile.4P3). Each other instance of ServiceDesk will
be prompted to close and re-open in updated mode, so as to use the new
file. The caveat is this: each of the utilities that also use your
QceFile (e.g., SD-MobileLink, SB-DispatchLink,
SP-DispatchLink, etc.) will still be using the old file, until you
update each to its respective latest release (which, naturally, will
cause them to likewise use the new file). What this means,
bottom-line, is older copies of those utilities will not see any
post-4.8-series changes you make in your QCE data, until and unless they
are updated to their own post-change versions.
(FYI, versions of utilities that are updated to use
the new QceFile are SDML Ver. 2.0.54, SBDL Ver. 4.8.0, SPDL Ver. 5.1.0,
LGDL Ver. 2.1.0, SSDL Ver. 2.1.0, EDR Ver. 4.7.0. There is no need
to worry about any such utility-update if you are not actively using
it.)
Terrific New
Performance-Testing Tool:
Does it ever feel like your system is running slow?
Do you ever feel like you'd like to have an objective measurement, to
tell you just how quickly it is or is not performing?
We must confess, our RSS clients (those who lease
cloud-hosted servers from us) have sometimes found themselves feeling
this way. Sometimes, on investigation, we've concluded the problem
is solely because of a slow internet communication on the client side
(nothing we can do about that from here). On a number of other
occasions, however, we've found there were issues causing slowness right
within the systems we provide, and of course those are matters we have
had to directly address. Regardless, it has sometimes been
difficult to determine which is the case. It's especially
difficult when our users are trying to make this determination on their
own.
This new tool is designed to let you directly see just
how well your system is doing (or ours on your behalf), and regardless
of context. It runs a series of processes, and times how long the
system takes to perform them. Based on a comparison to some
benchmarks, it then gives you an indication of the result.
To run the new tool, navigate via the ServiceDesk
MainMenu, as shown here:
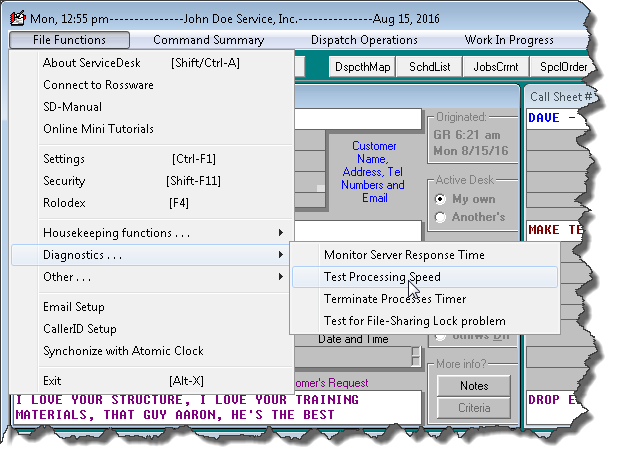
The next thing you'll see is this:
 .
.
When you click to run the test, you'll see something
like this:
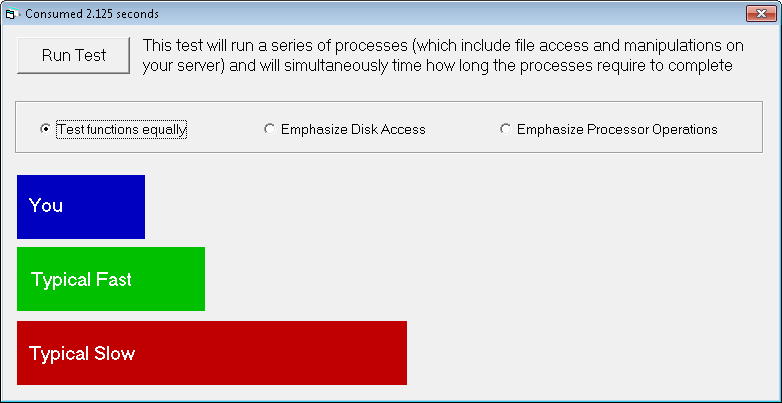
Please note the caption at top indicates actual time
as elapsed when performing the test. The blue bar indicates your
system's time as a graphic (shorter is better), compared to a
typical-fast (but not blazingly-fast) system (green), and as compared to
a typically-slow (but not abysmally-slow) system (red). If your
result is almost as good or better than typical-fast, you're doing
pretty well. If your result is closer to the typical slow, you're
not doing so well. If your result is beyond the typical slow, you
are doing quite badly.
Please also note that besides the standard (Test
functions equally) option as above shown, you may select to
Emphasize Disk Access or Emphasize Processor Operations.
The general idea is, if your system is slower than it should be, you can
try each of the lopsided tests and see if it's more likely one area
versus the other that's slowing things down.
We think this will be useful for all users.
Regardless, especially for our RSS users, we suggest you run it when
things are working well, so as to form a benchmark of what to expect.
Then, if it feels like things are running slowly, run it and compare.
Reported results will NOT BE AFFECTED by internet speeds, so this test
can be quite definitive in letting you know if the server systems in
themselves have an issue that needs to be addressed, versus there
potentially being some problem in the communication between them and you
(please note that in some instances there can potentially be a
communication bottleneck at our end, in which case it will still be
incumbent on us to address).
LG-Direct-Claims Now
Verified as Fully Functional:
I must sadly confess we were slow to perfect this.
We added basic direct-LG claims functionality some while back, but it
required real-world testing (and real-world debugging) to truly make it
fully succeed. Thanks in significant part to longstanding and
patient assistance as provided by Heather Michaelis at J&M Appliance,
Inc. (in Redlands, CA), you should find the functionality is now
perfect. Thank you Heather!
4.7.134 (5/30/16):
Option to Exercise
Dispatch-Options in Regard to Multiple-Selected Techs:
Everything evolves.
In the ServiceDesk DispatchMap you may do a simple
click on a technician's name at the top of his list of appointments.
In consequence, you will get a list of many things you may do, in terms
or providing him information as connected to that list of jobs:
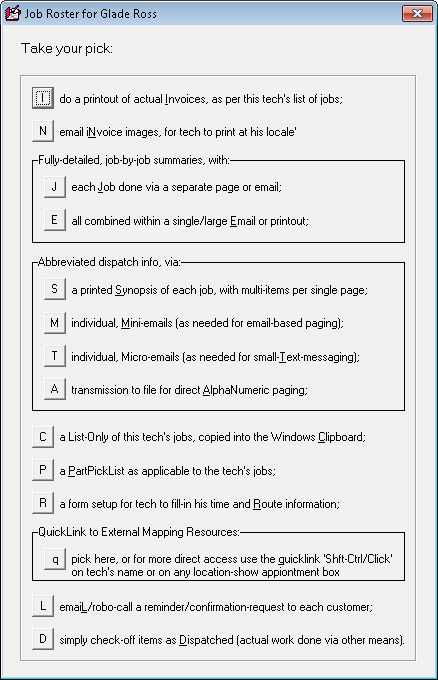
That list was not always so long. It grew one
item at a time as particular persons wanted new options. Then
someone wanted something entirely new. It was pointed out that,
when you have lots of techs, it takes considerable effort to rotate
through each and make the request of what you want in terms of output
for each, especially where you want the same output for all of many
technicians. We were asked to make an option to request a
particular output once, and have it apply to all techs. So, a
number years back we did that.
Recently there was a new request. Now it turns
out some people want to request a particular output from the above list,
and they want it to apply to many of their techs, but not to all of
them. So, absent any new facility, the only way to do that has
been by individually clicking on each of the particular techs for whom
the output is wanted. Again, if you have lots of techs that are
involved in the desired output, this can be considerable work.
Hence our new feature.
The longstanding path to get to the dispatch-options
list but as applicable to all techs is, when you are in the DispatchMap,
use the QuickKey shortcut Alt-P (it's the common
Windows 'Print' command). We've now augmented the options you'll
get when going there, as follows:
| Old "Print" options in DispatchMap |
New "Print" options in DispatchMap |
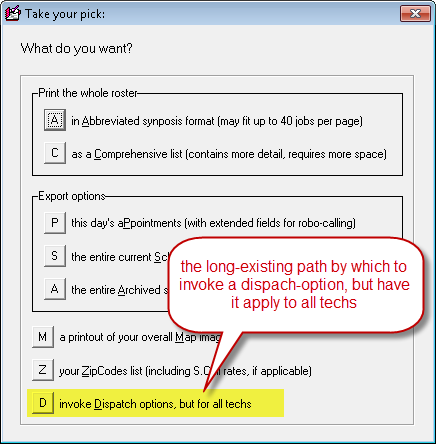 |
 |
If you pick the new option, then pick any particular
dispatch-options output, you'll be presented with a list of your
technicians that looks something like this (though your list of techs
may be shorter or longer, depending):
From this list you can use the
common Windows multi-select commands to pick the particular set of
technicians that you wish to have included in the output. It's
that simple.
Option to Initiate
Inventory Inquiry from Within Callsheet- and JobRecord ExtraNotes:
The ToolTips that you'll see when floating over
with your mousepointer (but in ServiceDesk, not here; what you see here
is just an illustration) say it all:
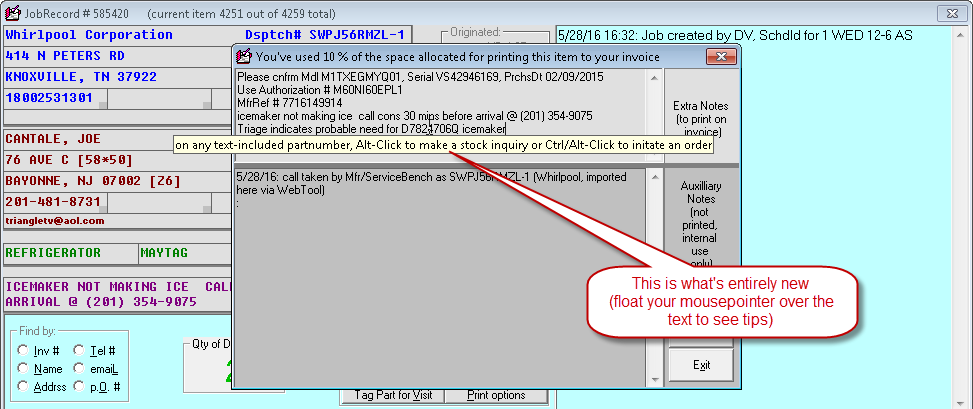
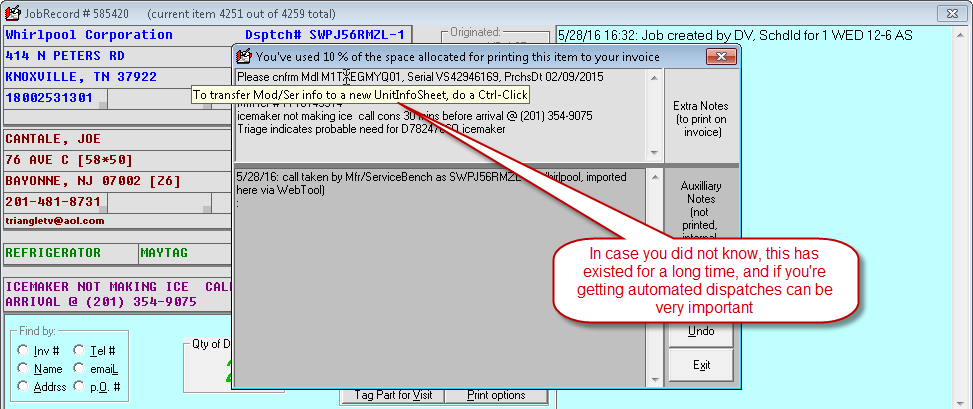
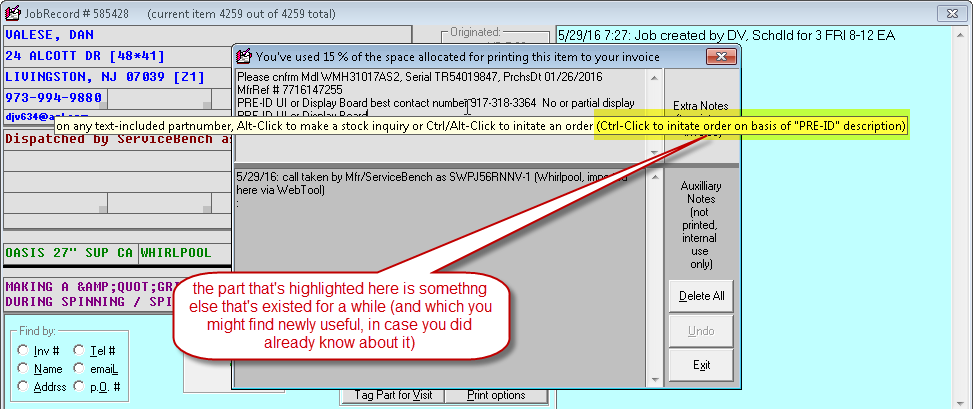
Option to Create a
Protected-Partition in Your SalesJournal:
Likely we should have done this one a long time ago.
After you've made any external reliance on
entries in your SalesJournal (as when, for example, you've done exports
to QuickBooks, filed sales tax liability reports on basis of a
SalesSummary Report, etc.), it's important that entries from that period
remain as they were when reliance was made. To state it otherwise,
you should not change the amounts as involved in entries from such a
period.
It does happen, of course, that sometimes you find
there were erroneous entries in an earlier period. If that's the
case and it's from a period that was externally relied upon, the proper
fix is to make a current-period adjusting entry, as opposed to by
changing that entry from the past.
Regardless, the design in ServiceDesk has been to rely
on you and your staff to be smart in this regard. Needless to say,
it has not been a smart element in ServiceDesk.
It is fixed now.
Your SalesRead form (Shift-F3) has a new button:
Just click on it, follow the prompts, and it will do
precisely as it says.
If you are wondering, yes, locked-period changes
will still be permitted if with use of your MasterPassword. Even
then, however, it will be in presence of a dialog that warns
appropriately.
Also (and if you are also wondering), yes, there
will be an auto-prompt to create the partition each time after you do an
export to QuickBooks.
Finally, yes, the ApplicationsJournal also
becomes locked per the same Protected-Partition date as you specify for
the SalesJournal.
4.7.132 (4/6/16):
Major Upgrades in
Full-Custom Source-of-Business Survey System:
First, let's be explicit in agreeing that it is
super-important to have a solid and accurate understanding regarding
which marketing investments are having what effect in bringing customers
to you. You really need to know this. Where a particular
marketing endeavor is producing tremendous "bang for the buck," you
likely want to do emphasize that one more. Where another is hardly
performing in spite of large cost, you likely want to abandon it.
It's critical information.
Since a long time ago, ServiceDesk has had what we
sometimes call a "canned" source-of-business survey system (see Chapter
10.G in the ServiceDesk Manual). It's structure is pre-defined,
and all you must do to set it up is create the list of yellow-page ads
that is applicable to your business at the time you are surveying (yes,
it was created when most service companies looked primarily to the
yellow pages as their primary source of new COD calls). For the
shape of the world in which it was developed, this system provides
superb structure and analytics, all pre-built and assembled for you
(well, except for your list of yellow-page ads).
But the world changed. Service businesses began
using several advertising mechanisms that our "canned" survey system did
not contemplate (most especially, of course, the internet). Around
eight years ago (see notes under release of Ver. 4.3.94, below), instead
of seeking to modify our "canned" system to make it accept every new
possible variation and nuance, we decided to build a new system (as an
alternative to the still-existing "canned" one) that offers complete,
unbridled customizability, and while still permitting a hierarchical
query structure (i.e., depending on the answer to one question, it can
lead to a different set of sub-questions, and depending on what's
answered there, it can lead to another new sub-set, etc.).
Regardless, while robust in its core, this new,
Full-Custom Source-Of-Business Survey system has been somewhat
bare-bones in terms of what's offered on its periphery. It has
not, for example, offered any built-in analytics on survey results,
other than just providing you with raw-numbers regarding the quantity of
hits in answer to each survey question (and even there it's been an
un-augmented Excel spreadsheet that provides such info, which (and at
least absent further analysis) is quite less than exciting on its face.
Our thinking had been, in exchange for our triumph in having provided
you with full and complete flexibility at the core, you may need to
perform the final and ultimate analytics on your own.
Recently (upon talking with a client in need), I
decided it was long past time for us to finally beef-up this
Full-Custom Source-Of-Business Survey system. Here is a list
of present improvements:
-
The Exported Results-Tally Report now includes not
just the quantity of hits-in-answer per query. It
also includes a figure indicating the amount of revenue
earned from jobs which, when surveyed at the outset, resulted in a
hit on that answer. To state it more simply, it's now not just
quantity that's reported; it's now revenue too.
-
In regard to both quantity and revenue, the
Exported Results-Tally now includes not just raw numbers, but also
does some underlying math to provide you with added columns that
indicate what is the average per-day rate as applicable to hits on
each item (both quantity and revenue) and what is the
percent-of-total-overall as attributable to each.
-
Since results data is now stored in a much
improved (more information-dense) manner, it is now possible for you
to conduct your survey continuously, yet report on only a
particular, date-defined sub-period. (Previously the Exported
Results-Tally was inclusive to whatever actual/total period as was
included in a particular survey setup.)
-
Since it now contains six results columns
(as compared to the prior just one), the Exported Results-Tally now
also has informative column headers, plus an overall header at top
indicating the date range included, and other elements of enhanced
formatting to make the information more obvious and attractive.
-
When a CSR has been prompted to conduct the survey
(this happens when scheduling a new job) and is mid-way into it,
then suddenly realizes that a prior question was answered
incorrectly, he/she can now hit Esc to re-start the sequence.
He/she can also re-initiate and replace a prior-completed survey, so
long as doing so before the Job/Sale transition (just right-click on
the Callsheet's Criteria button; this has always been a
method to manually initiate the survey queries, if not
wanting to otherwise wait for the auto-prompt).
-
Many businesses receive jobs via automation
(whether via SBDL SPDL, LGDL or SSDL), in which case (at least most
typically) a CSR will see a Callsheet with appointment info already
filled in, and will do the Job-Sale transition without ever having
typed into the Callsheet's Appointment box (which is the normal
trigger for invoking the survey). Until now, these instances
of incoming jobs have escaped the Full-Custom survey. Now they
are captured too. Specifically, when a user does the Job-Sale,
the system looks to see if a survey was completed. If not, the
survey query invokes at that time.
-
If you choose now to use a .csv alternate as your
source definition file, it no longer must be direct-designated in
lieu of the more proper .xls instance. It can simply be an
added file, while you maintain designation of the .xls instance as
your actual source. Each station, if seeing a same-path and
otherwise same-name .csv alternate, will use that alternate for the
purpose of loading the survey structure for survey-taking purposes.
Thus, each station will load much faster, and there is no concern
with non-Excel equipped stations being able to load. Even
better, there is no need to switch the Settings form based
designation back from .csv to .xls when wanting to export a
Result-Tally report, because it should simply be set and always stay
as a .xls designation there.
-
There is no longer a concern with different
stations "seeing" the source file via different absolute paths.
So long as you place your source file in the NetData folder on your
server (which, really, is the only logical place), ServiceDesk will
behind-the-scenes appropriately interpret that path for each
station.
The
applicable mini-manual has also been updated to reflect current
changes. We think you'll find these improvements finally make our
Full-Custom Source-Of-Business Survey system into the super
robust tool that you have wanted and needed.
Direct Claims
Transmission for LG:
Most of you enjoy doing direct claims submissions to
ServiceBench and ServicePower. There is no need to first save a
claim file and then upload it. Instead, ServiceDesk directly
uploads the claim for you. Boda bing, boda boom: it's done!
We also had direct claims submissions working with LG
between 2008 and 2010. However, in that latter year LG changed to
its then-new GSFS system, which lacked the ability to receive direct
submissions. Since then, y'all (at least if you are an LG an
servicer) have been using the comparatively old-fashioned file-upload
system for your LG claims.
Well, now you can be fully modern again.
A little while back, LG finally added ability in its
GSFS system to accept direct claims, and with this release of
ServiceDesk you may employ that ability. Just make the appropriate
pick when going to transmit your claim.
Minor Upgrades in
Scheduled-Job-Exports Type 3, 5, 6 and 8:
Formerly, these reports (Alt-F3) had a field to
indicate the amount of revenue received in labor on each job, but not
the amount received for parts and merchandise. That added field is
now included.
Export from the Special
Situations Advisory:
The heading says it all. Go to the form
(Alt-F11) and you'll see the new button for this.
4.7.130 (3/20/16):
New "Bulletin Board"
Feature:
Forgive me, but I think a lot of folks are gonna like
this one.
Like a lot of things these days, it was not exactly my
idea.
Janice Salman called from Just Press One. She
runs a call-center with a crew of CSRs, handling calls for a growing
number of Rossware clients. She said the quantity has now
reached more than 30, and it's getting tough for her CSRs to keep track
of the particular details (details that are needed to guide each
customer conversation) that vary for each particular client. She
wondered if I could suggest a feature in ServiceDesk that, as a
ServiceDesk instance comes up for any particular client, would volunteer
the particular details of which a CSR needed to be reminded in regard to
that client.
Well, I couldn't think of anything existing that
seemed to be a super fit.
So, I came up with something, and I think it's a tool
that will prove very useful to many of you, whether you have Janice's
team taking calls for you or not.
In a nutshell, this is a feature that allows you to add
a Notice section (aka "Bulletin Board") to the right of the Callsheets
in your standard ServiceDesk interface. Here's is an example of
what it might look like:
Of course, I only created a bit of imaginative text,
in the above, for the purpose of this illustration. It's solely to provide
a notion of some of the kinds of things you might want to do. You
could use your Bulletin Board for anything you might like. You can
use any color of text you want (or any combination of colors). You
can can use any font and any font size. You can use any desired
formatting. The general idea is it's a new space, that you can
make all yours, and you can change it as often (or as infrequently) as
you like.
You might notice, in the above, you can have
hyperlinks in your Bulletin Board. If a user simply double-clicks
on such a link, the system will immediately open the target. (Please
note these must be in the explicit-face-text, SD-Link-acceptable format;
embedded hyperlinks will not work in this context or in any other
direct-within-ServiceDesk context.)
To implement this new feature is easy.
To start, open a text editor that is capable of saving
in .rtf format (stands for RichTextFormat). WordPad is a good
choice, and it's automatically present in every Windows computer.
Compose the text that you want, and format it in whatever manner you
want (i.e., color of text as wanted, type of font, font size,
underlining, bold, italics, etc.). Then save your document in a
particular name, in a particular file-format, and to a particular
location. Specifically save to the sd\netdata
folder on your server, in .rtf format (happily that is
the native-save format for WordPad), and with this filename:
ThisCompanyBulletinBoard.rtf
That's all you must do.
ServiceDesk will see the file there, will expand on
its right-side to show your composed text, and will show it. It's
that simple!
Of course, any time you want to change what's shown in
the Bulletin Board, just open the file again, make any edits you want,
and save. Again, it's that simple. If you decide you do
not want to have a Bulletin Board displayed any more, delete the file, and
ServiceDesk will respond.
A few notes:
-
If any user's desktop window does not have
sufficient width for the expanded view, that user will of course not
be able to see the expanded view.
-
After you've added the file, deleted it or
otherwise changed it, it may take up to one minute before
ServiceDesk sees the change and adapts its view accordingly (the
reason is it only checks for such changes on a once-per-minute
basis).
-
As you may note in the illustration, the general
background color in the Bulletin Board will be configured to display
in the same color as you've picked for ServiceDesk itself. So
as to assure your text is readily visible, please be sure to pick
font colors that are a good contrast with whatever you have picked
for that background. It's true that from within your text
editor (WordPad or similar) you may potentially pick a particular
font-background color for particular text, but for most
purposes that tends to look less elegant and read less well (i.e.,
as compared to a transparent background).
-
Regardless of as just stated, it may sometimes be
beneficial to selectively pick other-than-transparent
font-background colors. One purpose, for example, could be
found in the fact WordPad (if that's the text editor you are using)
insists on automatically adding standardized hyperlink formatting to
any url that's typed. In other words, it underlines the text
and makes it blue (as in
IAmHyperlinkFormatted). As you can see in our first
illustration some distance above, this blue color may be a poor
contrast from your background. A sensible solution (at least
in this particular circumstance) could be to change the
font-background color on this particular text to something
non-transparent and contrasting, such as you see done here.
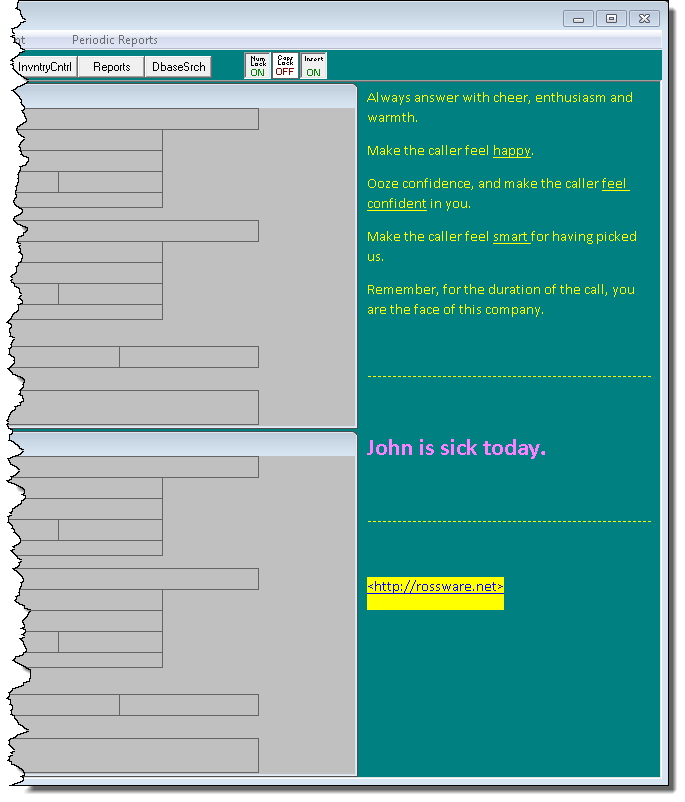
You'll likely notice that, in addition to adding a font-background
color for the hyperlink, I also spiffed up some other formatting
elements, as compared to the first example. Basically,
you are similarly in control of formatting -- in terms simply of how
you set it up from within WordPad (or similar), and in terms of what
will ultimately fit within the canvass provided (if you're putting
in a lot or of large text, you'll have to simply see by trial and
error whether it fits in the space we've provided for you).
We hope you'll love this feature. Please let us
know.
Improved
Auto-Formatting of Claims for AIG/ServiceNet:
Recently it came to our attention that claim
submissions to ServicePower with AIG as the expected-to-pay party were
being rejected, owing to absence of indication as to whether it was a
"sealed-system" repair versus a normal repair. Upon inquiring with
ServicePower, we learned the expectation on AIG claims is for a
particular field in their claim format (specifically, it's the field
they title "EIA or MFG Repair/Fault/Defect Code 1" to be
populated with the code "8002" to denote that it's a sealed system
repair, or "8001" to denote that it's a normal repair (why they do not
tell us these things in advance is anyone's guess).
Anyhow, with knowledge of this expectation, any of
y'all could have made your AIG claims sail through just fine, simply by
typing that "8001" or "8002" code into the particular box of our
on-screen NARDA, as needed, before transmitting your claim. To be
clear, it is this yellow-highlighted box (as shown with assistance of
the Translation-ToolTips) that, on ServicePower-formatted claims, is
translated into that particular ServicePower field:
Regardless, rather than putting you to the trouble of
having to type, we'd much prefer to automate. So, we've now coded
so that if you check the on-screen NARDA's dedicated "Sealed System
Repair" checkbox, as shown with yellow-highlighting here:
. . . and if it's on a claim being submitted to
ServicePower, with AIG or ServiceNet configured in the underling
JobRecord as the paying party (and if you have not otherwise placed any
text of your own into that box) -- if all that is true -- ServiceDesk
will behind the scenes populate the needed claim field with the needed
"8002" code. Correspondingly, if that "Sealed System Repair"
checkbox is not checked (but the other factors all remain true),
ServiceDesk will behind-the-scenes populate the needed claim field with
the needed "8001" code. It should make successful submission of
these claims into being once again a simple matter.
Flip-Flop and
QET-Insertions Now Available Within Archived-JobRecords:
Ken Owen from Service Care in Birmingham, AL pointed
to the need for this. It arises, he said, when it's discovered
days or weeks after the job was prior completed and "put-to-bed" that
the wrong party was claimed against. Perhaps you claimed against
Lowes, for example, and now it turns out you need to claim against
Whirlpool. When you need to flip the party-info sections around
and/or do a QET-insertion within a current job, it's simple. But
those automation facilities were not formerly available in the
Archived-JobRecord context. Now they are.
4.7.126 (2/23/16):
SMS (aka "Text-Messaging")
Now available as Alternate to Emails and/or RoboCalls (Specifically, for
Appointment-Reminder/Confirmation-Requests):
Folks have wanted this for a while. On the
surface, one might think adding SMS (stands for
"short-messaging-service") would be easy. It was not, but (and
regardless) we've done it.
In the next few months we plan to add text-messaging
options in several other contexts. For now, it's available in the
context of sending out appointment-reminder/confirmation-requests (as an
alternate/supplement to emails and/or robo-calls).
In addition to adding the option itself, we also
enhanced your control in regard to determining which particular
telephone numbers will be the target for robo-calling and/or
text-messaging, and over which (of potentially multiple) email addresses
may be the target for automated emailing. In fact, we've given you
a number of new options in how to scheme such control, with
intent that you may pick the particular scheme that best suits your
operation.
For detailed instruction on how to use these new
schemes (and, indeed, how to implement text-messaging in general), you
may
click here. In the alternative, from within ServiceDesk you
may go to the Settings form (Ctrl-F1 is the shortcut), and
there click on the button as shown here:
That will yield this interface, and if you click on the
indicated button it will open the same instruction document as above referenced
(that button as present within ServiceDesk will be a more handy link when you
later want to reference the same instruction document):
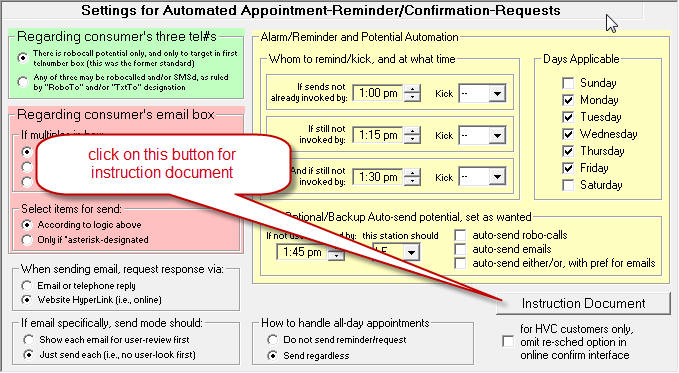
Please note that text-messaging requires subscription
to SD-CyberOffice, and there is a fee of 5 cents for each SMS.
As one other note, if implementing text-messaging from
ServiceDesk you'll also need to assure you are updated to SD-CyberLink
Ver. 4.5.52 or above. The reason is because some of your
text-message recipients may very well choose to reply via text.
It's only SD-CyberLink Ver. 4.5.52 or above that's equipped to detect
those replies, and to convert them into SD-Mails.
Durable
Indication of Whether Each Appointment Was Customer-Confirmed:
Our appointment-reminder/confirmation system has long
had a wonderful benefit: you can walk into your office in the morning
and, with a quick glance in your DispatchMap, have instant visibility
regarding which appointments have been customer-confirmed, and which
have not (it's then a simple task to manually call the minority who have
not, in the effort to verify if it makes sense to go ahead and send the
technician).
At least the above works generally.
However, if you happen to have techs that open their
SD-Mobile applications before you've made this review, the little hyphen
symbol that indicates confirmation ("-") will be replaced with a
check-mark that indicates the technician has received the job. So
(and at least for quick, on-it-face review purposes), the confirmation
information is lost (it's still present in each narrative JobHistory,
but that's less immediately obvious).
We now have a solution for this potential loss (and
it's why in the title to this section we use the word "Durable").
It's in a new, toggle-to-optional-display-mode
feature in the DispatchMap. From within the DispatchMap, simply
hit "F" on your keyboard (we'd like to have used "C" for "show-Confirmed",
but the "C"-toggle was already in use, so please think of it as the
"F"-toggle for "show-conFirmed")
(hit "F" again or Esc to toggle back to normal). In consequence of
using this toggle, all the normal check-statuses will disappear, and a
new and bolder symbol (specifically, a bold dot) will show to
distinguish confirmed appointments from non-confirmed ones. Here
is an example:
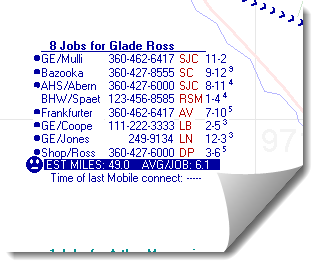
This showing will endure (and hence be "durable") even
if the normal/standard check status has been changed to something else.
This feature also requires that you update
SD-CyberLink to Ver. 4.5.52 or above, for it's only that version and
later that are equipped to set a new (and durable) behind-the-scenes
field with notice of the customer's confirmation (it also means that if
you're looking at appointments whose confirmations were processed via
older copies of SD-CyberLink, the durable indication will not be there).
If, BTW, you forget the key for this toggle, it's been
added to the DispatchMap's "CheatSheet" (right-click in any otherwise
non-operative DispatchMap space to display):

So just check there.
Improved Legend-Key
in DispatchMap:
This shows what's meant here:
| Old |
New |
 |
 |
To see the DispatchMap's legend key, the toggle is
"K".
4.7.114 to 4.7.120 (8/10/15):
Easier Embedding of Kudos
to Your Website:
In March I sent an email to y'all announcing a really
fantastic new feature.
Creation of this feature stemmed from a conundrum all
servicers face. You work like the dickens to make your customers
happy, and succeed grandly 99 times out of a hundred. However,
happy customers seldom post online reviews. On the other hand,
unhappy customers (those 1 out of 100, or fewer) very often post online
reviews. The result is, on the basis of any new prospect checking
online reviews as basis to judge your company, you end up looking much
less awesome than you really are.
Our new Kudos system was created as a means to solve
this.
It's an outgrowth of the fact our CyberOffice survey
system was already auto-generating a very large quantity of supremely
superlative comments from your customers (well, at least it's been doing
so if you are using this survey system; if you are not, you should be).
These praising comments have been great for the ego of our users, but
had not formerly been harnessed for their enormous value otherwise.
Now they can be.
Specifically, you can add elements into your website
that automatically display real praising comments from your actual
customers. These comments are dynamic, forever and automatically
updated, showing with live and recent dates. As such, they make a
"sale" to any browsing prospect (assuring you are the company they
should select for service) like you'd not believe.
Our metrics indicate companies that have implemented
such displays are approximately doubling their online-generated
business!
So, finally, you can turn-around the online,
review-presented picture that prospects get of you. Finally, you
can make real and direct use of all those praises that were formerly
going unused. It's awesome.
Regardless, there had formerly been a little
impediment for some. To embed this new presentation into your
website required use of a technology called PHP. Some web
development environments do not make it easy to work directly with PHP.
So, the main thing that's new in regard to this post is the fact that,
as of now, you can use a different (and much easier-to-embed) technology
called JavaScript.
For full instructions on how to embed this great
feature in your website,
click here.
Like other CyberOffice functions, this one too has a
moderate fee schedule attached,
details here.
Upgraded DispatchMap:
Better Speed
Some Rossware users have DispatchMaps that are big, covering huge
expanses of territory. They also have scores of technicians,
meaning there are hundreds of appointments within any given day's
schedule. Given the traditional method as used by the underlying
machinery for creating any new view position (as you "pan" your view Up,
Left, Down or Right), these large elements have sometimes resulted in
slower than instant "re-painting" with each such panning change.
It was potentially even worse for those using a centralized server (such
as involved with Rossware's "RSS" cloud-server hosting), because in that
situation all the imagery processing is done by a single machine, whose
resources are shared among multiple users. These delays are not
something most users have experienced, but, for those few who have, it's
not fun when you want to move from the bottom of your Map to the top (or
vice versa), and must wait a second or so between each movement.
This issue is now solved!
We've created an entirely new behind-the-scenes methodology that, for
those who've experienced such delays, should entirely eliminate them.
Indeed, whatever was the speed of "panning" that you prior experienced,
it's guaranteed to now be faster. It's possible (if your prior
speed created zero perception of delay, which was indeed the typical
scenario) you will not notice the difference, but the fact is
acceleration will be there.
Mouse-Drag Panning
In conjunction with the above-described speed-improvement, we
have taken occasion (coterminous with the same work) to upgrade a few
other DispatchMap elements.
Most notably, you may now do something within the DispatchMap you have
likely found yourself intuitively wanting to do -- and
feeling like you should be able to do.
Specifically, you may click down with your mouse and drag your
viewing position in any direction wanted. Try it. You'll
like it.
Improved Screen-Size Adaptation
Additionally, we have refined the DispatchMap's ability to intelligently
adapt to larger screen sizes.
As background, several years ago we often had trouble persuading new
users to upgrade their screens to the minimum screen-size that
ServiceDesk demands (which is 1024 X 768 pixels, aka "XGA").
Gradually, typical screen sizes began growing larger. When we
realized that a significant quantity of users finally had screen sizes
larger than than the XGA minimum, we further realized it would be
beneficial if the DispatchMap expanded to take advantage of such
larger-available screen space.
That's been a feature for a long time now (i.e., ServiceDesk expands, to
potentially fill your screen, when moving into the DispatchMap).
However, the expansion was not in every instance seamless. A
complicating factor is that we design your Map with panning positions
that assume an XGA-size display. When your actual view window is
bigger, one or more such panning positions may no longer make sense.
Earlier we'd programmed a somewhat clumsy adaptation for this. The
present adaptation is much improved.
When doing this improvement, BTW, it occurred to us we might do still
more. The present expansion scheme allows an expansion up to,
potentially, the full size of the particular screen (where you have
multiple screens) in which ServiceDesk is running. It occurred to
us some users (particularly those with very large maps, who also use
multiple screens) might enjoy an expansion that takes advantage of
multiple screens (i.e., will expand, if needed, across more than one).
We have not at this point done such coding as would be needed to make
this happen, but are curious as to whether it's something some of y'all
out there might like? If so, please let us know.
New Report: Office-Person's
Productivity:
Over the years, ServiceDesk has grown to be pretty darn strong in regard
to providing you with a large basket of superb analytics (aka
"metrics"). You may, for example, examine a plethora of attributes
regarding technician performance, or analyze a variety of measures
concerning company performance and profitability. There are even
methods for assessing burdens as compared to profitability between and
among your various High-Volume-Clients.
Many years ago, ServiceDesk did not have so much strength in the
analytics area. This strength has grown gradually, as users have
demanded better insight into particular areas of visibility, and we have
built in response.
Regardless, one area of analytics has remained sorely limited --
notwithstanding that at least one client has repeatedly asked for this
particular hole to be filled. I feel terrible that I kept failing
to find my way toward creating the new report he so much wanted, and
first asked for (I believe) well more than two years ago. Anyhow,
I committed to myself that I'd no longer permit other matters get in the
way of this . . . and, Eureka, I've now done it.
The prior neglected area involves assessment of productivity between and
among office personnel.
To be clear, there were some prior measurement methods
available. The Result-on-Dispatches Report,
for example (F11-->T-->D), shows (among many other things) the quantity
of jobs originated by each office person, along with the quantities and
percentages that led to first-time-completions, completions otherwise,
parts-ordered, no-shows, etc. The ScheduleJobsReport
(Alt/F3-->J) creates an export from which you can direct-mine for a
plethora of details regarding jobs as created by each office person.
Regardless, these prior sources did not directly measure the quantity of
a great many other actions that office persons are typically involved
in. Our new report does.
This new report finds its home in the Reports form, which is
QuickKey-accessed by striking F11:
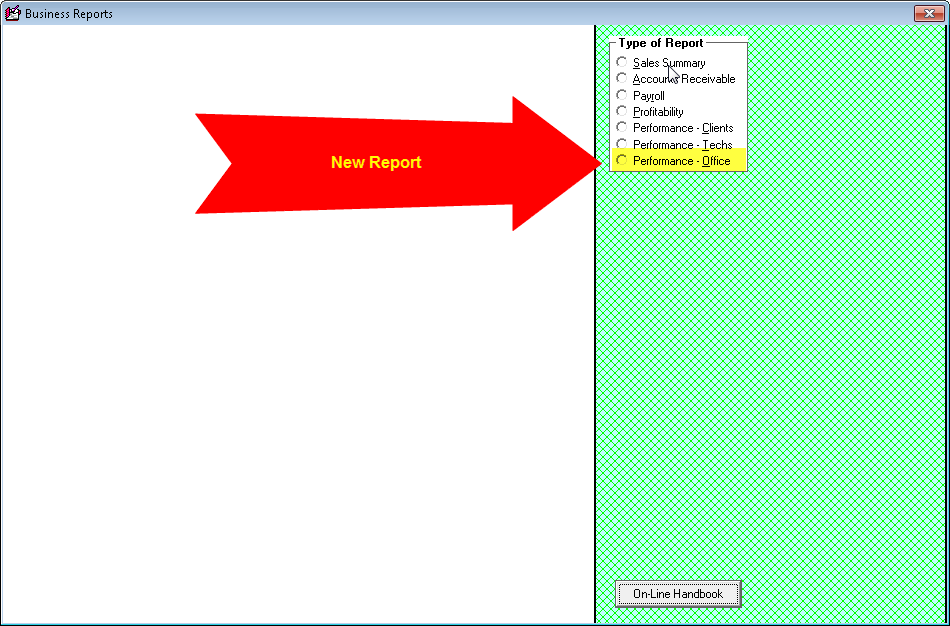
It runs much like other reports in this venue, and when complete will
display something akin to this (depending of course on your own data and
instruction parameters):

As you can see is suggested by the sub-title, this report uses
JobHistory notes to compile a tally of events as managed by each office
person.
To get an idea of how a report like this might be gleaned for
information, just take a look. At a glance in the first column,
you can see that "JG" was most productive in creating new jobs, while
"ML" was considerably more productive in creating appointments outside
of initial job creation (just look for the largest numbers as seen in
the first two columns, above). "ML" was also big on managing
appointment changes. Going on the down line, you can compare
productivity in several other areas. "JJ," for example, was the
largest actor in managing PartsProcess (special-order parts) activities,
and "LB" was just barely behind. In the farthest right "Totals"
column, you can readily see that "LB" participated in the greatest
quantity of actions overall (at least in terms of what we are managing
to measure here).
You may notice there are two groups of listed office persons, with a gap
in-between. Basically, those in the first group are pulled from
your current-at-the-moment "office-persons-roster" as maintained in your
ServiceDesk Settings form. Those in the second group
involve note entries with other office-person abbreviations (i.e., ones
that are no longer found in your current roster).
Like most of the reports in the F11 venue, this one too has been built
with a "Checking-Data Export." Basically, once the report
displays, there is a new button within the lower-right of the form:
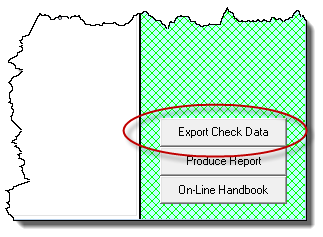
Click on that button, and the system will create an export that
explicitly shows the data it relied upon in compiling the analysis for
you. This can be very useful if you are seeking to verify
integrity in the numbers, or just better understand what stands behind
them. It also can enable you to do your own different kinds of
analysis, directly on top of what is contained within the export.
Here's a section of export as created from the above report:
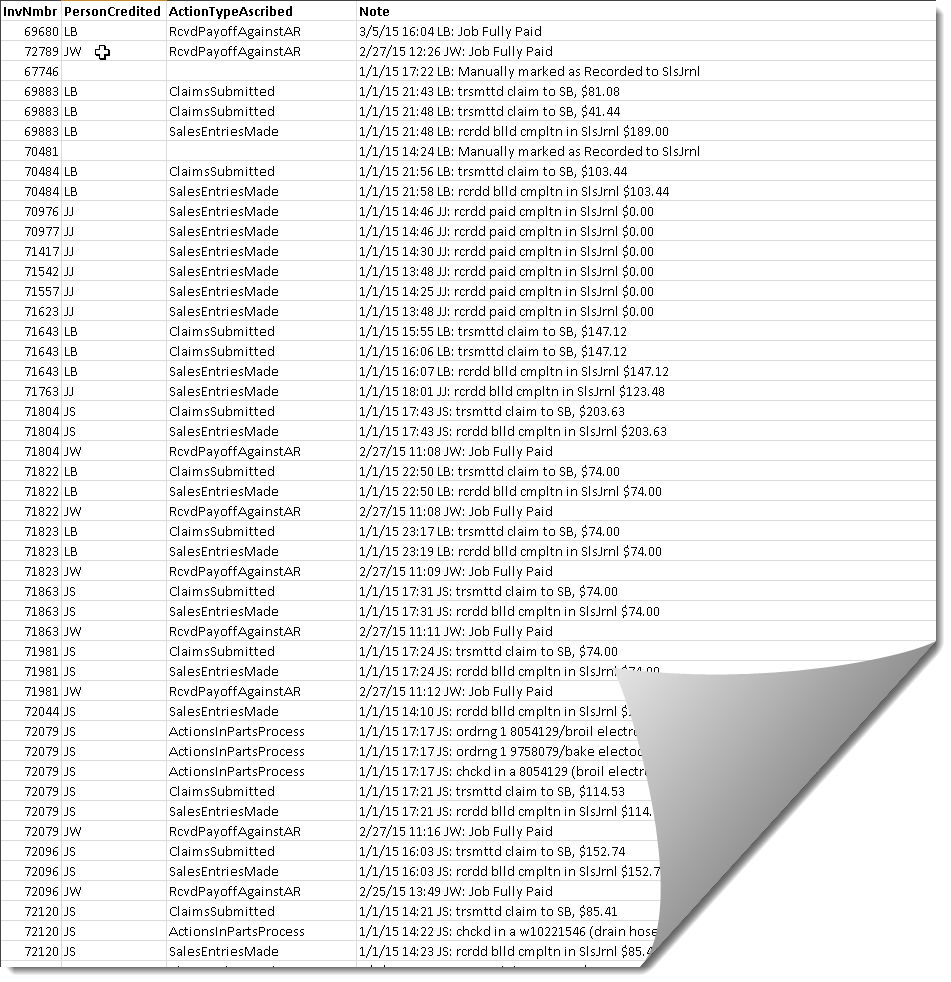
As you can see, it lists each note that it pulled from JobRecords as
applicable to the report period (it's the note itself that must fit
within the date range, not the JobRecord), and indicates what kind of
action it judged the note to involve, and which person was involved (a
blank in those columns indicates the system did not deduce any
tally-able action on basis of the note).
Try the new report. We think you'll like it!
Miscellaneous:
Upgraded LG-DispatchLink to optionally upload
narrative history. Also,
restored code regarding availability uploads to do math trick with
LG-reckoned burdens (undoing change as made 5/25).
Made
it so change of a UIS as attached and navigated to from JobRecord
re-flags any pending appointment as needed new upload.
Made
it so you can right-click on a Callsheet's Criteria button to invoke a
SourceOfBusiness survey.
Added function for auto-add to PartsHotList when
s/o item is marked MvdToStk.
Made it so spec-tagging a part and checking in a
s/o part re-flag an appointment for upload.
Fixed fact that when click in archived JobRecord history and it occludes
AfterNotes, then release, the controls on the AfterNotes did not
reappear.
Changed calls from DispatchMap to Bing and Google to use "https" instead
of just "http".
Added
filter in ResultOnDispatches report that causes it to exclude ShopJobs.
4.7.111 (6/7/15):
New A/R Search:
We'll give credit for this one to Jackie at Landers Appliance. The
impetus is Whirlpool's new method for honoring
replacement-parts-warranty. I'm referring to the arrangement
where, instead of giving you credit when having purchased a replacement
for a failed-and-formerly-replaced-part, the vendor instead gives you a
new part. Jackie's business makes an A/R to manage the expectation
for these replacements (much as they would an expectation for money
credit). Yet, when her company's main vendor ships the
replacement, they do so with absolutely no reference to the particular
job (or "claim") it is associated with. Thus, it's tough to match the incoming
part with the particular A/R that was setup to assure it is received.
The solution we came up with is:
-
I have just added a new search function in the Accounts-Receivable
form (F3). It allows you to do a search (and for any string of
characters) in the Notes section as applicable to your entire set of
A/Rs.
-
Jackie will make it a practice, when creating the special A/Rs that
are for this described purpose, to put the partnumber (which is
expected to be received back) into the notes of each such A/R.
-
When a part arrives that is involved in this
replacement-parts-warranty situation, she'll use the new
search feature, to thereby locate the A/R that's applicable to
that part.
Here's what it looks like:
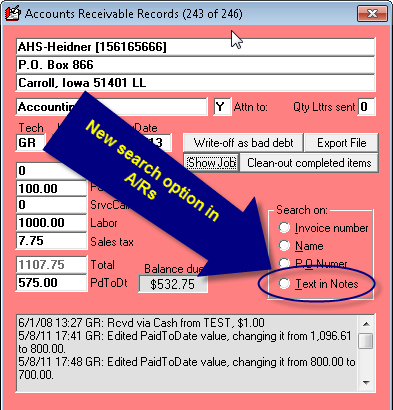
Of course, you can use this new search to look for an A/R containing any
string of text of any kind. It does not have to be a part number
you are seeking there.
New All-Appointments Display in
DispatchMap:
Credit for this one goes to Brenda at Saginaw Valley Appliance.
Brenda said her company gets a lot of cancellations, which opens
near-term vacancies they are anxious to fill. She said they
indeed use the DispatchMap's longstanding "Show-Jobs-Needing-Scheduled"
feature, which is intended (in part) to help fulfill this need (it's the
one that shows orange "pumpkins" as location-references for jobs that need
scheduled, and green pumpkins for any appointments that are
further out than the displayed date and which have been marked to
indicate the customer "wants-sooner"). But, she said, they often
can't find suitable jobs (as needed to fill
holes) via this category of display. In consequence, they find themselves going through
just ordinary appointments that are scheduled for further into the future, to see if
any can be moved up, so as to fill near-term holes. She said
this is somewhat laborious, and asked for an easier method by which to
rapidly and instantly see all those further-in-the-future appointments.
So, we made the new feature. Here's the reference to it in the
DispatchMap's Cheat-Sheet (right-click on any empty location on the
DispatchMap to see its Cheat-Sheet):
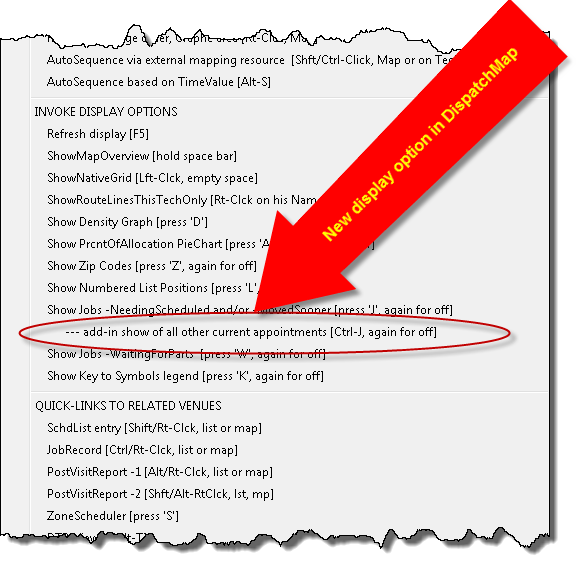
So, the general idea is, when you select this option, you'll see the
same set of orange and green "pumpkins" that display with the old and
longstanding option that's listed just above it. However, you'll also
see blue pumpkins (yes, blue) to signify the location of each other
appointment that's currently pending, but for dates other than the
actual displayed date. It is thus now possible to see your entire
appointment roster in a single graphic display.
As with the other "pumpkins," a simple click will of course open the
underlying JobRecord.
Improved Visibility into Spec-Tagged Items:
Now we answer to Mark at Convenient Appliance Service. Mark called
to say he needed better visibility regarding what inventory items are
spec-tagged, both from the inventory-management perspective and from the
perspective of Job-Management (i.e., when looking at a JobRecord, there
should be an easy means to see what's presently spec-tagged to it).
So, we've done two things.
First, the InventoryControl form (F10) has a new display option:
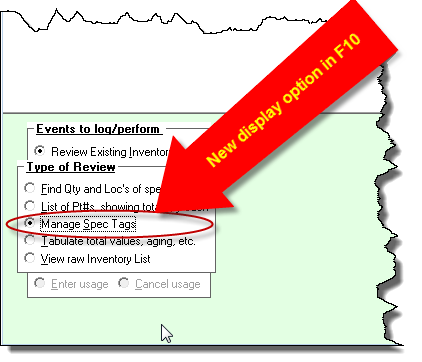
This new option will list every inventory item that has a current spec
tag. Thus, there is no longer need to peruse through the raw-View,
as there was in the past.
Secondarily, we added a new link-to-show function in the
JobRecord form (F7). Reminder regarding availability of this
function (and of its method) is obtained when you float your
mousepointer over this form's "Tag-Part-for-Visit" button:
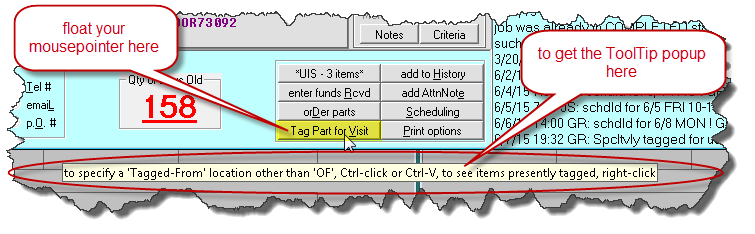
So, just as the ToolTip suggests, do a right-click if you want to see
inventory items as presently tagged for that job. In result, the system will open your InventoryControl form,
configured to show the new display (as described in the entry just above
this one), but poised to
list only such items as apply to the job from which you linked.
Show-and-Link Regarding Underlying
HighVolumeClient in A/R-Aging/Breakdown-by-HVC Report:
This one was to fulfill a request from Ian at The Appliance Guru. He
said his company has a very large quantity of clients who are setup in
the HVC category -- so many that, on reviewing A/R-aging with breakdown
by HVC (the sequence to obtain this report is F11-->A-->B),
it's not possible to recognize each such company based on the mere
abbreviation alone.
In solution, we now display a ToolTip over each/any HVC line-item in
this report, as you float your mousepointer over it. The ToolTip
provides the full name of the underlying HighVolumeClient:
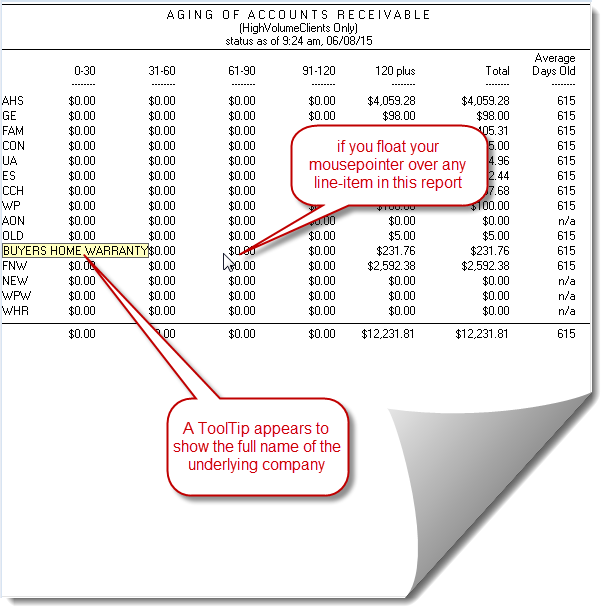
While doing this, it occurred to me that, additionally, you might want
to do a quick-link to the underlying QuickEntryTemplate, as applicable
to any HVC line-item you are looking at (suppose, for example, you see
one with that's got too many A/Rs that are too old, and you want to look
at that company's QET to review elements of your arrangements and contact-info
with them). If you simply click on any HVC line-item in this
report, it instantly opens that underlying QET for you.
(If you are wondering, BTW, why displayed A/R ages in the above report
are so very old, it's because it's
data from my old service company, which was sold many years ago.)
Miscellaneous:
Every release contains numerous small improvements and
fixes. Usually, they are either sufficiently small or technical so as to
warrant no description in this particular blog. However, there a few small
items in
this release we should at least briefly mention:
-
There is now an export of FundsJournal Entries (in the F9 form,
use standard functions to filter for display, click on the
Print/Export button, then choose export as opposed to printing).
-
In the InventoryControl form, the "Find-Qty-and-Loc's-of-Specific-Item"
report (accessed via F10-->I-->F) is now
scrollable, as needed for companies that have more than 30
technicians. (Also improved showing and scrollability in the
Tabulate-Values report.)
-
Changed the warning about the SD-Mail folder
having too many items in it. Now it will allow a great many more
items to accumulate, before warning you there are too many.
4.7.110 (5/20/15):
New Integrations with External Mapping Tools (Open-Route-in-Bing
and Optimize-Sequence-via-Google):
At Rossware, we are continually striving to reach an elusive target:
providing the most perfect-possible system for every user. Even in
a static world, this would be a tough goal to fully reach. But
it's tougher still because the world is not static. Suppose,
against all odds, on one magic day we actually achieved our goal.
The next day, we'd again be short, because overnight the world would
have changed.
Everyone of you, our users, is continually facing new sets of operating
dynamics as significant to your business. The computing
environment is likewise (and in and of itself) constantly changing (new
operating systems, new communication modes, etc.), and the set of
potentially connecting tools and entities (to which our systems can
interrelate and otherwise integrate) are changing too.
In particular regard to new capabilities as offered in this release,
we've long had two external-map-utility integrations that many were
enjoying, when suddenly both became less available (or at least less
useful) than before.
First, we've long had a method where
ServiceDesk will compile the list of stops that you have planned for a
technician on any given day, and direct-pass to MapPoint's routing
optimization engine. MapPoint churns through the set of
addresses. Accounting for road layouts and even traffic patterns,
it deduces a sequence of stops that will minimize driving time. It
spits the result back, and ServiceDesk sequences the tech's stops
accordingly. Many have loved this feature, in spite of the fact
that, to use it, you must purchase and install MapPoint. Sadly, as
of January this year that purchase was no longer an option.
Microsoft stopped selling MapPoint.
Second, many have likewise enjoyed using the
feature where, by simple action in the DispatchMap, you may open a
technician's route in either MapPoint or in GoogleMaps. More have
enjoyed the latter because GoogleMaps is free, and is available absent
any separate install. About a year ago, however, GoogleMaps
changed its interface to one that most of our users found less helpful
for multi-stop route-analysis (often the reaction was to blame us here
at Rossware for this change; honestly, we were not responsible for it).
Until very recently, there was an easy solution in that GoogleMaps would
permit you to revert to their "Classic" view. Recently, however,
GoogleMaps removed that option
So, at Rossware, we faced the conundrum where two valuable,
system-integrated tools were suddenly less available (or less helpful)
than before. We needed to find new tools with which to integrate
that would be, hopefully, as good or better than the old ones. In
this release, we have done precisely that.
In regard to using an automated
routing-sequence-optimization engine, we found a superb MapPoint
replacement in an online service provided by Google. At least so
far this service is free (which is obviously better than MapPoint), and
it even returns its optimized solutions more quickly than does MapPoint.
In regard to opening a technician's route in an
online mapping resource that has the same benefits as the old
GoogleMaps, we found a superb replacement in Bing Maps.
To give you easy access to these new options, we also had to modify the
applicable menu and Key-Mouse paths.
For automated routing-sequence-optimization, you may continue to use the
same Key-Mouse action as was formerly dedicated solely to MapPoint
optimization. That action is still (but now somewhat differently)
described in the DispatchMap's CheatSheet:
| Old Description from DispatchMap CheatSheet |
New Description of Path (right-click in any
non-functional spot of the DispatchMap to get this CheatSheet) |
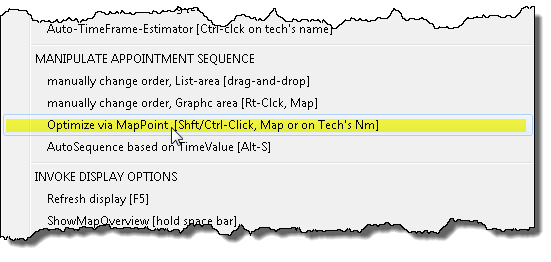 |
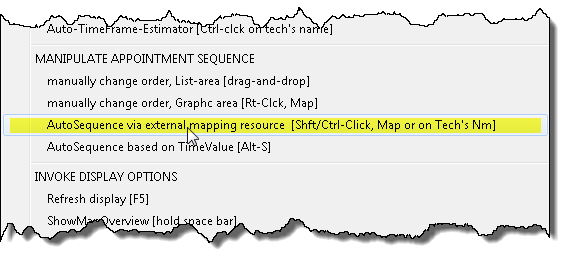 |
Since this Key-Mouse action now gives you multiple options (we have
retained the old options for those who still wish to use them), instead
of immediately doing the optimization via MapPoint, as before, it will
now take you to a new, "Link-to-External-Map-Resources" options
list, where you may pick the particular action desired:
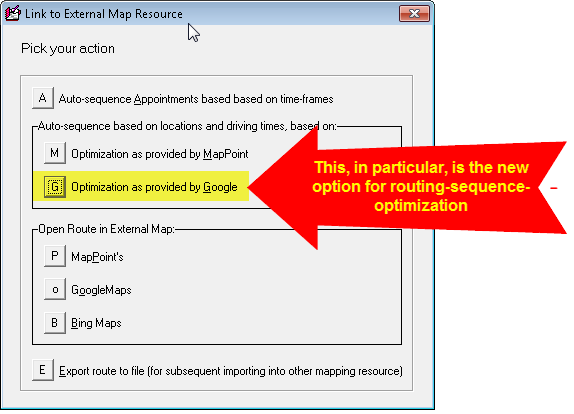
If wanting the new optimization, for example, you'd pick "G" from the
above. If wanting the old MapPoint optimization, you'd pick "M."
The old path for opening a tech's route in an external map was by
clicking on a tech's name at the top of his list, then picking from what
was beginning to become a very long list of options there. Rather
than making this particular options list even longer still (i.e., via
direct addition of yet another new option), we instead removed the old
and multiple "Open Route in . . . " set of options, and replaced with a
single option that, like the Key-Mouse action above-described, opens
that same new "Link-to-External-Map-Resources" options list:
| Old list of options as obtained when clicking
on a tech's name at the top of his list |
The now-simplified list of options |
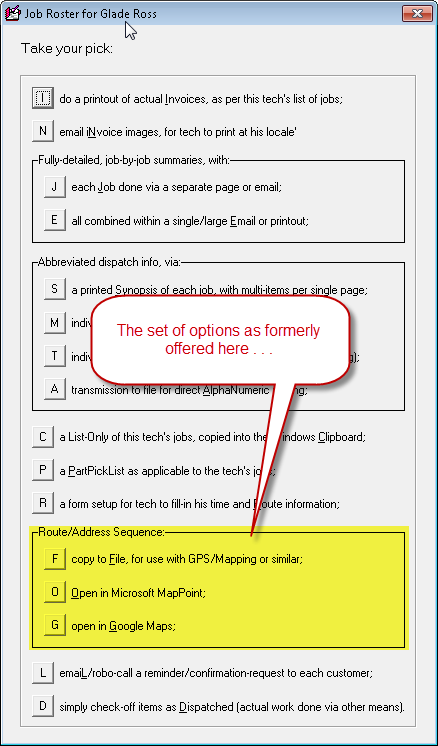 |
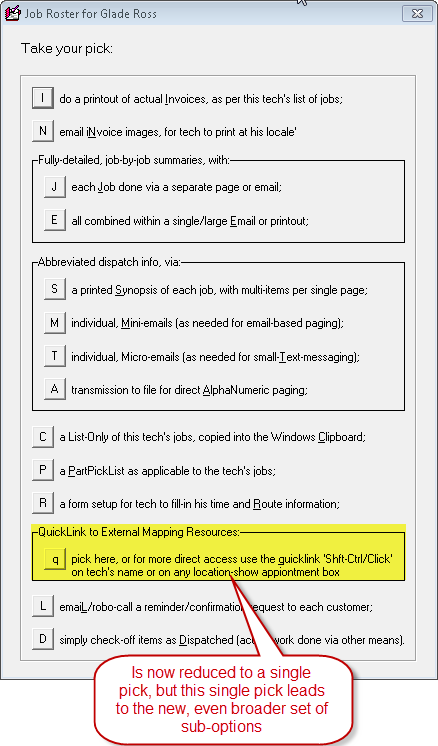 |
So, there are now two paths to this
newly-expanded (and now brought together in one place) set of options.
You may use the Cheat-Sheet indicated Key-Mouse action (Shft/Ctrl-Click
on either the tech's name or on any in-location-show
appointment reference), or you may do a simple-click on a tech's name at
the top of his list, then pick "Q" per the right-side image above.
For those who hated the change as made in GoogleMaps, we think you'll
love using Bing Maps instead. For those who loved the automated
routing-sequence-optimization, we think you'll find Google's engine is
very effective.
It is ironic, perhaps, that we are now providing an alternative to
Google as an online source for map-opening a tech's route, while newly
embracing a different arm of Google for routing-sequence-automation.
C'est la vie!
If you are wondering, BTW, yes, the open-route-in-Bing option has indeed
also been added within SD-Mobile/w (i.e., the Windows version).
We'll also add it to SD-Mobile/i (that's the iPad version) as soon as we
are able.
4.7.102 (3/9/15):
New Option for POS-Insertions List:
We've had many clients who, in the POS environment, wanted ability to
insert line-items to POS tickets, but as pulled from other-than the
inventory system's MasterPartsPlan, SmartParts listings (as typically
applicable to special-order parts) or to serialized inventory as pulled
from the SD-Dealer setup (these are the three pull/line-item-insertions
that have formerly been available).
So, we've now added this ability.
You may make a custom list of the particular insertion options you want
want to have for your setup. Your list will need to have four
columns. The first is an item identifier (roughly equivalent to a
partnumber), and will (when selected from the POS context) be inserted
to the partnumber column in the POS ticket. The second is for item
description, and will be inserted (obviously) in the description box.
The third is for price, and will (again, obviously) be inserted to the
POS form's price box. The fourth column is for an indication if
the item is to be deemed as non-taxable. If yes, you should simply
place within this column/box the expression "NO TAX".
Once you've made your list (and as above-described), save it in
comma-delimited format as PosInsertionsList.csv. Save to the \sd\netdata
folder on your server. ServiceDesk will see your file there, and
then make use of it.
Specifically, you'll see a new option come up (this option will be
activated only is ServiceDesk sees the indicated file) when clicking
into the partnumber box in any POS line-item:
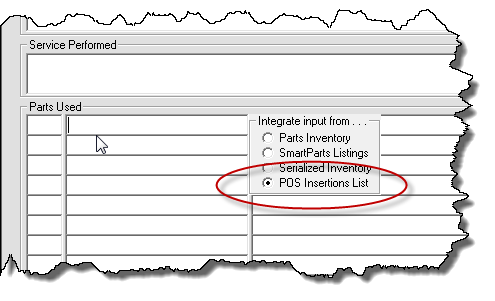
Pick this new option, and your dropdown insertions option will be
pulled from the list you have created. If you pick an option for
which "NO TAX" was designated (and assuming you've picked one of the
FinishedForms that includes the line-item-based tax-exempt checkboxes),
that line-item will automatically so check for you.
New Management Tool: Quick-View on
Callsheet Status:
You've likely recognized that the caption bar at the top of ServiceDesk
has an alternating display to let you know if you have Callsheets
needing attention, past-due for attention, the quantity and so on.
But, they only show you an indication of such Callsheets as are
applicable to you. If you are a manager, you might want to know
such indications as applicable to your entire staff, as a group.
This new tool is for that purpose.
Specifically, if you float your mousepointer at the "four-corners"
intersection just between where all four Callsheets meet . . .
. . . the caption bar at top will momentarily change to
give you a system-wide synopsis on the status of all pending Callsheets.
Option to Use Half-Hour Increments in
Auto-Time-Frame-Estimator:
Our DispatchMap (F5) has long had a tool that will
create a series of time-frames for each appointment as assigned to a
tech, based on parameters you provide (Ctrl-Click on the tech's name at
the top of his list).
Until now, the time-frames as inserted have been in
whole-hour increments only (i.e., if your parameters would have
otherwise made for sub-hour increments, the system would simply round to
the nearest whole hour). Now there is an option to have it round
to the nearest half-hour instead. To invoke the option, bring up
your DispatchMap's CheatSheet (right-click in any non-operative space),
and pick this option:
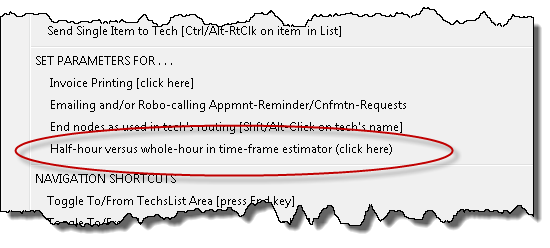
In result, we are now able to produce something
like this:
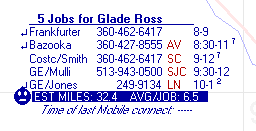
Whereas, before, you would have seen nearest whole-hours only.
Augmented Intelligence when Using Option to
MakeVacationEntries:
In the ScheduleList form (F6) there has long been an option to create
multiple "Unvlbl" type entries in one action, as particularly applicable
where a tech will be on vacation for multiple days. Until now, the
Job-Count value for these entries has defaulted at 8. Now, the
system will look to your Technician-Properties setup for the technician
involved (Settings form, click on the tech of interest).
Specifically, it will look to see what you have set as the maximum
JobCount value that this tech can handle in a day. If you have set
a value there, it will insert that particular value for these entries,
as opposed to the default of 8.
4.7.100 (2/3/15):
QuickLinks to ApplianceVideo.com's "How
to Replace this Part" videos:
Among Rossware clients are many ambitious, creative and ingenious people
(if you wish to know, we're pretty proud to be serving such a bunch).
Anyway, Matt Janoweicki and his team at Ace Appliance (Toledo, OH) began
a few years ago in building a treasure trove of extremely professional
videos, each showing the complete sequence of steps as involved in
replacing a particular part. They put the whole trove online (and
it continues to be fast-growing) in a website called
appliancevideo.com, and are now
making a serious business out of the enterprise.
Recently, Matt and his team asked if Rossware might be interested in
making some integrated ties into those videos. It seemed like a
good idea, and so now has been done.
In fact, it's been done for both ServiceDesk and SD-Mobile.
The link from within ServiceDesk is via the PartsProcess form (F8).
To open the "how to" video as connected with any part number, just do a
Alt/right-click on that part number:
That action will immediately query the
appliancevideo.com website for
any videos it has as associated with that part number. The website
will display with any such videos selected.
If you forget the above-described mouse/key action, don't worry.
It's another of the tricks that's described in the contextual
"cheat-sheet:"
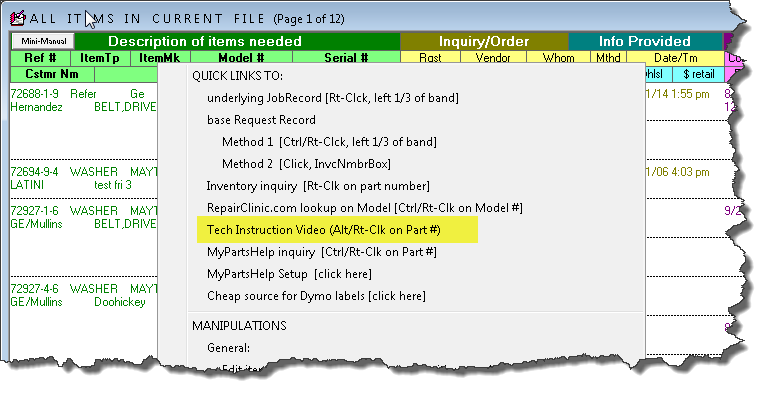
As in the case of other contextual cheat-sheets, it's accessed by
right-clicking in any otherwise non-operative portion of the form (e.g.,
for the F8 form it's easiest to right-click in the colorful label area
at top).
For information about how to use the new link from within SD-Mobile,
refer to the SD-Mobile
WorkDiary.
Auto-Grey-Toggling in PartsPick Form:
The PartsPick form (Ctrl-Shift/F8) was designed as an onscreen venue
where you easily see each item that needs moved to/from a tech, and
check-off such movements as have actually occurred.
It's a very powerful tool, and we designed with a philosophy engineered
toward enforcing conscientiousness in the user. In other
words, we did not want users to simply look at the surface of items for
which movement was expected, check-off whatever was moved, and ignore
everything else. We wanted to assure users stayed really on top of
the whole list of expectations, paying due attention to each and every
item.
To achieve this purpose, we made it so each item of expected movement
must be toggled in each session. Specifically, it must be toggled
to red (to indicate movement is indeed occurring) or to grey (to
indicate that item is being deliberately left as-is for the time-being).
Overall, that's a good purpose, but some users routinely were in a
situation where the system expected a large list of items back from the
tech, which they were deliberately leaving with the tech pending an
expected (but not yet scheduled) future appointment. It was rather
a nuisance to have to manually toggle-to-grey each of these items, each
time, before any other movements could be registered. So, we added
an option. It's referenced in the text when you click on the
"Record Movements" button, but without all items toggled as per
expectation. Historically, that click would produce a message that
simply told you you must toggle all items. Now, it adds a little
paragraph:
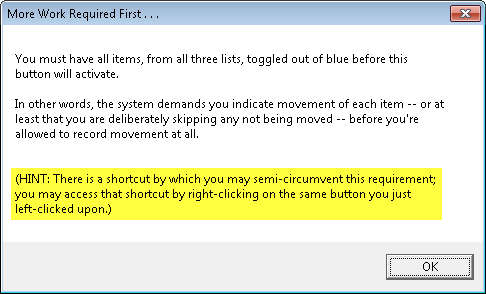
That added paragraph is there to guide you to the newly-added option.
Follow it's prescription, and you'll see this:
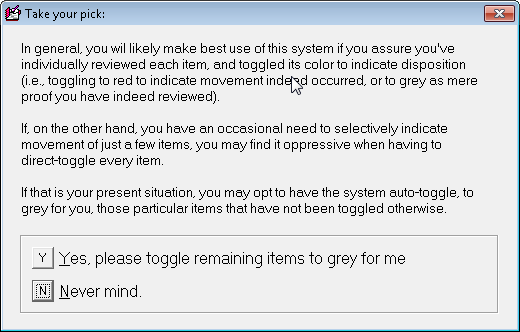
If you choose the first option, obviously, you'll get the result it
promises.
4.7.98 (1/16/15):
Upgraded SD-Mail:
I'll tell you a story.
When I first created the SD-Mail system, it was before regular internet
email had become the mainstream feature and practice it's now been for
the last . . . well . . . almost 20 years. I'd seen a movie in
which a within-business electronic mail system featured prominently
(1994's "Disclosure," with Michael Douglas and Demi Moore); I thought
the feature looked cool and useful, so I immediately wrote a similar one
into ServiceDesk. Though the feature was indeed cool, it was a
very short time later when regular internet email began to go very much
mainstream, and its capabilities were far more robust. Given this,
I assumed that any usage for my system would quickly go by the wayside,
as folks moved to usage of full internet email instead.
I was wrong.
It turns out, to this very day, most Rossware clients use SD-Mail like
crazy. And, since SD-Mobile was introduced (with inclusion of its
own tie-in to SD-Mail), they use it even more, for communication to and
from techs. I am gratified, for it's nice, when you've invested to
build a tool, to see that not only is it heartily used, but its usage
endures.
Regardless, over all these many years our simple SD-Mail system has
never been upgraded. Really, within ServiceDesk, it has persisted
in a state that's all but identical to my original creation. The
only real advance was extending it into SD-Mobile, and there's an
interesting twist on that. When I built SD-Mobile's own
SD-Mail interface, I made it far more modern and capable. Since
then, ServiceDesk itself has lagged far behind SD-Mobile in regard to
SD-Mail, and it was ServiceDesk that needed to catch up.
This release accomplishes that.
In fact, we've taken essentially the same SD-Mail interface as has prior
existed in SD-Mobile, and have now built the same into ServiceDesk.
It looks like this.
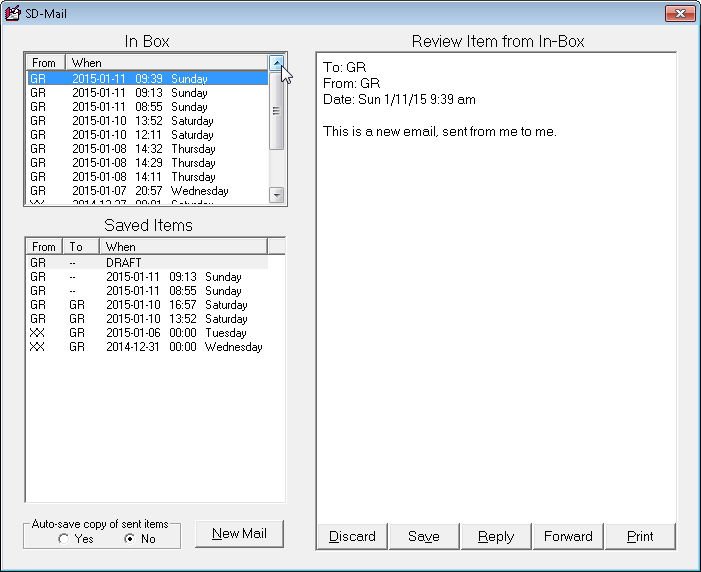
Likely, you will immediately see this interface looks much more modern
and capable. And it is. No longer are you limited to
seriatim (PgUp and PgDn) rotations among your 'In' items (instead you
can direct click to look at any item of interest, and in any order).
No longer must you choose between leaving an item in your 'In' box,
versus tossing it entirely (since there is now a 'Saved Items' folder
into which you can move it). No longer must you complete and send
an outgoing email before leaving your current session, else lose it and
have to begin again (since you can also save these, as drafts, to your
'Saved Items' folder). No longer must you manually type in your
Send-To targets (since you may now click from selections in a dropdown).
Regardless, you still have the option to type-in a target if that's your
preference (many of us keyboard-centric people prefer the speed that is
maintained when keeping our fingers on the keyboard); you can even tab
right back into the recipients box if making a list of multiple
recipients (i.e., type
G→R→Tab→D→S→Tab→A→M if sending a mail
to Glade Ross, Dave Somer and Art Manoogian).
Besides these user-interface improvements, there are a plethora of
others behind the scenes. For example, the entire and underlying
folder structure has been improved. Instead of each user's mails
sharing the same \sd\Email folder space, for example, each user now gets
his/her own folders, along with 'In' and 'Saved' subfolders too.
It's much better organization, and will produce improved operating
efficiency. Additionally, the email copies that are placed in the
\sd\OldMail folder will now on-their-face indicate sending and receiving
parties.
Overall, we think you are going to like this improved SD-Mail system
much better.
There is one caveat. It applies only if you're using SD-Mobile.
Because this system puts outgoing emails in a new subfolder (and in a
newly modernized format), it's important that you also assure your
SD-MobileLink program is updated to at least Ver. 2.0.25 (which right
now is the current release). This version is equipped to pull
outgoing mail items (as directed to your techs) from the new structure.
If you were to send SD-Mails from the new structure to your techs (and
if still using an older copy of SD-MobileLink), that older copy of
MobileLink would not be equipped to forward those SD-Mails onward to
your techs.
New Search Function in Inventory Control:
In the InventoryControl form there is a "View
Raw Data" option (F10→I→V).
When this option was made, it was not believed it would have much
operational use (the biggest reason we made it was so you can simply
see what the direct underlying data looks like). However, it
turns out some people are using it with some frequency, particularly
when wanting to manually edit spec tags. Given that, we have added
a search function there. To invoke it, use the conventional
Windows command for the purpose (Ctrl-F, the "F" is for Find).
New Accommodations for Spec Tags in Inventory Control:
When we first made spec tags, we thought they would be sort of a
light-weight, minimal-consequences feature. Honestly, it's how we
intended them. Turns out folks have wanted to make very robust and
extended use of them, and it's pushed us to continue to upgrade and
increase associated capabilities. This is another instance.
Actually, it's two others.
First, if you are looking to see what
quantity you possess of a particular stocking part (and in what
locations, F10→I→F),
it may be important to know that one or more of the indicated items are
presently tagged for other jobs. The system will now let you know.
Second, when you are wanting to order restock, it could be important to
know that one or more of the items that presently satisfy your minimums
are tagged, and so you may need to order restock where otherwise you
would not. Again, the system will now let you know.
Alternate Part Numbers Now Have Operational Significance:
For a very long time, our MasterPartsPlan (Ctrl-F11) has featured a
SupplementalInfo window. Click in the vertical green band just to
the right of any line-item, and its SupplementalInfo window will
display. Among other things, in this window, you can list up to
five alternate part numbers, for the primary listed item (these are in
addition to the two alternates that can be placed directly within the
line-item itself). The sad thing, all this time, has been these
five alternates have simply been present there for you to see and
review, but have not otherwise entered operationally into actual use.
This is now changed (and, actually, this change was shortly after the
last prior entry in this blog, the one just below).
Now, any alternates that you list are included in all the applicable
as-you-type drop-downs. So, say your main listing for an item is
ABCD, but you have a SupplementalInfo alternate for it listed as EFGH.
You can type either of the targets, see it in the dropdown, and select
either for identification of the part of interest. BTW, this same
enhancement extended into SD-Mobile as well.
4.7.89 (9/7/14):
You May Now Make "Fake" Technicians:
Since forever, ServiceDesk has allowed you to use "fake" serial numbers
in a UnitInfoSheet (though, of course, we use the somewhat more uppity
expression of "pseudo-number"). Since October of last year,
ServiceDesk has also allowed you to make "fake" appointments (see entry
in this blog accompanying Rel. 4.7.2) -- though again, for formality, we
use the expression "pseudo." Now we introduce a third "fake"
actor.
The genesis for this one came, actually, from the same shop that led us
toward the last one (Guinco in Fort Worth, TX). Jeff Guinn called
to explain how they are now finding it almost essential to specialize
each of their techs within particular areas of competence (laundry,
refrigeration, cooking appliances, etc.). The problem is they want
to keep most of their appointments unassigned until the day prior, but
it's important from within the DispatchMap to see which jobs (and how
many) fit into each competence category. For this reason, Jeff and
his team created some artificial technicians. In the Settings form
(Ctrl-F1), they created a tech called "Laundry," one called
"Refrigeration," and so on. In result, they obtained list areas in
the DispatchMap where each appointment could be temporarily assigned
(for the kind of competence it required), until the day prior, at which
point it would then be assigned to an actual/true tech. In other
words, they used the device of a "fake" technician to create a
semi-unassigned category: not assigned to any particular/actual tech,
but nevertheless assigned to the competence category.
Jeff reported that, though generally the scheme was working well, it had
some shortcomings. One of them was that ServiceDesk, not knowing
that "Laundry" and "Refrigeration" were not real techs, would within the
DispatchMap dutifully draw route-lines between each assigned
appointment. This made the DispatchMap look like an awful mess.
In many other places as well, treatment of the fake techs, as though
real, created issues. What was needed was some mechanism that
would allow these fakes to be treated more genuinely like the unassigned
category, within the DispatchMap, and not like a real tech otherwise.
So, we have now added a new technician property. If you go into
your Settings form (Ctrl-F1) and click on any tech listing, it
of course brings up the TechnicianProperties window as
applicable to that tech. Here is what it looks like now, with our
new addition:
If you actually check the new box, you'll see the system removes most of
the other settings options, because they cannot realistically be
applicable to other than a real tech:
(Please note that if, when selecting to make a tech fake, you have
already picked options that make no sense for a fake tech [such as to
indicate 'Using SDM', for example], the system will not undo those
settings [even though they become no longer visible]. To fix any
such situation, you should uncheck the fake-property box [so as to make
such settings again visible], fix the wrong settings, then check again.)
There are a few score of operations where ServiceDesk tallies through
your set of techs for a huge range of purposes. We have endeavored
to modify everyone of these so as to ignore techs as now designated
fake, except for the particular purpose where you may want them treated
as though real (specifically, where you are using as a device to make a
competence category, for temporarily assigning appointments, within the
DispatchMap). It's possible it will be discovered we missed one or
more such operations. If you discover this, please let us know.
New "Global" Part Number Search:
ServiceDesk tucks parts information into quite a few places. There
are important operational reasons for this, such as the fact
special-order parts are best managed via a system specifically tailored
to their purpose, while stocking parts are best managed via a system
differently tailored to their purpose. Regardless (and
as is true with any kind of machinery), to attain a gain in one
attribute of performance a price must paid elsewhere. In regard
to parts management in ServiceDesk, one such price is the fact, if you
happen to be interested in reviewing all of your company's dealings as
applicable to a particular part number, you might need to look in a
variety of places.
Let's suppose, for example, you are interested in seeing everything
your operation has had to do with part number 341241. It's
possible this part has been special-ordered one or more times. To
find any such events, you'd need to do a search in the current
PartsProcess area (F8-->M-->type-the-target-characters-->hit-Enter),
and do the same in the archived context (Ctrl-F8-->M-->type-the-target-characters-->-hit-Enter).
It's also possible 341241 is a stocking item, and, if so, you
might want see both what is your stock-movement history on it, plus
inquire as to what you have in stock presently, and where. To
separately determine these elements, you'd need to go your
InventoryControl form, and there do two different searches (F10-->U-->P-->type-the-target-characters-->hit
Enter for history of movements; and
F10-->I-->F-->type-the-target-characters-->hit Enter for current
stock at each location). It's possible, even, you'd want to
examine the anchor listing for this item in your MasterPartsPlan (Ctrl-F10-->S-->type-the-target-characters-->hit
Enter).
To be sure, we have long had contextual cross-links between some of
these venues, so that with an easy click from one you can instantly see
what another has to show in regard to the same part (if in the MasterPartsPlan, for example, a Ctrl-Right/Click will
direct-open the InventoryControl form's view of quantities for that
item at each location; and, vice versa, if in the InventoryControl form a
Ctrl-Click on an item will instantly open its anchor listing
from within the MasterPartsPlan). Regardless, there has been no
simple, "one-stop-shopping" method via which to instantly find
everything ServiceDesk has to tell you about all its dealings with
any particular part number.
Recently, a client (Ray from AAA Appliance in Plano, TX -- what is it
with these Texas guys?) all but
insisted we provide this, and it seemed like a reasonable idea.
The new feature is accessed from within the PartsCrossover form, via a
simple button (shortcut access is Shift-F8-->G). Here
is what the new button looks like:
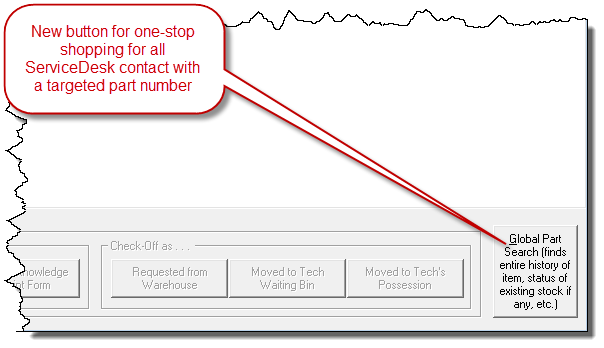
You may either use the shortcut above-descried, or click with your
mouse. Either way, a dialog box will ask for your search target.
You may type as much or as little of the part number of interest as you
wish. In response, the system will automatically open all relevant
searches for you, and display the results.
Optional/Added Part Numbers Now Have Operational Validity:
This is one we should have done a long time ago. We so much
should have done it long ago, it's quite embarrassing it has only
been done at this late date.
In the inventory system, each stocking line-item has an attached
Supplemental-Info form. In the MasterPartsPlan (Ctrl-F10), you can
display this form by clicking in the green band, just to the right
of each line-item. In the InventoryControl form (F10), a
simple click on most listings will display it. Within the form
there is a section for listing up to five alternate part numbers.
These are alternates that may potentially be used in addition to the
two, in-column alternates that can be created within the face of each
line-item (those base-level alternates are identified as IndustryNumber and OtherNumber).
Thus, you may store up to eight different part numbers, as connected
with a single line-item. But there has long been a difference
between the base-level alternates (only two) versus
the five Supplemental-Info alternates. The latter have not been included in any of the
as-you-type searches, and therefore have had
very limited usefulness.
That oversight is corrected with this release.
Now, when your system rebuilds the underlying index that enables
as-you-type identification of stocking line-items, it will include in
its index build all of the alternate numbers you have listed in
Supplemental-Info. So, when you go type any of those in a
contextually-applicable context (including your techs in SD-Mobile), you'll see references as needed:
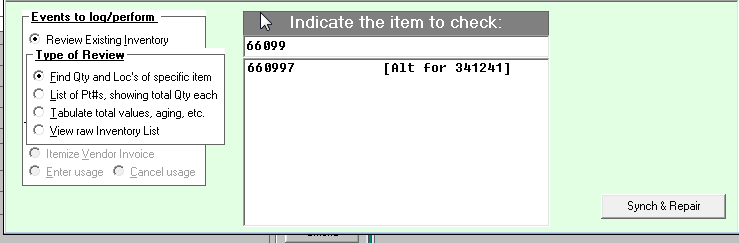
Picking an alternate reference will select the core, underlying
line-item, just as you'd otherwise expect. I am sorry we were not
quicker with this obviously-logical improvement.
Added User Fields Now Available for Customized CyberOffice Emails, and Two-New
Customizations Now Available:
In November of last year we added significantly to the set of
CyberOffice-connected emails where you may customize the text to more
perfectly fit your own particular preference, taste and circumstances (see
entry in this blog accompanying Rel. 4.7.63). Each of the
emails involved can use from among a particular set of fields, where
actual/particular text replaces a mere placeholder in the customized
text (e.g., "We are reminding you about your appointment scheduled for
[Appointment]."). In general, we made available to your customized
text only the particular and same fields as were used in our
canned/default text. It turns out, in some of these emails, some
of you wanted to use other fields. This release adds significantly
to the list of fields available in each of the potential customizations.
For details, please see pages 18 through 23 in the
CyberOffice Handbook.
Additionally, we have added
two new items, to the
list of auto-sent emails where you may customize the text, as opposed to
using our direct canned text. In fact, I believe with these two
additions all auto-sent emails are now subject to potential
customization.
The first item that is newly subject to potential customization is the
Survey-Invitation, as sent my SD-MobileLink. This particular email
is something of an oddity in that, while its functionality is indeed
part of the CyberOffice suite of services, it's in fact the MobileLink
program that does the actual sending. The reason is, mechanically,
it simply works out better that way.
The second item is an email that's also sent by the MobileLink program,
but it's actual Mobile function. It's sending of the e-ticket to
the customer.
Instructions on how to do the work for these newly-customizable items is
likewise found in the
CyberOffice Handbook, but on page 24. It may seem odd
that we've placed instructions there, for how to do customizations for
emails as sent by SD-MobileLink. We simply thought it would be
easiest for you if all auto-send email customization instructions were
in one place.
Incidentally, for these last two customizations to be possible, you must
update your copy of SD-MobileLink to at least Ver. 2.0.15 or above.
4.7.87 (8/3/14):
Twice as Many Zones May be Deployed (Now 60, as Opposed to 30):
Though it's a rare situation, a very few clients have wanted to divide
their territories into more than 30 zones (30 is the max quantity of
divisions that has prior been accommodated for). With this
release, you can now make up to 60 zones.
The change involves more than just restructuring elements within
ServiceDesk. Because they are involved in zone/availability
management with third parties, each of the DispatchLink utilities (SBDL,
SPDL and LGDL) also had to be updated with ability to manage the
increased quantity of zones. So did the SD-CyberLink utility, for
its uploading of availability information for your own customer's online
scheduling. Updates have been posted on all of these, in addition
to the update on ServiceDesk itself. It's important, if you choose
now to setup with more than 30 zones, that -- in addition to updating
ServiceDesk -- you also update any such utility you may be running.
As an incidental byproduct of updating all these utilities, each has
also been updated with internal wherewithal to inform the ServiceDesk's
new "Command View" of its running state (a feature announced in
the last-preceding-update entry).
Other DispatchLink Utility Improvements:
A couple of releases back, we added an option in SB-DispatchLink (SBDL)
that changes how holdbacks are calculated. For clarity, holdbacks
refer to the practice of withholding portions of your availability from
exposure to the third-parties these utilities link to. The general
idea is that, typically, you do not want third-party-administrators
and/or OEM-warranty clients to hog all your available capacity, and
thereby leave you with no room left for your own more profitable COD
work. So, the DispatchLink utilities have long had a couple of
parameters you can set to "hold-back" a percentage or quantity of slots
within each scheduling pocket. This holdback method was somewhat
blunt, so earlier this year we added a far more sophisticated method
(see entry below dated 1/7/14) that lets you far more finely specify
holdbacks -- in particular, as specific to individual zones and days of
week.
Anyhow, for either situation the holdbacks have been designed to apply
to the quantity of slots you had remaining for a given
scheduling pocket (i.e., allocation minus present burden), rather than
to the raw allocation. One of our users provided some good
arguments for why it would be better (at least for certain situations,
such as his) for the holdback specification to apply against raw
allocation instead. So, there's now an option in each of the
utilities to apply instead on that basis. For example, in SBDL it
looks like this:
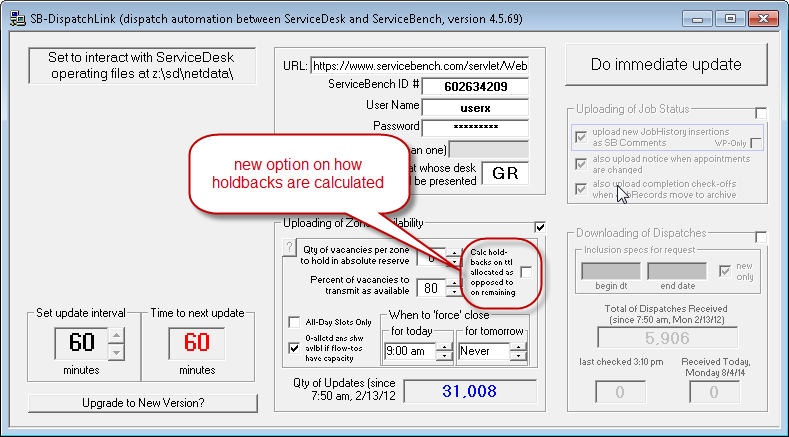
Other ZoneScheduler Improvements:
While overhauling our within-SD ZoneScheduler interface
(Shift-F5) to accommodate more zones, we made some incidental GUI
improvements. Most notably, if you have ServiceDesk itself
expanded when the ZoneScheduler form is opened, the ZoneScheduler
interface itself will expand to take advantage of the enlarged available
space. This may be particularly useful if you decide to setup with
a very-large quantity of zones such as is now available.
4.7.85 (6/20/14):
New "Command View" Offered from the About ServiceDesk form:
If your office has more than just one ServiceDesk station, you may find
yourself wanting to know (and perhaps monitor) what systems are turned
on and running at other stations. This is particularly true if
your office is running multiple utilities, such as SD-MobileLink and/or
SD-CyberLink, for example, or any of several others. Until now,
there has been no way to directly monitor this, except by checking
directly at other stations to see what is running there. Now we
have a method.
To use the new method, go to your About ServiceDesk form (it's
the first option under File Functions in the main menu, or a
handy keyboard shortcut is Shift/Ctrl-A). There, you can
simply move mousepointer over the textual area that indicates when the
Auto-Archive last ran:
In response, there will be an immediate pop-up, looking something like
this:
To put it another way, this method is similar to invoking a Windows
ToolTip (i.e., float your mousepointer over something), though this is a
more elaborate ToolTip than is typically the case.
As you can see, this one provides a ton of potential information
regarding what's running within your system, and where, and how
currently.
The current release of ServiceDesk is configured so that each instance
posts more information (regarding what is turned on and where), than
before, so as to make more such information available here (where posts
were done in older versions, the information as available to show you
will be more limited, as in the case above regarding the WipAlert
feature being turned on at the desk of Karie Spaet).
Also, each of the relevant utilities must be updated to do their own
postings of information, for showing in this report (in other words,
until and unless you are running a utility that has received this
updating, it will not do the posting that's needed for this report to
see its information). We will be updating each of these utilities,
for this purpose, within the next following few days.
New Option to Omit the Offer to Reschedule, within the Online
Confirm-Appointment Interface:
This one was driven by some servicers wanting to improve their metrics
as measured by certain third-parties, such as Whirlpool. Among
other measures of concern are days-between-dispatch-and-first
appointment, and days-between-dispatch-and-completion. The direct
matter of concern is, when you make it easy for a consumer to
reschedule, they tend to do so with more frequency than otherwise.
So, say on Monday you get a third-party dispatch that's scheduled for
two-days hence (i.e., Wednesday). If you in fact fulfill that
appointment on Wednesday, it will be fairly good for your metrics.
But suppose on Tuesday you use the SD/CyberOffice feature to email the
consumer a reminder, with request to click on hyperlink to confirm they
will be there on Wednesday. Your consumer gets the email, clicks
on the hyperlink, and sees this as the interface:
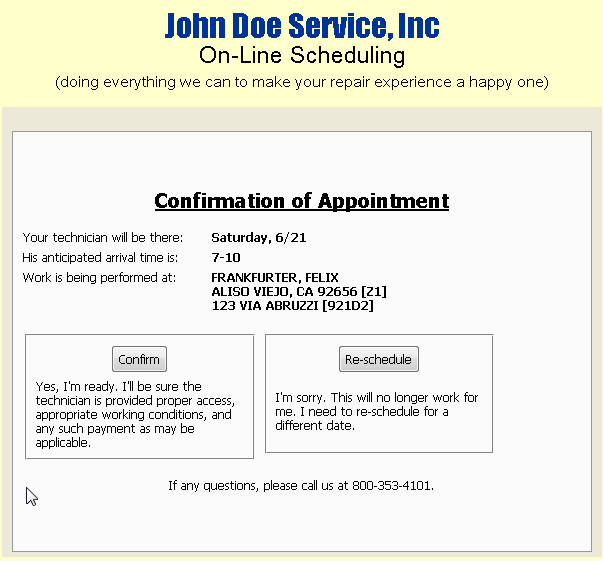
Your consumer sees the offered re-schedule button and thinks: "Ahhh,
maybe it would be more convenient to pick another date." So, he or
she clicks on the button, and picks a date two weeks out. Now,
because of that one incident, your metrics are caused to significantly
suffer (I was going to type "shot to hell," but we should not use that
kind of language in a professional blog).
So as to make this kind of scenario less likely, we were asked to make
an option to eliminate the reschedule button. We figured
most people will likely want to maintain the button for COD customers,
so we configured the new option, within Settings form, as
follows:
As you can see, you are basically allowed to have the Re-Schedule button
taken away for all your jobs as associated with High Volume Clients (aka
"HVCs," these are the parties for whom you have setup
QuickEntryTemplates, and for whom you have created two- or three-letter
HVC abbreviations within their templates).
If you wish to use this feature, just go to your Settings form
(Ctrl-F1), and invoke the sub-settings window for appointment reminders
by clickong on this button:
Then, check the indicated checkbox option (i.e., as illustrated two
items above). In result, the confirmations interface as seen by
your consumers (specifically, those where the paying party is setup as a
High Volume Client, and for all invitations as sent after you've made
this change) will look like this:
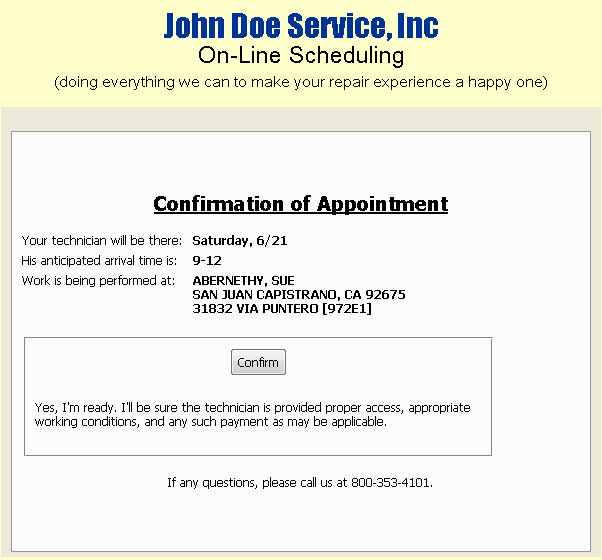
We hope you like it.
4.7.83 (5/12/14):
Pre-Screening Jobs: Improved Mode of Review and Check-Off:
It's not the same world it once was -- at least so far as concerns
appliance service (apologies are repeated here, for those of you who
work in other industries, for the fact our focus predominates on
appliance service). It used to be you could stock just a few
hundred parts on a truck, and it was sufficient to produce a high rate
of first-time completions. Not any more. Because
manufacturers now use so many specialized operative parts, the only way
to get a good first-time-completion rate is by advance-examining each
job -- before the tech goes out -- and seeking on such basis to advance
supply him with such parts as the symptoms suggest he may likely need.
Most service companies refer to this as "pre-screening." Borrowing
from the medical field, a few others refer to the process as "triage."
It was way back in '05 when we were first asked to add programming
elements into ServiceDesk to specifically accommodate triage. It
should be noted, in this regard, any need for special treatment of
actual parts, as involved in triage, relates solely to transfers
from inventory (i.e., pulling items from a storeroom shelf, for the
tech to take with him), as opposed to special-order parts.
For the latter (i.e., where you choose to special-order a part without
first having a tech's on-site diagnosis proving need), the standard
ordering mechanisms work just as perfectly as otherwise. For
pulling items from inventory, on the other hand (and specifically as
connected with triage), standard mechanisms do not work so well.
There are a few reasons:
-
Unlike special-order items, inventory items are not normally
(i.e., absent some special system otherwise) tagged to a job.
Thus, absent some new and added mechanism, there was no way to know
on the day of an appointment that the tech needed to be taking a
pre-screened-for-the-job inventory item with him.
-
Though the inventory system could nevertheless be used to simply
transfer a pre-screened item from office to the tech (i.e., so he'd
then have it with him when going), there was formerly no system to
flag, if the tech ended up not using the part, that it now needed to
be retrieved back from him.
-
Even the above assumes you can reliably predict which tech will be
fulfilling an appointment. This is often not true, and even if
you have fairly definite plans, they can change (say the intended
tech gets sick). This makes any advance transfer, of a
pre-screened-I-think-it-might-be needed part, problematic
regardless.
-
Another factor is you might end up needing a pre-transferred part
elsewhere (e.g., for an across-the-counter sale). It would
make better sense to have it still in the office and available for
such immediate use, as opposed to sitting in a tech's inventory
waiting the day of an appointment on which it might be
used.
Based on these factors, we created what we affectionately call
"Speculative Parts Tagging" (a sub-part of which has sometimes been
referred to as the "Anticipatory Parts Transfer"). The system was
primitive at first, but has been augmented many times since, so that
today it is reasonably robust.
At least, in and of itself, it has been pretty good. Where it has
lacked is regarding the larger environment in which it lives.
Specifically, we have not had any very good mechanism to
facilitate having a particular person in the office know which jobs are
due for pre-screening (i.e., just providing a simple on-screen venue in
which to easily iterate through those particular jobs), and to readily
distinguish those from ones that have been pre-screened.
It's a need that exists, indeed, whether your pre-screening results in
spec-tagging from inventory, or special-ordering items that were not
prior in inventory. Either way, a good context of selective review
makes excellent sense. In its absence, folks have improvised with
existing tools, though none have been been perfect for the purpose.
We have had sort of a tool (a poor one, but a tool
nonetheless). Introduced in 2010, this mechanism involved a
then-new check-off symbol in the DispatchMap (where every appointment
always has some particular check-off status). To indicate any
particular appointment has been pre-screened, we made it so you can
there toggle its check-off status to the CR symbol, as illustrated here:
For at least some, this provision allowed the DispatchMap's roster of
jobs to function as a workable pre-screening
(let-me-see-the-jobs-that-need-it, and
distinguish-from-those-that-do-not) venue. For most users,
however, it has not been ideal. As but one of its
shortcomings, it's really a job that needs to be pre-screened,
as opposed to the appointment for a job. There are many
others, but I'll not review them further except to say: I have described
this old triage environment for the sake of providing context for
introducing what's new. In a nutshell, the tool as just described
was formerly the only purpose-provided tool we had for this need.
Now, we have created something far better.
As mentioned, it is much more a job that needs pre-screened, rather any
particular appointment for a job. Hence, the ServiceDesk JobRecord
form (F7) now has a new control. In default mode, you'll see it
looks like this:
If you click on it, you'll get a dialog like this:
If you answer "Yes," the new control will change to look something like
this (with particulars as apt, of course, to the circumstance):

There will also be a notation, automatically added to the JobRecord's
narrative history, similar to this:
Thus, each JobRecord can now readily show on its face whether it's been
pre-screened (and, even more, by whom and when). And, it's
permanently in the history. This latter is important because, if
need should arise, you can also toggle a job back out of pre-screened
status (via method, dialog and results similar to as above-described,
though opposite in effect):
To clarify, this method is intended to supersede use of the
CR-symbol-check-off within the DispatchMap (at least as a mode for
providing an optimized venue for conducting the pre-screening process).
Even so, we have not removed those symbols from relevance in the
DispatchMap. In particular, when you make an appointment for any
job, its check-off status will automatically be set equal to whatever is
the pre-screened status of the underlying job. Additionally, when
you change the pre-screened status of a job, the system will reach out,
find any pending appointments as belong to that job, and change their
check-off statuses to match (assuming they have not advanced to any
check-off stage beyond the CR symbol, in which case they'll be left
unaltered). The general purpose is so you will continue to have
pre-screen check-off visibility within the DispatchMap, though
the real venue of operation has moved from there into, more
specifically, the JobRecord environment.
So, all this is pretty good, even excellent -- except something more is
needed.
What is that something more?
Very simply, you need a convenient and powerful venue from which to
review solely those JobRecords that have not yet been pre-screened.
You need this, to accommodate the process of doing the pre-screening on
those particular jobs. In other words, you need an optimized
triage venue.
With one added enhancement, our wonderful JobsPerusal form (Shift-F7)
now fits this bill perfectly.
Formerly, the bottom-right corner of the JobsPerusal form had these
exclusion options:
Now, there is a new one, as shown here:
So, there it is. All your pre-screen person must do is go to the
JobsPerusal form (again, Shift-F7), pick any other
inclusion-or-exclusion filters in which he or she is interested, then
"check" this new filter option. He will then be shown solely those
jobs on which the pre-screen process is still pending (assuming, of
course, he has prior checked-off all that have prior been pre-screened).
As he then goes through each such item in what is effectively a "needing-pre-screen"
queue, and does the needed work, he'll check-off each item, and thereby
gradually reduce the queue to none (and it will remain as none, of
course, until others in the office add new jobs into it).
Honestly, we think it's pretty ideal. We think you're going to
love it.
4.7.80 (4/14/14):
New Method for Managing Expectation for Above-1 JobCount Values on Upcoming
Appointments:
A job is in waiting status (perhaps waiting for parts to arrive, for the
customer to return from a vacation, or whatever else is the case).
You know that eventually you'll be making an appointment for the tech to
fulfill, and you know this new appointment must have some particular
JobCount value greater than 1
How do you assure that, when it's time to make the appointment, you
remember to insert this greater-than-1 JobCount?
Or,
imagine another scenario.
You had an appointment with a greater-than-1 JobCount, and for whatever
reason it was canceled. You know it's going to be re-scheduled.
How do you assure that the re-scheduled appointment gets the correct,
above-1 JobCount value?
Until this release, ServiceDesk has not had a truly magnificent system
to assist you with this. Now it does.
At its most basic, this new system depends on a specialized kind of
AttentionNote (most folks call these "sticky notes;" they are the
little-yellow electronic notes that can be added into a JobRecord).
For a long time, there's been another particular kind of AttentionNote,
called a "JobLink." The purpose of this kind is to associate jobs
one to another (see entry here accompanying Rel. 4.1.123).
Now we introduce a second kind of particular such note. What makes
both kinds "particular" is that, based on very specific internal text,
ServiceDesk knows to react in special ways, based on their presence.
Naturally, there was already a method by which to create the JobLink
specie of AttentionNote. To accommodate this new particular
specie, we have simply expanded on that method.
More specifically, in an F7 JobRecord form there has long been a button
on which you may click to create a standard (you-type-in-what-you-want)
kind of AttentionNote. There has also long been a slight variation
on this button. Since introduction of the JobLink
specialized kind of note, there has been the option to do a right-click
instead of a simple left-click on that button (or, if preferring
shortcut keys, the alternate command is Ctrl-E as opposed to the
standard, left-click-mimicking Alt-E). There is also a reminder
ToolTip for this variation, as you'll see by floating your mousepointer
over the button. Prior to this release, such mouse-pointer
floating would produce this:
Now, it instead produces this:
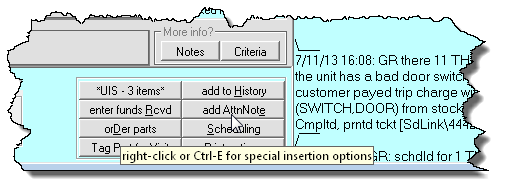
It's not a lot different, but as you can see the ToolTip now suggests
there will now be more options than just one, when you choose this
alternate method for invoking the button click. Indeed, the
right-click option would formerly have taken you directly to the dialog
to produce reciprocal JobLinks. Now, it will instead produce this:
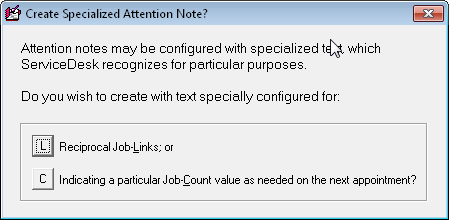
As you can see, it now produces a choice between the old (and formerly
only-offered) option, versus instead choosing the particular new option,
that we are now talking about.
When you choose that new option, you'll get a dialog like this:
And when you enter your desired-for-next-appointment JobCount value,
ServiceDesk will insert an AttentionNote to the JobRecord similar to
this (this is, specifically, the result you'd see if indicating the next
appointment should have a JobCount value equal to 3):
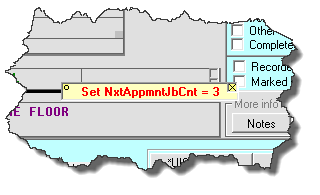
Now you may wonder, with that note there, does it simply provide you
with a reminder -- that you must personally pay attention to when making
the next appointment?
No, it's much more helpful than that.
When you go to create an appointment for any job, ServiceDesk will now
on its own accord look to see if any such AttentionNote (i.e., with text
precisely as per above, though the actual number can vary) exists.
If so, it says to itself: "Aha, this appointment should have a JobCount
value of X." Upon so concluding, ServiceDesk will auto-insert that
value for you, into the new appointment (of course, you remain free to
edit differently if desired). And, upon creation of that new
appointment, it also automatically deletes the AttentionNote for you
(it's done it's job, after all, and should no longer be needed).
That's the basic functionality -- though behind-the-scenes it gets a
little more complex for some situations.
To illustrate why, suppose your customer cancels an appointment that has
an other-than-1 JobCount value (something came up, and there's intent to
reschedule in the future). If this occurs, ServiceDesk will
behind-the-scenes automatically create a new, specialized AttentionNote
to assure the next appointment appropriately gets the same other-than-1
JobCount value as the one being canceled. At least, it will do
this for a normal cancelation. However, suppose you indicate that
the appointment you are deleting was simply an erroneous entry. In
that case, the system figures it better make sure of what's needed, and
presents you with a dialog like this:
Another somewhat tricky situation arises when you decide to change an
existing appointment, and if one of those specialized JobCount
AttentionNotes is present, and with a value that does not correspond
with what's in your being-edited appointment. How should the
system respond to this situation. Since it's unclear, it will
present you with another dialog, as follows:
If you are wondering, BTW, yes, this new functionality also works when
your customers self-schedule online (via SD-CyberOffice) for any return
visit. The SD-CyberLink utility will look for these same
specialized AttentionNotes, and upon seeing any will assign the needed
JobCount value to any relevant appointment as online-created (though you
must be updated to at least the now-current release of SD-CyberLink to
make this happen).
If you are further wondering, yes, this new power also translates into
interaction via SD-Mobile. More specifically, a particular section
in the tech's Mobile PVR page has been changed . . .
| From This . . . |
To This (new/added function highlighted): |
 |
 |
As you can see, there is now explicit provision for the tech to indicate
the JobCount value as needed for his next visit.
By way of distinction, this new facility applies, in particular, to the
situation where your tech is leaving it up to the office to schedule his
anticipated return -- as opposed to using other facilities that exist
within Mobile for doing his own direct-booking. This latter
situation has long been covered, so far as JobCounts are concerned, for
the facility that allows direct-booking lets the tech directly-specify a
desired JobCount for the appointment he is himself creating -- and that
count goes right in, directly, to the actual appointment that results.
It's only where he is leaving it up to the office, to re-book (and for
an appointment that will not yet exist), that a concern has existed.
And that is, of course, where this new facility (as above shown) comes
into play.
Where the tech uses this new facility to indicate any JobCount value
other than 1, SD-MobileLink will automatically create that new specie of
AttentionNote, within the applicable JobRecord, as it downloads and
processes the tech's PVR (concurrent releases of both SD-Mobile and
SD-MobileLink, or higher, are required to enable this added
functionality).
All in all, we think you'll love this new feature. We hope you'll
take advantage of it.
One more thing (and if you're wondering), yes, if it's to be operative,
the text as inserted to the AttentionNote must be in exactly
the form ServiceDesk creates it, when you use this option. If you
were to manually type exactly the same text, it would indeed work just
the same. However, if your text was even one character different,
it would not work the same.
Improved Prompting to Read About New Features:
We have two different online WorkDiaries: one for ServiceDesk and
another for the SD-Mobile system (we likely should have added
WorkDiaries to chronicle and explain new features in other products,
but, to date, there are only those two).
We very much want you to read the new entries in these, as you update
and have available the new features that are explained. It's been
somewhat tough to get most people to do this. Initially, we added
a little dialog in the update sequences that offered to open the
applicable diary for you (i.e., the one for ServiceDesk if that's what
you're updating, or the one for Mobile if you're updating either
SD-Mobile or SD-MobileLink). We found most people did not read
still, so we changed the dialogs. They no longer offered a choice,
and simply opened the diary pages for you (except with ServiceDesk you
could choose to do it before or after you downloaded the update).
This also proved to be not very effective. The applicable diary
would open, and most people simply ignored it. For many, it was
more a nuisance than a help.
So, enter Phase 3.
Now (and we really hope this is what makes a difference), you will not
be invited to open and read the online Diary unless, in fact, it
contains a new entry that's pertinent to the version you have updated
to. And, you will no longer be denied a choice. However, the
system will, once in each run session, continue to invite you to
read an applicable diary entry, until you consent to at least let it
open for you. Once you do this, it will not pester you again until
and unless there is, in fact, a new entry posted that you have not yet
opened to.
We hope this proves to be better.
Of course, if you were one of those that never responded by reading,
you'd not likely be seeing this posting either. c'est la vie!
4.7.79 (4/2/14):
Added Visibility for WP-Measured Average-Days-to-Completion:
For those of you doing Whirlpool work, we understand there's a recent
renewed emphasis on certain metrics -- one of them being the average of
days between dispatch and job completion. We have long given you a
number of insights into this.
For example, F11-->C-->Q
will produce a report (it's called the "Quality of Service" report)
that, for each high-volume-client (including WP-Warranty and/or
WP-Contract service, as applicable) will indicate several figures,
including quantity of days from first visit to completion (not quite the
same as from dispatch from completion, but useful nonetheless).
Similarly, F11-->C--P
will produce a report (called "Performance Metrics") that's specifically
tailored to, as near as possible, match several of Whirlpool's own
focused metrics, including separation between average days to completion
on jobs with-parts (and this is indeed from dispatch to completion),
versus average on jobs without-parts. But, it will only show such
indications based on specification of the underlying client, and not on
basis of whether it's a job (regardless of client, and regardless of
whether it was COD or not) that was dispatched to you by Whirlpool.
Still another relevant report can be navigated to via F11-->T-->M
(its called the "Percent of Completions" report). It's also an
excellent resource. Among other meaty morsels of info, it
indicates average number of days from first visit to completion.
Again this is different from average of days from dispatch to
completion, but (and, more seriously, so far as the desired metric is
concerned) the breakdown has divisions via techs, rather than via
dispatching entity.
So, though all the above provide a rich resource set, none was quite the
perfect fit some of you have desired. Based on this, we have now
augmented the "Checking Data" export as provided appurtenant to the last
above-described report (look for the "Export Check Data" button that
appears after the report displays). That export formerly had just
five data fields. It now has 13, including an indication of
whether each applicable job was dispatched to you by Whirlpool
(and regardless of whether it was COD or otherwise). If you run
the report then produce the export, we think you'll find the added
fields provide a great deal of raw data -- which you are free to
manipulate (this is rather easy in Excel) for whatever analytical
purposes as may suit you.
4.7.78 (3/18/14):
In-Process, Explicit Warning Re Applicable SSA:
The Special Situations Advisory (SSA) is designed to let you make a
unique record, as applicable to a particular customer or address, involving some
special situation as applicable to that customer or address (e.g., he's deadbeat,
do not perform service for this person). Whenever you are in a
Callsheet and type in a name, address, telephone number or email that
matches an applicable SSA item, you'll see references to
that item (along with other references in the CstmrDbase showing).
These will be distinguished by the fact there are # signs in the
line listing.
Until now, it's been up to the user to visually notice
such a listing, and volitionally click on it, to then review and take
into account whatever is disclosed in the item. The problem is, a
user might fail to notice, or may not bother to volitionally review.
There was desire for the software to more directly "force" the user to
notice. That's what this improvement is about.
When a user clicks to "Job/Sale" from a Callsheet, the
system now checks for either a name or address match in the list of SSA
items. If there is a match, the user gets a message similar to
this:
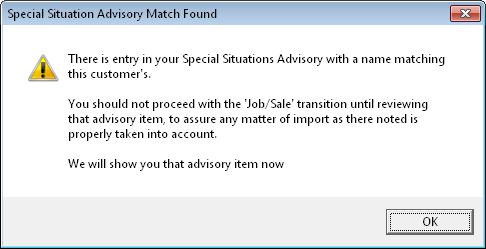
After being shown the SSA as applicable (and then closing it), they'll
then get this:
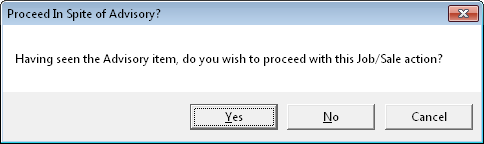
The action from that point forward, of course, is obvious.
Beefed-Up Multi-Tech PartsPick Export:
A while back we added an option to export from the PartsPick
form (Shift-Ctrl/F8) a summary of items needing moved for a particular
tech (see entry below for Rel. 4.7.47; we added a button in the form's
bottom-right corner). Thereafter another user wanted the ability
to do similarly, but for all techs, and via a single click for all.
For this (and though the addition was not then here announced), we added
a button to the form's bottom-left corner):
This new button was thus significantly powerful, but still left some
movements to be managed separately. Specifically, its output
accounted only the for the same items as directly managed via the
PartsPick form, which by nature deals with moving special-order parts
and spec-tagged inventory, but does not account for simple and standard
inventory restock.
That's what is addressed in this release.
Output from this button will now include not just what's shown to be
moved on the face of the PartsPick form. It will also include what
needs to be moved to the tech, by way of simple inventory restock.
More specifically, it will show what needs to be moved based on the
Items-Recently-Used method.
Additionally, when simple inventory restock is used from this venue, it
will do one better than when using the same method via the
InventoryControl form (F10). In that form, there is at
present no built-in mechanism by which the system remembers for you what
was the last time you ran the process (and which, therefore, should be
the "begin-date" for movements that trigger the next-new process).
Here in this context, the system explicitly remembers the last date and
time, and offers it as default for the current process.
4.7.71 (1/7/14):
Augmented Intelligence on Exposing Availability:
This is a big one.
It's one of the items that, from the page's inception,
has been in in our "Vote on Project Priorities" webpage (go to
my.rossware.net, and pick this
option to see votes and cast yours). It's the first project-item
from that list to be fulfilled (a few other big ones are pending
fulfillment very soon).
In a nutshell, this item/project involves the fact
that where you are exposing scheduling availability to third-parties
(e.g., to ServiceBench via the SBDL utility, to ServicePower via the
SPDL utility, etc.), there is a natural preference to "hold back"
some of your capacity for your own COD-scheduling purposes.
After all, it is much better to harness your techs' capacity doing
higher-paid COD work, as opposed to less profitable warranty and or
contract-service work.
Since the DispatchLink utilities were first built,
they have included an option to direct-specify how much availability you
wish to hold-back from exposure/offering, to the entities involved.
However, these settings have been relatively "stupid," in the sense that
whatever holdback value as is specified applies across-the-board, to all
zones, all time-segments and all dates. This across-the-board
holdback scheme has really failed to adequately address need. It's
not only because you might prefer different holdbacks for different
zones and/or different time-segments; even more seriously, scheduling
availability is a little bit like fruit: you grow more anxious to use it
up as its expiration grows nearer.
To state the above another way, if you're looking at a
date ten days out, you may estimate there's a good chance you will be
able to self-fill 60 percent of its capacity via your own-scheduled COD
jobs. Thus, for a date that distance out, you may want to holdback
60 percent of your availability, from exposure to third-parties.
But consider a date just five days out. If you have not by now
filled 60 percent of that date's capacity (and with your own jobs), you
may estimate it as less likely you will manage to do so, and may welcome
more jobs from third-parties to help fill the vacancies. Hence,
you might want to reduce your holdbacks to 40 percent. Now
consider a date just one day out (i.e., tomorrow). If tomorrow's
vacancies are not otherwise filled, you may welcome any jobs (even if
from third parties) that can manage to fully harness your resources.
So, for tomorrow, it's possible you will want to set your holdbacks at
zero.
The bottom-line is that, in the real world,
intelligence dictates reserving more for dates further out, and
reserving less for dates closer in (and likely according to some sliding
scale).
As mentioned, until now, our holdback schemes had no
basis via which to incorporate such intelligence. Now they do.
If you go to ServiceDesk's ZonePlanner interface (Shift-F5-->then
click on the "Show Planner" button), you will see it now has a
new settings section:
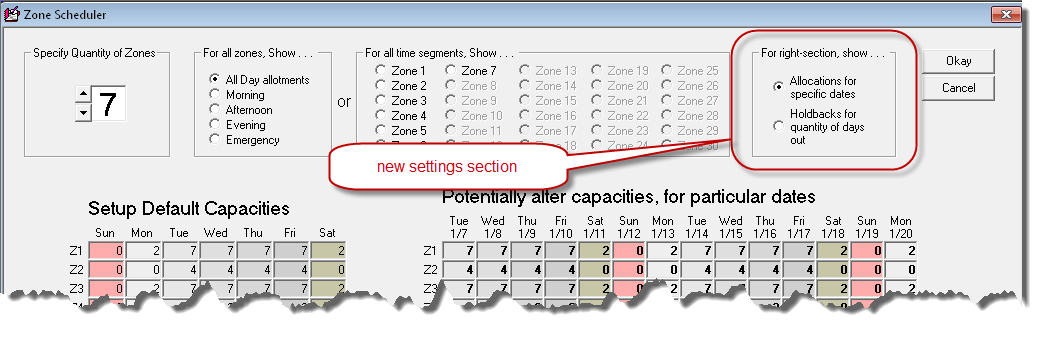
With the default/standard option selected there, the
interface shows and works just as it has historically. If you
select the second and new option, however, the area where you could
prior alter capacities for particular calendar dates changes from
something similar to this (varies somewhat depending on your setup):
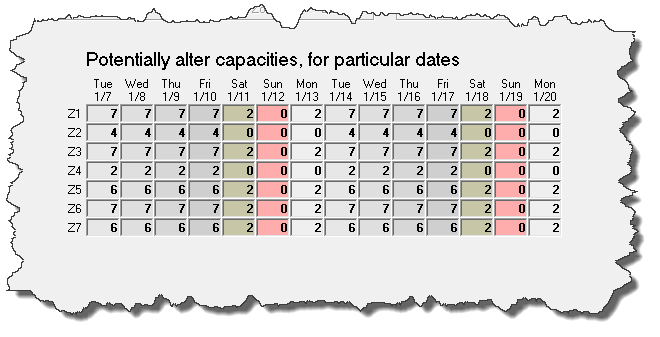
To this:
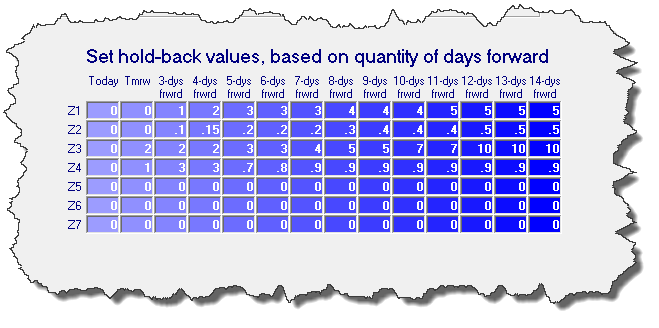
As you can see, it's setup to allow you to specify
holdback values individually, for each and every scheduling cell (i.e.,
zone-and-time-segment combination) -- and according to quantity of days
out, varying from today and stretching to two weeks distant. If
you float your mousepointer over, you'll see there are ToolTips to guide
you in more particulars.
Most specifically, if you place a whole-number
in any cell, the system will then holdback that discrete quantity
from your indicated capacity otherwise, specifically as concerns
any offering to applicable third-parties.
Example: Suppose in a given scheduling pocket
you have allocated a capacity of 10, and for the same pocket you
indicate a holdback (as applicable for the relevant quantity of days
out) of 3. It means, so far as offering pocket-relevant scheduling
slots to third-parties for that slot, the system will figure capacity is
7 (10 minus 3). Thus, if the actual burden scheduled is, say, just
5, the system will offer 2 slots available (7 minus 2). But if the
actual burden scheduled is 7 or more, it will offer 0 slots.
In the alternative to placing a whole-number in any
slot, you may instead place a decimal-fraction. A
decimal-fraction is any number that is greater than 0 but less than 1
(e.g., .2, .37, .9). It is a mathematically perfect way to dictate
a percent when applied mathematically (i.e., .2=20%, .37=37%, .9=90%).
Use this method if, instead of wanting to holdback a discrete quantity,
you instead wish to holdback a particular percent.
Example: Consider the same scheduling pocket as
above described. If we indicated a desired holdback of .3 (as
opposed to 3) exactly the same result would obtain, so long as capacity
was precisely 10 (.3 of 10 = 3). But what if capacity was instead
set at 12. A holdback of 3 (whole number method) would remain a
holdback of 3. A holdback of .3, however, would now result in
effectively holding back 4 (.3 times 12 = 3.6, which rounds to 4).
Depending on circumstances, you may find the
whole-number method more effective for your purpose, or the percent
method. Each is provided so you can choose whichever fits best.
At this moment, just one of the DispatchLink utilities
has been updated to use the values as may now be created via the the
above-described (and just-now augmented) SD interface. It's SBDL
(aka SB-DispatchLink). We will update others in the near future.
Within each such utility, the ability to use the old
(comparatively "stupid") method will persist, and control, until and
unless you create one or more non-zero settings within the new SD
interface. What happens, essentially, is the utility will look for
any non-zero values there. If it finds even one, it will say to
itself: "Aha, we're using the intelligent holdback method." Based
on this, it will change modes. Instead of using its own ("stupid")
settings, it will use what you have created in your SD-ZonePlanner
interface.
To make it appparent which basis it is using, SBDL
(Ver. 4.5.55 and forward; other utilities again to follow) will change
its interface slightly. Specifically, so long as you have checked
the option to upload availability, it will change the section where
you'd otherwise specify un-augmented/"stupid" holdbacks from within it,
from this:
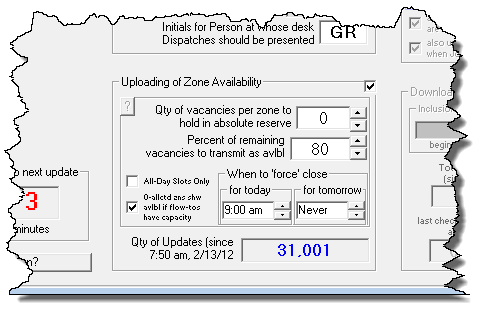
to this:
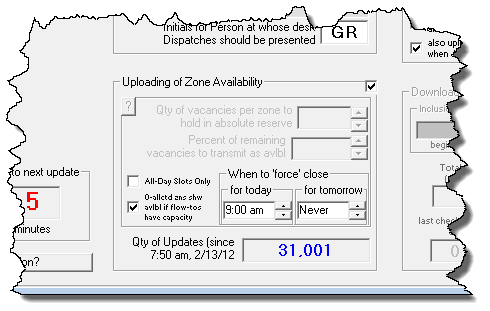
As you can see, the section is disabled and
semi-blanked -- so as to make it visually obvious it is having no
controlling effect. Again, you will not see this until (and
unless) you have specified one or more non-zero holdback values from
within SD (and unless you've updated to a utility that incorporates the
improvement; for SBDL it's Ver. 4.5.55 or above).
4.7.70 (1/2/14):
New Functionality Option in SB-DispatchLink Ver. 4.5.53):
This new option relates to Flowing-Pipes,
those instruments that allow unused capacity in one zone to be
accessible for use in another (for details see the
FlowingPipes-Handbook).
Potentially, these pipes can be confusing. They allow excess
burden in a "flow-from" zone to effectively move into the unused
capacity of a "flow-to" zone. What is potentially confusing is
that, as burden flows in one direction, capacity consequentially travels
in the opposite. The thing you must remember is that any such pipe
in itself points in the direction of burden flow. If you keep this
well in mind (and remember that capacity moves oppositely) you should be
in good shape to avoid the kind of confusion that easily results
otherwise.
Anyhow (and in regard to our new feature
option), it turns some of our users had found it useful to put all
capacity into one of more flow-to zones, and zero capacity in a
particular flow-from zone. Logically, they expected that the
capacity of the flow-to zones would effectively transfer back into the
flow-from zone. This indeed worked just fine so long as the
flow-from zone was setup with a capacity of at least 1. If setup
with 0, however, it did not work. It turns out the reason for this
is we'd coded in some logic governing the potential flows. It
essentially said: "If the user has specified zero capacity for this
zone, that indicates a definite no, and we should not allow any
effective flow of capacity back into it. But, for some users
pursing a particular strategy, that's not the logic they wanted.
Hence, this new option is now added:

As you can see, the descriptive text is tiny, so as to
fit within the space available. Unabbreviated, it reads:
"0-allocated zones show available if flow-tos
have capacity"
If you leave the option unchecked, the system will
behave the same as it has historically. If you check it, it will
allow any unused capacity from a flow-to zone to effectively fill-in to
flow-from zone, even if it's otherwise allocated as having zero
capacity.
Generalized Overhaul and Improvement in ZoneScheduler Form:
Often folks are anxious to verify that SB-DispatchLink
(and similar utilities, such SP-DispatchLink, LG-DispatchLink, and so
on) are uploading correct dispatch-availability info to the
third-parties involved. Generally, this can be done quite readily
by online review via the third-party's provided interface, to see what
availability values have resulted there, then comparing to what's shown
within SD's ZoneScheduler form (Shift-F5). With but minor
exception, this has worked quite well.
However, there have long been certain machinations,
with availability, which the DispatchLink utilities perform (along with
SD-CyberOffice, for the purpose of exposing scheduling availability to
your own direct customers), which SD's internal ZoneScheduler did not.
For example, the utilities have each long been
programmed to automatically do a burden flow between time-segments
within a given zone-and-date-pocket. To illustrate, suppose for a
given zone-and-date pocket you've allocated 5 slots for morning, 5 for
afternoon, and 10 for all-day. Suppose you've actually booked 9
for morning, 8 for afternoon, and 4 for all-day. Technically, you
are now overbooked for total capacity (9+8+4=21, which exceeds the
summed capacity of 20 as achieved by adding capacities of 5+5+10=20).
If a utility was to consider only the afternoon segment, it would
conclude you still have 6 all-day slots available, and would then upload
that. Obviously, it would not be a good result for you. To
prevent that, the utilities are coded to flow excess burden from one
time-segment (within any given zone-and-date pocket) into any unused
capacity of another.
Somewhat similarly (albeit with a somewhat opposite
result), imagine the same capacity setup as above described, but where
you've ended up with burdens of 13 all-day appointments, against 2 for
morning and 1 for afternoon. In that circumstance, you still have
overall capacity of 4 (20-minus(13+2+1)). If no behind-the-scenes
adjustment was made, this capacity would be offered exclusively in the
morning and afternoon categories (since you're already overbooked on
your all-day allocation). But that's not good. You'd rather
have folks choose all-day, if they are willing. Given this
preference, the system is coded to see where (in such scenario) you have
availability across the spectrum of time segments overall (even if not
for all-day specifically) and, in such a case, artificially notch up
all-day availability to 1, hoping that is the category a consumer will
select.
Anyhow, these kinds of machinations were not being
managed within SD's own Shift-5 ZoneScheduler form, and it sometimes
resulted in confusion when folks sought to reconcile what they were
seeing there with what they were seeing (and after an applicable utility
uploaded) via online review with an applicable third-party.
Particularly because we'd just added an option to accommodate further
machination on the utility side, we decided we should upgrade SD's
ZoneScheduler form so that it might with greater precision show what is
expected to be uploaded to third parties.
While we were at it, we made a plethora of other
improvements.
The upper-right-hand corner of the form has been
changed as follows:
| Old |
New |
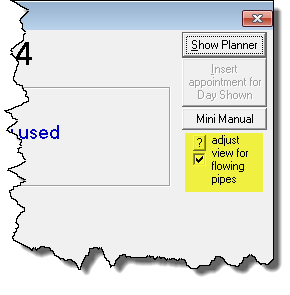 |
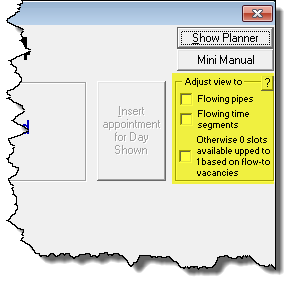 |
We have highlighted the changed area to focus on.
The general idea is, previously you could check the provided option and
see the graphs change to show the result of your own-created
zone-to-zone flowing pipes. Now you may check another option to
show the result of time-segment-to-time-segment flows (as
above-described), and/or a third option to see where exposed
availability will be notched up, in a scheduling pocket, based on
availability in associated pockets (again, see above for explanation).
You will also find if float your mousepointer over any of these areas, a
ToolTip will appear with further explanation. All of it is so you
can more particularly judge what is being exposed to others via various
online mechanisms.
In regard to such better-seeing, we have also added a
new row of numbers in the display, as here shown:
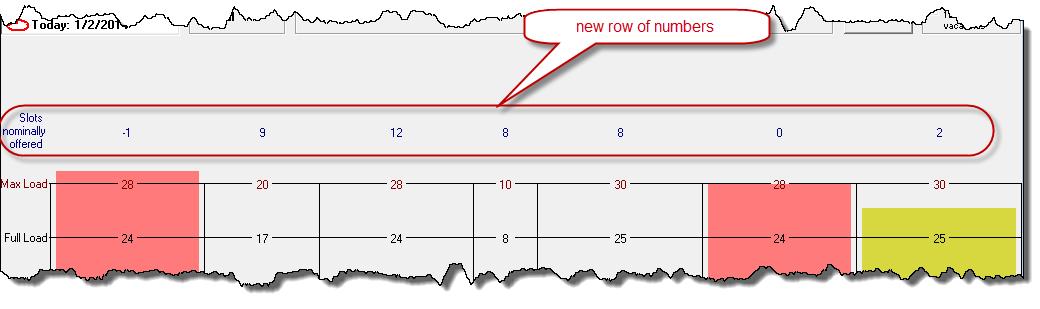
As you can see, this row does the math to indicate
remaining availability in each applicable pocket. More particular,
if you enable the options to allow the same internal machinations as the
DispatchLink utilities perform, this row of numbers should show the very
same values as are uploaded by those utilities (i.e., no more
confusion).
And there's more.
If you've setup one or more zone-to-zone flowing
pipes, do you ever struggle to remember (as you look at this
ZoneScheduler interface) which pipes you've setup, running from which
zone to which zone, and in what direction? We figured there should
be a graphic to assist you, in this regard. (In fact, we'd planned
to create it when this form was first envisioned and created back in
2002, but we never got around to creating it until now.)
Now (and finally), the pipes become graphically real.
I just now took a moment, and setup pipes from zone 1
to 2, from 5 to 3 and from 5 to 7. Then, I re-displayed my
ZoneScheduler form. Look at what it now displays:

See those new pipe graphics? Aren't they cool!
BTW, the overburden in Zone 1 (as seen immediately
above) shows as such because I did not have the option checked to
show the result of flowing-pipes. Look how it changes when I
check that option:

To be clear, that particular option-to-show-flow has
long existed. However, with benefit of the pipe-graphic, it is now
much more contextually obvious what is occurring, plus you have
immediate, visual verification if you have setup your FlowingPipes.txt
file as per end-result wanted.
One other matter is, where applicable, there will now
be an indication of whatever job-counts you have assigned to Zone-0
ShopJobs (for more details on the underlying method, see entry regarding
Rel. 4.5.68).
Aside from these very functional improvements, the
interface has been improved aesthetically. The colors are now much
more refined. The form more properly fills its space. There
is more vertical space above the "Max Load" line in which an overfilled
graph can fully display, before intruding beyond available space.
Overall, we think you'll find it to be a much more enjoyable interface
to use.
4.7.69 (12/26/13):
Fix for Duplicated Past Appointments:
In Ver. 4.7.67 I'd made an improvement to guard
against a just-discovered vulnerability that could, potentially, result
in an occasional loss of an appointment in an office that has multiple
users simultaneously working in appointments (such small,
behind-the-scenes improvements as that one are not generally announced
here; indeed, for every more noteworthy improvement as here announced
there are twenty or more that receive no official notice).
Anyway, it turned out there was a flaw in how that
improvement was made, and it resulted in appointments for past days (as
viewed when you PageUp in the DispatchMap) duplicating. In fact,
after each night's archive they'd duplicate again -- so, for a
date, say, five days ago, you'd end up showing five instances of each
appointment.
This release includes a procedure that will fix those
duplications. To run the procedure, open your DispatchMap, and on
your keyboard hit Shift-Ctrl-Alt/R (the "R"
is for "R"emove duplicates). Just follow the prompts, and the
procedure will fix your data.
Generalized
Print/Export from F8 PartsProcess Form:
The main concept for working within the F8 form is to
do work on-screen. Given this, the primary print or file-output
options we've had, there, have been as intended for provision to others
(e.g., when ordering parts and needing to provide order info to the
vendor). There has also been provision to print labels for parts.
And, if wanted, it has forever been true you can print what's presently
shown on the screen by using SD's universal "Print-what's-shown"
command, which is Ctrl-P. However,
there has been no provision for doing a complete output (whether to
printer or a file) of all items that fit within the presently-selected
display category. That is the option now added. It is
accessed via Alt-P, and shows as an option
in the contextual CheatSheet:
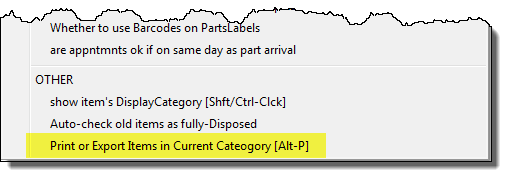
4.7.67 (12/5/13):
Added Option in the New "Warn-If-Expected-Part-Arrival-Is-Too-Late-For-Appointment"
Feature:
Sometimes I receive a nasty reward for having created
an awesome new feature. It is someone responding with: "Oh yeah,
we love that, but now you must make an option for us to do it
differently."
It happened with the new feature described just two
items below. In creating that feature, we assumed you need to be
receiving a part at least the day prior to appointment date. Turns
out this is not true for some operations. In particular, there are
some that have their parts vendor managing parts for them (indeed,
filing each tech's tote before a messenger delivers to the tech's
residence, on a daily basis). The ETA for any part that's put into
the F8 screen is the date they expect the vendor to be populating the
tech's tote with that part. So, for this situation, it's perfectly
fine if the date-of-arrival on the part is the same as the appointment
date.
Given the above, we now have a new Settings option in
the F8-form's Cheat-Sheet (right-click in any non-operative space of the
form to get its Cheat-Sheet), as follows:
| picking this Cheat-Sheet option |
produces this settings dialog |
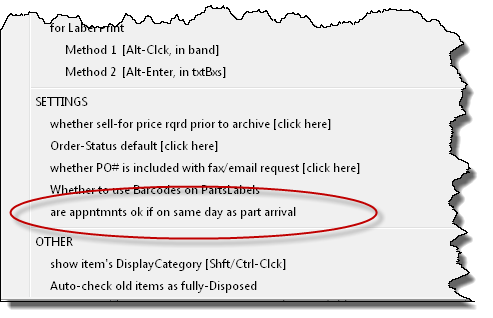 |
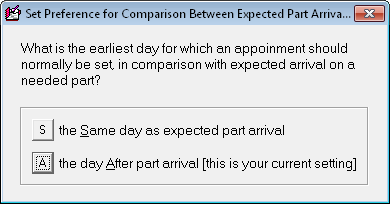 |
The result of this option setting is, we think,
self-explanatory. However, if not clear, it's this. With the second
setting (which is default) you'll be warned if an appointment is the same date
as ETA on the part, or sooner. With the first setting, you will only be
warned if appointment is sooner than the part's ETA.
For Serialized-Inventory and POS Operation, Improved Auto-Fill Link-to-SalesJournal
Entry:
If you use SD-Dealer for managing serialized inventory
(and SD's POS system to conduct sales of such inventory), you may have
lamented the fact that, when linking from there to make a sales journal
entry, the system did not separate your serialized-inventory sales into
the "Merchandise" category of sales. Instead, it would
place the value into the "Parts" category, along with any
other line items from the ticket. That is now corrected (turns out
it had formerly been coded to appropriately separate out merchandise,
but without us realizing it that element of functionality was broken
when we upgraded another matter, quite a long while back).
Improved Treatment of S.Call Categorization in Mobile FinishedForm, Including
its Auto-Fill Link-to-SalesJournal Entry:
When we designed the ticket format for use in
SD-Mobile, we strived for a layout that would be useable across a very
broad range of charge-structure preferences. This was needed
because, for the Mobile context, it is far less practical to provide a
structure that allows for infinite user customization of the ticket,
such as we do within ServiceDesk itself. One element, in
seeking to allow such breadth of use, is the ticket was not designed
with inclusion of a box labeled "Service Call." Instead, we made a
box labeled "Labor" and a box labeled "Other." We figured this
would allow a reasonable fit for both those companies that refrain from
charging a separate "Service-Call"-labeled fee, and for those that do
(where it can simply be placed in the "Other" field.
By and by, however, we had requests from folks who
wondered if we could program an option where, with a simple settings
change, that "Other" field could have it's label changed to say "S.
Call" instead. We assented and created the option.
It's in the MobileLink program, as shown here:
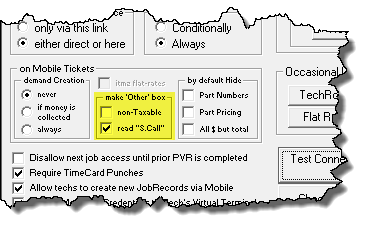
But, we only programmed to make the option effective
within SD-Mobile itself. Nothing was changed within ServiceDesk.
In consequence, SD's FinishedForm-context representation of the Mobile
ticket continued to show a "Labor" field and an "Other" field, even if
you checked the option above shown.
That is changed in this release (i.e., now SD's
FinishedForm-context representation of the Mobile ticket will comply
with the option you set above). There is another element of change
that is perhaps even more important.
When you link from the FinishedForm context to an
auto-filled sales journal entry, there must be a translation from which
boxes are filed-in on the particular FinishedForm you're linking from,
to which fields are populated in the sales journal entry. For
going from the Mobile ticket, we've had it programmed so that both
"Labor" and "Other" are summed together -- into the Labor category of
the sales journal entry line. The reason is because we did not
know whether "Other" was used as a service call, or for something else.
However, now that we are bringing into the
Mobile/FinishedForm context information about whether that "Other" field
is being used, explicitly, as ServiceCall field, we can so handle it.
Specifically, if you've picked that option, the system will now
translate that box into the sales journal entry's ServiceCall field,
just as you'd expect.
4.7.65 (11/26/13):
Automatic Warning on Whirlpool Core Returns:
In cooperation with Whirlpool, we are now keeping your
system up-to-date with a current list of all the parts that involve a
core charge. Interactions within ServiceDesk and SD-Mobile will
automatically warn when your work involves such a part. The only
thing you must to do activate this is consent when asked for permission
to install the list (this will occur for appliance servicers only; if
you are in another field of service, the prompt will not occur).
For Whirlpool warranty servicers, there is another
feature that works in conjunction with the above. If you are using
a part that Whirlpool would like to receive back as part of its Quality
Assurance program, you'll be prompted accordingly.
4.7.63 (11/18/13):
Better Management of Processes as Connected with Ordering Pre-Screened Parts,
Including a New CyberOffice Transaction Scenario:
More and more companies are pre-screening their jobs
to assure a likelihood the tech will have all needed parts with him on
the first trip. In many instances this means ordering parts before
ever going out. In some instances the appointment has already been
made, and you may find -- upon going to order a pre-screened part -- its arrival is
not expected until after the appointment date. To cope with this
dynamic means doing several things:
-
As you order each such part, you must look to see
if there is an appointment already pending, and, if so, whether the
expected arrival on the part squares well with that appointment date.
-
If the anticipated arrival on the part is not
sufficiently soon for the appointment, you must call the customer,
explain the situation, and ask to cancel the present appointment.
-
You must then actually do the appointment cancellation
within ServiceDesk.
-
You must reschedule for a new appointment date
(either at the time, or later when the part arrives).
Another factor arises from the fact that ServiceBench
is now often including pre-screen part suggestions in its dispatches.
The SBDL program places these into a Callsheet's ExtraNotes (which are
of course transferred to the resulting JobRecord), meaning (to take good
advantage):
-
You must make a special effort to be on the
lookout for these notes, and, upon finding them, you must make
significant effort to process accordingly.
We have done several things to
aid your work, in meeting these imperatives:
-
We have changed the F8 form's right-click on job
reference action. Formerly, this would quick-link to the
underlying Parts-Request record. It now instead direct-links
to parent JobRecord.

This is to make it much more
rapid and intuitive to see all the details as offered by the
underlying Job.
-
If there is a pending appointment for any job that
underlies an F8 PartsProcess item, a ToolTip will appear for that
item as you float your mousepointer over either it's left-most
reference area, or over the DateExpected area. The ToolTip's
color will be green if there is no apparent conflict between
the ExpectedDate and appointment date, or red if there is a conflict:
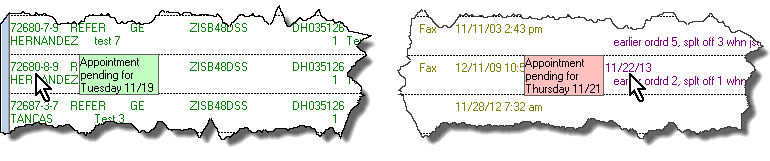
This is to make it so you don't even have to check the
underlying JobRecord, so as to know about pending appointments --
and so you have a more obvious visual reminder if in fact there's an
issue.
-
When you insert an expected date in an F8 item's
ExpectedDate box, the system will behind-the-scenes check to
see if there is a conflicting appointment. If it finds a
conflict, it will present you with the following
dialog box:
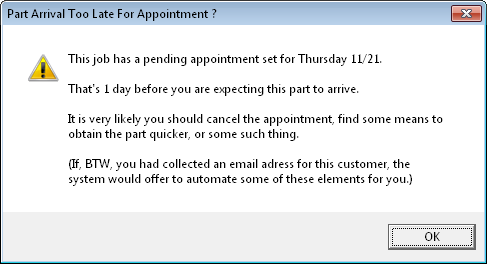
At least the above is what you'll see if the underlying JobRecord
has no email address for the customer. If it has one, you'll see this instead:

Either way, so long as you are appropriately populating that
ExpectedDate box, you don't have to be deliberately watching.
The system will volitionally inform you of a conflict between
expected part arrival and appointment, regardless.
-
In the latter case above (i.e., where the
JobRecord includes an email address for the customer), you'll notice
the first option offers to cancel the appointment for you, plus
email the customer with notice of the cancellation, and to include
within the email a hyperlink on which the customer is asked to
click, for the purpose of scheduling a new appointment (this one, of
course, needing to be after the expected arrival date of the part).
To do all of the above is as easy as picking that selection.
You need do no separate work to achieve the actual cancellation within
ServiceDesk (it's taken care of for you, and appropriately
documented within the JobRecord's narrative history, too). You
need do no separate work to inform the customer. Very likely,
you need do no separate work even to get the job re-scheduled, for the
customer will likely do it via the email-included hyperlink.
-
The feature as just described involves our new CyberOffice scenario
-- specifically, an invitation for
the customer to re-schedule a new appointment, via online interface, when the
existing one is cancelled. We're labeling this one
Scenario 12. It's pretty simple. When the customer
clicks on the email-provided hyperlink, it takes him or her to the
scheduling machinery as embedded within your website as part of the
CyberOffice system (for this transaction it is particularly
configured to refrain from offering any dates that precede the day
after you expect to have the part). When the new appointment is made, it plugs
automatically back into ServiceDesk, just as do other appointments.
-
As you can see, the second option in the above
dialog offers to do all that was just discussed, but does not
include a hyperlink to accommodate immediate re-scheduling by the
customer. If you are not yet using CyberOffice, you can fully
use this option regardless. Or, in some instances, you may
prefer to use it if you simply do not want to re-schedule until after
the part arrives.
-
Regarding pre-screen information that comes from
ServiceBench in an SBDL-inserted dispatch, ServiceDesk will now look
for such items when you do the Job/Sale transition from Callsheet to
JobRecord. If it sees such an item, it will present you with
this dialog:
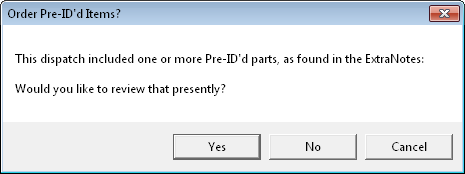
With your consent in this dialog, ServiceDesk then opens the
underlying ExtraNotes. As you can see here, when you float you
mousepointer over the portion that describes the "PRE-ID" item, a
ToolTip informs you of a wonderful new shortcut:
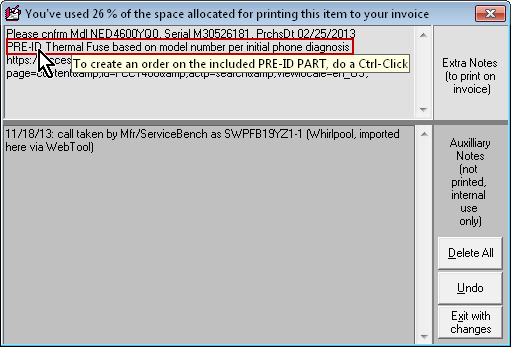
Just as the yellow ToolTip invites, you may do a simple Ctrl-Click
on the "PRE-ID" text. In response, the system will open a
PartsRequest-creation window for you, where you can then instantly
initiate the process. We feel this should make it so you no
longer need to engage in the deliberate effort to go looking for
these "PRE-ID" notes, and it facilitates more easily going from the
PRE-ID'd item to the actual order creation.
New Text-Customizations Available for CyberOffice Emails as Sent by
ServiceDesk:
The CyberOffice system incorporates a variety of
emails that are generated by either ServiceDesk or SD-Cyberlink to
automate (or in some instances semi-automate) communication with your
customers. In each instance, we have formulated text for these
emails that we judge as suitable for the purpose. Occasionally,
people want their text to be different, so we have long provided the
ability to setup for use of your own custom text in substitution for our
"pre-canned" variety. But, this customization ability has extended
only to some emails, not all. This release adds several to the
list of emails that may be customized.
Emails that have long been customizable include: (1)
acknowledgment of an initial order-request as sent by SD-CyberLink; (2)
acknowledgement of confirmations, as sent by SD-CyberLink; (3) request
to confirm appointment with provided hyperlink (so the customer can
confirm online), as sent by ServiceDesk; and (4) request to confirm
appointment by email reply or return call, as sent by ServiceDesk.
With this release we add to our "customizable" list
the following: (5) emails as sent by ServiceDesk to request initial
scheduling on a job (typically involved when service was ordered by a
third-party-payer) and with provided hyperlink (so the consumer can do
such scheduling online); (6) email as sent by ServiceDesk, as per above,
but without provided hyperlink (meaning the consumer must respond by
calling the office to schedule); (7) emails as sent by ServiceDesk to
inform parts have arrived, with hyperink-provided for the customer to
schedule a new appointment; and (8) emails as sent by ServiceDesk to
inform parts have arrived, but without a hyperlink (meaning the consumer
must respond by calling the office to schedule).
In addition to the above, the two new email scenarios
(as discussed in the section above) also have their emails setup as
customizable: (9) emails as sent by ServiceDesk to inform of appointment
cancellation, with request to reschedule via provided hyperlink; and
(10) emails as sent by ServiceDesk to inform of appointment
cancellation, with description of intent to re-contact for scheduling
after the parts arrive.
The CyberOffice Handbook has been updated to better
describe, overall, how to create and implement your own customized text
(it has very nice tables now, shows you the default text, etc.).
Besides that general improvement, if of course has details as needed for
each of the newly customizable contexts:
http://rossware.net/MiniManuals/CyberOfficeHandBook.pdf
To go directly to the topic, please see pages 18
through 23 of the above-referenced document.
"Hlpng"-Type Appointments are Now Appropriately Handled in the CyberOffice
Appointment-Confirmation System:
If you do not know what a "Hlpng"-type appointment is,
you should. They are for where you need to send one or more added
techs to the same appointment. The primary/lead tech should be
assigned the appointment as per normal. Any other tech that you
want to send simultaneously should also get an appointment, but with a
tiny twist. In place of the customer's name, you should place the
precise text "Hlpng" (an obvious abbreviation for the word "Helping").
Typically, you'll follow with a space and then a name or
abbreviation-for the tech who's lead on the appointment (as in "Hlpng
GR").
These "Hlpng"-type appointments have been a fixture in
ServiceDesk since virtually the beginning, and work great. Both
ServiceDesk and SD-Mobile know to treat appointments in an
appropriately-different fashion, when seeing that "Hlpng" expression in
lieu of the customer's name.
Recently, though, a user pointed out one place where
we'd not programmed to sensibly account for the difference. He
told me when a customer cancels an appointment via the CyberOffice
confirmation process, it's only the main appointment that's cancelled.
Any potentially-appurtenant "Hlpng" items remain un-cancelled. On
investigation, I found it was worse than that. ServiceDesk itself
was not screening to avoid extra confirmation requests when "Hlpng"-type
appointments were involved. In consequence, the customer could
receive a confirmation request on the main appointment, plus further
request for any "Hlpng"-type appointment add-ons.
And it wasn't merely an issue on cancellations.
Ideally, the consumer should be able to confirm or
reschedule on the main appointment only, and have any of those
actions transfer to all "Hlpng"-type appurtenant appointments
(i.e., it was not a concern solely within cancellations). This
likewise was not being done. Clearly, a fix was needed.
This release does all of that. ServiceDesk will
now refrain from sending confirmation requests on "Hlpng"-type
appointments. More than that, in conjunction with the main
appointment it will upload new data to the online CyberOffice data.
This new data will indicate the identity of any "Hlpng"-type
appointments as associated with the main one. With such data
present, the SD-CyberLink utility can now see what appointments are
appurtenant, and -- whatever action the user does on the main
appointment (whether confirming, cancelling or re-scheduling) -- it can
apply the same result to all (this requires an update to SD-CyberLink as
well, Ver. 4.5.33 and above will have this improvement).
Improved the DispatchMap's Automated Time-Frame-Insertion Function:
It's possible you don't know about this feature.
If it's your office's practice to leave many or most appointments at
"all-day" status until working out each tech's route the day before, and
if it's further your offices's practice to then convert appointments
from all-day to smaller time-frames (so the customer can be informed and
not have to plan on potentially waiting at home all day), this feature
is for you.
In a nutshell, with a simple action in the DispatchMap
(a Ctrl-Click on the tech's name at top of his list of jobs) this
feature inserts time-frames for you, using sensible logic according to
parameters you specify. It is very much easier and quicker than
doing it manually.
Until this release, however, there was a limitation.
The feature was designed with expectation it would be working with a
list of appointments that all began with all-day status.
Thus, if you had some in the list that were already specified for a
smaller time-frame, it would balk.
This release addresses that. Now, you may
optionally tell the system to simply bypass any appointments that
already have a time-frame.
Better Avoidance of Overbooking in SB-DispatchLink:
Several months back we added a feature in SBDL whereby
it optionally uploads appointment changes to ServiceBench. This
seems to have had an unintended consequence -- in particular, such
consequences would potentially arise if yours is an office that engages
in the every-afternoon ritual as above-described (i.e., changing
tomorrow's appointments from all-day to smaller time-frames as you get
the routes worked out). What was evidently happening is as
follows:
Say, around 3 or 4:00 in the afternoon, you assign
time-frames to a bunch of jobs that were formerly all-day. SBDL
dutifully uploads these changes. ServiceBench's machinery then
sees the changes, and, accordingly, changes its tally of which
availability category each was tallied against. They were tallied
against All-Days. Now they are tallied against either Morning or
afternoon. Until the next update cycle, this opens up vacancies
(formerly filled) in the All-Day category, and suddenly you get a rush
of new dispatches as pushed through that momentary opening.
Ver. 4.5.51 of SBDL (available for update now) patches
that vulnerability.
4.7.55 (9/4/13):
A Little Aid on Warranty Claims:
ServiceBench and other warranty processors all require
that electronically-submitted claims be configured to fit a particular
format, which each uniquely defines for their own exclusive purpose.
These formats specify a series of "fields." Each field is
essentially a "fill-in" space that expects a particular element of data
to be contained within it. Among such fields is one called "WarrantyType."
Historically, this field was used to indicate whether
the claim was for "Parts-Only," "Labor-Only," for "Parts
and Labor" or it was a claim made under "Special Authorization"
or a "Policy Adjust." In other words, this is a field
that, in general, refers to circumstances as indicated by the checkboxes
at top of the traditional NARDA form:

ServiceDesk has long been programmed to check the
appropriate box for you, based on how other boxes within the form are
populated (e.g., if you've indicated parts charges but none for labor,
and if there is no special autho number provided, it checks "Parts Only"
for you). It has further long been programmed to behind-the-scenes
translate, when formulating the actual claim string as needed for any
processor, to the particular WarrantyType-Code as fits the applicable
checkbox selection.
There was a day when the above was reasonably simple.
However, in the last few years it's become rather more complicated as
the variety of expected WarrantyType-Codes, and variation in selection
of Code as expected for circumstance, has proliferated. For
example, ServiceBench now requires added codes to report COD jobs in
some situations (varying still further depending on if its a
referral-program-initiated COD versus otherwise), a different set of
codes if the work was for Lowes, and a different set still if you are a
Canadian servicer, as opposed to U.S.
As each of these complications has come to light, we
have written added IQ into the portion of ServiceDesk that manages the
translation, in the effort to assure the needed WarrantyType-Code is
appropriately uploaded for each circumstance. Regardless, to make
it always right has become rather complex, and potentially difficult to
troubleshoot when a claim issue rises.
To assist in such situations, we decided a while back
it might be helpful to expose the actual WarrantyType-Code-character the
system was translating to (and would therefore upload as part of the
claim string) in each instance. Thus, we added a little box in the
NARDA's top-right corner, to so expose:
That box was also made editable -- so that, if you
know you need a different code than the system is naturally inserting
for you, there is opportunity for you to change to that different code.
The small enhancement that's made with this release
(yes, the above was indeed much explanation for a small enhancement) is
addition of a ToolTip, exposed when you float your mousepointer over the
little WarrantyType box:
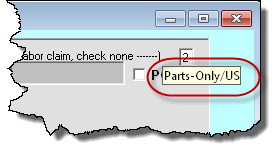
It tells you precisely what the code-table meaning is,
for the code-character that's been inserted for you.
And there's a more substantive improvement. We
discovered a change, that we'd prior added to make certain U.S.-based
claims code as COD when needed, was reacting in an over-broad manner,
and coding some non-COD, parts-only claims as COD (which resulted in
initial rejection and need for manual online correction). That is
corrected in this release.
4.7.54 (8/23/13):
Fully-Modernized Auto-Dialing:
If you have not prior enjoyed the pleasure of seeing,
on your computer screen, the telephone number of a person you wish to
dial, and finding you may initiate that dial-out with a simple click,
you have little idea how much you've missed.
It's one of those conveniences that, once you become
habituated and discover how nice, intuitive plus time-and-effort-saving
it is (not to mention how "right" it feels, like the kind of thing that
in a modern world you simply should be able to do) -- once
you've encountered all this, you'll find it's your feeling that strong
men would have to drag you kicking and screaming back to the cave-man
world, to ever again take you away from it.
Because this "small convenience" is nevertheless so
great, it's one that's been present in ServiceDesk virtually since its
inception.
However, this long-standing capacity was programmed,
in those early days, to use a technology that was prevalent in those
early days. Specifically, it was programmed to use a dial-up
modem. You may recall, back in the days before everyone had
broadband, if you wanted to connect your computer to the internet, it
was done by having it equipped with what was essentially its own
"telephone" (aka modem). A standard telephone cord would connect
from this item's port to a standard telephone jack. Your computer
would literally dial-up an internet provider, and that would be your
connection to the internet.
Our long-standing method for auto-dialing (which has
continued to work all these years for those implementing it, and,
indeed, works still) depends on this modem. Specifically, it makes
a call to that modem, telling it to go "off hook" (i.e., same as when
you lift the handset on a standard telephone) and dial the number of
interest. The idea is, once this dialing has been done, you then
pickup your normal handset and continue in normal fashion.
This system has worked, and worked very well, for
those implementing it. The problem is that implementation has not
been practical for many (or in many cases as useful as it might
potentially otherwise have been). There are a number of reasons:
-
Many offices have phone systems where the jacks as
provided to each station are other than standard phone-system jacks
(dial-up modems require standard phone-system jacks). In other
words, for many offices the jacks talk to some central and
proprietary box, and via some protocol other than standard
telephone-system language (aka POTS, stands for "plain old telephone
system").
-
Even where a POTS jack is available at each desk
(or even a particular desk where the feature is particularly
desired), it will in most cases be direct attached to a particular
POTS line. If that line happens to be otherwise busy when the
user wishes to auto-dial (perhaps in use by someone else in the
office), it means that same line is not then available for
auto-dialing purposes.
-
KSU and PBX based phone systems (which otherwise
use POTS lines for at least their connection out to the larger
world) may not detect when a particular, direct-modem-connected POTS
line has gone off-hook. This makes it less obvious when a
modem has completed the auto-dial and should be user picked up, or
that another user should not simultaneously pickup, etc.
-
VOIP/SIP based phone systems do not have POTS
lines underlying them at all. For these, there are no POTS
connections available for a modem to connect into at all (at least
absent installation of special-added hardware).
-
Today's computers are no longer standard-equipped
with dial-up modems -- meaning, if you wanted to use this old method
for auto-dialing, it's an add-on extra accessory you'd have to
acquire and attach to your computer.
The combination of these factors has made it more the
exception than the rule, where our users have taken advantage of
ServiceDesk's otherwise-wonderful auto-dial capability. We've long
wanted to address that, and with this release we finally have.
Our fully-modernized auto-dial feature allows you to
use TAPI.
What is TAPI?
It stands for "Telephone Applications Programming
Interface." It's a technology (or set of protocols, methods
and Windows capabilities) designed to facilitate communication between
applications running within Windows and any phone system that is
connected to and "talking" to your local network of computers (aka local
area network, or LAN). At least, it's designed to facilitate such
communication with virtually any such system.
What do I mean when saying "virtually any?"
Essentially, your phone system must be TAPI-compliant, meaning its
manufacturer designed it with ability to communicate and respond to
requests under TAPI standards. Almost all "systems" as
manufactured in the last ten to 15 years have in fact been so designed,
so if you have a "system," chances are very high it has this capability.
Notice I have also emphasized the word "system."
Why? If you have a set of multi-line phones that connect directly
to POTS lines (again, ordinary, direct to phone company connections), it
is not a "system" in the sense I mean it. At the least, a true
"system" puts some kind of proprietary box (often called a KSU or PBX)
between you and the phone company's standard set of incoming lines.
If you've made the transition to VOIP (likely using SIP as your local
protocol), your system does not connect to phone company at all (or at
least does not via standard POTS modalities). It may run off a
dedicated "black box" or via software in a PC. As long as it is so
centralized (i.e., something more than, say, a Magic Jack) it is
likewise a "system."
If you have any such a "system" (and if it's connected
or can be connected to your LAN) you can almost certainly use our new,
modernized auto-dial feature -- and easily, too. In most instances
(this will depend on your particular system) it will not even require
added hardware. It will certainly require no other connections to
the computers in your office (i.e., auto-dialing from each will work
through the standard network/Ethernet connection they already have
setup).
It is up to you and your telephone system provider to
first assure each station (at least each where you want this feature to
operate) is setup to properly TAPI-communicate with your phone system.
Once that is done, there is but one, very simple element of setup to be
done in ServiceDesk. Go to the Settings form (Ctrl-F1)
from each applicable station, and in the modem-setting box select "TAPI"
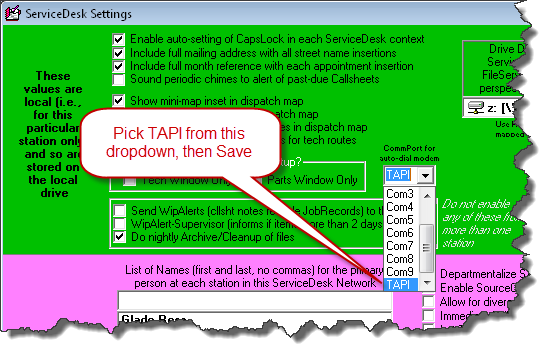
That's it. Really. It's no more complex
than that. Once you've done this, ServiceDesk is fully ready to do
TAPI-based auto-dials.
It can be done from virtually any SD location where
there is a box designated for a telephone number (e.g., Callsheets,
JobRecords, Rolodex, etc.). Generally, from such a box, you can
either right-click or double-click (for any who do not know,
"double-click" always refers to the left mouse button). It can
also be done (this is another new element with this release) from any
hyperlink-enabled box (e.g., the Description box in a Callsheet or
JobRecord, the History box in a JobRecord, etc.) if you double-click on
a telephone-number as otherwise free-form-text found within that box.
When you invoke any such auto-dial request, you'll
instantly see the auto-dial window:
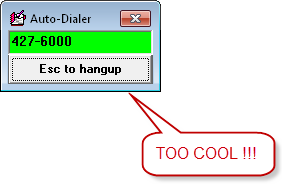
and, simultaneously, the TAPI request will go forth.
I suspect the exact following response may vary somewhat depending on
the particular phone systems. When I use the feature in our
office's VOIP/SIP system, my extension immediately rings, telling me to
pickup the handset or headset (or perhaps the speakerphone, as a third
alternative). When I do, the auto-dial window automatically
retires, and I find myself then on the line listening to the ring
confirmation of the completing call. It's like magic, and is
virtually immediate.
I wish I could shout very loudly my urge for you to
implement this ASAP. Assuming you have a phone system that is
compatible (or that can be made compatible), you'll find it is SO
WONDERFUL. It's the way the modern world should work. There
that telephone number is, in front of you and on the computer screen,
already existing in data form. Why in the heck should you have to
read that number with human eyeballs, translate through the wet matter
of your brain, think through the sequence of digits then manually punch
them onto a pad. That's stupid. The right, sensible and
modern way is to effortlessly click on the number, and it just dials.
It's how it should be, and how it will be once you assure the underlying
setup is in place for your phone system.
In regard to the setup work as needed for your phone
system (this is entirely outside ServiceDesk), there are three things
you must assure:
-
Your phone system must be connected to your LAN
(it's just a standard network-cord connection, like any other), and
must be ready to respond to TAPI requests.
-
Each station (at least each where you want the
feature to be operational) must have an appropriate TAPI-driver
installed in its Windows\System32 folder. This is sort of a
micro-app that directly manages communication between Windows and
your phone system. Much like a printer driver is particular to
a printer, this driver is particular to your phone system, and will
generally be obtained from your phone system provider.
-
The Windows "Phone and Modem" setup, at each such
station, must be configured to appropriately access the
above-described driver.
The above-described elements of setup are not part of
your ServiceDesk support. It is between you and your phone system
provider to assure they are properly secured. As an easy test to
assure you've obtained success, in this regard, we suggest you use the
built-in Windows Dialer. It's a phone-dialing utility
present in virtually all Windows versions (click on Start, Run and type
"Dialer"). If this utility connects to and dials out through your
phone system, it means you've setup correctly, and we can virtually
guarantee SD's auto-dialer will work with equal perfection.
Please understand if you cannot succeed with this
basic Windows test, it is with your phone system provider where you
should seek support, and not Rossware. If you can succeed with
this basic test, and still have trouble, then of course come to us.
So that you know, the first thing we'll do, if you come to us, is test
that Dialer. It it works with your phone system, yet you're having
an issue using the feature within ServiceDesk, it will definitely be our
problem to solve. If it does not work, we'll insist you go back to
your phone system provider for the needed assistance.
By the way, if you do not have a phone system (i.e.,
you're using one or more phones, multi-line or otherwise, that connect
directly to standard phone system jacks), we recommend auto-dialing just
as highly (you are simply in the category of folks that could have been
doing it rather easily all along). You can buy modems to add to
your computers at less than $15 a piece (just Google to find them).
Setup is easy. You'll love it.
4.7.50 (7/26/13):
Rolodex Export:
Ever want to take the ServiceDesk Rolodex (F4) with
you? There's a new button for the purpose:
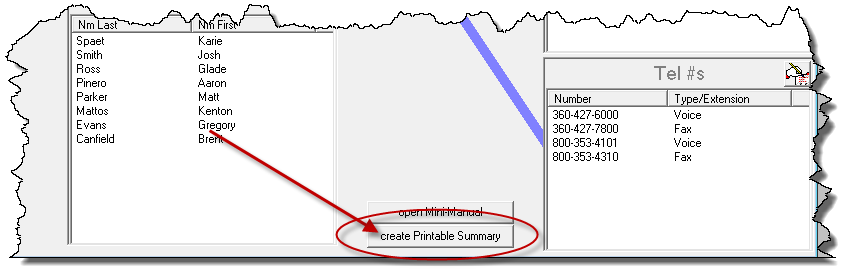
What it does is create a simple document that
summaries the data out of your Rolodex. It's essentially the same
document that is now, by default, made available to your techs using
SD-Mobile. If wanted, you can make an alternate, edited copy of
same for them. For details, see the SDM-WorkDiary.
4.7.49 (7/12/13):
"Discount" Button Added to POS:
This is an item that's been slow in coming -- in the
particular sense that a couple of users have been requesting it
for a very long time. To those users, I am sorry it took so long.
Anyhow, it's now here.
In any of the FinishedForm formats (Alt-F4),
a tiny new button will be visible in the box that totals the parts
boxes. From the POS form itself, for example:

If you wish to add a discount to your ticket, click on
the button. It will query as to the desired discount percent
(defaults the first time at ".15" for a 15 percent discount, and will
default all subsequent times to whatever you picked the prior time).
In response, the system will on the bottom parts-listing line insert a
discount line item, describing the discount and inserting its amount:
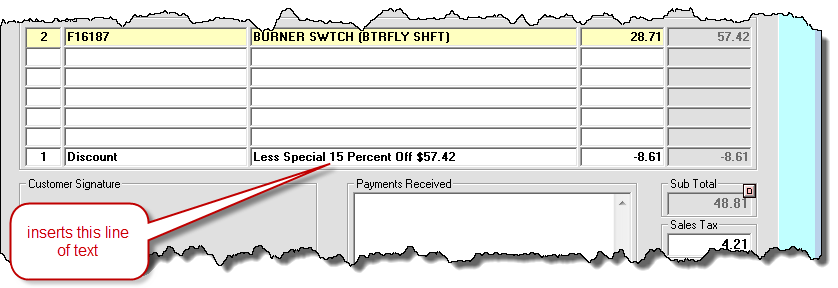
If you edit other parts-listing line items after
this insertion, the insertion will remain unaffected. This means,
if you want to update the insertion, you'll need to click on the
Discount button once again (essentially, it will re-calculate and
re-insert the discount, based on whatever is now the otherwise totaled
amount of parts-item listings). This item can also be removed
(just as can any other parts-item listing) by right-clicking on it.
Improved Insertion of Work-Performed in Finished-Forms:
Recently a user pointed out that, where ServiceDesk
reads in a JobRecord's history to assemble a description of the tech's
work and insert it into a FinishedForm (particularly and especially into
the NARDA, as needed for warranty claims), it was sometimes including
text that really was not needed (and in some instances very much not
wanted). Especially not wanted were recitations of money
collected.
Indeed, we've learned significant resources are in
some cases being expended by humans, to manually edit what it's fully
possible, instead, to code for machine editing.
This release provides such improved machine editing.
Any money-collected recitations, at the least, you should now find are
auto-removed for you. If you find there are other elements you
would similarly like to see better machine-edited, please let us know.
File-Export Option Added for PartsPick from DispatchMap:
Two releases back (see notes accompanying Rel.
4.7.47), we added a file-export option for PartsPick data as assembled
via the PartsPick (Shift-Ctrl/F8) form. This was
based on a direct client request.
Turns out, it was not the context where the
export was truly wanted. It was wanted, instead, in the much-older
context for assembling PartsPick data, which is one of the
"Send-To-Tech" options available from within the DispatchMap (F5, to get
this option in general, right-click on a tech's name, at the heading of
his list of jobs there). Grudgingly, we now offer the option in
this context too (both efforts involved a lot of coding work).
More specifically, it's offered when you use the
alternate "Send-To-Tech" method -- the one as provided to invoke a
"Send-To-Tech" option, but for all techs (i.e., as opposed to just one,
whose name you otherwise clicked on). This method is invoked from
the DispatchMap via the shortcut-sequence Alt-P-->D-->P.
At such point the PrinterSelect dialog comes up, and you simply need to
choose for the output to go to file, rather than the printer:

If you're curious, a major difference between the two
PartsPick contexts is the older one (from the DispatchMap) was designed
to simply to provide a list of what needs moved to the tech. It
provides no means to simultaneously tell the system what movements you
are (or are not) making. It also does not indicate items that need
to be received back from the tech. Overall, the much-newer
PartsPick form is far more powerful -- though each may have their
particular place, depending on your mode of operation.
Enhancements for Clients on RSS:
RSS is our acronym for Rossware Server Solutions.
It's the option where you can pay us to host a server for you, which
makes it easy for each of your office personnel to log into ServiceDesk
from any computer at any location. It's still a reasonably new
offering, and we are still learning to tweak things in its regard.
Until now, we have not tweaked elements directly in ServiceDesk.
Recently, we realized a need.
First (and as you may know), if you're not actively
running the SD-Backup program, ServiceDesk makes rather a pest of itself
in seeking to persuade you it ought to be done. This, and all the
pester elements we engineer, are done for your ultimate benefit -- based
on what we've seen users suffer, by not doing things they ought to.
Regardless, RSS users do not need to be running
SD-Backup. It's because the RSS system itself provides its own
very robust backup elements, so others are not needed. Thus, such
pestering in the RSS context made no sense. This release fixes
that.
Another little change is, when RSS clients now connect
for assistance, we'll be direct-alerted to the fact you're an RSS user.
This will, in many cases, help to better direct our efforts (there have
been cases, if you wish to know, where we're helping an RSS client with
some issue in SD; we conclude the problem is "in the environment," and
tell the user they need to take it up with their IT provider; oops, it's
us).
"Department-Assigned" Added to the "Jumbo" Parts Label:
This is one that will likely interest only a very few,
but if you have the need, you'll like it. If you use the
Departmentalization feature, and if you'd like the underlying-assigned
department to be listed on parts labels, it will now happen if you pick
the "Jumbo" style Dymo label.
Upgraded SP-DispatchLink (Ver. 4.3.54):
Over the
years, a great deal of sophistication had been added into SBDL (stands
for SB-DispatchLink; it's our integration utility for ServiceBench) --
in particular for how it figures uploading of availability.
Among
such elements is a function slightly akin to "flowing-pipes," but it
happens without any setup by the user, and is between day-segments
instead of between zones.
Example:
Suppose that for a given zone you have allotted 5 jobs for morning, 5 for
afternoon, and 5 for all-day. On a particular day, you've
scheduled 9 for morning, 8 for the afternoon, and zero for all-day.
Thus, you have 17 total total bookings against 15 allocations.
Obviously, you're overbooked. SBDL has long been smart enough
(just as is the "All" view from within the SD's ZonePlanner form) to see
such overbooking, and to refrain from offering availability for any
segment (even though, essentially, you have zero all-days booked against
allocation of five slots, meaning, looking at that segment alone, it
might appear you should have five slots open there). Essentially,
where one day-segment area is overbooked, SBDL "flows" that "overbookingness"
(nice word, eh?) into another segment area. This is but an
example. We've added a number of similarly-sensible IQ elements.
Until
this now-announced release of SPDL (stands for SP-Dispatchlink; it's our
SBDL-equivalent utility for ServicePower), the latter did not possess
this and a few similar elements of enhanced IQ. In other words,
SPDL would, for the described example, look simply at the fact you've
allocated five for all-day, you have zero scheduled for all-day, and
would therefore offer five all-days as currently open).
Why was such added IQ not formerly there?
These added IQ elements were
added into SBDL gradually over time, as (from experience) we realized
various needs. Until recently, nothing jogged our realization that
the same needed to be done in SPDL. Just about as soon as that
realization came (it was last week), we brought it up to par.
Why was there formerly nothing
to jog our realization?
Until recently, the online
availability review, at ServicePower, was knowingly erroneous, so far as
its ability to accurately reflect true availability values uploaded.
Because of this, there was no easy/direct way for users to verify if
values as uploaded were a good reflection of what they wanted uploaded,
and to inform us if otherwise.
Regardless of explanation, if
you are using SPDL, please update it at once. You'll have better
availability-upload results.
4.7.48 (6/27/13):
Added QuickPic-Viewing Accommodation:
Recently we were troubleshooting for some users where,
upon picking a QuickPic photo to view, the system indicates inability to
download the picture. This is evidently caused by security
elements in the user's system, which in some instances can be rather
challenging to overcome. Sometimes, when you come up against a
wall, it's better to go around, rather than to insist on going through.
Our solution in this instance is to offer an alternate
mode of viewing.
By default, SD's QuickPic viewer first downloads the
requested photo, then opens it in whatever installed application you
have designated, within your Windows setup, to open .jpg files
(typically this is some kind of photo-viewer app, such as Windows Photo
Viewer). But, as my dad used to say, there's more than one way to
skin a cat.
An alternate way to view most photos (including those
of jpeg variety) is, simply, within your web browser (e.g., Internet
Explorer, FireFox, Chrome, etc.). This is our method around the
wall.
If something in your system stops the default method
of QuickPic download (or if, perhaps, you simply prefer to view in your
web-browser as opposed to a picture viewer), you can change from the
default. The method is to simply right click within the
JobRecord's instance of the QuickPic button:

At which point you'll see a dialog that looks like
this.
Simply pick your preference, and your QuickPic photos
will be presented accordingly.
4.7.47 (6/23/13):
New Section in "Result-on-Dispatches" Report (Evaluate Performance of Office
Personnel):
In the past two or three years, we have had increasing
requests for reports to help managers evaluate the performance of office
personnel. It's an area we've been weak. There are a number
of exports you can do from the Alt-F3 form (and, on the basis of
information in those reports, do some of your own analysis). There
is also the CyberOffice Survey system, which does a truly superb job of
helping you evaluate how well your call-takers are doing, in terms of
making your customers feel splendidly delighted. But (and in
rather stark contrast to the plethora of tools we have to evaluate
technicians), we've not had a lot more to help you evaluate office
personnel in more concrete terms.
Paul Manning emailed a while back with a particular
concept. He said he's very fond of our Result-on-Dispatches Report
(F11-->T-->D), for the abundance of detailed information it provides.
He further explained he thinks some of his office persons may be
lagging, particularly when it comes to pre-screening jobs in the effort
to assure maximum probability of first-visit-completion. He suspects, but would like real-numbers confirmation
before he lets anyone go. He looked at how this report lays out
comparisons between techs (in regard to several measures regarding what
ultimately happens on dispatches) and wondered if there could not simply
be a similarly-included insertion for office personnel (on the basis,
specifically, of which particular office person performed the Job/Sale
transition on each particular job).
It seemed like a rather good idea, and so is completed
in this release. Here is a snippet of the now-current report, with
the newly inserted lines highlighted in yellow (they will be different
for your company, obviously showing a list of your personnel):
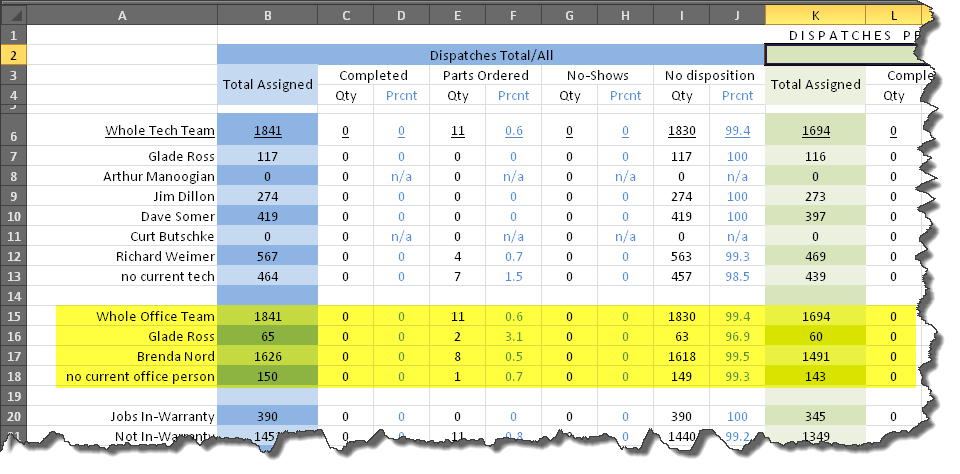
Please forgive the fact many of the actual numbers here do not show
well. I pulled from the old data from my old service company (from
way back in 2001). At such time ServiceDesk was not maintaining
all data elements in the same way it does now, by which reason this
particular showing suffers. Yours should not.
Finished-Forms Protection Against Typing Too Much Text to Fit In Printout:
Most of the forms, as available from within the FinishedForms
context (Alt-F4), include one or more scrollable text boxes. By nature,
these boxes allow you to put in many lines of text. Because of this, it's
possible a user might put in more lines than can fit within the allotted space
of the underlying form-format when printed (whereas, on-screen, it is no issue).
This release adds a feature to warn if your typed text infringes into this,
good-printout-threatened territory.
Specifically, where this situation occurs the system
will change the background color of the scrollable box to red, and a
ToolTip (little message that appears when you move your mouse over) will
appear as follows:

You remain free to type more or less text as desired.
It is not a club: just an aid to help you, when you're intending to
create an actual ticket image (whether "printed" to electronic format or
actual paper) as to whether there are two many lines to ultimately fit
in that context.
Option for File-Export from PartsPick Interface:
Many months back we added an option, via a simple
button, to physically print a summary of items as listed in the
PartsPick interface (Shift-Cntrl/F8). Recently, a client requested
ability to use essentially the same summary via an Excel or similar
file-based format. That option is now added. The old Print
button, which had looked simply like this:
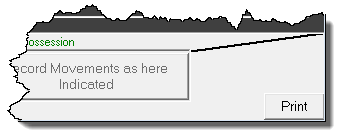
Now looks like this instead:
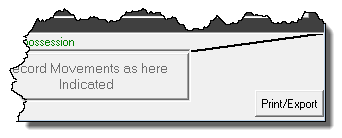
When you click on it, the Printer-Select dialog box newly offers the
option to Send-to-File. If you desire it, pick that option, and
follow the prompts. It's that simple.
4.7.46 (6/20/13):
Updated Method for Accessing QuickPics:
Overnight, last night, we re-configured the store-method for
the rapidly growing mass of files as connected with our SD-QuickPic system.
Based on how these files are now being differently stored, the method
ServiceDesk formerly used, for showing you the pics, had to be changed.
This release has the needed change. If at this point you try to open these pics,
but from an earlier version of ServiceDesk, you'll get nothing but a blank for the
picture. If doing the same via this release or forward, by contrast,
you'll get the same perfect result as always.
4.7.41 (5/27/13):
New "Panning" Shortcut for DispatchMap:
Each ServiceDesk client-business has a unique DispatchMap,
custom-created to fit its own service territory. Almost all are scaled
such that less than the entirety can fit within a single screen view. To
cope with this, the system allows you to "pan," moving the view-window to change
the portion of DispatchMap that is "exposed" at any moment.
Prior to this release, there were three methods to
pan. First is by using the arrow keys on your keyboard (aka
"cursor" keys). Secondly, you can move your mouse to near any edge
of the DispatchMap view screen, watch for the cursor to change to a move
symbol, then click (has the same result as punching the same-vector
arrow key on your keyboard). Thirdly, you can roll your mouse
scroll wheel (from virtually any on-map position) for vertical movement,
or move to the right or left edge and scroll/roll for horizontal
movement.
This release introduces a fourth method. For
those of you that have particularly large DispatchMaps (meaning many
panning steps are required to move across the entire expanse), this new
method will be particularly appreciated -- because it
allows you to skip over intervening pan positions,
and go directly to the position of interest.
This method uses the DispatchMap's Mini-Map Inset,
which you may or may not have enabled from the Settings form. If
you do not have it enabled, we suggest going to your Settings form, to
turn it on:
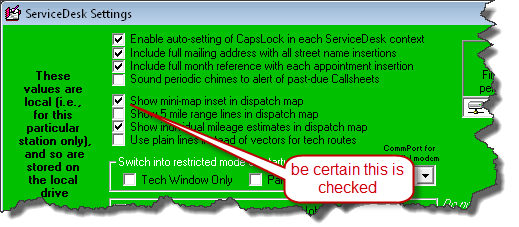
The actual method, in the new panning feature, is
simplicity itself. Just right-click within the Mini-Map at the
position you want your pan/view position moved to. Your view
position will move there instantly (and won't "pass Go" while on its
way):
If you did not know, by the way, you can move the
Mini-Map inset itself (also, the little job-burden pie-chart) anywhere
within the view screen you wish. Just drag with your mouse to move
it.
4.7.26 (3/15/13):
"Alarm-Clock Plus" Function to Assure Afternoon Send-Outs of
Appointment-Reminder/Confirmation-Requests:
Several people recently asked for this. They explained
how, whether based on emails, robo-calls or a combination, ServiceDesk's
afternoon send-outs of appointment-reminders for the next day (these include
requests for the customer to confirm) have become so very valuable -- with one
downside. It is sometimes they forget to initiate the process, with big
loss in benefit.
What was requested, essentially, is a reminder, within
ServiceDesk, providing a "kick," more or less, urging an operator to
initiate the process.
For context, we have not believed it is optimum for
initiation of the send-outs to be entirely automated (i.e., set to
automatically occur at a certain time each day, without user
involvement). It's because these reminder/requests should not go
out until such point in the day when you have the next day's
appointments rather fully worked out. The time at which this is
accomplished can vary. Thus (and as a matter of design), we've
thought it made most sense that it's regular practice, each afternoon,
that someone is responsible for finalizing the next-day's roster (at
least so much as is possible), then that person initiates the
reminder/request send-outs.
But, if users forget to do this, it's a problem.
This release presents our solution.
Our first task, in creating this solution, was to
create an interface where you can indicate how you want your
alarm/reminder system setup. Turns out we already had an interface
for setting other appointment-confirmation preferences. It was
introduced a bit more than a year ago (see notes accompanying Rel
4.5.58), and was accessed via selection from within the DispatchMap's
Cheat-Sheet:

While we could have made a new settings interface for
our new purpose, it seemed sensible to keep all such related settings
together, but with an important change. You may notice the above
explicitly notes its settings are "local" (i.e., particular to the
station where set). There had been no reason for this aside from
ease in programming. The new settings definitely needed to be
system-wide. For this reason, we have superseded the above with a
new interface. It incorporates the same three settings-options as
were above available (while making them system-wide rather than merely
local), and adds a much larger section for our new matter of concern.
This new interface is accessed from the Settings form (Ctrl-F1), via
button as shown here:
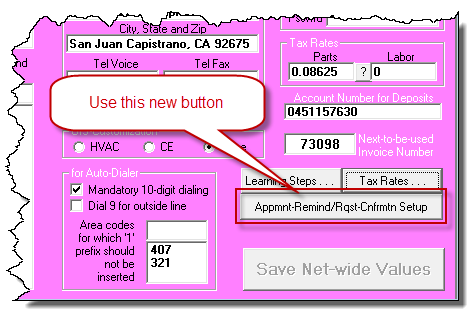
Here (with moderate annotation), is what the new
interface looks like:
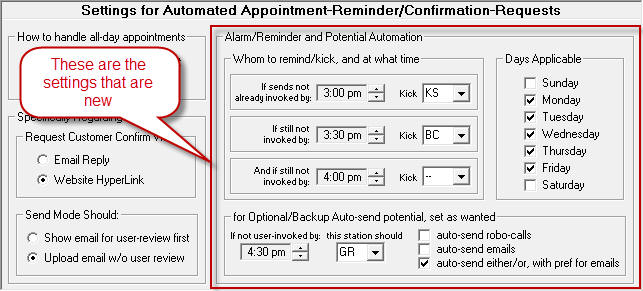
Please notice the old three settings preferences are
on the left (all that's truly new is on the right).
As you can see, the interface allows you to setup
successive reminders for up to three different persons. Part of
our logic is the first person might happen to be out of the office (or
maybe sleeping) on a given day. If so, the second person provides
a backup. Ditto between the second and third persons.
As you can also see, there is provision for even
further backup. You can set it so, if no human responds at all to
alarms as potentially setup for them (by, of course, manually initiating
the reminder/confirmation-request send-out), the system will indeed go
ahead, and automatically initiate the send-out, entirely on its own
(this is the setup that's done in that bottom area).
We suspect some users will be tempted to forego human
reminders, with choice to depend entirely on automated send-outs.
We'd be reluctant to take this choice, for a couple of reasons.
One is it's likely optimum to initiate send-outs just as early as you
are confident tomorrow's schedule is reasonably finalized. If
you're at that point earlier in an afternoon, it is beneficial to do it
at that earlier-in-the-afternoon point. At the same time, if
you're not yet reasonably finalized, it's better to wait until you are.
A trigger that's wholly timed and automated cannot produce this
flexibility.
We suspect others may choose to depend entirely on the
human reminders, leaving the machine-initiates option un-set. We'd
be more sympathetic with this choice. However, if the
machine-initiates option is set for a significantly-late time (at or
after office closing hours), we believe it is arguable that it's better
to have the reminder/requests go out even if automated (i.e., as opposed
to not going out at all.
If it is not clear from the interface, by the way, no
alarms will sound for anyone if, by the time set for that alarm (or for
the computer itself to initiate a send-out, if so set), a send-out has
already occurred. Thus (and to make it more clear), if person A
responds by initiating the send-out, persons B and C will not be
alarmed; nor will there be any automated initiation.
The actual alarm/reminder is via a box that will
appear on an applicable user's screen (dings several times as it
initiates), and looks like this:
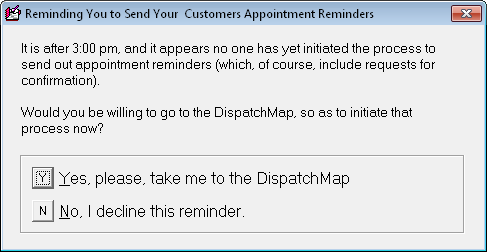
This alarm will appear on the designated desk for one
minute, then extinguish for one minute, then re-appear and repeat the
cycle. The cycle will continue until either the send-out process
initiates, or the day ends. It will not stop simply because a
second or third person's alarm period arrives (though if a second or
third person initiates the send-out, that will indeed stop it). If
you are wondering, you can set as many or few, among the available
alarms, as you wish.
You'll notice there is also a section where you can designate
the particular days of the week in which the alarm-potential will be operative.
There is a secondary effect in days selected. Suppose you have days set as
per the default/example. You also have the computer-initiate option set to
go, and on Friday no user initiates, leaving SD to initiate itself. After
initiating send-outs as applicable to Saturday's roster (which may or may not be
empty), SD notices Saturday is not checked for applicability of this new
assure-send-out feature. Based on this, it figures it better initiate for
Sunday as well, and so does so (likely no appointments for Sunday, so that may
have little effect). It then notices Sunday likewise is not checked for
applicability, and so self-initiates the the next day's roster, which of course
is Monday's. Thus we achieve the logically-desired consequence that an
auto-send as managed on Friday will actually send for appointments as scheduled
for Saturday, Sunday and Monday (assuming days setup as in the example; you
could setup otherwise if desired).
Please note the old settings preferences (those that
prior-existed, and have been moved to the left-hand side of this new
venue) will need to be reset here, if you desire other than the default
settings.
We hope you enjoy this new enhancement, and make it
profitable.
4.7.24 (3/3/13):
Survey-Limiter Option:
If you're not using the SD-CyberOffice Survey system,
you should be. Its power is awesome. The technician finishes a job
(as registered within SD-Mobile), and within moments the customer is sent an
email that expresses gratitude for the opportunity to be of service, and asks if
the customer would not mind completing a super-quick, four-question survey (it's
the "on-a-scale-from-one-to-ten,-pick-a-value" kind). The survey is
designed to give you enormous information on the basis of just those few
questions, plus provides an excellent opportunity for you to turn things around
on those rare occasions when your customer was less than happy (an optional
comments section also gives you a source for very useful and pleasing kudos).
Anyhow, among those who've implemented this survey
system (and, of course, love it), some have had a little issue. In
particular, it is those doing service for Whirlpool. The things
is, Whirlpool does its own surveying. When customers have already
been surveyed by you, then get surveyed by Whirlpool too (whose surveys
are not so blessedly short and quick), there is concern some degree of
annoyance might arise, causing your customer to report on the Whirlpool
survey less favorably than if they'd not already answered yours.
That's where this new option comes in.
In the ServiceDesk QuickEntriesTemplate
(Shift-F1, pick a client, then click on "Edit"), there is a new
checkbox:
There is one more thing. You'll need to update
to the current release of SD-MobileLink (Ver. 1.4.128). Even
though the survey system is a CyberOffice feature, it happens to be the
SD-MobileLink program that sends the email invitations (it's because
it's downloading of the tech's completion PVR, an SD-MobileLink
function, that triggers such sending). Prior versions of
SD-MobileLink are not programmed to look to see if, for any given
client, you have checked the above box in ServiceDesk, and to refrain
from sending the survey in circumstances thereby made applicable.
4.7.22 (2/26/13):
SD-QuickPic ! ! ! ! ! ! ! ! ! ! ! ! ! ! ! ! ! ! !:
Yeah, this one is pretty big.
We've introduced our first smartphone app.
It's designed to harness something smartphones do
particularly well: taking pictures, and forwarding them elsewhere via
the internet.
For background, for sometime there has been a large
and growing movement among servicers to have their techs photo-document
an array of matters connected with each job. First among such
elements is the model/serial plate on the machine being serviced.
We have heard of numerous instances where a manufacturer claims a
provided mod/ser combination is not valid, and rejects the claim.
A picture is then provided, and the argument ends. Another photo
purpose is to document that a machine and/or the floor on which it
stands were already subject to damage, before the tech began working.
There are other purposes as well.
Until now, companies that extensively use photos have
implemented somewhat clumsy methods to get the photos, as taken by each
tech, from the techs and into ServiceDesk. One method, for
example, is to have the techs upload their pics to photobucket (an
online sharing site). To make this work, the techs have to
manually flag each pic to indicate which job it's involved with, and
someone in the office has to go online, find all the new pics, download
each, then manually attach to their applicable jobs. It's a
significant amount of work. We figured we could eliminate all such
extra effort -- and facilitate more pictures as well, by making the
underlying processes much easier.
Enter SD-QuickPic, our new smartphone app.
For now, it's exclusive to the Android platform.
We plan, ASAP, to add for the IOS platform (Apple) as well.
Here's how it works:
The tech first needs to download the app from Google's
play store (same as downloading any other app into one's smartphone).
He can search on the phrase "sd-quickpic" and find the
app-download easily, or here's a
link. Then he needs to run it. Initially, there's a place for
him to put in his and your company's SD-Mobile credentials (same as
within SD-Mobile itself).
The app runs, and shows him a list of his jobs as
applicable to the present day. It also shows if there are prior
pictures associated with the underlying machine to be serviced (i.e.,
the connected UIS). If so, he can click on the reference to view
such prior pics.
If he wants to snap a new picture as connected to any
job, he simply taps that job's reference, then snaps the picture.
He can then type in a description, if wanted, and save/upload the
picture.
The pics are uploaded and maintained for you on our
array of servers. We've provided buttons in two places, within
ServiceDesk, via which you can access these pics. The first is
within the current-JobRecords form, which will provide a list of such
pics as connected with that particular job:
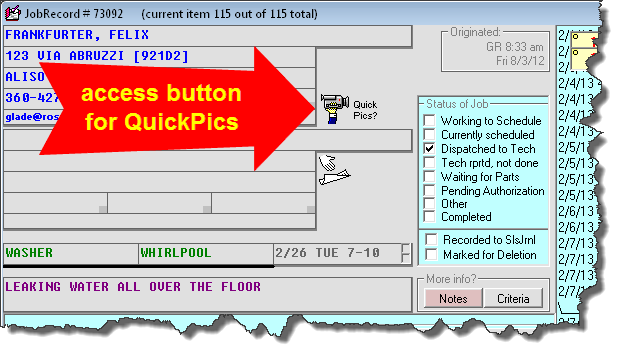
The second is in the UnitInfo form, and will provide a
list of pictures as applicable to this particular machine as represented
in the loaded UIS:
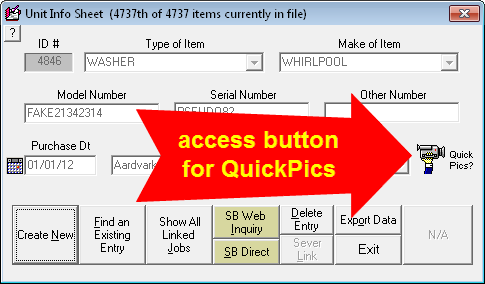
There is also a new release of SD-MobileLink now
available for download (Ver. 1.4.127). When creating the narrative
entry in the JobHistory that results from a tech's SD-Mobile-based PVR,
it will include a notation indicating if he added pictures during that
visit, and this will act as a hyperlink (if double-clicked upon) to the
particular pics he took on that visit.
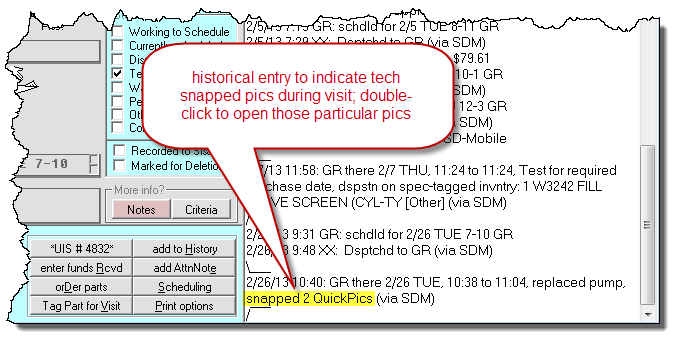
(Small caveat: this notation will arise only where
pics are snapped and uploaded before the PVR is downloaded by
SD-MobileLink).
We have been working toward this offering for
sometime, and are very excited to finally offer it. Naturally,
there is a fee. It is only 4 cents per pic uploaded. The app
itself is free.
One note: There is a bug in the latest Android release
that, on first, post-install run, fouls-up the step from picture-snap to upload.
If your tech encounters this, he should simply close and re-open the app.
It should solve the problem.
ADDENDUM: Since release earlier
today, we've discovered some instances of Android are encountering significant
operational faults. If your techs encounter this, please ask them to click
on the "Report" button. This sends information to our Android developer
that will assist him in troubleshooting.
4.7.20 (2/4/13):
Better Pricing from SmartParts data in Mobile -- Especially for Canadians:
Our SmartParts lookup system (as present within ServiceDesk
and as a stand-alone program) has long had a feature where you can load in
pricing that's particular to a specific participating parts vendor. We've
invited virtually all the vendors to participate, but to date only Reliable
Appliance Parts has done so. Thus (and, in present effect) you can load in
pricing specific to Reliable (this is opposed to the more generic pricing that
is otherwise offered).
This Reliable-pricing feature was enhanced more than a
year ago when we added an option to add in Reliable-specific pricing
for Canada, as opposed to the U.S.
Within SD-Mobile, we offer a selected portion of the
SmartParts lookup database. It's applicable when the tech is
typing a partnumber in either of the special-order boxes on the PVR
page. It has lacked the Reliable-specific option that exists in
ServiceDesk and in the stand-alone version of SmartParts. In other
words, it offers the generic underlying price-points only (to be very
clear; these are foundational prices, your own applicable markup scheme
has always been allowed, regardless, to vary therefrom).
A number of Canadian users, in particular, have wanted
to have Reliable/Canada-specific pricing in the Mobile context.
That (along with Reliable-US pricing, if optionally desired) is what is
now offered. Full details are in this day's post as made in the
SDM-WorkDiary.
4.7.19 (1/25/13):
Improved Verbiage in Confirmation Emails and RoboCalls:
Recently a user told us his customers, on receiving an
appointment confirmation request (whether by Email or RoboCall), were
sometimes uncertain whether the indicated time-frame referred to AM or
PM. For most indicated time-frames, the AM/PM context is obvious
(who could doubt, for example, that an expectation for the tech to be
there within the "12-3" time-frame refers to PM"). For some other
indicated times, however, there truly is ambiguity (what is more likely
the intent, for example, if the time-frame reference is "6-9"?).
We figured this should be addressed immediately, and
while we were at it decided to improve the involved language overall, as
relating to both the day-description and the time-frame description.
Our goal was to make both descriptions more conversational in tone.
Thus (and to provide some examples), time-frame descriptions have
changed to convey to your customer as follows:
|
Old
|
New
|
|
7-10
|
between 7:00 AM and 10:00 AM
|
|
9:30-12
|
between 9:30 AM and 12:00 NOON
|
|
11-2
|
between 11:00 AM and 2:00 PM
|
|
2:30
|
about 2:30 PM
|
|
2:00 AM
|
about 2:00 AM
|
You might note the system is using the same AM/PM assumptions
as used within SD itself, and if you want to override those assumption in your
time-frame indication (as you setup the appointment), you simply need to add an
explicit AM/PM designator, per standard practice.
Day-descriptions have also been changed for better
conversational tone and descriptiveness:
|
Old
|
New
|
|
Saturday, 1/26
|
Tomorrow, Saturday the 26th
|
|
Monday, 1/28
|
Monday the 28th
|
|
Friday, 2/1
|
Friday, February 1
|
Please note the old notations were particularly bad
for RoboCalling, for the voice-synthesizing engine would translate, for
example, "Saturday, 1/6" literally as "Saturday one slash six"
(in other words, this is precisely what your customer would hear).
It worked, but made for a somewhat less elegant user experience.
For the customer to instead hear "Tomorrow, Saturday the 26th"
is obviously much better.
Please also note we've built some IQ into the
language. The prefix "Tomorrow" is inserted if in fact the
involved date is tomorrow, but omitted otherwise. The month
reference is included if the appointment is in other than the current
month, but is omitted otherwise. We think, all-in-all, it should
make the interaction seem a bit more human-like, for your customer.
Some Fixes for Inclusion of Tech Picture:
Two entries back/below, you'll see where we added an
option to include the involved tech's picture in confirmation emails.
Pretty cool, but it turns out there were some circumstances where it was
not working as intended. Those flaws have been fixed with this
release.
4.7.17 (1/22/13):
An Alternate Look at Recalls:
For many years, we have offered two robust reports to
give you an extremely solid basis to measure the rate at which your
techs are doing work that results in recalls (F11-->T-->B). The
two use alternate methods, either of which may be optimum for your
circumstances, depending on your mode of work (please see pages 23 to 28
of our
ReportsHandbook for details).
By nature, these reports are designed to flag work
that was in some manner deficient, so as to result in a recall later on.
Because of this, the reports by necessity must be looking at work that
is at least some distance in the past (i.e., so as to have allowed time
for the subsequent, "hey,-it's-still-not-working-right"
requests to arise). If you try to measure this factor
without allowing for sufficient such intervening time, you simply do not
get a good measure. It's the nature of the beast, and given that
fact it is always impossible to have a good measure of
recall-avoiding performance that is very near to real time.
To re-state the point, that measure can only be assessed at a moment
where it's receded some distance (at least a couple of weeks) into the
past.
There is, however, another measure of potential
interest, and it's one Steve Blaisdell at Action Appliance called about
yesterday. It's to know, simply, how many jobs within a more
recent period (say last week) happened to be flagged as recalls.
The key difference in this interest is we are not seeking to measure
quality of earlier work (i.e., whether the earlier work led to recalls);
rather, we are seeking, simply, to know how much of our current work
happens to consist of the recalls themselves. To state it another
way; in the traditional reports we are seeking to measure the
blameworthy work, which later led to recalls. Steve wanted a
measure for the later, fix-it work itself.
Though it would certainly be possible to make a
dedicated report for this purpose, sometimes I can deliver a needed
result faster, via a lesser means. In this case I've added a new
field to the "Export Customer Data" form's "Scheduled-Jobs
Report Type-1" (Alt-F3-->1). In a nutshell, you can run that
export for the period of interest, then sort the result by the new field
(it's the last field, and is labeled "KeyWordDsgntdAsRecall?").
This will provide a quick count of the quantity of jobs within the
period that fall into such category, as compared to the quantity that do
not.
If there is sufficient demand for it, we can make a dedicated
report (to direct-provide these comparisons) at a later date.
Other Improvements:
As always (and as you can see by the Version-Number
changes) there have been many and miscellaneous other improvements, of a
nature that do not really require separate mention here.
4.7.14 (12/24/12):
Tech Pictures May Now be Included in Confirmation
Emails:
Have a look:
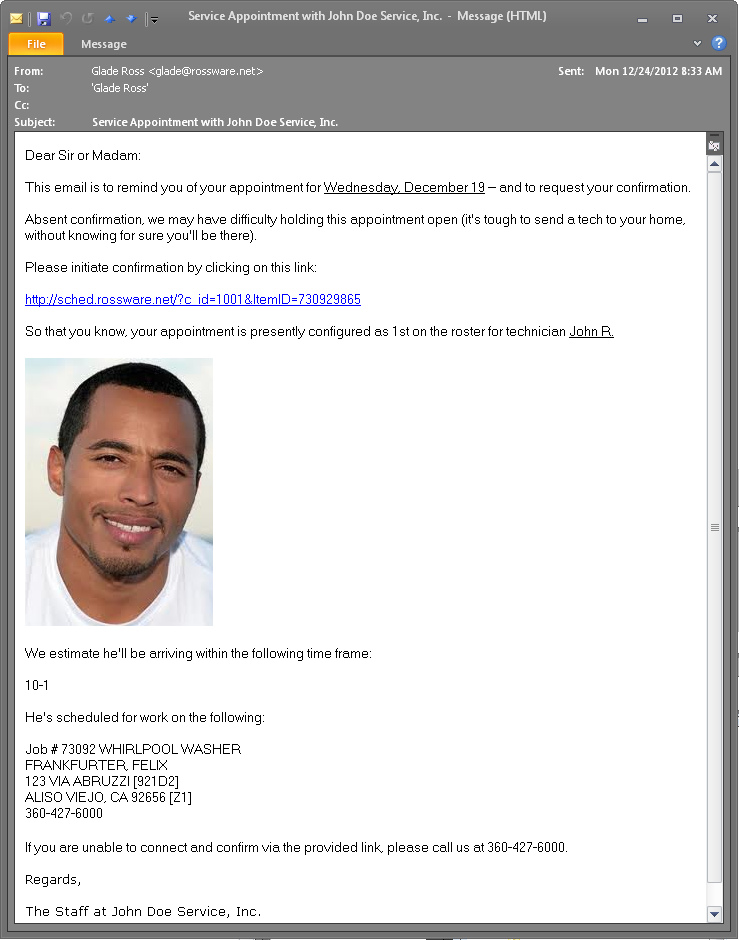
The concept is obvious. Your customers will feel
more comfortable (and even more impressed with how advanced and caring
your operation is) when you provide a picture of the tech you'll be
sending their way.
We have added a section in the
CyberOffice Handbook which details how to add these pictures (in
fact, we have done a massive updating and improvement in that handbook
overall). The section which details how to add pictures for your
confirmation emails begins at Page 19.
We must here provide one caveat to the instructions
you'll find in the handbook. It instructs you to use your
my.rosssware.net
login to post the desired pics. Turns out that particular element
in the my.rosssware.net
interface is not yet ready. However, there's an immediate way you can
upload your tech's pics. Just email each (with name format as
specified in the Handbook) to
techimages@rossware.net (please make sure it's only one pic per
email; if you place in more than one per email it will not work; also,
please assure for your filenames you follow the case-convention as
specified in the main instructions).
New "Post-Completion RoboCall" Feature in SD-CyberOffice:
Several users asked for a system to automatically make
RoboCalls to customers after the job is complete. There are a
few different ideas as to what kind of verbiage these RoboCalls might
encompass, but the major notion seems to involve something along the
following lines:
"This is a message from XYZ Appliance Service,
and we want to thank you for granting us the privilege to service your
machine. We hope everything went superbly, and, if not, that you
will please let us know so we can amend. Please also know that in
the next two or three weeks you will be contacted by Whirlpool to
fulfill a survey on their behalf. We hope you can view us
favorably at that time."
We've made the system so you can create your own
scripts for this purpose, and in fact employ different scripts depending
on whether it's a COD job, or any particular third-party payer.
You can also control the timing for when the calls go out.
Much as with our new tech-pics option for confirmation
emails, there is also a just-added instruction set, for this feature, in
our newly-revised
CyberOffice Handbook. Those instructions begin at Page 16.
As another parallel, this one too has a caveat regard
where the instructions tell you to use the my.rosssware.net
interface. For the time-being, you must contact our Josh and ask
him to add script blanks for you to there edit (soon the script blanks
will be provided automatically).
SD-CyberOffice-integrated Survey System:
This is one is really big. It's really
big.
While working to add documentation on the two new
CyberOffice features above-described, we discovered (to our horror) we'd
never made a general announcement on this awesome survey system, in
spite of the fact it's been operational for almost a year. So, here
is our belated announcement.
As intimated, this survey system is awesome!
The general concept is, after a tech completes a job,
the system sends a thank you that incidentally asks the customer to do a
very quick (it truly is very quick) online survey. The
survey is based on the NetPromotorScore method, which is nearly
magical in its ability to glean maximum useful information with minimal
intrusion of inquiry (just four, please-rate-on-a-scale-of-one-to-ten
questions). Tanner Andrews gets credit for leading us toward this
method.
Benefits in using this system are enormous. It
assures your customers you care. It informs you (and down
to the individual level) how well both your call-takers and techs are
doing in making customers happy. It gives you direct commentary
from your customers (besides the four questions, there's a comments
section where they may optionally type). In some instances,
for example, customers will have been so impressed as to write glowing
testimonials (which makes you feel good, and you can also use in ad
copy). In some they will have been disappointed,
and the notice as provided by their response provides an opportunity for
you to turn that disappointment around.
If you're not using, you have no idea what you're
missing. It really is stupendous. Start using it.
You'll be glad you did.
New Rossware-MySql-Server Checking, and
HyperLinks in ServiceDesk "About" Form:
Recently, as we've been working to upgrade
redundancies, performance and reliability in our system of co-located
servers (they provide data services for SD-CyberOffice and
SD-Mobile, and are also the foundation for our hosted websites and
hosted servers), we've encountered some outages. In part, these
have been transitional hiccups (working toward greater reliability, the
transitional state and essential learning curve have made for
temporary decreased reliability).
Aside from being frantic to fix ASAP when these events
have occurred, we've noted one of the main elements for stress (at least
among many users) has been uncertainty as to whether the problem is on
their end or ours. So (and regardless of the fact we strongly hope
to avoid any further outages), we've added a mechanism to make it easy
for you to tell.
Essentially, we are employing a second co-located
server, that is independent, outside and separate from our main bank
that's housed at a facility just a few miles from us (it's located prox
100 miles away in Portland). It continuously monitors our
main bank, and will independently report on whether there is an issue.
We've actually had this going for some time, so as to inform us if
there's a problem (it will wake us in the middle of the night if so).
Now we've made it so you can also access its information.
In the ServiceDesk "About" form (first
option under "File Functions" in the Main Menu), there's a new
hyperlink:
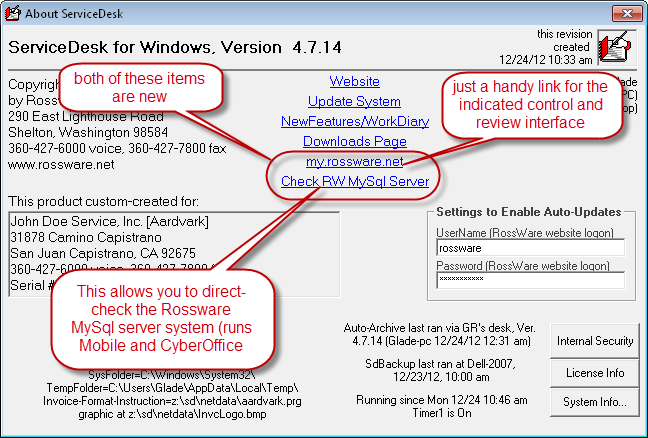
When you click on the new checking link, you'll get an
immediate report, such as the following:
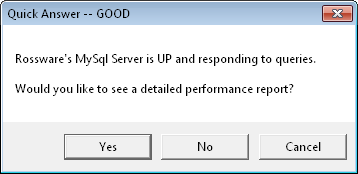
As you can see, it not only tells you the simple
status; it also asks if you'd like to view a detailed performance
report. It's an online analysis of our server performance (there's
no cheating there, really), and you will likely find it interesting.
In addition to allowing you to volitionally check, we
are now also employing this external-checking ability to modify the
reports that are given to you when connection problems occur.
Instead of the system simply telling you it's failing to talk to
Rossware's server (and maybe it's a problem there or maybe it's on your
end), it will first make a behind-the-scenes determination via that
external monitor. If this shows it's on the Rossware server end, it will
tell you so unambiguously. It will even distinguish for you if
it's a scheduled-maintenance down (these do happen from time to time),
or otherwise. If otherwise, it will further assure we are on the
matter, just as soon as we are (which generally will be within a very
few minutes of the occurrence, given systems that actively alert us).
These "Enhanced Notice" improvements are in this
release of ServiceDesk, and will be in the next releases of
SD-MobileLink and SD-CyberOffice.
Enhanced "Cloning" for Planned MasterPartsPlan
Quantities:
In the last release (see just below) we increased the
max potential quantity of specialized stocking plans from 6 to 60.
Almost immediately, a related augmentation was requested.
There has long been a mechanism where you can populate
quantities for any particular specialized Plan by cloning from
quantities as setup under the standard Truck plan. The general
idea is, you can rapidly/easily populate a foundation of plan quantities
via the clone method, then refine where different quantities are
particularly wanted as different for your new plan:
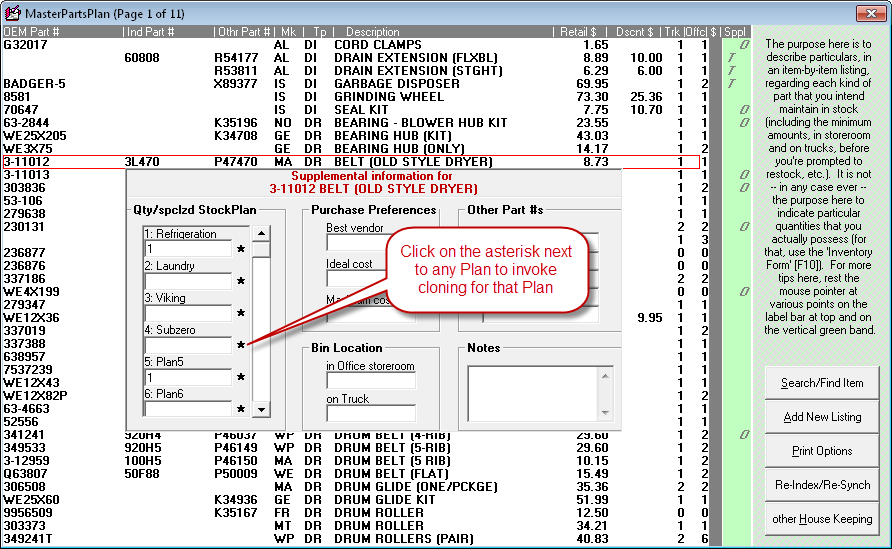
However, more flexibility was requested. Maybe,
instead of cloning from the standard Truck plan, for example, you want
to clone from a particular other specialized plan. Or perhaps,
instead cloning from another Plan, you want to set your plan values
according to actual inventory quantities as presently exist at a
particular location.
This revision adds such flexibilities. Nothing
is changed in terms of how the cloning process invokes; it's merely an
enhanced dialog. Thus, when you click on the asterisk next to a
Plan reference in the MasterPartsPlan's Supplemental-Info form, you'll
now get this:
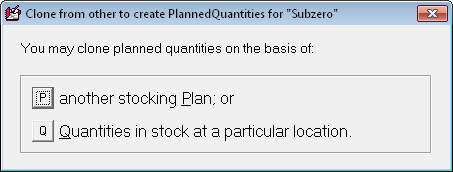
If you pick the first option, you'll be
presented a list of all other Stocking Plans, and allowed to choose from
any. If you pick the second, you'll be presented with a list of
all Inventory Locations, and allowed to pick from any. It's pretty
much that simple.
4.7.12 (12/16/12):
EUREKA!!!!
HALELUJAH!!!!
SUPREMO FANTASTICO!!!!
Increase in Quantity of Unique Stocking-Plans:
The exorbitant fanfare in the title is intended to
reflect how badly some of our users have wanted this, along with the
fact some have have wanted it for a very long time.
The expansion was slow in coming primarily because I
envisioned it as necessarily entailing a very major overhaul (involving
core re-design elements) of the complete inventory system. It's
difficult to fit such a major re-work into our development agenda.
About ten days ago one of our users (Brenda at Fields
Appliance) presented a very factual and convincing case which vividly
demonstrated how dramatically inadequate, for their purposes, has been
the 8 unique stocking-plan max that has existed to-date (standard Offc
plan, standard Trk plan, plus 6 added plans). Though I'd already
felt significant weight to provide the expansion, the vividness of
Brenda's demonstration served to get my mind working much harder on the
task. As it worked in this fashion, I managed to conjure a strategy
for increasing the quantity of stock-plans available, sans any major
overhaul. This made it practical to do in the short-term, rather
than long-term. Hence, the improvement is offered now.
Our old ManagePlansAndLocations form
(Ctrl-F10-->H-->L) looked like this (where the area on the left is used
to define up to six beyond-base stocking plans):
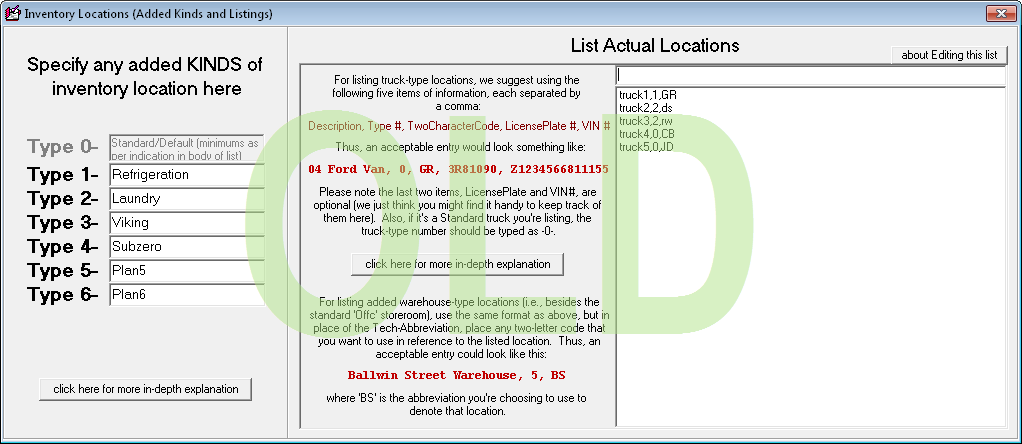
Our reinvented form looks instead like this:
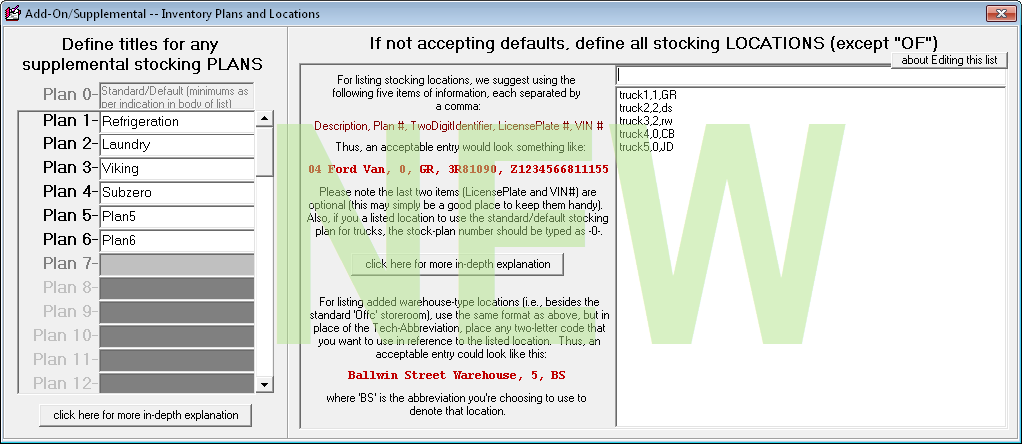
As you can see, the area where you can define add-on
stocking plans is considerably changed. Even on the face of it,
you can see the quantity of potential add-on plans is increased to at
least 12. In fact, with use of the scroll function (you can use
the standard scroll method, or the scroll wheel on you mouse will work fine
too) you can create and access a full 60 (ten-times more than before).
We doubt if anyone will need a larger quantity than that.
The ManagePlansAndLocations form is not the only
place the change was needed. It applies as well in the
Supplemental-Info window, as tied to the MasterPartsPlan
interface:
| Old |
New |
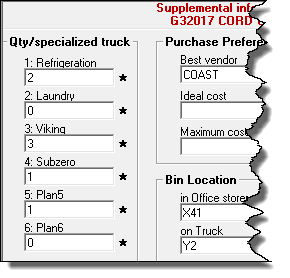 |
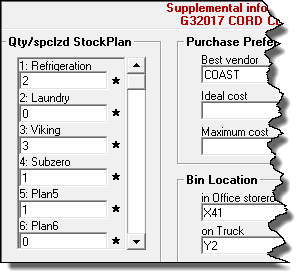 |
This is, of course, where you set the minimum for
each stocking line item as corresponding to each of your specialized stocking
plans (however many you happen to setup). Again, the scroll function allows you to access the entire
array of up to 60 unique/added plans.
New Export for InventoryItemsOnOrder:
As any experienced SD user knows, we have two, rather
separate systems for handling parts: the PartsProcess system for
special-order parts, and the InventoryControl system for stocking parts.
Each is tailored for the particular needs as applicable to its
respective context, and they are very different. A major
historical difference is that, while the PartsProcess system has always
been designed to keep very careful track of items on order and awaiting
arrival, in the InventoryControl system we historically considered this
a less essential objective.
A significant departure from this laissez faire
approach (in regard to inventory items on order) was created some 13
months ago (see entry accompanying Rel. 4.5.45), when we added a feature
that keeps behind-the-scenes track of what's on order, and when you go
to formulate a new order informs you, in regard to any item that may
need to be ordered, of any order that's presently pending for that same
item (again, please see the prior release notes).
As we added that enhancement, we contemplated it would
be but the first step toward creating a more full-fledged,
pending-PO-tracking element, as part of SD's InventoryControl system.
This release provides a tiny further step.
Specifically, we've made the Inventory-Items-On data
much more readily visible. Prior to this release, the only way to
see such data was as it was reflected when going to place a new order
via the F10 form. We've now added a simple export function, that
allows you to see it in full:
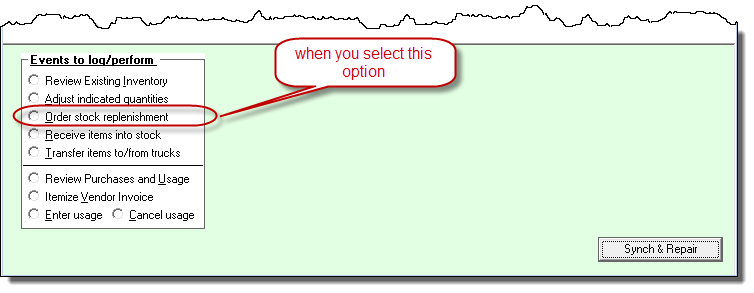
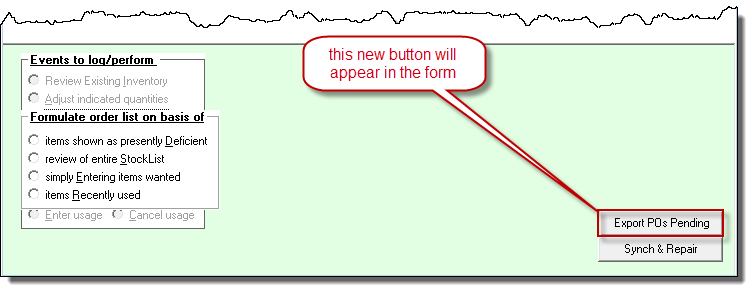
We recognize this export will facilitate a somewhat
less-convenient visibility than might be optimum, and lacks any facility to edit
the actual source data as present within ServiceDesk. If users express the
need, we'll no doubt expand to such capabilities in the future. In the
meantime, a simple export like this can be created with a much smaller
programming investment than can a full-fledged (and editable) user interface.
4.7.8 (11/29/12):
New Fields in "Usage Rates" Report:
Tanner Andrews (Andy's Appliance Repair, Lincoln, NE)
works very hard to assure he's stocking each of his trucks in the most
optimum manner possible. His was among the voices that drove us to
create our "Usage Rates" Report (Ctrl-F8-->U) way back in October of '08.
Recently, he wanted better definition than this report has prior
provided. Specifically, we wanted to easily see not merely the
frequency of each part's usage for his operation as a whole: he wanted
to easily see usage for each location (so as to better define which
locations should sensibly be stocking which parts).
It made good sense, so we have delivered.
If you run the main report, the portion that displays
onscreen will appear just the same as before. But if, after the
main report is displayed, you click on this button over toward the
right:
the resulting export/spreadsheet will have several new fields,
not prior provided. Specifically, it will have as many more columns as you
have different inventory locations. Each such new column will indicate,
for each part-number/line-item listing, the quantity as used by that respective
location.
The concept of including these columns may seem pretty
obvious and basic (to such an extent to make it seem embarrassing they
were not already there). Sometimes it takes a really smart guy
like Tanner to realize where something so basic has been missed.
Thank you Tanner.
New "Print" option for same content as prior available
in Large/Detailed Email of Dispatches:
Based on the fact we so strongly consider SD-Mobile as
the mode via which modern service offices should be dispatching jobs, we
are less than anxious to keep pouring resources into updating and
improving older and more legacy methods. However, we're not always
good at saying no.
There are a plethora of dispatch methods that arise
when, from within the DispatchMap, you click on a tech's name at the top
of his list of jobs. Among these is one designed to send the tech
his entire roster (including rather exhaustive associated details) in a
single/large email. We purposely optimized text within this email
for -- well -- the email context. Back to that list of options,
there is also one designed to locally-print the tech's roster, similarly
with exhaustive detail (but here optimized for printing).
Lo and behold, if there weren't some users who
preferred the email formulation of contents, but wanted it in a
printout, rather than an email. As we said, we're sometimes not
good at saying no.
So, right on the face of the dispatch-methods menu,
you may now see subtle changes in wording, to indicate our newly
enhanced flexibility:
| Old |
New |
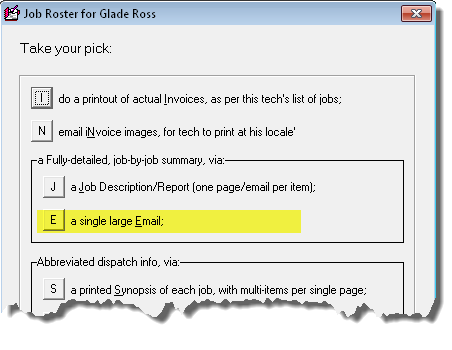 |
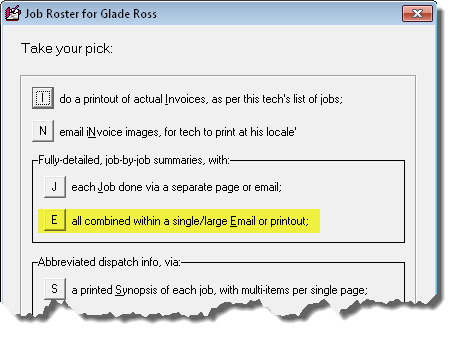 |
From this point forward, when you click on the beloved
"E" option, instead of simply being presented opportunity to email,
you'll instead get the Printer-Select dialog box, configured to allow
specification of email or printing:
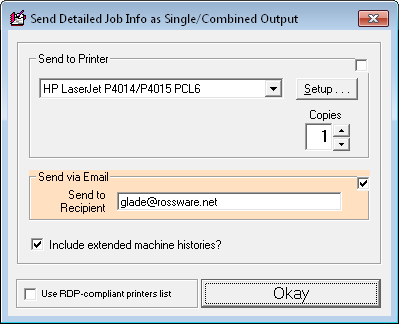
It should at first default for email, which means if
you want printing instead you have to check that as the alternate
function.
Restoration,
as Option, of Old MailList-Maker Method:
When, just two weeks ago (see entry accompanying Rel.
4.7.5), we did a complete rebuild of machinery that constructs a mailing
list for you (making it dramatically more efficient), we felt very good
about it. Alas, no good deed goes unpunished. It turns out
the old method had one distinct virtue that did not survive the new
improvement: it allowed you to directly select how far back the system
would look, among completed JobRecords, for names to insert to the list.
Our old and inefficient method was conducive to that
kind of selection. The new method is not. Given this, we've
added a dialog, when you choose to make a MailingList (Alt-F3-->M), as
follows:
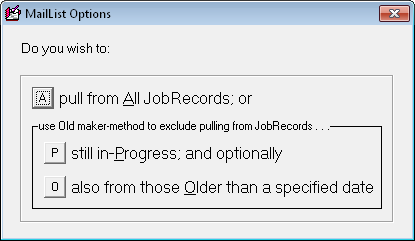
So, you can now revert back to the old method, if
wanted for its one virtue.
Update in SB-DispatchLink (4.5.34, 11/22/12):
Multiple New Functions for Auto-Integration with
ServiceBench:
Yes, this venue is typically used to describe
ServiceDesk-specific improvements, as opposed to those made in
complimentary apps. However, since so many of you also use the SB-DispatchLink
utility (SBDL), and since we've made rather significant improvements
there, this seems like a suitable place to announce.
Only some three months ago we added two new elements
of information that may potentially be auto-uploaded to ServiceBench,
via SBDL (that time we announced via email to SBDL users): ServiceDesk
JobRecord HistoryNotes and direct/separate close-transactions for
completed jobs:
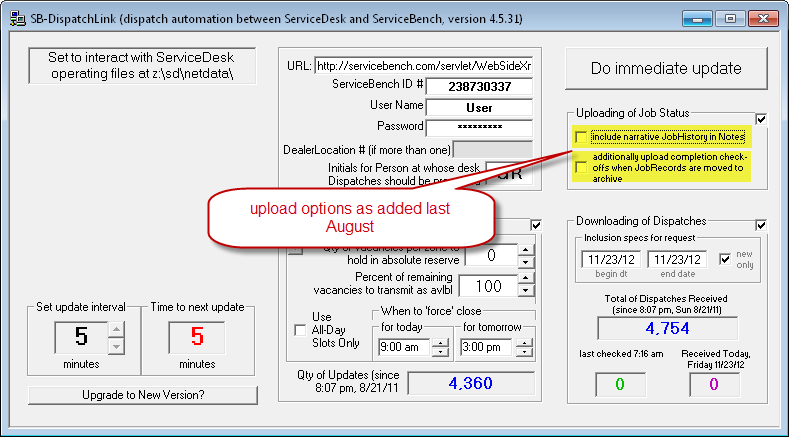
Since then, we've been asked for three more additions to our SB-uploads
roster: (1) direct notice when job is re-scheduled; (2)
direct/live-informing when a tech arrives and/or departs from each job;
and (3) direct notice of each event when a message is left for a
customer (or similar significant to job-progress event).
It appears, evidently, NEW is campaigning hard (and perhaps other
entities are as well) to maintain a live and real grasp of how each job
is progressing.
Regardless, we have added each of these new transaction functionalities
into SBDL (though not all show as discrete options within the SBDL
interface):
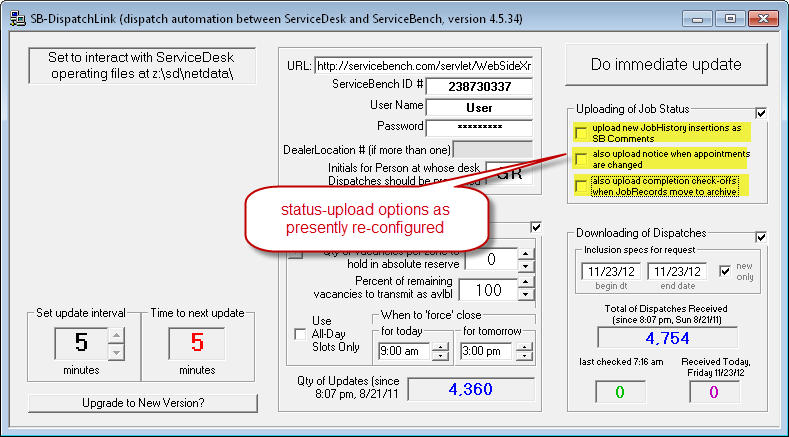
Here is a specific explanation for each of these options, as now setup:
Looking in the first of the checkboxes as now configured, you'll see it
reads similarly (though not quite the same) as compared to what was
added in that position three months back:
| From Three Months Ago |
New/Current |
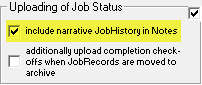 |
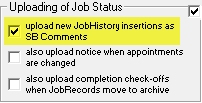 |
Formerly, if you had the above-option checked, JobRecord HistoryNotes
would be added with each sub-status upload. Specifically, they'd
be added as a single (and typically large) block of text, within a
Comment section that was directly appurtenant to the sub-status update
itself. In other words, it was simply part of the status update (a
mere comment appended to the same), and was not a transactional-upload
event in and of itself.
We discovered, with such notes provided in this fashion, they were not
reaching the eyes of persons interested in seeing such details (such as
NEW personnel). Upon also learning some users were being pressed
to log into their ServiceBench online interfaces to manually enter notes
each time they talked to (or left a message with, etc.) a customer, we
decided we needed to upload JobRecord history notes (and with each note
as a separate item) directly into the same place users were being asked
to do it manually.
So, if you now have the first sub-option checked (as above illustrated);
it will invoke a rather different underlying action, as compared to
before. Instead of uploading the entire JobRecord historical
narrative as a mere add-on comment with the status upload, it will
instead upload each discrete entry, as added to the applicable JobRecord
history since the last prior update. It will upload each such new
item individually, and using a dedicated ServiceBench Add-Comments
transaction as made for the purpose. In result, these notes should
now be placed precisely where needed for appropriate visibility by
underlying ServiceBench clients (e.g., NEW).
Now we focus on a checkbox option that is indeed totally new,
with this morning's release:

As its wording suggests, this one will upload to ServiceBench notice whenever you change an appointment (or make a new
one) on an applicable job (i.e., one that was dispatched to you by
ServiceBench). Much like that above-described "Comment" upload,
it's being done via a dedicated SB transaction we'd not formerly been
employing.
Though the third status/sub-option checkbox is not new
with this release, we'll nevertheless provide some contextual
explication (in particular, for any who may have missed the explanatory
email from three months ago):

Normally, SB-dispatched jobs are put to bed
("closed") via the claim-filing process, as done from within
ServiceDesk. The problem is this sometimes does not occur in the
intended fashion. In particular, we've learned for some servicers
it's quite common to have a job dispatched by Lowes, with a claim being
made against Whirlpool. This fails to close the Lowes job.
This option (as added three months ago) is designed to assure closing
occurs, regardless. Indeed, it should assure closing after a
JobRecord is moved to the archive, whether a claim was involved in any
manner.
You may notice there are no checkbox options for
turning on or off what we described, early in this post, as another
addition to the arsenal of status-upload related functions: direct/live-informing when a tech
arrives and/or departs from each job. There is no sub-checkbox
for this, because this function is not sub-optional. If you have the
main/general "Uploading of Job Status" frame checked, general
status changes will be uploaded, along with when the sub-status changes
because a tech has arrived or departed from a job. We simply do not contemplate anyone
will want to upload status generally, and not want to do the
arrive/depart sub-status change as well.
Of course, it's also true that if you do not have your
techs using SD-Mobile (or using it but not doing it live as per design
intent) there will not be a basis to do the live reporting of their
arrivals and departures. Uploading of those events depends on the
system itself having due notice.
Please be aware, BTW, these new functions, that are
optional, default as unchecked. If you want the functions to
occur, you need to check the applicable boxes.
4.7.5 (11/13/12):
Improved MailList-Maker Export:
Hit Alt-F3 in ServiceDesk and it brings up what was
originally called the MakeMailList form:
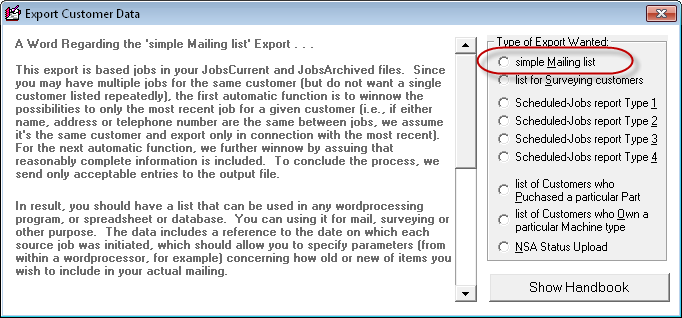
It was called that because, originally, its only
function was to produce the output that's now but the first among nine
(the other export options have gradually been added).
Anyhow, that oldest and original function was, until
just prior to this release, very creaky -- to such an extent that, for a
large database, it could take many hours to do its task. The plain
fact is the underlying program code was doing the needed work in a very
inefficient manner, and this is a place where efficiency counts.
Part of what's involved in constructing a Mail-List export is winnowing
through the entire mass of JobRecords, to assure the output has but one
line-item for each actual customer (and not repeated line-items where
you've done repeated work for that customer). We also want to
assure there is no more than one line item for each physical address.
This prevents us, for example, from sending multiple mails to the same
household if different persons there ordered service from us (say once
by the husband, and once by the wife). It also prevents us from
sending a mail item to both a former owner/resident (who's long since
moved elsewhere) and the current resident too. The system is
configured, for any given address, to export a line-item only for the
name as most-recently associated with a given address.
The old method as underlying this export engaged in a
painstaking process of checking each potential addition, within the
range of all prior additions, before adding it into the export. It
was logical, but with many tens of thousands of records could result in
a very slow progression. It also was limited to producing no more
than 32,767 actual output items.
Our improved method uses a more clever algorithm to
achieve the same result, but in a much more efficient manner, meaning
for large data sets it will run very, very much faster. It also
overcomes the 32,767 limit.
Added "Items-Returned" Figures to the PartsProcess
Form's Acquisitions Report:
A little more than a year ago (see notes accompanying
Rel. 4.5.34) we added the Acquisitions Report (Ctrl-F8-->Q).
It's purpose is to itemize, by vendor, the cost and quantity of items
purchased within a defined period. Recently a user requested
visibility into quantity and value of items returned. This release
offers the first step.
What we've done, substantively, is to simply add a
couple of new columns to the Acquisitions Report. One indicates
(again, itemized for each vendor) the cost of items returned, and the
other the quantity.
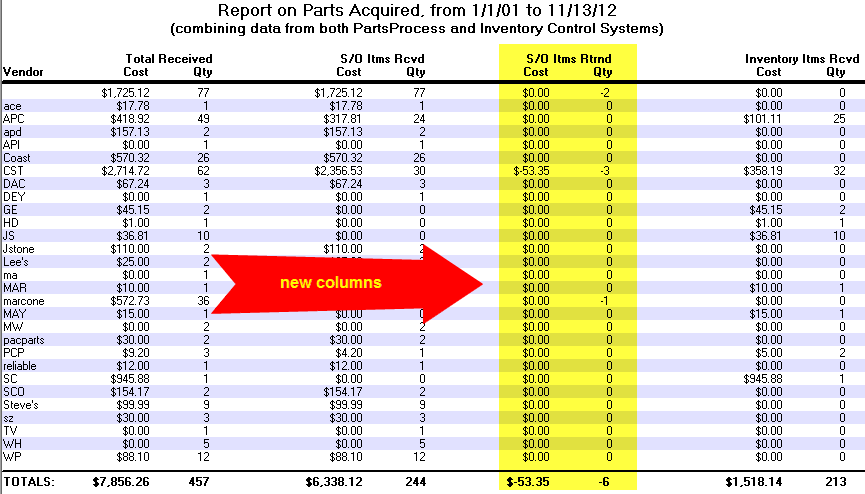
There are some limitations in this initial offering.
So far, we're tallying special-order returns only (i.e., items managed
as inventory are not included). Also, there is a little bit of
fiction in terms of applicability to the date range. The return
tallies are based on the same criteria (for the parent special-order
request fitting the specified date range) as are the main entries.
This is in spite of the fact the actual return dates may (likely are)
different, and dates of any credits received are likely more different
still.
4.7.2 (10/11/12):
New Option for No-Visit Pseudo-Appointments:
Approximately five months ago (see notes accompanying
Rel. 4.6.5) we made it so "naked" appointments (i.e., ones
direct-created within the F6 form and without any connection to an
underlying JobRecord) port to techs in SD-Mobile (as reviewed in those
notes, it's pointed out that while it had always been possible to create
such "naked" appointments in ServiceDesk, prior to that improvement they
had not shown for techs in their SD-Mobile interface).
We mention the above for context and distinction (and,
yes, I am still sufficiently juvenile to enjoying saying "naked").
Our present new feature, instead of involving
non-job-tied "naked" appointments, involves a new kind. Unlike the
animals just discussed, these are tied to jobs, but (and regardless) do
not involve any real intent to meet with a customer. Rather, they
involve what we'll henceforth call pseudo-appointments (for
those of you who do not while away your hours memorizing
How-to-Expand-Your-Vocabulary books, pseudo means fake, pretend, not
real).
Why would you want a fake appointment -- and as tied
to a specific job?
The reason is simple. It's to serve as a device
that prompts for one or more needed actions on that job, but in
situations other than where the customer is expecting the tech to be
knocking on the front door.
For example, suppose, based on a WipAlert, you notice
a tech was at a customer's home two days ago, and was supposed to
research something to further the repair, but there's no evidence he's
done it. Solution? Create one of our new
pseudo-appointments. It's a way of prompting him to do the
research, and booking a time-slot for him to do it within.
You can use these new creatures for any such (or
similar) purpose. Best of all, your techs are permitted (even
expected) to do PostVisitReports on them (in this context you'll need to
think of such PVRs as as pseudo-PVRs), which nicely
accommodates things like resultant creation of part orders, or of new
real appointments, etc.
So how do you make one of these new
pseudo-appointments?
It's pretty simple. In the F6 form we've added a
new column of characters, on the very far left. The characters are
simple checkmarks. Every standard appointment (even a "naked"
appointment) has one:

These checkmarks denote simply that the appointment is
not one of our new animals. In other words, it's not a
pseudo-appointment. It is a "real" (or at least a "naked")
appointment.
Given the above, if you want to create a new animal,
you simply need to uncheck that box. It's default state is
checked, which signifies "I am a real (even if possibly 'naked')
appointment." Simply uncheck to indicate otherwise.
What are the consequences of unchecking?
A major reason this project has been somewhat long in
coming is because there are a plethora of contexts within which a
pseudo-appointment -- if it's going to be correctly treated as such --
must be treated differently. This plethora meant a lot of work,
seeking to make each such context appropriately different. Here is
a partial listing:
-
Historical notations (as made in each applicable
JobRecord when an appointment is created) are changed as needed to
reflect this different kind of "appointment."
-
Within the DispatchMap, the display of
pseudo-appointments is altered, to make it visually apparent they
are not true appointments with the customer. This alteration
consists of changing the display color (of the applicable list-item
reference) to a semi-feint grey:
On making this change, we realized it would be sensible to display
the old naked-appointments with the same visual distinction, and it
is now so.
-
Similarly, it seemed appropriate to refrain from
adding these pseudo-appointments to the count of actual/true
appointments as displayed in the DispatchMap, so (and in common with
naked-appointments) they are withheld from that tally. On the
other hand, if you decide to use an above-zero JobCount value for
any such animal, it's important to include such JobCounts in the
JobCount tally, and that is indeed done as well.
-
Still within the DispatchMap, while it seems
appropriate to show pseudo-appointments as applicable within each
tech's list section, it does not seem appropriate to show them
within the graphic area. That distinction is indeed made.
-
Continuing within the DispatchMap, each of its
contained methods for conveying dispatch-list info to the tech (as
offered when you click on a tech's name at the top of his list of
jobs) needed altered to make explicit, in regard to any pseudo-job,
that a pseudo-appointment is what's involved, and not a real
appointment where the tech is expected to drive to the customer's
home (we noticed while doing this work, incidentally, that the old
Naked-Appointments were not prior being including in these various
outputs, and this was simultaneously addressed). There were no
less than 12 different outputs that required significant
modification in this category.
-
Continuing still within the DispatchMap, the route
integrations with MapPoint and GoogleMaps needed altering to assure
pseudo-appointments would not be included in their work.
-
Finally within the DispatchMap, the
Confirm-Appointment-with-Customer functions (via Email and/or
RoboCall) needed altering to assure pseudo-appointments were not
included in their operations.
-
Outside the DispatchMap (but still within
ServiceDesk), each of the tech-performance reports (as relating to
how they score in regard to fulfilling appointments) required
altering to assure pseudo-appointments do not alter their results.
There were two of these to deal with.
-
Within SD-MobileLink, changes were needed to
assure this new element of information (distinguishing between a
pseudo-appointment and a real one) is appropriately uploaded to each
tech.
-
Within SD-Mobile, it was essential that, for any
pseudo-appointment given the tech, we provide a reasonable
notification it is not a regular appointment (i.e., where he's
expected to drive to the job). On the JobsRoster page, for
example, there is this distinction:
On the JobDetails page, we figured the notice should be much
more hard-to-miss, so there we have created this extremely-visible
indication:
-
Similarly, much as it was important to exclude
pseudo-appointments from the automated tech-drive/routing modes as
offered in the ServiceDesk DispatchMap (i.e., via integrations to
MapPoint or GoogleMaps), the same was important for such parallel
functions as are present in the SD-Mobile. Ditto, in regarding
to excluding pseudo-appointments from the semi-automated RoboCall-Next-Visit-to-Announce-Tech-is-On-His-Way
feature.
-
Finally, in regard to SD-Mobile, there are a
plethora of checks the system engages in to assure the tech has
correctly prepped everything prior to submission of his PVR.
Many of these are not sensibly applicable in a
pseudo-appointment/pseudo-PVR situation. They needed to be
appropriately excluded for that contest.
-
Okay, the above was not quite final.
Within both ServiceDesk and SD-MobileLink, PVR-historical-text
insertions had to be modified to insert differently for any PVR as
submitted on a pseudo-appointment (e.g., if the tech reported that
he worked on a pseudo-appointment-triggered concern from 2.35 to
2.58, you wouldn't want a resultant historical entry to read "PD
there 13 THU, 14:35 to 14:58;" instead, an entry in this
context has been programmed to insert in the form "PD invlvd 13
THU, 14:35 to 14:58").
As many connected operations as we have thought to
appropriately modify, it's possible we missed one or more, that we
should have thought of. It's also perhaps more than likely (for a
set of modifications covering so great a scope) that one or more have
been imperfect. Regardless, please let us know if you see
something we missed or did wrong.
As a final matter of concern (and this falls entirely
on you), it's very important to assure you and your
techs are updated to our concurrent releases of SD-MobileLink and
SD-Mobile (both must be Vers. 1.4.115 or above)
before you create any of these new
pseudo-appointments. Earlier versions will not know to
treat them differently. In other words, if you create one of these
new animals and concurrent updates are not done on the Mobile side, any
pseudo-appointment will look to the tech like a real one. Thus,
he's likely to go to the customer's home, but with no real appointment.
Please don't let his happen. Assure your
Mobile-system apps are fully updated before creating any of these new
animals!
In concluding this entry, we realize you may desire an
easy, shorthand method to distinguish between real/normal appointments,
our new pseudo-appointments, and the old variant/option of
naked-appointments. Try this:
(a) A naked-appointment is sans any
JobRecord (but may expect the tech's presence at a particular place and
time);
(b) A pseudo-appointment is sans
any real visit (but is JobRecord attached);
(c) A true/normal appointment
includes both.
4.6.40 (10/3/12):
Option to Include Consumer's Email Address in Claims:
Recently, ServiceBench provided a new claim-upload format
that accommodates several new fields (see notes accompanying Rel. 4.6.15).
Among these is one for the consumer's email address. In conjunction
with this, SD's on-screen NARDA was re-configured with a number of new
boxes, to accommodate the new fields, including one for the consumer email
address. Claim-upload mechanisms were similarly changed so that, if
you have text in that new email box, it is appropriately uploaded to
ServiceBench as an inclusion within your claim.
But there is something we did not do.
Specifically, we did not make it so the consumer's
email address would automatically pull from the underlying JobRecord,
and auto-fill for you to this new box in the on-screen NARDA.
The reason we did not is we'd prior heard from some
servicers that they were reluctant to share email addresses, as
collected by them, with manufacturers.
Recently we had a request from some other servicers to
accommodate this auto-filling (one or more manufacturers, evidently,
were pressuring them to provide such data). So, to accommodate
both those who wish to provide the information -- and simultaneously
those who do not -- we have now made the email-to-NARDA auto-fill
function available, but optional.
In fact, we've done a little better than making it a
mere blanket option. You can pick the particular underlying
clients for whom you want the auto-fill, and have it for them, but not
for others.
The option is via a new checkbox in the
QuickEntryTemplate as applicable to each QET client:
Very simply, the email-address-auto-fill will occur
for those clients where you've checked this box, and will not for those
where you have not checked it. It defaults to un-checked, so be to
sure to go in and check it (for the underlying manufacturer for whom
needed) if you desire the auto-fill.
AttnNotes Now Included in
Emailed Job Summary:
When you're in the DispatchMap and you click on a
tech's name at the job of his list of jobs, you get a plethora of
choices, regarding actions you might wish to perform in regard to that
list. Among those options is to send a summary of all the jobs via
email:
Until now, that particular production did not include
AttnNotes (aka "SkickyNotes") from the underlying JobRecords. Now it does.
4.6.39 (9/30/12):
QuickLink to the
my.rossware.net Dispostion-on-Robo-Calling Report:
Are you using the CyberOffice-based features to confirm
your next days' appointments? If not, did you know, with a very quick
action each afternoon, you can have ServiceDesk send emails or automated
telephone calls (aka "robo-calls") to each of your tomorrow's appointments,
reminding them of the appointment, providing the time-frame, and requesting
confirmation? Yes you can, and it's very cool.
Whether you use the email or robo-call method (you may
in fact choose to use either, both or a combination), upon the customer
confirming, cancelling or re-scheduling, the result is automatically
placed back into ServiceDesk for you, along with a nice notation in the
JobRecord's historical narrative. In the case of robo-calling,
though, there are circumstances where nothing may come back. In
particular, the customer may not answer their phone, in which case you
may be curious to verify what happened on the robo-call (how many times
it tried, when it tried, if it left a voice message, etc.). That's
what this new feature is for.
Wherever in a JobRecord's narrative history you see
the expression "robo-call," you may double-click
on the expression, and ServiceDesk will take you to the
specifically-applicable report on (as otherwise available by logging in
to) the my.rossware.net website.
In other words, that expression within a JobRecord's history text is, in
effect, a hyperlink to said report.
Thus, you may double-click on what's shown as
highlighted here:
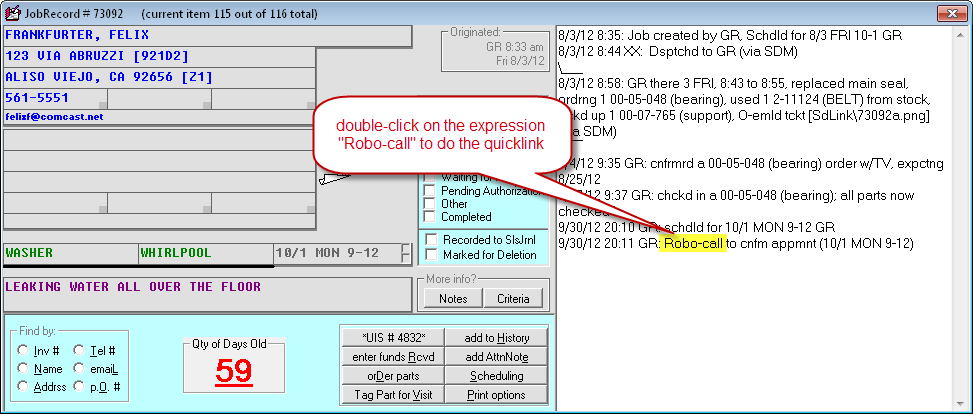
To get instantly to an online report that looks
something like this (the true telephone number below is blanked, because
the image is from a real report):
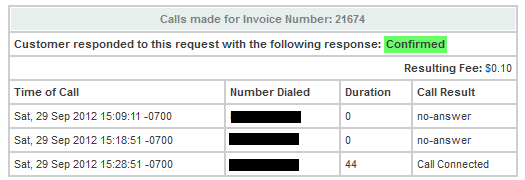
If you forget this QuickLink trick, we've also
inserted a ToolTip reminder to help. Whenever ServiceDesk sees
that that magic expression ("robo-call") exists in a
JobRecord's narrative history, it will display a ToolTip as follows when
you float your mousepointer over the JobHistory box:
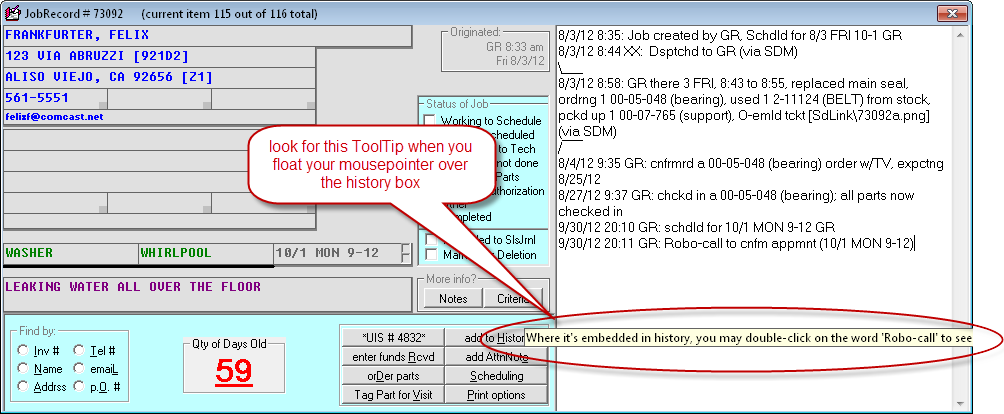
If you are interested in this feature and have not
setup with it, please call, and we'll work to get you going.
4.6.36 (9/23/12):
New "Funds Collected" Report:
Some two-and-a-half years ago (see entry accompanying Rel.
4.4.7) we introduced a new report, designed to itemize (categorized by
collection source) each item of money as ostensibly collected, throughout
your system, for any given date or date range. This was to provide a
direct means by which to easily reconcile the money that's actually turned in by
each source, for such period, with what easily reconcile the money that's actually turned in by
each source, for such period, with what should have been
turned in. It's been a popular report, but recently we were asked for
something different.
For context of consideration here, we have always had
a method whereby ServiceDesk is primed to give you notice if any item of
money -- as supposedly collected -- does not ultimately show up for
processing. The original (and still in-place) method is rather on
the back-end. It assumes you've used some means of direct-checking
as tickets are turned in, to assure appropriate matching monies are
there (such as, for example, that new report we added two-and-a-half
years ago). It then watches after the fact. Essentially, PVRs
(and similar processes) create entries in the FundsJournal regarding
each money item supposedly received. When deposited (or similarly
processed), these items are "checked off." If any items persist
without being checked off, they bring visible notice to themselves, by
virtue of their growing and obvious datedness. If still not
checked off, they ultimately trigger a direct complaint, that positively
forces notice. This is our back-end assurance. Your own
vigilance is the front-end.
In a nutshell, our two-and-a-half-year-ago-added
report provides a very nicely augmented means to assist you in
exercising due diligence at the front end. Essentially, it gives
you a front-end check-off list. On a daily basis, you can print
the report, and easily verify that each item of indicated money indeed
shows up.
Our new report gives you a middle check. Suppose
an item gets by you at the just-described front end. Maybe you did
the front-end check, noticed an item missing, intended to follow up, but
then got distracted by other matters, and forgot. Or, perhaps you
have techs that turn in monies at such disparate times as to make that
front-end check (at least via a single report) not very practical.
Suppose any of the above, and you don't want to wait for our traditional
back-end method to give you notice of items that did not show up. Again,
we're talking a middle check.
Our new report is designed, simply, to list money
items not yet checked-off as deposited. More specifically, lists
them with the same "source""categorizations as the traditional front-end
report (i.e., a section for each tech, one for POS, one for monies
received in payment on A/as the traditional front-end
report (i.e., a section for each tech, one for POS, one for monies
received in payment on A/Rs, etc.). The obvious underlying logic
is that if an item has not been checked-off as deposited, there is not
yet verification (via such means) you have indeed collected if from the
source involved.
Navigation to this new report is simple. Our
report from two-and-a-years ago has been accessed, directly, via this
item in the FundsControl (F9) form:
Now, if you pick that same option, you get a choice
between that longstanding (front-level) report and the new
(middle-level) one as now offered:
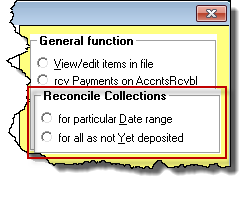
The second of the above-highlighted choices will give
you the new report.
New "Itemize Vendor Invoice" Report:
This report involves an addition to the InventoryControl
(F10) form. Before discussing the report itself, we'll first disclose
we did at little rearranging in this form's main functions menu. Here
is a comparison:
| Old |
New |
 |
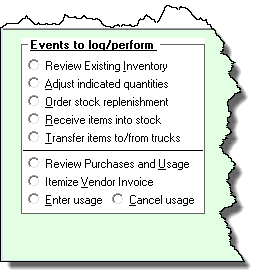 |
As you can see, aside from the fact a new item is added (the
real subject of this entry), there is also some re-sequencing of items. On
adding that new item, we realized the prior sequencing of functions had been
less logical than it should have been. So, we worked on that logic, and
added a little line divider to separate functions into two logical groups.
Now for our real topic. Do you see which item,
above, is the new one? Here is some help:
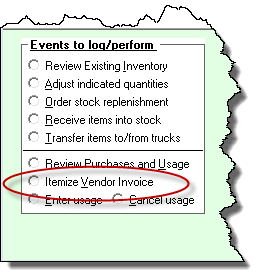
This report was long requested by Bob at GRA-NEVA
Appliance Service. He calls it a "Receiving Report." The
idea is to provide an easy means to see precisely what was ostensibly
received on a given invoice from a given vendor. It allows an easy
means to verify what was entered as received corresponds with what
the vendor has on his invoice. When you run the report, it will
initially display on-screen. However, the form's PrintList button
will appear, and you can just click on it if wanting to print.
4.6.34 (9/17/12):
Dramatically-Enhanced Spiffs System:
Earlier this year (see entry accompanying Rel. 4.6.8) we
offered a very simple (e.g., lightweight, minimal) system to accommodate a
program of special, motivational payments you might wish to setup for your
employees. It was, indeed, minimal. With this release, we offer
a much-expanded (and considerably more integrated) spiffs system.
In fact, the design of this system is such that it
might (according to your preference) constitute an entire compensation
system for your techs, and according to your own design (i.e., in lieu
of hourly, salary or commission basis).
There is a new mini-manual fully describing this new
system. For the new mini-manual you may either
click here, or, if you go
within ServiceDesk to its Rate of Earnings form (Alt-F2), there is a new
button there to provide a link:
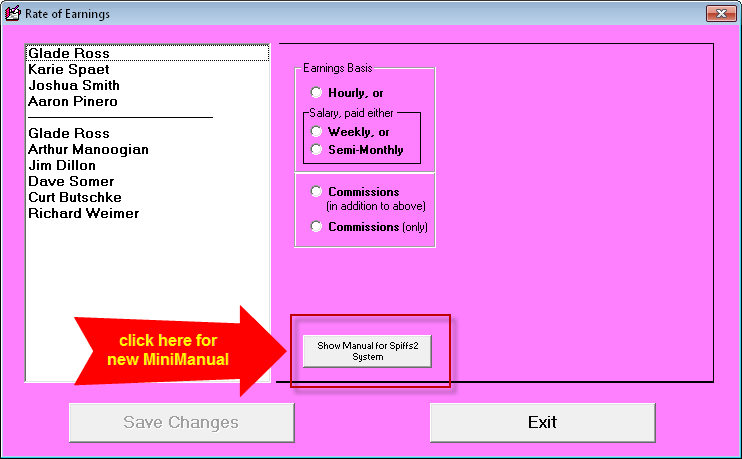
4.6.33 (9/13/12):
Integrated Facilitation for Direct-Ship-to-Customer
Part Orders:
Have you heard of doing this?
Instead of having special-order parts shipped to your
own office location (where you must unpack, inspect, temporarily store
-- and, finally, arrange for transfer to the tech prior to his returning
to the home for a scheduled visit -- you instead have them shipped
direct to the customer.
In this mode, there's no need to for you to unpack,
inspect, store or transfer to the tech. You just schedule for the
tech to go out, and send him. He finds the parts waiting for him
on his arrival. Among other advantages, if the part is of the kind
where cosmetic blemishes can lead to rejection by the customer (e.g., a
refrigerator door panel), you can ask the customer to open and inspect
prior to even booking the return appointment. This can save many
wasted trips.
You may be skeptical of this method (and, sure, there
a few drawbacks), but the advantages are legion. Those intrepid
businesses that have switched to the method vehemently swear by it.
They say they'd never go back, in a million years.
Enter our new feature.
If you're using the direct-ship method, there's a
considerable amount of added info to give your vendor, in connection
with each ordered item (or set of items as applicable to a particular
job). Specifically, you must provide the customer's full shipping
data. It's at least three lines of text, and takes considerable
time to manually provide in each instance.
That's why we've added a new method in the F8 form's
Assemble-Order interface. This is where you select
the display category titled "Items needing ordered." You
then do a series of Ctrl/Right-Clicks on the items you wish to include
in the particular request you are formulating (i.e., "marking" them for
inclusion), then hit Enter on your keyboard. At this point you're
presented with a dialog that asks you to pick the particular method, as
wanted, for conveying the order to your vendor. Here's a
comparison of that dialog box, from old (prior to this release) to new:
| Old dialog, as shown in F8 after
you've selected items for inclusion in an order, then hit Enter |
Image of the new dialog, with
newly-added option circled |
 |
 |
As you can see, the new option involves emailing your
order, with inclusion of "ShipDirectToCustomer Instructions."
Here is what the long-offered (and standard)
Abbreviated-format request looks like:
As compared to the new, ShipDirectToCustomer-oriented
request:
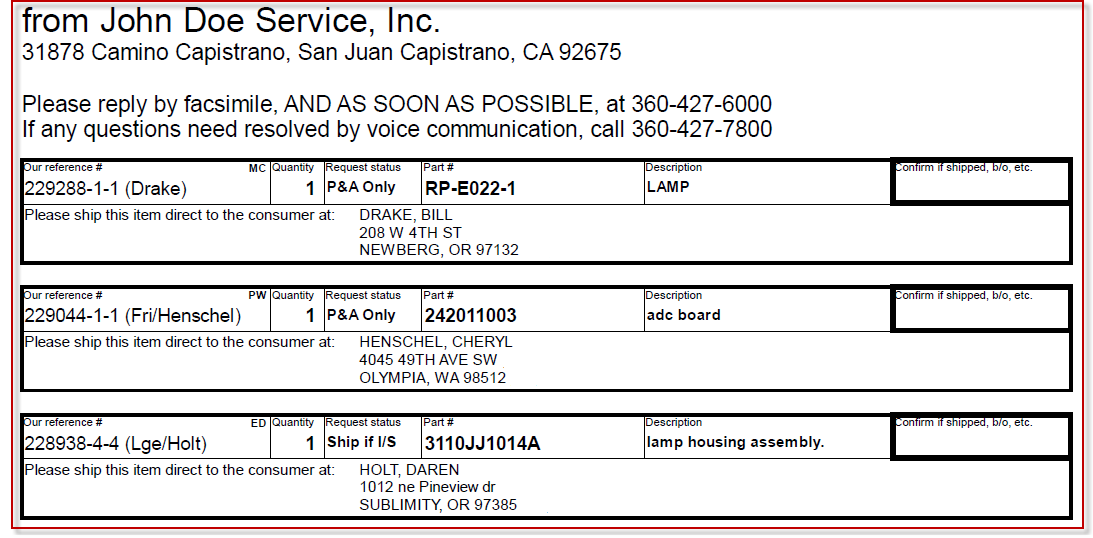
Logically, the system looks for appropriate ship-to
information in each request-item's attached JobRecord. Exercising
further logic, if it's a JobRecord that lacks a consumer's addresses
(particularly as in a POS situation that was not setup for
direct-shipping to the customer), or one that's designated as a ShopJob,
the system will automatically alter the request to specify shipment to
your office, as opposed to the consumer.
New "Resurrection" Option in
archived-PartsProcess:
Back in June (see entry accompanying Rel. 4.6.16) we
introduced a "HpToRtrn" status category for PartsProcess items. This
was to accommodate the situation where you have a maximum return quota with
a particular vendor, and present return of the item in question would exceed
that quota. Thus, you place it into this status to designate you'll
want to return if sufficient future vacancies allow, or (even better) you'd
love to use it in the meantime on a different job, should the opportunity
arise.
There's one element we did not work out in that
scheme. It is this. Suppose some other job comes along on
which you can use the item in question. How do you transfer it
from the job on which it was originally ordered (and not used) to the
one you wish to use it on now. We simply did not go so far, last
June, as to work through this conundrum.
Of course, our users are ever-practical, and Mitch at
Video Tech Center invented an answer. His solution was to employ a
method we created in December 2010 for a somewhat different purpose: the
"Resurrect" facility (see entry accompanying Rel. 4.4.89).
The general idea, in a "resurrection," is an archived-PartsProcess item
can be restored back into the current context. As originally
conceived, this resurrection option was provided solely for the
situation where you allowed a Process item to go to archive before
realizing you needed to attach a daughter-band for the purpose of
managing a core return. Resurrection allows you to restore it back
to current for that purpose.
In a nutshell, Mitch realized he could use
resurrection for a different purpose. However, he also discovered
the existing structure (as tailored for its original purpose) was not
optimum to his invention. So, we've made a variation that is:
| Old dialog, as shown in Crtrl-F8 when
you right-click on a process-item |
New dialog, with newly-added function
circled |
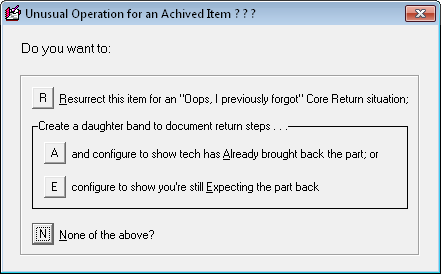 |
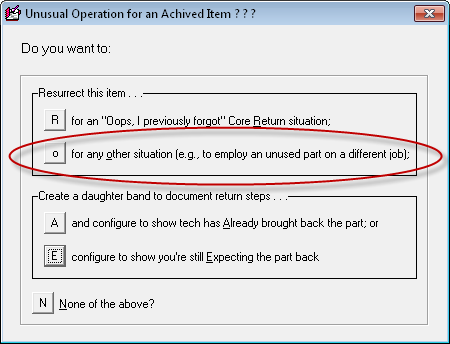 |
As you can see, the new dialog adds a new/second
resurrection option. If you pick that option, you'll further get
this dialog:
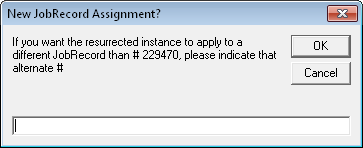
Obviously, if you want to move the item's application
to a different job (i.e., different from the one it was formerly
ordered-in for), this dialog provides the basis.
This new method provides appropriate documentation at
all points. The moved-to JobRecord will have an appropriate
notation in its narrative history, so on, and etc.
Other PartsProcess Improvements:
There are too many of these to list individually, but
simultaneous with the current new features we fixed an entire series of
moderate defects that had been noted, particularly as regards our
cradle-to-grave structure.
QuickLink to RepairClinic.com:
RepairClinic.com (http://repairclinic.com)
has become a useful website for many businesses. Some of you are going
there with great frequency, especially to lookup parts as applicable to a
particular model. To make this easier, we've added a new QuickLink.
In the F8 form, just do a Ctrl/Right-Click on any model number
(specifically, as present within a process-item's Model-Number field).
In response to this simple action, ServiceDesk will open a RepairClinic.com
website page for you, with a completed search on the model in question.
If you forget the command, it's also been added to the
contextual CheatSheet (just right-click in the colorful label-area at
top of the F8 form), as follows:
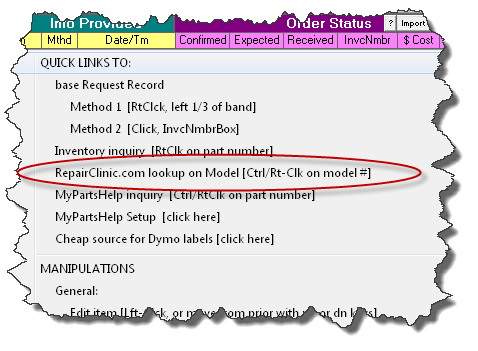
We have also, incidentally, added the same function
into SD-Mobile.
4.6.24 (7/22/12):
Protection Against Unintended "Within-90-Days
Repeat" Claims:
The request for this came from Ken at Shaughnessy
Appliance (in Alberta, Canada), and in retrospect I realize it's a feature
that should have been there long ago. Quite simply, when you go to
submit a claim from ServiceDesk's Alt-F4 FinishedForms context, the system
will automatically do a behind-the-scenes check, to see if any other
relevant claims were prior submitted within 90 days preceding. Any
such prior claim could potentially be on the same job, or on a different job
but involving the same underlying unit. Depending on which is the
case, if applicable, you'll get a message such as this:
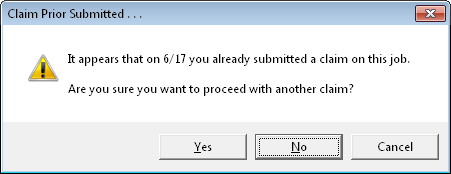
Or this:
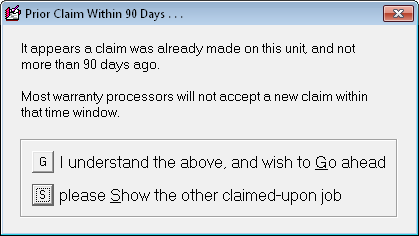
All you need for this new benefit is to do the update.
Improved Formatting for Lowes Claims:
From time-to-time we learn on the basis of feedback that
particular elements of claim-formatting must be done in uniquely different
ways, for particular underlying claimed-upon payers. As we make these
discoveries, we adjust our claim-formatting mechanisms to appropriately
adapt. Recently we learned of a whole slew of
departure-from-the-normal-rule elements that needed to be applied when
claims are submitted to ServiceBench, and with Lowes as the claimed-upon
party. Absent these unique applications, it turns out, claims as
uploaded under Lowes accounts have required online fixing of particular
element before they are accepted. Such online fixing is not something
we want you to have to do.
This release incorporates all the unique-to-Lowes
modifications, which we have just learned are in fact necessary.
If you have prior found that all of your Lowes claims required
after-the-upload-online-fixing, you should now be pleasantly surprised
to find this is no longer the case.
Enhanced/Built-in Re-sorting of Certain DataFiles, Plus
Reporting-Checks:
One of the most immutable rules of programming is borrowed
from larger life: it's that infamous "Law of Unintended Consequences."
Bowing to demand, we have in the last couple of years
made it increasingly easy (in the latest addition of ability, see notes
below accompanying Rel. 4.5.60, it's virtually automatic), to make
entries to the SalesJournal on the basis of putative entry dates that
are other than the true current date. It turns out that
out-of-date-sequence entries can cause issues for certain reports and
processes that expect to sort through a file rapidly to find entries
fitting a range of dates.
Based on such issues, a significant while back we
added mechanisms that automatically re-sort the SalesJournal with each
nightly housekeeping event. But it turns out other files are
affected too, including (most particularly) the FundsJournal. We
have also found that sometimes folks simply backdate a computer, and by
such means manage to input entries that mess up the normally-expected
sequence of dates.
To address such issues, this release adds further
built-in, automated nightly sorting for the FundsJournal and
InventoryMovementsJournal.
Additionally, since there are number reports within
the F11 Reports form that rely on the SalesJournal being appropriately
sorted, this release also adds a behind-the-scenes checking mechanism,
designed to assure it's not out-of-sequence whenever you go to run a
report there.
New Printing Option from FinishedForms:
This picture likely says it all:
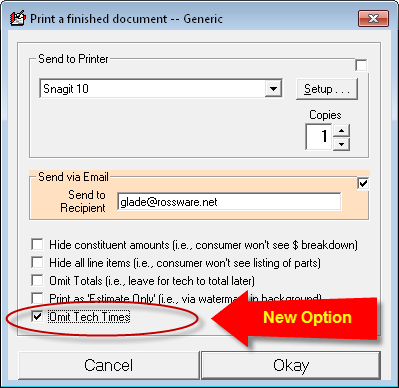
Sometimes folks use the FinishedForms to make a
nice printed invoice for property managers, and similar. We
learned sometimes when the bill is big and the paying company sees the
tech was only there for a short while, it causes problems. This
option gives you the opportunity to refrain from showing the time or
times your tech was on premises at the job.
4.6.23 (7/17/12):
New Warranty-Claim Format -- for Warrantech:
When you're in the Alt-F4 FinishedForms interface and to
go to transmit a claim, there has long been a significant list of entities
for whom the claim can be formatted. The final option has long read
"Others . . ." It has further long been the case that when you click
on "Others," you get a little message that essentially says: "If you need to
submit claims in any format other than as listed here, let us know, and
we'll add that format to the list."
That just happened in regard to Warrantech, a company
that markets and services extended product warranties. An option
to format claims in their format has now been added:
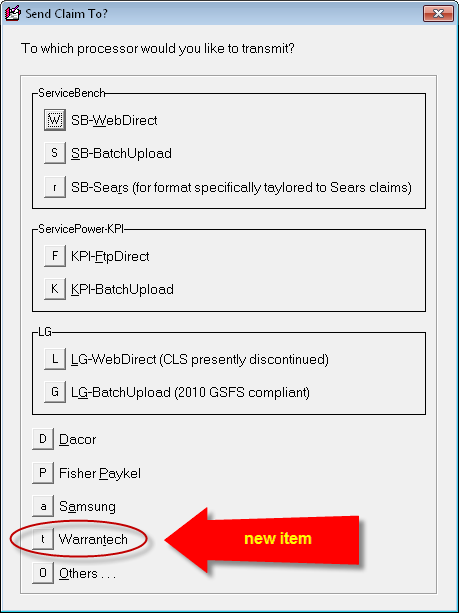
If you need assistance understanding which boxes
from the onscreen Narda fill to which Warrantech fields, please use the
Translation Tips, just as for any other format. Please also be
aware there is no direct-transmit method for Warrantech claims.
Just as with Dacor, Fisher Paykel and Samsung, you'll be saving claim
info into a file, and it will then be up to you to assure that file is
appropriately uploaded to Warrantech.
Additionally, please note we are not confident these
claims will work perfectly, right out of the box. Warrantech's
documentation (regarding the expected claims format), leaves significant
ambiguity. From such documents we have made our best
interpretation of what they are seeking, but your experience may prove
our interpretation was off. If so, we will need (and look forward
to) feedback to correct.
4.6.16 (6/26/12):
New Feature to Cope with Teeny Return Quotas on Parts:
Recently we heard from a user that Samsung has imposed a
limit on the quantity of parts that can be returned, within any given month,
and return credit received. The limit, we understand, is 5% of
whatever is the total purchased.
OUCH!!!!!!
This means if you've done $10K in purchases in a given
month, your returns cannot exceed $500. It's a pretty tiny limit,
and means you could potentially be stuck with some losses, if
ServiceDesk did not do its best to help you (even then you might, but at
the least ServiceDesk should do all that it can).
That's what this release is about.
We have added a new HoldLoc category in the
PartsProcess system, as follows:
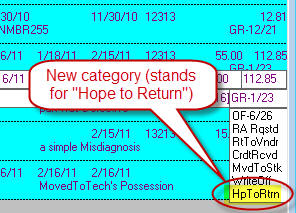
The idea is, if you need to return an item and either
lack quota space for the return within the current month or you want to
delay until deciding how to juggle items within your max quota, place
the PartsProcess item into this new category. It can then be
reviewed and managed, under that particular and new category, via the
various "To-The-Grave" management functions, just as is applicable with
other categories.
In this case, there is an added and further special
function. You are likely familiar with the fact that when a user
is working to special-order a part (and when the same part number
happens to exist in inventory), the system attempts to interdict the
order. Basically, it injects a message informing your user that
the part is in inventory, and it would make far greater sense to use the
instance that's in inventory, as opposed to special-ordering the item.
So, here's the further logic. If you can be
assisted in using a part that you'd been hoping to return (by having
notice provided when a user is about to re-order the same item), it not
only means more quickly satisfying what had been perceived as an order
need; much more powerfully, it means there's no longer a need to fit
that return within your very skinny return allowance (thereby making
potential space for other returns within said allowance).
So, what we've done is added to the same
behind-the-scenes call that looks within your inventory to see if an
about-to-be-processed special-order request can be satisfied from
inventory. That same call now makes a further check, to see if
there are any special-order items in the Special-Order system in this
new status, and from which the request can be satisfied. If so, it
presents a message similar to the following:
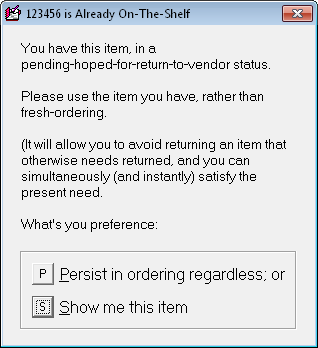
Nothing is needed for implementation of this new
feature, save using the new category. There is, however, one
caveat. The system creates its behind-the-scenes ready-access list
(that is consulted for this check) each night as part of the
Auto-Archive process. This means that if in a current day you have
just added an item into this new category, it is not available
for producing any of these new alerts until the following day.
4.6.15 (6/24/12):
New/Advanced Format for ServiceBench Claims:
Recently ServiceBench introduced some new claim fields,
that allow us to now provide more information as connected with each claim.
This release of ServiceDesk will upload in the new format, and is needed for
all ServiceBench claims henceforth, as it's this new format their system is
now expecting.
Among the new fields that will now be uploaded is a
"Date Started" field. This is different (and to be distinguished)
from the long-standing "Date Call Taken" (aka OriginDate) field.
Its purpose, in part, is to allow improved metrics on service company
performance. For a long time, servicers complained that in many
instances longer cycle times were induced by the fact a consumer
requested a first appointment that was many days (sometimes weeks) out.
Where the only measurement of cycle time was a comparison between
OrginDate and CompletionDate, this kind of situation was indeed
sinister. The new field is intended as an indication of when the
tech first walked into the customer's home, to begin work. A
comparison between that date and CompletionDate can be significantly
more meaningful.
Within SD's on-screen NARDA, we've jostled the boxes a
bit to accommodate some of the new stuff. Here is one comparison:
| Old section area |
New section area |
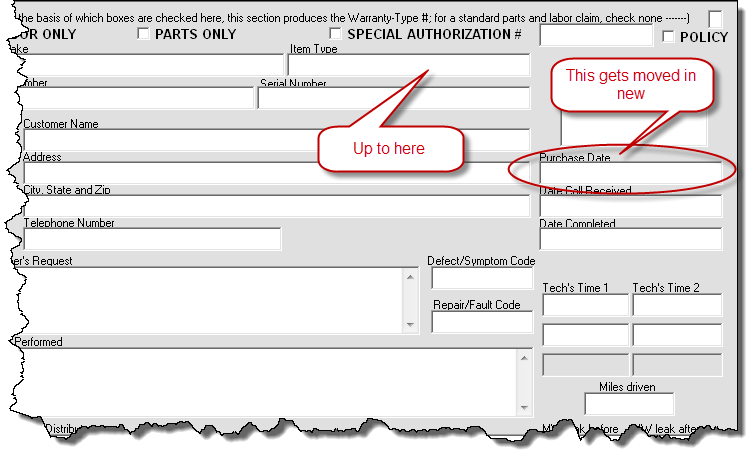 |
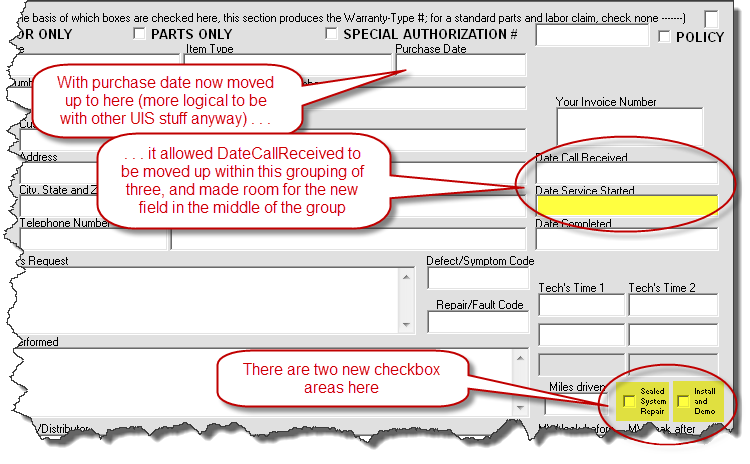 |
If you look carefully you'll see there is also a new
CustomersEmail box. We have not currently coded for this box to
auto-fill with importation of a job to the NARDA, as it's our estimation
servicers may typically not wish to share email addresses (such as they
may have collected) with underlying ServiceBench clients. If you
fill-in the box with an email address, it will nevertheless transfer to
ServiceBench (in other words, for the time-being we are leaving this
field for you to fill-in manually, if it's a piece of information you
want to upload).
Another difference in the new format is that, where
COD jobs are involved, ServiceDesk can now (assuming such information is
provided in the NARDA) upload information concerning amounts charged and
monies collected (if you do not desire to so upload, simply leave this
info absent from within the NARDA).
4.6.10 (5/28/12):
Printing Option in PartsPick Form:
Slightly more than a year ago, we introduced the wonderful
PartsPick form (Ctrl-Shift/F8). Its purpose is to provide a
one-stop venue, to see all parts that should be getting moved to or from
each truck, as relevant to the past and next day's work. Recently
someone pointed out there is often a need to move away from the computer
screen, to where parts are actually at, to accomplish these movements, and
it would enhance ease if the information could easily printed to a piece of
paper, which, in turn, a person can then use to walk about, locating each
applicable item.
Ask and ye shall receive.
In it's lower-right corner, the form now has a new
button:
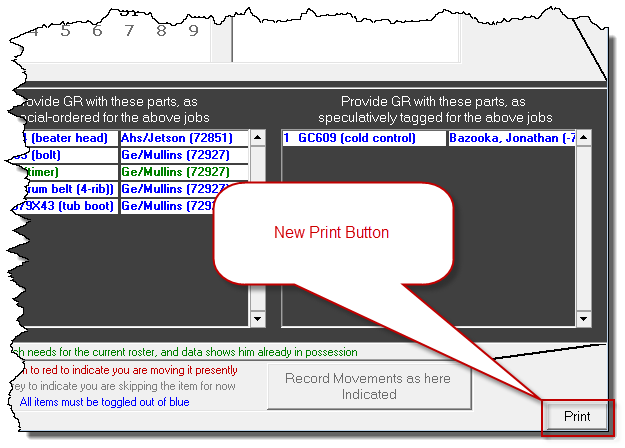
If you want to print the list, click on the button.
It's that simple.
4.6.8 (5/20/12):
Better Accommodation in the Inventory System for
Multiple Warehouse/StoreRooms:
Initially, SD's Inventory Control system was built with
the assumption that, aside from such inventory as kept on each truck, each
service operation would have a single inventory storeroom ("OF"), and
movements to and from the the trucks would all be via that single location.
You might call this the "assumed-office-storeroom-as-hub" premise.
In bits and pieces, we have transcended that premise.
Quite a long time ago, for example, we made it so you
can specify and manage inventory locations that are independent of
either techs or the assumed office storeroom. Just a couple of
years ago, we made it so restock shipments can be checked directly into
any location, with no need to pass through the office storeroom
first.
Recently some users have wanted to further transcend
the "assumed-office-storeroom-as-hub" premise. This release
accomplishes such transcendence in two respects:
1. Within the F10 form's two main
Transfer-Items functions (typically used to restock a tech from
office inventory), you may now optionally designate a source other than
"OF" as the "pull-from" location. Stated more simply, you may now
move a set of designated items directly from one truck (or any other
non-"OF" location) to another.
To do so, you simply must select the function in a
slightly revised manner (this slight revision informs SD of your intent
to specify a different-than-standard "OF" source for what's being moved)
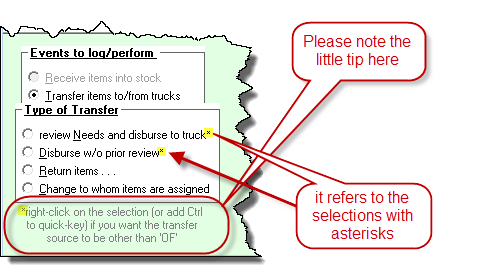
We added the capabilities in this manner because
we did not want to slow down the more typical scenario by placing an
added inquiry into it. As you can see from the above, if you want
the source to be other than the standard "OF," just right-click to
select the function (as opposed to what would otherwise be a normal
left-click) -- or, if you're using the quick-key access method, hold
down Ctrl while doing so. Either method tells ServiceDesk you want
to designate other than "OF" as the source, and it will provide a dialog
for you to indicate such other.
2. When speculatively-tagging items
from stock for particular jobs, you may now indicate a source (for such
tagged items) other than "OF." Suppose, for example, you have a
second physical location (with its own inventory storeroom), and sub-set
of techs who work from it. If you're spec-tagging parts for jobs
those particular techs will be going on, you'll want to tag them to
inventory as located at that secondary location, and not at your main
one.
The contextual guide to use of this feature is
provided in the F7 form (i.e., same context from which you initiate a
spec-tag) via a Tooltip that arises when you float your mousepointer
over its "Tag Part for Visit" button.
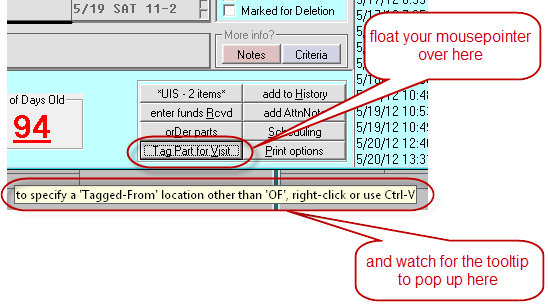
As you can see, the method to designate
other-than-standard/assumed-location parallels what we just saw above.
Do a right-click (as opposed to standard left-click) on the button, or modify
the quick-key shortcut with Ctrl (please note that if you happen to have your
Windows focus in a text box, the "Ctrl-V" quick-key method will be superseded as
a Windows Insert command).
Alternate Sales-Tax Rates for POS operations at
Satellite Locations:
If you have multiple locations, each conducting POS
operations, and if those locations are subject to different tax rates, this
one is for you.
This is one of those solutions where the need is so
rare that, rather than providing a direct user interface whereby you can
specify this variation, we're asking you (should you have the need) to
create a little file that will tell ServiceDesk what it needs to know
for your circumstance.
Here are the brief instructions:
-
Open any text editor (e.g., Word, WordPad, NotePad,
etc.).
-
Type the first rate (it's the rate on
materials if you're U.S.; PST if you're Canadian),
then Tab, and type in the second rate (the rate on labor if
you're U.S., GST if you're Canadian). Type each rate
as a decimal fraction (e.g., 7.25 percent would be typed as .0725).
-
Save the file as "MyPosTaxRates.TXT",
and be sure to save as as "File-Type" Text-Only.
-
Place a copy of this file into the operative
LocalData folder as applicable to each station where needed
(i.e., any that needs POS tax rates other than as placed into the
ServiceDesk Settings form). To determine which is the
applicable LocalData folder at any station, bring up its About
ServiceDesk form; a list of applicable paths is in the lower-left.
The above is all you must do. ServiceDesk looks
for the above-described file on startup. If it sees it, if reads
inside to find the two, special-for-local-use rates you have provided.
It then applies these in the POS context, for the station involved.
Spiffs (or Alternate Use):
Occasionally, we accommodate needs, but in less than a
royal fashion (our logic is that it's impossible to do everything royally,
and some provision is better than none). In this case, a client finds
it useful to pay techs particular add-ons, for things like selling water
filters. It's practical for the operator that's making SalesJournal
entries to keep an eye out for those particular items where such spiffs
should apply, but less practical to make notes in each instance in any
context outside of ServiceDesk. A method was desired via which said
operator could denote, as connected with each such SalesEntry, when any such
spiff was applicable. This release accommodates that.
Specifically, when in the SalesEnter form (F9) and
making an entry, if as an operator you note it's a sale on which a
spiff should apply (or any other special notice you want to attach to
the sale), simply right-click in your entry line, before hitting Enter
to insert it. This can be done before you've entered text, during
or after. What matters is simply that it's before hitting Enter
for the line's insertion.
In response to this right-click action, the system
will query you for text entry (up to eight characters), which will
become part of that SalesJournal entry, in a special little
OtherData field. If you're using it for the Spiff purpose,
perhaps you'll put in an actual amount (or perhaps a description of the
Spiff: whatever purpose you wish to achieve).
This new/extra field is not generally
viewable, because at this point we've not wanted to revise all the other
many mechanisms with which the SalesJournal is associated (it would be a
more major project than we're presently ready to undertake for this
purpose).
Instead, the main place to make use of this new field
is in a Sales data export, as available from the Reports form (F11),
after having ran a SalesSummary report for any period of interest (look
for the "Export with Extended Data" button in the form's
lower-right). When you run the export, you'll find a new field in
the output labeled "OtherData." This field will contain
whatever you've input via the method above-described.
Of course, you may sometimes find mistakes were
made, and need to be fixed. For that reason, we've also provided
limited access to this field from the SalesView form (Shift-F3).
Simply use the method you wish there to display the item or items of
interest. If you wish to see (and perhaps revise) the "OtherData"
field as attached to any item, simply right-click on it.
Again, the mechanism we've provided for this purpose
is a bit "back-door"-ish in nature, but for now (and for the
particular/atypical need involved) we hope it will be adequate.
4.6.7 (5/18/12):
New "Time-Allocations" Report:
Back with release of Ver. 4.4.68 (see entry here for
5/24/10) we introduced an awesome DTR-Viewer (Daily-Time-Report) ,
via which you may review, with super-intuitive graphics, precisely the time
segments each tech spent on the clock, and -- for such segments -- which
specific portions were checked-in/working at actual customer jobsites.
It's a super tool, and, if you've not been making use of it, we highly
encourage you to do so.
Recently, certain users desired some of the same
information that is there presented graphically, but in a textual
format, and instead of encompassing simply a single-day of information
at a time, to encompass a user-specified span of days.
So, we have a new report to accomplish this purpose.
As you might guess, this new report is accessible from
the Reports form (F11). There you should select "Performance -
Techs," then "Time Allocations:"
Pick your date range as prompted, and you should see
something like the following in result.
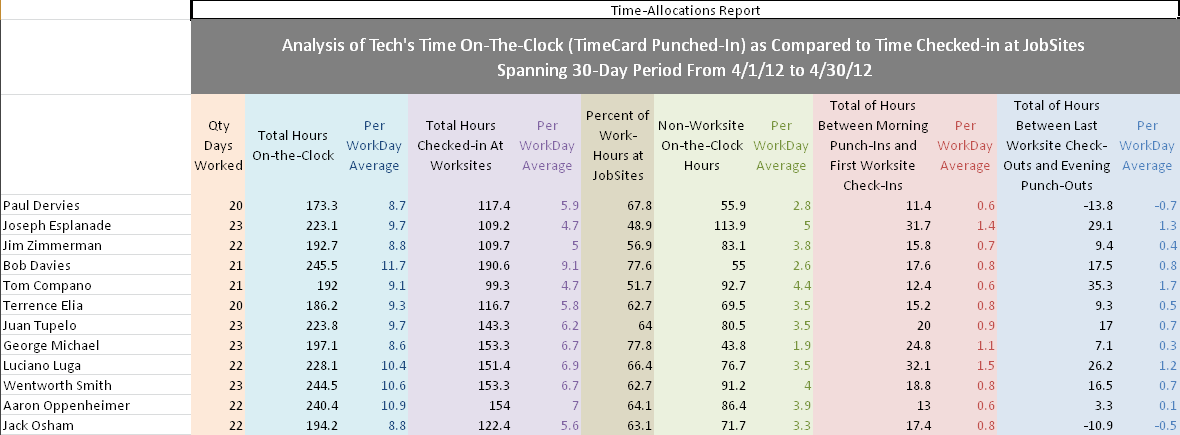
Please bear in mind that, like some of our other
recently-added reports, this one too depends on the computer involved having
Excel installed, which is a component of Microsoft Office.
4.6.5 (5/8/12):
New "Tech-Status" Display in the DispatchMap:
For those of you using SD-Mobile (it's most of you), we've
found that many have not known that to see when each of your techs last
connected (and which version of SD-Mobile each is running in), you can
simply click, within your in-office SD-MobileLink program, on its "Test
Connection / Check Link Activity" button. This produces a quick
little report, on the details just mentioned.
Of course, the above-described program is only accessible
from a single desk (the one which runs the MobileLink program), and we've
learned folks at multiple desks would in some instances like to stay
informed, throughout each day, as to the status of each tech in terms of
informationally connecting with the system. So, we added a new
display:
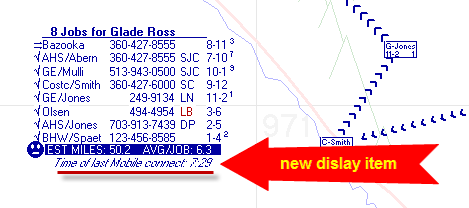
Besides needing this new version of ServiceDesk to deploy,
this new feature also requires an update in the MobileLink program to its
(currently offered) 1.4.97 or above Version (absent that update the enhanced
display in ServiceDesk will show nothing but blanks for the indicated
times).
Non-Job "Naked"-Appointments will Now Port to
the Tech in Mobile:
In the ServiceDesk ScheduleList form (F6), there
has always been the ability to click on the "New" button, and create a
straight appointment entry that is not tied to a job. These can be
used to put "Vacation" entries into the schedule, for example. Or, to
put into the schedule an office meeting that you expect particular techs to
attend. Or, to schedule a time for a tech to have his truck serviced,
etc. The possibilities are almost endless, and we've determined to
call these "naked" appointments because, well, they're not tied to a job. These appointments
show up (just as do job-tied appointments) within the DispatchMap, providing
a nice, on it's face indication of how each applicable tech will be occupied
during the times in question.
When we created the mechanisms in SD-Mobile that pull
appointments from ServiceDesk, our thinking was entirely tied to the
standard, job-connected appointment scenario, and we neglected to
accommodate this other kind. Thus, until now, SD-Mobile has not been
displaying these "naked" appointments for the tech.
We realized this oversight early-on, but have been slow to
address it because there was an easy, user-based solution. Many
companies created one or more fake "jobs," to stand-in for such things as
office-meetings, and made appointments for those fake jobs as needed (thus,
these show up for the tech in his Mobile interface just fine). Though
the expedient has served well, it's nevertheless been a little less than elegant.
The current releases of SD-Mobile and SD-MobileLink
(updates in both are needed) address our original oversight. Now,
"naked" appointments as made in ServiceDesk will port directly to the
tech in Mobile. There is no longer any need to maintain fake jobs,
within ServiceDesk, to "clothe" them.
You may note that, directly speaking, it's an improvement
in Mobile mechanisms we're announcing here, and, normally,
Mobile-side improvements are announced in the SDM-WorkDiary
(as opposed to this, the SD-WorkDiary). However, it's
within ServiceDesk where you need to know about this improvement, in order
to take advantage of it.
Updated SD-Backup Program:
Since long before it was first introduced to the public,
ServiceDesk has had a companion program called SD-Backup.
It's designed to run in the background from any non-server station in the
network, and automatically makes regular backups of ServiceDesk's primary
operating data. We highly recommend you have this program rigged to
run automatically, at least every day throughout the day, if not (indeed)
24/7.
Having been developed so early, this program had grown
somewhat archaic in comparison to the SD system whose job it's been to
backup. Josh, here, undertook the task to fully update and modernize
this little program. While he's been doing a ton of very sophisticated
web-side programming for us, it's his first foray into programming directly
for the desktop on behalf of Rossware. I think he's done a fine job.
Please update to this latest copy of SD-backup. Unlike ServiceDesk,
the update is not automated. You'll need to go to the ServiceDesk
downloads page, pick the update there, and be sure to unzip to the correct
folder (where you otherwise have ServiceDesk itself installed and running).
This means you may need to change from the default "Unzip-To" path.
Also, please be sure you don't have the old SD-Backup running when you
unzip. If you do, Windows won't allow the old program file (in-use for
the running program) to be replaced.
4.6.4 (5/7/12):
Beefed Up "Result on Dispatches" Report:
Four months ago we introduced a new report (see notes
accompanying Rel. 4.5.67). Many call it the "FCC" (First Call Completions)
report. For all appointments as dispatched during a period, it shows
whether the job was: (a) completed; (b) parts were ordered; (c) it was a
customer no-show; or (d) there was some other disposition. It breaks down
such values by tech, and shows totals for the team as a whole. It further
segregates between appointments that involved a first visit, versus appointments
that did not, and provides aggregates for all appointments as a whole.
This release enlarges on the above.
Specifically, besides providing breakdowns on these figures by
technician, it segregates between in-warranty and out-of-warranty. It
segregates between OEM-warranty High-Volume-Clients and non-OEM-warranty
High-Volume-Clients. It segregates between any-and-all third-party-bill
jobs, versus non-bill jobs. Then, it provides breakdown figures by each
and every particular HVC, then by Make, and finally by Type of machine being
serviced.
If all the above segregations are not sufficient to your
analytical desire, the accompanying Check-Data export provides all the
specific data as needed, should you wish to do any further segregations (or
cross-segregations) on your own.
4.6.3 (5/1/12):
New Sales-Tax Strategies Now Available:
If you're observant, you'll note this release involves a
Version-level change (from the 4.5 to 4.6 level series). We do these
Version-level changes as infrequently as we can. They are necessitated
wherever, to achieve some new function that is considered essential, we must
re-format one or more existing data structures. In this case, re-formatted
structures involve two areas: the SalesJournal and A/R files. Upon first
running under this new Version, ServiceDesk will automatically read data from
your old such files, and create a new files in the now-current/new format.
To assure preservation of data integrity, users will be disabled from further
using 4.5 series of ServiceDesk, once any station has run with this new version
There are two elements in particular we've made possible with
this change.
First, you may implement an entirely new strategy for managing
sales-tax rates and applicable jurisdictions. In particular, you can
define a set of taxation schemes, and assign each/any job to the scheme to which
it (in your judgment) belongs.
Second, you may explicitly keep separate track of the two tax
constituents as involved in each sale (particularly important for a small group
of Canadian users with separated PST and GST).
Given that ServiceDesk now has several tax strategies that may
be implemented, we decided it was time to create a
Tax-Strategies Handbook -- to
provide a one-stop, comprehensive overview and guide. It's there you can
learn details, both about what's newly offered in this release, and to guide
your implementation of tax strategies in general.
It's obvious you can click on the above link to open this new
Handbook. Additionally (and for convenience when not looking at this
particular entry), it may be accessed any time by going to the ServiceDesk
Settings form (Ctrl-F1), and there clicking on the little "?" button that
fits between the two tax-rate boxes:

This new Handbook is designed to supersede what had been a
more limited document, which explained simply how to setup a TaxRates file
(which file involves just one of several potential strategies, as now outlined
in our presently more comprehensive Handbook). There are elements in this
new Handbook that likely everyone could benefit from reading. We recommend
that you do.
4.5.73 (3/16/12):
Tagged-Parts Disposition Added to In-Office Type-2 PVR:
This is another instance where the in-office Type-2 PVR (which
long pre-dates the newer PVR as present within SD-Mobile) has been
after-the-fact brought up to more advanced standards as created within the
newer/Mobile system.
Specifically, quite early-on the Mobile PVR interface was
engineered to show a tech items that had been spec-tagged for the job, and
demand he indicate whether he used them or not. If not, it demands that he
indicate why not (just as the same as for special-order parts).
With this release, the in-office Type-2 PVR adds spec-tagged
parts to the same listbox where it's prior requested a disposition check-in on
special-order parts. Thus, there is no need to enter usage of such items
in the "Items used from Inventory" box. It should be done from the
specific dispositions (PickList) box instead.
BTW (and so y'all understand for context), the Mobile
mechanisms are and will remain where our first focus goes when it comes to
interacting-with-the-tech's-work features. Regardless, there are still a
number of users who've not gone to Mobile, and in a reasonable degree we want to
keep the in-office alternatives up to snuff.
Improved Days-In-Past Appointment Viewing in Dispatch Map:
SD's DispatchMap (F5) is obviously used most frequently for
viewing and managing your roster of appointments as applicable to the present
day and days that still lie in the future (tomorrow, the next, etc.).
However, it is also sometimes used to view days in the past. It has
sometimes been somewhat inconsistent in this task. The programmed
algorithms as used to locate the appointments as applicable to a given day
sometimes have worked imperfectly, resulting in less than perfect results.
In this release those algorithms have been totally re-worked, and should prove
to be much more reliably robust.
4.5.72 (2/26/12):
Automated "Call-to-Next-Customer" Function Now Added in SD-CyberOffice/SD-Mobile:
Technically, this is a CyberOffice feature -- but, as with a
few other CyberOffice features, its implementation is only practical within the
context of using SD-Mobile.
What is the feature?
Quite simply, as the tech indicates he's completed one job, an
automated telephone call can immediately go out to the next stop, informing
their tech is on his way. This is a further implementation of the "robo-calling"
function we added a few weeks back (see entry here accompanying Rel 4.5.58) for
use when confirming/reminding on appointments (as typically done the day prior
to the actual appointment date).
To use this new implementation, you need to be subscribed to
both SD-CyberOffice and SD-Mobile (if you are not, call, and we'll get you
setup). In the CyberLink program (you'll need Ver. 4.5.12 or later),
you'll need to "check" a new box to "turn-on" the feature:
Once that is checked (and assuming your technicians are
updated to SD-Mobile Ver. 1.4.86 or later), they'll see a new popup appear
whenever they click, in the Mobile interface, on a job's "I've Finished"
button (at least assuming there are more jobs following the one involved):
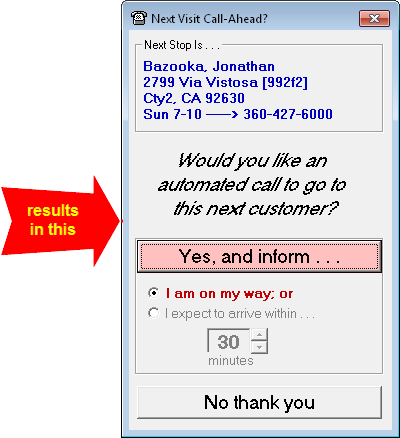
As you can see, it's very fast and easy for the tech.
Within seconds of his consent, a telephone call will go to that next stop.
When the call is answered, an electronic voice will identify the call as being
from your company, and inform of the tech's soon-to-be-expected arrival.
Specifically, if your tech has picked the first-provided option, it will (after
identifying your company) state: "Your technician, [insert technician's
name], is just finishing his prior job, and then will be on his way.
Please have your machine accessible and ready to be serviced. We will see
you soon." If he picks the second option, it will speak similarly, but
state the number of minutes within which the tech is expected to arrive.
Very simple, we think, and very effective.
Improved Setup for BarCode Inclusion (or not) in PartsLabels:
We added the option to include barcodes within PartsLabels
over three years ago. On recent review, it was realized the method as then
created to allow the user to specify whether with-BarCode labels were preferred
(as opposed to standard, text-only labels) was less than optimum. With
this release that awkwardness is corrected. There is a new Settings option
in the PartsProcess form's CheatSheet (from the F8 form, click in any otherwise
non-operative space):
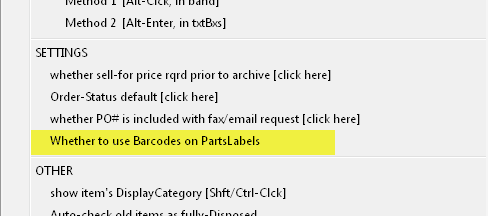
Just click on this CheatSheet item, and you can then pick yea
or nea for use of BarCodes (the default is nea). (Incidental to adding
this new Settings option, we realized the dialog on the three items above it
were not as optimum as they could be; so those have each been independently
improved).
"Check-Data" Export Added to the
new Result-on-Dispatches Report:
About a month ago (see entry accompanying Rel. 4.5.67) we
introduced a new report designed to specifically show percentages and quantities
of dispatches that ended in completes, ordering parts, no-shows and other,
broken down by techs and other criteria. When creating that new report, we
suspected there would be desire for a corresponding option we've prior provided
in connection with several reports.
What happens is sometimes folks run these reports and do not
feel the results are credible. Our solution is to provide what we call a "Check-Data"
export. The idea is, as the code churns through your data to produce the
final tallied figures, it simultaneously compiles an item-by-item table that
contains the specific data it relied on for the tally. This allows you, if
you feel in way any skeptical about the tallied result, to open that table
(exported data) and review the items one-by-one, to see if there is any
discrepancy in how the reporting mechanism handled and judged your data.
Other reports, that already had this "Check-Data" function,
were the TechsTimeOnJob report, TechsCompletionAnalysis
report, TechsRevenue report, both Recall-Rate reports, the
QualityOfService report, MarginAnalysis report, Profitability
report and PayForPerformance report. The simple idea is, after
the report displays, there's an added button toward the lower-right corner of
the Reports form:
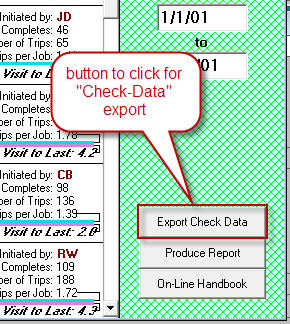
If you want to review the "Check-Data" export as applicable to
the report, just click on that button.
Anyhow, that's all background for stating that, sure enough,
some folks soon requested that our new "Result-on-Dispatches" report be
equipped, same as these others, with its own "Check-Data" export. That is
now added, with this release.
4.5.70 (2/8/12):
New SmartsParts Data Release, and Enhanced/Canadian Pricing Option:
Typically we have been updating SmartParts data about three
times per year, and our last update was in November, which made us not quite due
presently (typical pattern-wise, that is) for another update. However, we
were informed by a few users of SmartParts pricing (in particular on Whirlpool
products) that was significantly too low. On investigation, we learned
Whirlpool had released new pricing, with very large increases on some items, not
long after our prior update. Thus, it made sense to do an update of our
own immediately, rather than waiting for the normal update cycle as is more
typical.
This update also applies, incidentally, to the SmartParts data
set that's automatically built-into (and included with) the SD-Mobile service.
It's virtually automatic there.
If you're using SmartParts otherwise (i.e., in the office),
please do a SmartParts data update immediately (go to Alt-F10 and click on the
CD-tool symbol in toolbar at top).
If you're not using SmartParts otherwise, we highly recommend
you install the data (call us for user/download credentials) and check it out.
Most who've gotten used to it consider it indispensable. You may try for
30 days for free.
If you did not know, SmartParts is both a data set (models and
serials, with lookup on models of fast-moving parts), and is also an
independent, run-on-its own program. The Alt-F10 window within ServiceDesk
is essentially the same interface as is presented by the stand-alone SmartParts
program. If you're using ServiceDesk, there's little need for the
stand-alone program, since you get virtually the same interface within
ServiceDesk (the stand-alone program was mainly intended for non-ServiceDesk
users, though you're welcome to use it in such form regardless, if wanted).
Anyhow, there is an element functionality that until this
release of ServiceDesk could only be accessed from within the stand-alone
version of SmartParts. It's a feature that allows you to specify for
download, into the SmartParts data set, parts pricing that's particular to a
participating parts distributor. To date, the only distributor who's setup
to provide such pricing is Reliable Appliance Parts, and theirs has been
available for several years. More specifically, their U.S. pricing has
been available for several years.
In such regard, a recently-implementing Canadian user, noting
that Canadian prices are not the same as U.S. prices, asked if we could get
Reliable (which is very big in Canada) to provide the same data as they've
already been providing, but with Canadian pricing instead. They agreed, so
now (within the SmartParts) interface, you can specify to grab
particular-to-distributor pricing from either Reliable-US, or Reliable-Canada.
Additionally, while the dropdown for this specification
formerly existed solely within the stand-alone version of SmartParts, it's now
available from the within-SD interface as well. From the ServiceDesk
Alt-F10 view, just click on the "i" information symbol on the toolbar.

The option you select has effect when you click on the
toolbar's CD symbol to update.
Added Security Tracking:
We've long had some pretty elaborate security built into
ServiceDesk, including elements that log (in various contexts) a whole series of
user actions. Recently, though, a new user had an idea for a kind of
logging we were not doing, and it seemed like a great idea.
In a nutshell, any time a user is asked for and presents a
password, our new log will record that specific event, as such an event.
The logfile that's built is called KeyIncidents.csv (the word
"key" is employed because passwords are essentially particular keys inserted
into the locks of particular doors), and will open nicely in Excel:

As you can see, the first column indicates when the event
occurred. The second identifies the security context involved (you can
reference your ServiceDesk SecurityActions form, Shift-F11, for
meaning). The third identifies a string as associated with the particular
key/password as used (aside from MasterPassword, this comes from the second
column on the Users page within the SecurityActions form).
The fourth identifies an abbreviation for the username under which the
applicable instance of ServiceDesk was operating. The fifth identifies the
name of the computer the program was running in. The sixth is a data
integrity number. Basically, it encodes certain parameters for the file
and entry that will permit you, if the need should ever arise, to determine
whether the file has been subject to edits.
In regard to this last, we could have configured the file to
be encrypted, but that opens up its own complications, We deemed the
tamper-evidence numbering system as a more simple expedient, better tailored to
actual level of security need involved.
With this particular release, the file will be found within
your system's operative \sd\netdata folder. From the next release forward,
it will found in the \sd\LogFiles folder.
4.5.69 (2/5/12):
Core Return Labels:
As we add new features, it's almost inevitable that one thing
leads to another.
Back in August of 2010 (see notes accompanying Rel. 4.4.73) we
added direct Core Return functionality where, essentially, a PartsProcess
daughter band is created (and connected with the parent band on which the
replacement itself was ordered) to manage retrieval and return of the core.
Of course, we'd long had the ability to create parts-labels from these bands,
but it had not occurred to us to alter for different/special label printing as
connected with a core-return daughter band. A new user suggested it, and
it seemed like a good idea. So now, if you choose to create a label from
such a daughter band, instead of a standard label you'll get this:

You'll note it's just a big, maximum attention-grabbing label,
without details specific to the item involved. We figure the main label
that you print (from the next PartsProcess item above the core-return listing)
will have the details, and the space within the next label should be used for
maximum attention. We also realize you could advance-print many sheets of
labels with such simple printing, but the in-process context as here provided
should make the sequence far more convenient.
4.5.68 (1/31/12):
Tax Liability Report Very Much Improved In Appearance:
Almost a year ago (see entry accompanying Rel. 4.5.3), we
introduced a compiled Tax Liability Report. We emphasize the word
"compiled" to distinguish from the pre-existing situation. The concern is
for users that must report on tax liabilities to different jurisdictions and at
different rates. We'd long provided exported data via which these separate
obligations can be deduced and reported, but did not prior do the actual
compiling of summaries for you. That's what our new report (almost a year
ago) introduced. However, it was not a good looking report. It
placed plain text into a simple Excel spreadsheet that otherwise lacked any
formatting to enhance clarity and easy understandability. That's what is
now improved. The Excel spreadsheet as produced by this report now looks
like this:

(The old one looked so bad we're embarrassed to show it even
for contrast.)
You'll notice the little red comment flags next to each
jurisdiction title. When you open the comments provided, you'll see they
provide a listing of the zipcodes that, for the sales reported on, were found to
exist within each such jurisdiction. Other appropriate contextual notes
are also provided, for the sake of any assistance you may need in interpreting
the report.
Tax Jurisdictions May Now be Defined at the Sub-Zip Level:
The above-described presentational improvement was triggered
when we were working on a more substantive improvement, as we'll now describe.
Almost three years ago we introduced the ability in
ServiceDesk (again, we're dealing with users that have different tax rates in
different jurisdictions) for you to define the rate as applicable within each
jurisdiction via creation of what we call a Tax-Rates file (see entry
accompanying Rel. 4.4.5). The simple concept is you list each zipcode, and
for each indicate the jurisdiction that's applicable, and tax rates.
ServiceDesk (and SD-Mobile) consult this file when needing to ascertain which
rates should be applied to a job within each such zip area. So does the
above-described report.
It seemed like a great plan, but with one caveat. We
soon received reports indicating that in some areas a single zipcode area will
actually span across one or more different tax jurisdictions. So, if I
define a particular zipcode as belonging to one jurisdiction (as per the plan we
developed), the result will be wrong for those residences that, though within
that zip area, are actually in a different tax jurisdiction. Dang!
This release provides a solution for that. In essence,
our new method allows you to have split-zipcodes. Details are in a new
chapter, as just added to our "How to Create Your Tax-Rates File"
handbook. One way to open that handbook is via a button provided in
the ServiceDesk Settings form:
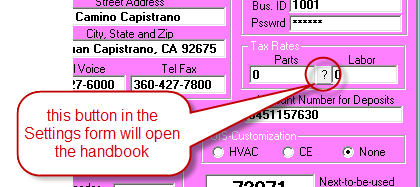
Or (perhaps more convenient for the moment),
just click here.
When you open the little handbook (and assuming you want to know how to split
zips), look for its Chapter 4.
Improved Zone Handling for ShopJobs:
Occasionally over the last few years, we've had users express
a particular conundrum. It arises in connection with ShopJobs, and when using any of our DispatchLink
utilities (or CyberLink) to keep outside entities (such as ServiceBench, ServicePower or
your own online scheduling interface) apprised of availability status. The
conundrum is that, most typically at least, servicers do not want ShopJobs
to decrement against availability. This is because, in contrast to field-appointments,
the time that's needed for shop work can typically be pushed around as needed to
accommodate acceptance of much more time-critical field appointments.
To be somewhat more specific, the issue arises only in the
particular case where a company decides to create pseudo "appointments" for
their ShopJobs. Often companies find that a pseudo appointment is needed as the mechanism to
put the intended/needed work on a tech's roster, to assure it's addressed in a
reasonably timely manner (absent such "appointments," shop work can tend to be
put off off forever and ever).
The question then becomes: when creating these pseudo
appointment for ShopJobs, how do you avoid having them decrement availability in
zones that are setup to manage availability on field work?
This release (actually, it was in the last release, but we
forgot to announce it then) offers a solution.
First, we made it so the system will accept (for the
appointment's designation of applicable zone) Zone 0. Zero is not a
true zone. It's a fictional one -- meaning that any appointment assigned
to Zone 0 does not count against any real zone's availability (please note the
underlying JobRecord may still be assigned to a real zone, and it's the only
appointment's independent designation that potentially decrements
availability status).
Second, we added a new query that injects when you go to make
an appointment in connection with a ShopJob:
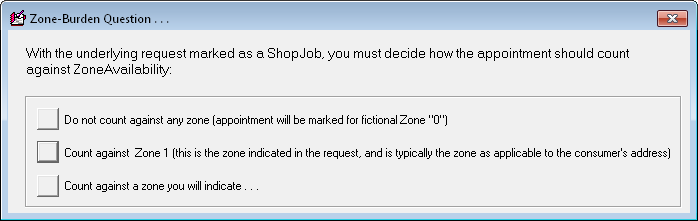
The query is needed because what's sensible, in terms of what
should be done concerning the zone-assignment, will vary with circumstances.
In some cases the appointment may be intended as one that's delivering the
product back to a customer; in such a case, you'll want to accept the middle option
(above): to insert the true/actual zone as applicable to the consumer's address
(this is pulled from what's already designated within the JobRecord).
In another case, you may be pulling in a technician who's otherwise assigned to
field work (within a true/outside zone) to do the
in-shop work -- in which case it would make sense to pick the third option, and
then indicate (as the subsequent dialog asks)
the particular zone within which that tech works. And, of course, there
are the instances where you do not want the appointment to count against true
zone, in which case you'll pick the first option above.
Please note again this remedy applies only if you're setup
with multiple zones. If you're setup with a single zone (or with no zones
at all), none of this will affect you.
4.5.67 (1/29/12):
New Report on Technicians' Performance in Regard to Dispatches Received:
Though we've long had excellent reports for evaluating
technician productivity (indeed, a whole set of them), we kept getting requests
for some different kinds of numbers, as compared to what we were directly
providing. In particular, folks wanted to more directly see, from among
the quantity of appointments as assigned to each tech (aka "dispatches"), how
many within a particular period resulted in completions, how many resulted in
ordering parts, how many no-shows by the customer, etc.
This release features a brand new report to satisfy such
requests.
It's called the DispatchesPerformanceReport, and is
situated within (sensibly) the Reports form (F11), within its "Performance
- Techs" sub-category.
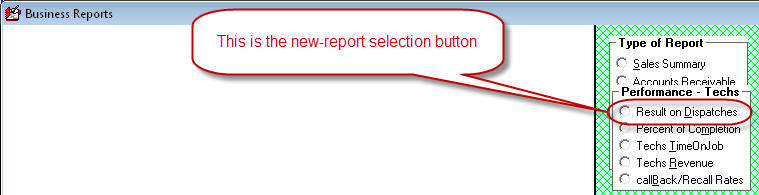
Here's what the actual report output looks like:

As you can see, it's somewhat more raw-numbers oriented than
are some of our other reports (this is what we heard some users wanting).
This report does require installation of Microsoft's Excel to
contain its results, so if you do not have that application installed on the
machine where you want to run the report, it would be a good idea to do so.
Our Reports/Online Handbook (available via provided
button within the Reports form) does have an added section to describe
more specifics about this new report (new Chapter 8 therein).
4.5.64 (1/16/12):
Mobile Tickets Can Now Be Initiated within SD:
In November of '09 (see notes accompanying release of Ver.
4.4.38) we added the ability within ServiceDesk's FinishedForms context (Alt-F4)
to directly open a ticket, as created by a tech within SD-Mobile. This
made it possible for an office person to have complete edit-ability over
Mobile-created tickets. Most particularly, an office person could now edit
such tickets, add pricing and
otherwise finesse, for the tech's reuse upon a return visit. (Of course,
the opened Mobile tickets also became useful tools for ultimate entry to the
SalesJournal.)
Though great this addition was, there is a significant element
we did not at the time include.
Specifically, we did not make possible for a person in
the office to initially create a Mobile ticket, prior to the tech ever having
made one himself, as applicable to the job. This might be appropriate, for
example, if the office receives a request for service and is able to tally up
everything that will be involved prior to sending the tech out. This might
be done for the sake of giving the customer a direct and precise quotation.
Supposing the customer accepts, it's best to have that same document the one
which the tech will then use, upon performing the work, for presentation to the
customer.
With this release of ServiceDesk, that is now possible.
Whereas, if you previously went to create a Mobile ticket on a job where none
prior existed, you would have seen this message:
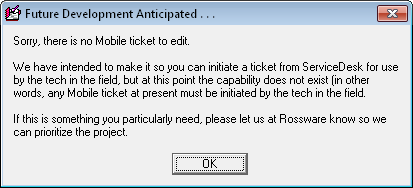
Now, instead, you'll see the following:
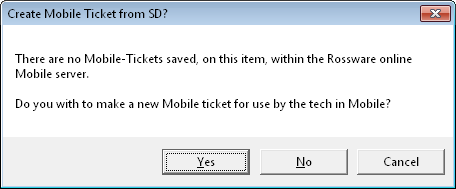
Just confirm you want to make the new ticket, and the rest is
child's play. Upon your "saving" the new ticket, ServiceDesk uploads it to
Rossware's online Mobile server, where it is then available to the tech, when he
goes out on the job.
4.5.61 (1/6/12):
Still More (and Continuing) Evolution on the new Robo-Calling:
I thought we were doing a good thing by adding
built-in screening, to prevent sending of reminder/confirmation-requests in
circumstances where the underlying appointment is in a status that indicates
it's already beyond such a stage (i.e., a request was already sent, the item was
already dispatched to the tech, etc.). That intended "enhancement,"
however, resulted in a storm of protests, and so has been highly modified with
this release.
In current state, the system will check when you request to
send reminder/confirmations, to see if any applicable appointments appear to be
already beyond that stage. If so, it will present a message like the
following:
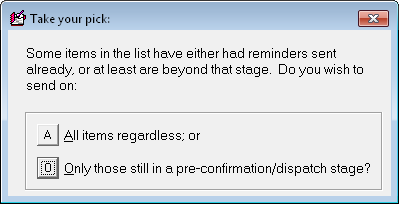
Take your pick, and you'll get results as wanted.
4.5.60 (1/4/12):
Continuing Enhancements on the new Robo-Calling:
Since our introduction two days ago of Robo-Calling, it's been
a whirlwind here at Rossware. It's possible this feature has generated
more immediate excitement than any prior. Early adopters found bugs we
needed to fix, and produced a nearly instant flood of ideas for improvements.
We have tried to implement all as quickly as we can. This release fixes
all known bugs, and incorporates all requested improvements, as needed within SD
itself, that we are aware of to date.
Corresponding with this release of SD is a new release of
SD-CyberLink, Ver. 4.5.8. You'll need to update to that to take advantage
of the ability of your customer to choose to cancel (as opposed to confirm) the
appointment via robo-call communication option.
One new ability that will not be contextually apparent
(absent notice here) is a new option placed into the Confirmation/Options form.
Current with the last-prior release, that form looked like this:
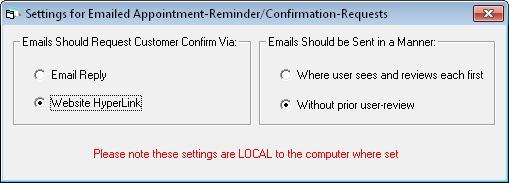
Now it looks like this:
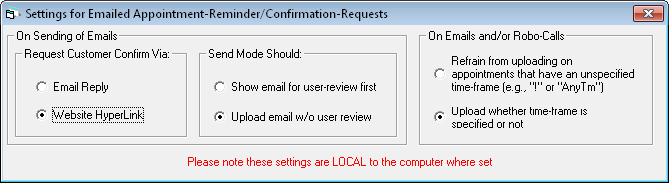
As you can see, the new section on the right gives you an
option that is self-explanatory.
New Sales-Entry Option:
There's a new method to accommodate the need to record
SalesEntries with dates that correspond with when the work was actually done, as
opposed to when the entry was made (which has been the default date used in all
circumstances, prior to now). There's a new button in the F9 SalesEnter
form for the purpose:
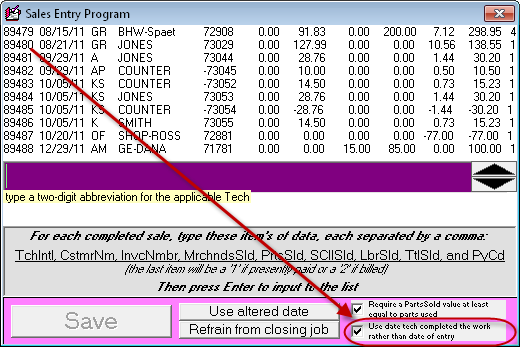
This option may be particularly useful if you pay your techs
on a commission basis, and want to assure their commission reports match
perfectly with the reporting period (and contain solely work that was physically
done within that period, as opposed to when the SalesEntries were entered).
New PartsProcess Export:
We have people wanting to get ever more kinds of data out of
the PartsProcess system. We decided to create a comprehensive export, that
simply provides all fields for all records from that context:
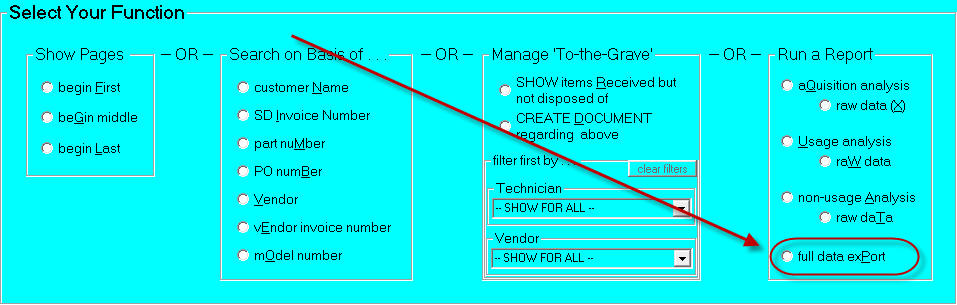
If you do not recognize, this new option is in the F8
Archived-PartsProcess form.
4.5.58 (1/2/12):
Robo-Calling to Remind/Confirm On Appointments:
At Rossware, we hate to move backward.
Some five years ago, we introduced the truly modern and (in our opinion) correct method for reminding your customers of their upcoming appointments, and
soliciting their confirmations. The function is part of our
CyberOffice suite of options, and works with incredibly efficient,
super-silky smoothness. Quite simply, ServiceDesk sends an email the
afternoon prior to each appointment. This email reminds of appointment details, and invites the
customer to click on a hyperlink to confirm. That link, in turn,
takes your customer to an interface on your website (we provide as a plug-in)
where he/she can either click to confirm, or re-schedule if need be. Full
results feed automatically back into ServiceDesk. This is, quite simply
(and, again, in our opinion) "the way" your reminder-and-confirmation process
should work.
However, we've encountered a bit of push-back from some
of our users. The refrain insists that there remain a significant percentage of
jobs where it's impossible to effectively communicate with the customer via
email, and so more old-fashioned communication modes must be retained. In
particular, the desire is pressed for a system that, instead of using automation
via email, would use automation via telephone calls instead (aka "robo-calling").
You wish; we deliver!
Again, we've been somewhat reluctant, because we feel it's a
step back in technology, but we now nevertheless offer robo-calling as a method
for auto-reminding appointments with your customers, plus to allow their
automated confirmation.
Prior to this release, if you picked DispatchOptions from SD's
F5 DispatchMap (either by clicking on a tech's name at the top of his list or
by keying Alt-P then picking the "Invoke for All Techs" option), down near the
bottom of the resulting list of options, you'd see this:
The option as shown highlighted above invoked our
long-standing CyberOffice/Email/Hyperlink mode of reminding on applicable appointments (plus
triggering for confirmation, etc., as described above). Within the same set of options from
this release forward, you'll see the following instead:
As you can see, the option wording is changed to encompass a broader
purpose. It's not just emails now that can be used as the method.
The option can be used, as well, to trigger robo-calls. When the option is
picked, the differences continue. This is what you saw before:
What you'll see now is very different:
As you can see, you can still choose to use what we consider
the modern method (emailing). Or you can choose robo-calls. Or you
can choose to prefer emailing on jobs where an email address is present,
with the system primed to robo-calling otherwise. Finally, you can choose
to both email and robo-call in each case where appropriate targets (email
address and/or telephone number) exist in the underlying JobRecord.
You may notice that the old options gave you a couple of
different parameters from which to pick in regard to emailing (customer confirms
via email versus hyperlink, and with emails user-reviewed first versus not).
Those email-method options still exist, but have been moved out of the
every-time dialog into more of a set-once-and-forget context.
Specifically, if you right-click in the DispatchMap to bring up its CheatSheet,
there's a new menu option there:
Clicking on it will produce this:
As you can see, it's a micro-settings form -- a place where you can set once what
would have been the particulars of your choice within the old
email-appointment-reminder/confirmation-request dialog (with the choice thus
separated, it does not have to be offered to you each time).
When you choose to robo-call a reminder/confirmation request
to your customers, within 15 minutes a telephone call will be made to whatever
telephone number is in the first telephone number position for the consumer
(e.g., CustomerTel1 if it's a COD job, LocationTel1 if it's a third-party-payer
job). If there is no pickup of the call, the effort will repeat at 15
minute intervals thereafter -- until one of three conditions arise: (1) a person
or device on the other end finally picks up; (2) the appointment is otherwise
confirmed within SD; or (3) the date/time of the appointment moves into the
past. Outgoing calls will go into wait mode during any period outside of
reasonable calling hours (specifically, they are allowed only between 7:30 am
and 8:30 pm, local time).
When/if the call is answered by a human, an electronic voice will remind of
the appointment (with appropriate details), and ask the consumer to press 1 to
confirm. If the call is instead answered by a voice-mail type of device,
the electronic voice will leave a message with appropriate details, and ask the
recipient to call an 800 number to confirm.
Regardless of how confirmation is produced, within minutes of
its occurrence you'll see the appointment
reference in SD's DispatchMap change to the appropriate symbol showing
confirmation (it should happen within the next-cycled update of the SD-CyberLink
program), plus there will be a notation in the JobRecord's narrative history
describing the confirmation (very similar to if it was an email/hyperlink-based
confirmation, but with text modified accordingly).
This is considered an extension of our CyberOffice
suite of functions, and requires a CyberOffice subscription to enable.
In fact, it's very important that you update to the latest SD-CyberLink release
(Ver. 4.5.5) before using this new feature. There is a fee of 10 cents for each robo-call that
is completed (i.e., if/when picked up on the other end; there is no fee for
outgoing calls that are not picked up). We are paying the
service that does the actual calling, and must be reimbursed the expense.
We will charge the amount as part of your standard monthly billing.
Auto-Application of Discounts Via Transition from FinishedForm to SalesJournal
Entry:
A new client in Canada does a lot of work for Sears.
Sears pays the client 15 percent less than the amount invoiced. In other
words, Sears expects the invoice to show one amount, while what they actually
pay is 15 percent less than that. How to accommodate?
What we've done is, when you're using amounts as populated in
a FinishedForm to auto-insert to a SalesJournal entry, the underlying code will
now look for some key phrases and amounts in the underlying JobRecord.
Specifically, in the CustomerAddress box, it will look for the
phrase "Materials Adjust". If it sees that phrase, it
looks to see if there is a numeric expression following it. If there is,
it will apply that numeric value, as an adjustment ratio, to the two materials figures
as involved in the sale
(merchandise and parts), when doing the auto-fill to a SalesJournal
entry.
Similarly, in the CustomerCity box, it will look for the phrase "Labor Adjust". If it sees that phrase, it looks to see if
there is a numeric express following it. If there is, it will apply that
numeric value, as an adjustment ratio, to the two labor figures as
involved in the sale (scall and
labor), when doing the auto-fill to a SalesJournal entry.
Based on the above, this Canadian client should setup his
Sears QuickEntry template in a pattern something like this:
Based on the QuickEntry template being setup in this fashion,
those key phrases will be inserted to any applicable JobRecords as created with
Sears as such a client. Thus, when it's time to do the SalesJournal entry,
the phrases will be in the applicable JobRecord. You'll assemble
total/face amounts of the sale (as per usual) within the FinishedForm.
Then, when you click on the ExecuteSale button, ServiceDesk will see the
adjustment amounts, and adjust accordingly when inserting figures to the
SalesEnter form.
4.5.51 (11/27/11):
More on Pricing Control:
A long while back, we introduced an option in our
MarginPlanner system to allow, in essence, MSRP to rule, in terms of what SD
inserts via its auto-pricing mechanisms. This need was registered, in
particular, by a client who felt that if he varied from MSRP he'd lose the
loyalty of his client base. The formal title for this option is
DeferToPublishedPricing. It depends on having SmartParts data
installed (the source of such "published" pricing), and is triggered by simply
checking an appropriately-labeled box within the MarginPlanner form (Shift-F10):
The thing is, until now this option has had effect only within
SD itself, and not within Mobile -- where the tech is in fact often inputting
parts that must be priced then and there. With this release,
implementation of the option will potentially carry through into Mobile as well.
In particular, when you now check the main option within SD, a new sub-option
will appear immediately under it:
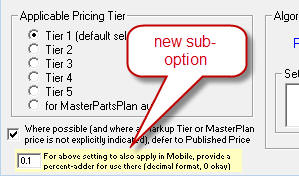
As intimated via the contextual labeling, if you leave the
indicated box blank, your DeferToPublished pricing option will not carry through
into Mobile (i.e., the default/status-quo that's prevailed until this release
will be maintained). If you place a value there, however (even a value of
zero), it triggers for the option to carry into Mobile. The underlying
logic is, you may want your Mobile pricing to be tied to MSRP, but perhaps just
a bit more (the above-illustrated setting, for example, would result in
Mobile-created pricing being inserted at 10 percent above MSRP). You can
pick whatever percent difference from MSRP you want Mobile-created pricing to
be, including precisely at MSRP (in which case you'd insert a value of 0).
More for Kinooks:
Yes, if you're a client in the US, you're indeed among the
overwhelming majority of SD users -- but it doesn't mean we can overlook our
dear friends to the North. As mentioned in an earlier release, they have
some special tax needs there, owing to the fact they have provincial sales tax
(PST) and federal sales tax (GST). In some of their provinces, both are
effectively charged as one entity (HST), but in others they're fully separate.
Back with release 4.5.44 (see relevant entry below) we had a major upgrade
within Mobile to accommodate the separation. This release concerns an
enhancement within SD itself.
In particular, we recently learned from a client in
Saskatchewan that, at least as configured there, some sale items are exempt on
one of the two taxes, some on the other, some on both and some on neither.
This is relevant to SD's FinishedForms POS interface (Alt-F4), where the
Generic and Custom form types have long been configured with a
column of line-item checkboxes, to indicate whether each corresponding line-item
is tax exempt. For Canadian users as just described, two different such
columns are needed.
| Instead of this: |
Users in some Canadian Provinces need this: |
 |
 |
The first of the two columns should be checked to indicate
that a corresponding line-item is PST-exempt, and the second to indicate
GST-exempt (if you forget which is which, float your mousepointer over the top
of any checkbox for a ToolTip reminder). With this release and forward,
the two columns will appear (within the Generic and Custom FinishedForm types)
for any user whose SD installation is setup to indicate separate PST/GST
treatment.
4.5.50 (11/20/11):
Upgrade for the Within-SD Type-II PostVisitReport -- Bringing it up to the
Current SD-Mobile Standard in Regard to Checking-Off Usage (or Why Not?) of
Special-Ordered Parts:
If you're bored by historical context, skip the next three
paragraphs.
The first PVR interface in ServiceDesk was what we presently
call the PostVisitReport Type-I (Shift-F7). It collects PVR information
via a dialog (Q & A) type interface. It was the only PVR method for the
first few years. It was designed primarily with intent to accommodate a
technician sitting at a console in the office and making his own PVR. In
2002s we recognized the need for an interface where an operator (more
typically an office person doing the PVR on behalf of a tech, rather than the
tech himself) could simply click or tab into each area as relevant, as opposed
to running through an entire dialog in every instance.
Thus, we developed SD's PostVisitReport Type-II, which is much more a
fill-in-the-blanks type of interface.
When first introduced, our new Type-II PVR did not have quite
all the added bells and whistles as had been developed in the old and more mature
interface (such as, for example, being able to report that a part as used from
stock came from a different location than the applicable tech's truck).
Gradually, we added them in, eventually bringing Type-II up to full par. Then, as folks began
asking for even more bells and whistles, we began neglecting the old interface.
We would, in short, add a new bell or whistle into our shiny new interface (such
as the system which warns if a part, as being special-ordered, is actually in stock), while neglecting to add into the old. Thus, over
time the PVR Type-II became a much more capable agent, as compared to the old
interface.
Approximately three years ago we introduced a new (and third)
PVR interface, as incorporated in SD-Mobile. Its history follows a trajectory
similar to the Type-II PVR within ServiceDesk: first it did not have all the
bells and whistles, but we gradually improved and augmented until it did, then
as the process continued it eventually eclipsed the within-SD PVR in terms of
the total power and utility it offers.
With that as context, what's involved now is retroactively
bringing SD's own Type-II PVR up to current SD-Mobile standards -- in one
particular respect.
Specifically, some 13 months back we augmented
our cradle-to-grave parts management system (see 10/12/10 entry in the
SD-Mobile WorkDiary).
Prior to that, Mobile's "check-off usage" section had nothing better than an
almost perfect parallel to the section that's existed (until this release) in
SD's Type-II PVR: a place where the user is permitted to check-off
indication of usage, and in absence of such action the system assumes non-use.
We altered the Mobile interface to make it so the tech is required
either to check-off usage, or to otherwise indicate a specific reason why he did
not use the item.
We had a request to add the same enhancement into SD's Type-II
PVR, and that is what's accomplished in this release. Now, where there are
one or more items showing in this particular Type-II PVR box:
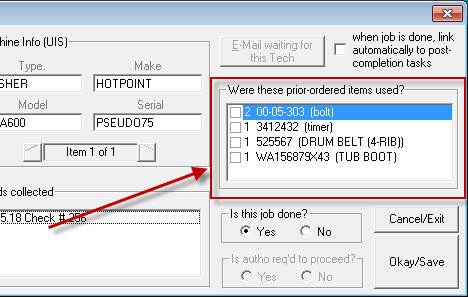
and if the operator clicks to save the PVR without having
first indicated disposition of each such item, this interdicting message will
appear:
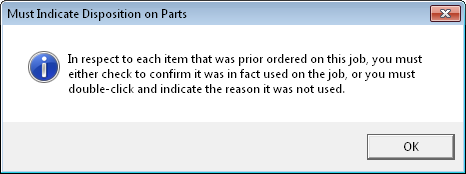
The user will be returned to the main PVR interface, to
complete the required work. Just as in the Mobile interface, a
double-click should be used, on any line-item, if needing to indicate non-use
and the reason why. It triggers a box like this:
where the particular reason can be indicated. The
specific listing of options in this box will be precisely the same as in Mobile.
What's shown above is the default, but if you've customized the list for Mobile,
the same customization will be seen in ServiceDesk (for instructions on how to
customize, see
this document).
One more enhancement, to mimic current Mobile standards:
If there was a core on the item involved, the operator will be informed, and not
permitted to proceed unless indicating the core return was placed into proper
channels:
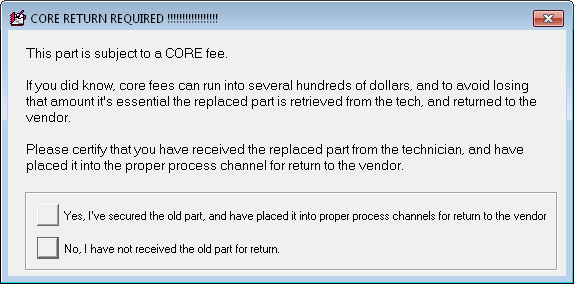
In general, we do not intend to bring SD's internal/built-in
PVR interfaces up to every standard that has developed (and will certainly
develop further still) in the Mobile context. We feel our more advanced
users (the ones more in need of and more likely to use advanced bells and
whistles) should be migrating (most have already done so) into Mobile regardless
-- so it is where we are logically putting most of the advanced power as
regarding information flow between office and technician. In the
circumstances involved, however, it seemed sensible to migrate this particular
enhancement back into the older environment.
A Model Communication:
We work "stinking" hard here, striving constantly, with
enormous energy and determination, to make the system better for all of you, our
beloved users. We think of it as a virtual partnership. We're
working for you, and you (in turn) help us with your input. But the fact
is (I am sorry to say), some of our users are a little less effective in helping
us than we'd like. When we receive communications that lack specificity
and context, it is sometimes worse than receiving no communication at all
(consumes our time reading them, but with no benefit in understanding). In
general, where you're initiating a communication and expect to put us to work in
responding (typically via an improvement in the software) we need you to be
willing to put in sufficient work to make your communication effective.
Recently, I received an improvement/fix request from a user
that struck me as the perfect model I wish all would strive for. Given
that it concerned a somewhat complex topic, the sender had first taken the time
to fully explore and familiarize himself with what he was encountering in
ServiceDesk. Then, he further took the time to formulate his description
in a manner that made it totally easy for me to understand -- and with great
precision -- what he'd encountered. I can't tell you how much easier this
made it for me to go right to the underlying fault, and fix it.
With the author's permission, I am here providing a copy of
that email for all to view (click
here).
Though Paul Manning happens to set the highest possible
standard (in communication excellence), many of you likewise do superbly in
making your communications precise and readily understandable. I cannot
tell you how greatly I appreciate that.
I also immensely appreciate when, like Paul, you are
considerate in choosing to direct requests to persons other than me (Glade Ross)
when accurately anticipating it is not a matter that requires my personal
attention. We've grown large enough here that it's not practical, any
longer, for users to expect my direct attention on matters where other staff are
competent to assist. I can't be stretched that thin, so appreciate where
people have the insight to leave me free for the matters where I am truly and
uniquely required.
If any of you do not know, unless there is a specific reason
why I should be particularly addressed, email requests should instead go either
to a particular staff person other than me, or to our general support mailbox (support@rossware.net).
If everyone chose to go direct to me in every instance (as some do; I've been on
a campaign to try to break this habit), I'd be spending all day every day --
doing nothing but attempting to keep up with emails. That would not a
productive Rossware make.
4.5.45 (10/23/11):
Finally Filled that big/little "Hole" in Inventory Control:
Even when first introduced on the market, ServiceDesk had a
lot of awesome features. There were several particular and significant
functions people reasonably expected, however, that did not exist. When
asked about such expected elements, I've candidly referred to them as "holes."
As a general development strategy, we've gone after the hard things,
occasionally skipping past an element that seemed less immediately important.
Over time, we've made it back to most such areas, filling in such holes
as were initially left behind. But one in particular has remained, until
this release.
In the inventory control system, we've long had several superb
systems for ordering stock replenishment. We've also had a superb
interface for checking in stocking parts as they arrive. We have not,
however, had a mechanism for keeping track of what's on order for restock and
waiting for arrival (referring here specifically to stock replenishment, as
opposed to special-order where in fact such details have long been very precisely tracked).
For persons migrating from other systems where they had such
an ability, this hole has at first seemed shocking. At least on initial
discovery, they've typically thought the hole would be untenable. For
years, though, I've had the same reply. Please try the system as is.
If after real use you find this hole is an issue for you, it will then be a
priority for me to fill it. Otherwise, I need to spend my time on projects
real-life users are actively clamoring for.
To be candid, I've wished somebody would later tell me the
hole had proven to be untenable, because I've grown tired of confessing to its
continued existence. It did not happen, though, until last week. A
user in Newfoundland called and said
for them it's an average of ten days between placing their order for restock and
receiving the shipment. During that time, they need to order restock again
-- and, obviously, need to know what's presently pending in that ten-day order
queue.
As had long been promised, I turned my attention immediately to the
matter.
From this release forward, ServiceDesk will automatically keep
track of re-stock orders when you create them via the F10 form's
items-presently-deficient method (keyboard shortcut is F10→O→D).
It will also automatically check-off items, as prior placed into this new
ItemsOnOrderQueue, as you check in parts using the F10 form's
receive-items-into-stock method (keyboard shortcut is F10→R).
In fact, while working in these two environments, you won't notice
this activity. It's simply done behind-the-scenes, for you.
Where you'll see a difference is where you go again
to that same order-on-the-basis-of-items-presently-deficient
environment, and view items on which you are still deficient, and where an order is
presently pending. In that circumstance, text in the right-third of any
applicable line-item will appear in a magenta color, as opposed to the
normal black. This is to alert you to the fact an order is actively
pending on that item. And, if you simply float your
mousepointer over the item, a ToolTip will appear that details precisely what
order is pending (or, if multiple orders, it will detail the multiples):
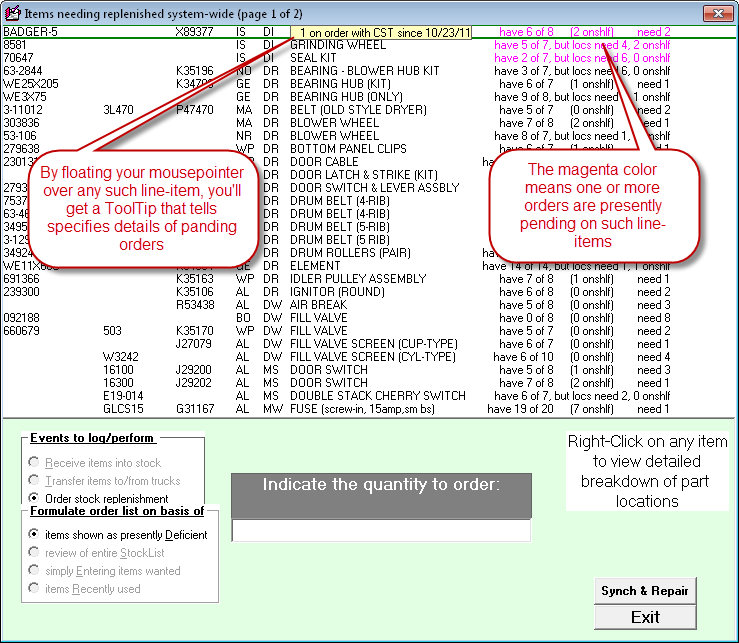
There are certainly enhancements we might make in the future,
now that we've created this particular structure. For example, we might
make it so you can receive a shipment simply by direct-matching it to the prior
order. For now, though, the above is as far as we've gone. It meets
the minimum need.
Improved IQ on WipAlerts:
This is one that's likewise been a long time coming, but -- hey
-- we got there.
WipAlerts are a totally awesome feature. If you've not
been taking advantage of them, I stoutly, strongly, and with huge emphasis
recommend you change that omission post-haste. Really, they're totally
powerful, and if you're at all past the beginning stages of ServiceDesk
implementation, you should be using them.
Regardless, as awesome as WipAlerts are, they've long suffered
from a particular limitation in IQ. It concerns either of two situations:
1. You have an appointment pending for some
date rather far into the future; or
2. You've ordered one or more parts, and
the expected delivery date is rather far in the future.
In either case, the customer is not really
expecting to hear from you for some significant time. Regardless, it's
been the structure of the WipAlerts system to periodically pester you, even
while you're waiting for that far-off event. On the one hand, this is not all bad. In my service
business, we learned that even when we told a customer it would be at least two
months before a part would arrive, if we did not call them at least
occasionally during the intervening period, they'd conclude we'd neglected them.
WipAlerts are a great tool to help assure that occasional contact.
However, they do not need to remind you as often as otherwise.
Until now, they've had no IQ to distinguish between that
circumstance and others. With the present release and forward, they'll be smarter.
Specifically, where either an appointment or expected
parts-delivery date are still pending, the WipAlert system will multiply
whatever is otherwise the specified grace period, for the category, by a factor
of five. As an example, suppose you've left the grace period as applicable
to the "Waiting for Parts" status category at the default value of 3 days.
If so, and if the system finds the anticipated arrival date of any pending
special-order order part is still in the future, it will multiply that three
3-day grace period by a factor of five, changing it to 15 days instead.
In consequence, you'll not receive a WipAlert in such such circumstances unless
its been 15 days (as opposed to a mere 3) since the date of the most recent
entry in the underlying JobRecord's historical narrative.
To assist you (and, frankly, we here at Rossware too) in
remembering what is the structure of this enhanced WipAlert IQ, we have also
augmented the ToolTips that show when you float your mousepointer over any
JobRecord's status selection. Instead of merely showing whatever is the
applicable grace period for that status, the ToolTips as particularly applicable
to the status categories of interest will additionally have some added text to
explain this added IQ. Here's an example:

As with any ToolTip, this one comes up when you float our
mousepointer over the underlying object that triggers it (in the above case, the
"Waiting for Parts" check category).
Small Enhancement in Tech's Revenue Report:
Recently we were asked to add a couple of figures to the
"Tech's Revenue" report (keyboard shortcut to get there is F11→T→R.
The new figures are shown (circled) here:
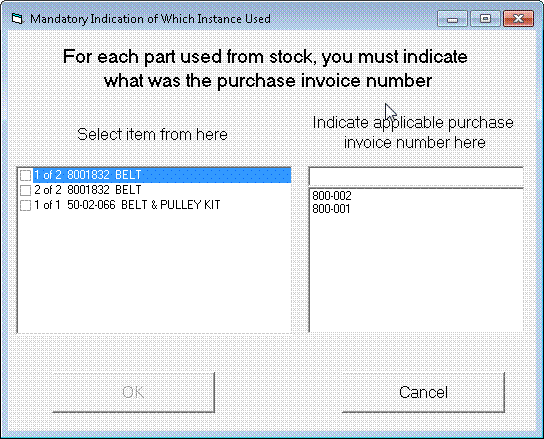
The first-circled section is obvious in meaning. The
second breaks down the tech's average per-day sales in Materials (M) and in
Labor (L).
Better Housekeeping:
A database-cleanup routine (for the UnitInfo.mdb file) was
added to the regular nightly archive sequence. It will help keep your
UnitInfo database performing in top trim.
4.5.44 (10/10/11):
Explicit Exempt-Amount Fields Added to Tax Export File :
In the Reports form (F11), when you a run Sales-Summary there
has long been button for exporting extended data, including in particular a
table that itemizes each sale with significant accompanying data (zipcode where
each sale occurred, department, etc.). We have just added three more
fields to that export (exempt materials, exempt labor, and exempt total).
These values could always be derived, but now they are there
explicitly.
Full Accommodation for
PST/GST Separation -- as Needed in Some Canadian Provinces:
If you are a Canadian client, this will interest you
(otherwise not).
If you operate in a province that requires separation of PST
and GST on your invoice, we hope you have known there is an alternate version of
the Generic FinishedForm that's designed to accomplish this. If
you need this and have not been setup for it, please contact our office and
we'll help you make the change.
If you also are using SD-Mobile, this will especially interest
you. Until now, there has been no ability to separate PST and GST in the
Mobile ticket format. Now there is. For details, please look in the
SDM-WorkDiary for the entry
carrying the same date (10/10/11) as this one.
4.5.43 (10/7/11):
Improved "Returns" Handling via the POS System:
I must confess I am sometimes slow to finally get something
right. I thought I had POS returns management fairly well "nailed" when
rolling out the improvements as announced on 9/13 (see entry below of that
date). Turns out, that area of operation was less well "nailed" than I
thought. This release seeks to address that
I have, in fact, worked out a whole new (and much
better-streamlined) procedure for managing returns, and I've done a completely
new re-write of the manual section (the prior re-write was only a couple of
weeks old) that's devoted to the topic. You'll need to read that
section, please (it's very short), to know how the streamlined/easy method is
intended to work.
You can open the entire FinishedForms Mini-Manual, if
you wish. Use
this link, or the button as provided for the purpose within SD's
FinishedForms interface (see first graphic in the preceding entry below, to know
where that button is at). The whole mini-manual document is about 17
pages, however (excerpted from the main SD manual) and for returns in particular
it's only about two pages (near the end) that will concern you. We suggest
you go to the very bottom of the document, then up three pages. The
section of interest begins in the middle of that third-from-the-bottom page.
4.5.41 (9/19/11):
Expedited Initiation of POS Transactions when using the "From-Callsheet-Mode:"
Back in 2008 we introduced our Direct-POS system, which allows
maintenance of a POS-Window from which point-of-sale transactions can be
conducted with no need of initiation from Callsheets. Regardless, it
remained possible to initiate via the old method, via Callsheets, and many
users preferred to stay in such mode.
In such connection, we've also long had an option where, from
a Callsheet, you can optionally right-click on the Job/Sale button as a
means of telling the system that, upon creating an underlying JobRecord via the
little yellow "Create Job/Sale" form, you want to transit immediately from
thence to the FinishedForms interface (as needed when you're doing a POS).
Recently, a user pointed out that the momentary stop in that little yellow form
served no significant purpose. He wanted express passage straight past,
direct into the FinishedForms interface. It seemed like a smart idea, and
with this release the change is implemented.
Re-Write of Important Manual Sections, and New Mini-Manual:
With all the work as recently done in connection with POS
operations, there was a very serious need to update the manual accordingly.
In fact, upon going to complete this task we found the applicable manual section
was so out-of-date as to be piteously embarrassing. It wasn't just it's
contents. The entire FinishedForms discussion (encompassing both warranty
claims and POS) was but an add-on section in a chapter otherwise devoted to
other topics. That reflected developmental history. The
FinishedForms interface and all its related functions began small, and only over
time grew into such proportions as exist today. At any rate, given today's
proportions, it's a subject area that deserved its own chapter, and the manual
has not been re-organized to make it such. And it wasn't merely
re-organized. The entire chapter has been written fresh, to accurately
reflect today's state of the art in terms of what exists in the underlying
systems (the old section was tossed).
The current manual re-write is available for download (in pdf
format) from the ServiceDesk downloads page. Additionally, we've altered
the buttons that first appear when you do a direct load of the FinishedForms
interface.

The button as highlighted above will open the newly-written
section from the manual, as an excerpt specifically on the topic of the
FinishedForms interface, and the details of its particular warranty-claims and
POS functions. It's there to be handy for you, as a Mini-Manual, whenever
you need it.
4.5.40 (9/14/11):
Further Tweaks on POS:
You might think it would be nice for me (as the President of a
software company) having no bosses to answer to. Hardly. I've got at
least 520 bosses. When I try to please some, I aggravate others, and vice
versa. Sometimes it seems like a no-win situation. In the present
case, I thought I'd engineered the new POS "command" interface in a
manner that would satisfy every desire, but I was naive.
In a nutshell, I provided means (and as particular to any form
type) to accommodate any combination of sub-actions as integrated with a
single-click for Sale, and with either sequence of Sale-first or Sale-last.
Of course (and as always), any sub-action can be individually clicked, too.
But that wasn't good enough. Some people wanted a single-click option that
would do a collection of selected sub-actions, but excluding (as opposed to
including) the Sale. Remember that Burger King slogan ("Have it your
way")? That's me. Therefore, the just-introduced new interface has
gone from this:

To this:

As you can see, the "Execute Sale" button has been changed in
color and moved to the right. In it's place on the left is a new "Do
inclusions only" button. I believe the structure speaks for itself.
4.5.38 (9/13/11):
Massive Overhaul on POS Functions:
Let's face it.
POS operations have not been Rossware's forte. It
may have been overstating it, even, to call our past POS functionality a "system."
It was made from bits and pieces, cobbled together from elements first built for other purposes. The
overall result has been workable, but not many would have called it pretty.
With the present release, we are at least several steps closer to having a
system that, if still short of "beautiful," you might at least find
worthy of affection.
Improvements are as follows:
1. Improved
Methodology for, and Immediate Visibility on Items Flagged for Inventory-Transfer and/or
PartsProcess Action:
Here's a place where the prior design was truly dumb.
There were mechanisms that allowed any line-item in the applicable FinishedForm
to be "flagged," as applicable, for an actual transfer to/from inventory or
creation of a special-order request in the PartsProcess system. Intended inventory movements were flagged by
selecting an item from the as-you-type dropdown (specifically, with it keyed to
internal inventory). Special-orders were flagged by manually typing a
double-asterisk somewhere in the line-item. In the first case, there was
no immediate visibility as to whether an item was flagged, and drop-down
selection was the only method to accomplish flagging. Plus, there
was no direct way to turn off a flag. In the second case, the
double-asterisks might have seemed a good visual indicator,
but even this was not always true, for the system was programmed to ignore
double-asterisks if present from a prior session. In either case,
whether an item was truly flagged, or not, only became apparent when the "Enter
to Inventory" or "Create Order" process ran, as applicable,
typically at end of your POS session.
Welcome to a new world.
All for-action flagging is now immediately visible, and
remains so in real-time. If something changes to remove a flag, you'll
immediately see it. If something changes to add one, you'll see that too.
Flagging visibility is accomplished, simply, by coloring the line-item that's
flagged, and with a particular color, depending on the flag type.

It is also now easy to manually flag (or un-flag) any
item. Just do a right-click in the description box:
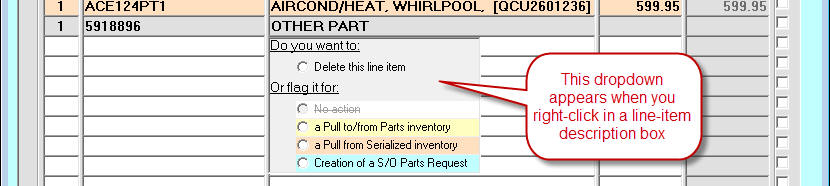
Upon right-clicking (and as you can above see), you're presented with a simple set of
flag-related options (plus the same opportunity to delete the line item, which
used to be all you'd get with a right-click). The flagging options also
include the same colors as the flags themselves, so the dropdown can
simultaneously serve as a "key" to remind you of what each color means. As
far as operation is concerned, just pick what you want. It's that easy.
Additionally, there is now an option to automatically
flag an item for special-order creation. It follows the pattern of
auto-flagging-for-inventory-transfer that's long existed (e.g., as occurs where
an item is selected from the inventory-integrated dropdown). Logically,
this new auto-flagging works in parallel fashion, but where you've set the
dropdown to integrate with SmartParts data (as is typically used when typing in
a non-stocking item). One difference is that this automated
flagging is optional. It defaults to On. If you prefer to have it
Off, pay attention when the "Integrate Select" box comes up (just after you've
clicked into any previously empty partnumber box):

As you can see, it's easy to turn this automation off (or
back on again) as preferred. Please also note the preference setting is
specific to user and FinishedForm type involved.
One more note about these new methods. This does not
concern anything new, but we want to be sure there is no misunderstanding.
Simply because an item is flagged for action, does not mean the action
has occurred. In fact, it almost means the opposite (once the action does
occur, the item is automatically de-flagged). Please do not mistake
flagging for actual action. The actual actions occur only in conjunction
with, as applicable, the "Enter to Inventory" and/or "Create Order"
processes (typically as invoked at the end of your POS session on a particular
ticket).
2. Improved
Actions Interface and Integration Options:
As is true of many long-in-use systems, our FinishedForms/POS
interface is the product of many evolutions. Believe it or not, it's first
incarnation had one function only: to enable printing of text to a
paper Narda! That was it. Thus, at the time, this interface needed
(and had) but one action button, and its descendant still exists today: it's the button labeled "Print ticket." Next in evolution
was adding the "Transmit claim" button (to accommodate that
new-fangled, hoity-toity method of conveying a claim to a manufacturer that we
now take for granted).
Then someone wanted ability to print the entirety (not just
initiating information) on their own form (i.e., not to the Narda, and not using
SD's up-front ticket-printing method, which only does initiating information),
so we added the first alternate form. Then someone thought, since they
were assembling sales numbers in the FinishedForm context anyway, wouldn't it be
nice if that was used as the basis for filling in a sales-entry, so we added an
action button for that. Then someone said, maybe you should make it so I
have the option, if I'm choosing to print or transmit anyway,
that it automatically offers to make the sales-entry (essentially self-clicking
on the "Record Sale" button), so we added that (making the option
particular to each form type).
And it continued. By and by our first client came along
who was doing significant POS work, and it became evident we could adapt these
mechanisms for the purpose. But if so, the interface needed integration
with parts inventory and special-ordering, so we added built-in flagging for
such actions (though they were very clumsy until now, as above-noted), along with
buttons to accomplish the actual events. It was also realized, in regard
to these new action buttons, it would be nice if their "click" events were
also optionally auto-integrated with doing a print or transmit,
(i.e., just like "Record Sale") so
this also was duly programmed into the system.
Evolution does not always make for pretty. Below is
what the resulting structure looked like, just prior to this release:

On reviewing the above, it became evident that an improvement was long overdue.
Here is what you will now see:
Formerly, the "Record Sale" button was but one of
many. Now, please observe it is instead labeled "Execute Sale," and
is given the due prominence that seems logical for a POS interface.
Additionally, instead of it being potentially integrated with other actions as
before, other actions may instead be integrated with it (we think, for POS
operations, this is the logical emphasis). Plus, the mode of integration
is now much more explicit and selective.
Specifically, the former method for integrating actions
(i.e., to tell the system you wanted one particular button-click to auto-include others) was by
right-click-toggling-to-red the form-selection-radio-button as pertinent to the
form type on which you wanted this (referring, of course, to the one,
"vanilla" form of integration as was formerly offered). That does not happen
any more. Instead, each of the action buttons (aside from "Execute
Sale") will show a little checkbox on its top-right corner at any time that the "Execute
Sale" button is activated (again, please see above). With any particular form type selected,
you can simply check (or uncheck) the button/actions you want included when the
"Execute Sale" button is itself clicked. These settings are again local, and
particular for each form type (in fact, each will default to a check state we
deem as most typically wanted for the form type involved).
Please note there is also an option as to sequence
(i.e., whether the sales-entry occurs before the integrated clicks, or after).
If you do a simple left-click on the "Execute Sale" button, the
integrated clicks will occur before the sales entry. If you do a
right-click, they'll occur after (no need to memorize this fact; a simple float
of your mouse-pointer over the button will bring up a ToolTip to remind).
Of course, you should also note that each of the potentially auto-included
buttons may be clicked-on individually, in their own right.
Another change is that the "Enter to Inventory"
and "Create
Order" actions (formerly accommodated via two separate buttons)
are now accommodated via a single button only, labeled "Execute LnItms."
It's another button that, if you forget exact meaning, you can float your
mouse-pointer over for assistance.
3. Numerous
Other Fixes and Improvements:
Really (I'm not just bluffing), there are tons and tons of
smaller improvements. One example: if you fail to fill-in a
quantity yet select an item from the dropdown, the quantity box will
automatically populate at 1. It's a small convenience, but such matters
add up.
Greatly Improved Automation When Updating:
Our resident "geek extraordinaire," Josh Smith,
gets direct credit for this one. If you've updated ServiceDesk even once,
you've learned the actual update file (as downloaded from our website) is a
single, self-extracting zip folder. In other words, all files as contained
in the update overall are "packed into" this single file, which is equipped to
self-extract those files into your computer (it's the self-extraction utility
you're seeing when that "Winzip Self-Extractor" window pops up).
The thing is, the location where the files need extracted
to can vary, depending on how ServiceDesk is installed in your computer and
network, and I'd never managed to discover a method via which ServiceDesk can
dynamically tell that Winzip Self-Extractor what "Unzip-To" path it should
offer. For such reason, it is simply hard-set to the most typically needed
path ("c:\sd"). To compensate, the update-dialog within ServiceDesk has
been programmed to tell you, the user, that you'll need to manually change the
path to, when that is fact the circumstance. The problem is, people tend
to not read the dialog, and end up unzipping to the improper location.
Even for those that do it right, it's an unwelcome added step to have to make
that change.
Good ol' Josh managed to find the trick that my research
had failed to discover: namely, a way to programmatically (and on-the-fly) tell
that WinZip self-extractor what unzip-to path it should offer. Based on
this, the ServiceDesk-managed update sequence is now much improved. There
are no longer any steps in the sequence telling you what you need to do to
manually change that default path. Instead, it will default just
as needed for the circumstance. In fact, there's not even a need for you
to click on its Unzip button. That, too, is automated. Overall, you
should find the update sequence much more automatic, and fast.
4.5.34 (8/29/11):
New Parts-Acquisitions Report:
By popular demand, the archived-PartsProcess form
(Ctrl-F8) has a new report. Here is where you request it:
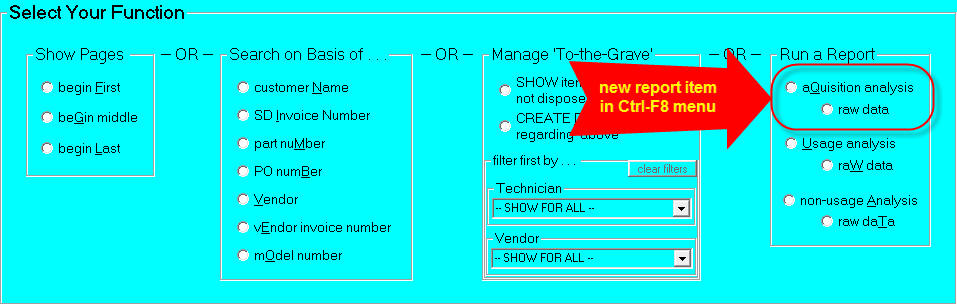
And here is what the actual report generally looks like:
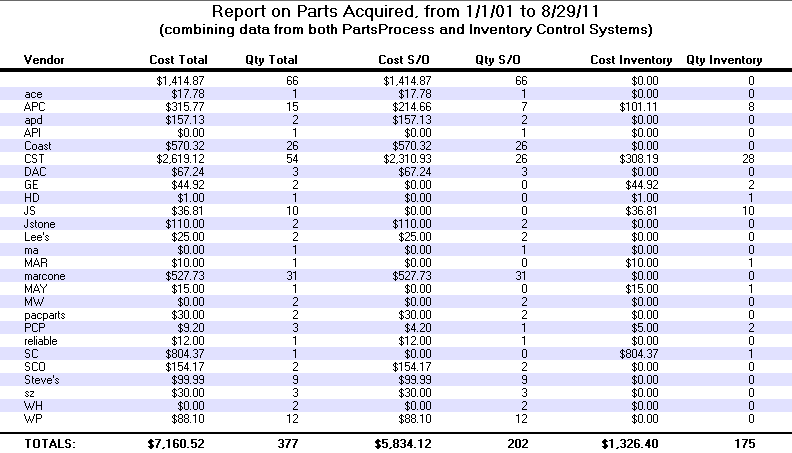
In short, it's a summary,
itemized by vendor, of everything you purchased over a specified period of time.
Like its cousin Ctrl-F8 reports, when this one displays there are buttons to the
side that allow you either to print the results, or to open an underlying Excel
file that contains the underlying, item-by-item records on which the report is
based. If you've had a need for something like this, we think you'll love
it.
Improved Claims-Handling for Panasonic:
One of our CE (consumer electronics) clients recently
brought to my attention that the system was doing a poor job with the particular
needs as involved with transmitting Panasonic claims to ServiceBench.
Three particular needs were expressed:
1. Some Panasonic claims involve the
need for a special (otherwise non-standard) WarrantyType designations.
This is a field-value that most often indicates whether the claim is Parts-Only,
Labor-Only or Both, and ServiceDesk has heretofore handled those distinctions
implicitly (i.e., behind-the-scenes, without you needing to worry about it).
For this Panasonic need, however, we needed to make a method for the a Panasonic
servicer to set it explicitly. That need is met via a new box in the
on-screen NARDA:
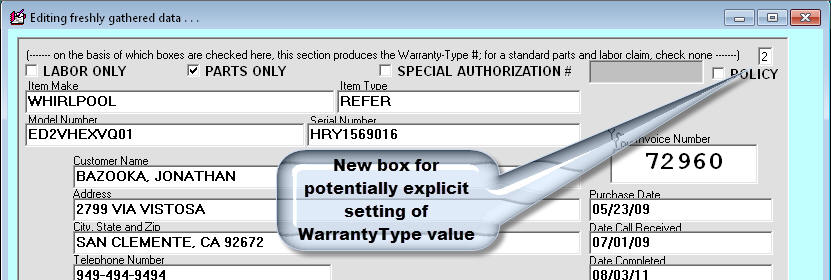
Please note this new box will self-populate with the
same value as would have always been implicitly-deduced on your behalf (i.e.,
behind-the-scenes, within the system). We're simply making that deduction
visible now, and providing a place where you can manually change it, if
wanted/needed. Please note, in such regard, the system internally
re-calculates what's normally-appropriate in this box anytime the total-tallies
in the form change (i.e., if parts were added or taken away, labor added or
taken away, etc.) -- so, if you need to set it manually, do so after the other
items have all been setup.
2. Panasonic needs a CaseNumber
in each claim (which is pulled at the SB end from their claims-transmission
Other Item2 Code). We are accommodating this via our on-screen
NARDA's Contract/Service Agreement Number box:
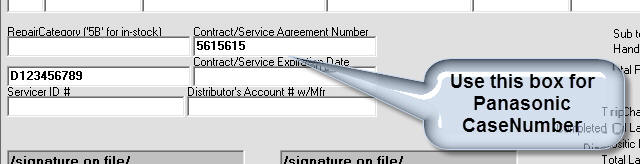
Please note it is a special-treament for the system to
place the contents of the above-identified box into SB's Other Item2 Code
field. It will apply only when the system sees "PANASONIC" as the
underlying client on the job.
3. Panasonic needs round-trip-mileage
in each claim (which is pulled at the SB end from their claims-transmission
Other Item1 Code). We are accommodating this via our on-screen
NARDA's Miles driven box:
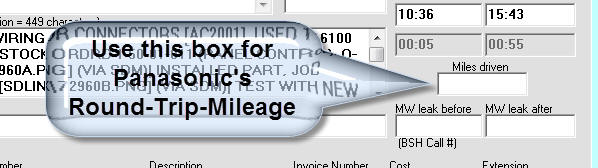
Again, please note it is a special-treatment (only where
Panasonic is the underlying JobRecord client) for contents of this box to be
placed into SB's Other Item1 Code.
If you're wondering why things must be so complex, it's
becase ServiceBench uses various of its claims-transmission fields differently,
depending on who is their underlying client. We have to cope with those
differences from our end. Regardless, in addition to the actual
operational special-adjustments as are described above, the contextual
Translation-ToolTips have also been modified to explicitly describe what's being
done (and in what circumstance) with the contents from each box.
4.5.31 (8/21/11):
Improved Handling of ServiceBench DispatchIDs:
We have adopted a new strategy for managing the ServiceBench DispatchID.
For some, the old method was fraught with frustration.
It depended on you maintaining an appropriate setup of text (DispatchID
in the right place and with appropriate flags), and if you broke the rules,
ServiceDesk would not capture and interpret the DispatchID correctly.
Beginning with ServiceDesk Ver. 4.5.31 and SBDL Ver. 4.5.5 (both posted
on the morning of Monday, 8/22), there's an improved method.
In a nutshell, SBDL will now place the DispatchID into an added and
protected
location (some have referred to this concept as "hard-coding"
the number). Specifically, it will
go into the underlying
MoreInfo
notes. Formerly such notes were
configured by SBDL to read as follows:
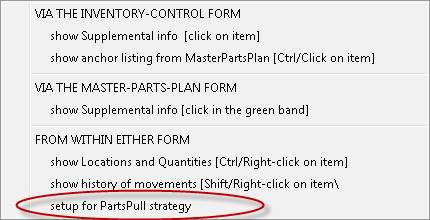
Now the DispatchID is contextually inserted:
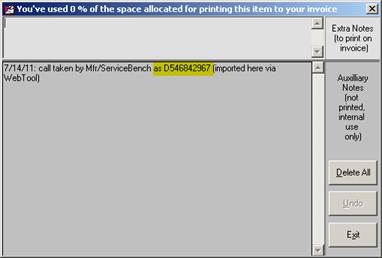
And, if any user tries to do any edit on this section of text, the edit will be
disallowed. They'll encounter this
dialog instead:

The DispatchID is thus kept in a secure and protected location, where
ServiceDesk can in all instances accurately capture it.
4.5.29 (8/10/11):
Happiness in Smiley Faces:
If you examine the following image as extracted from a
DispatchMap, you'll see some objects you've not seen before:
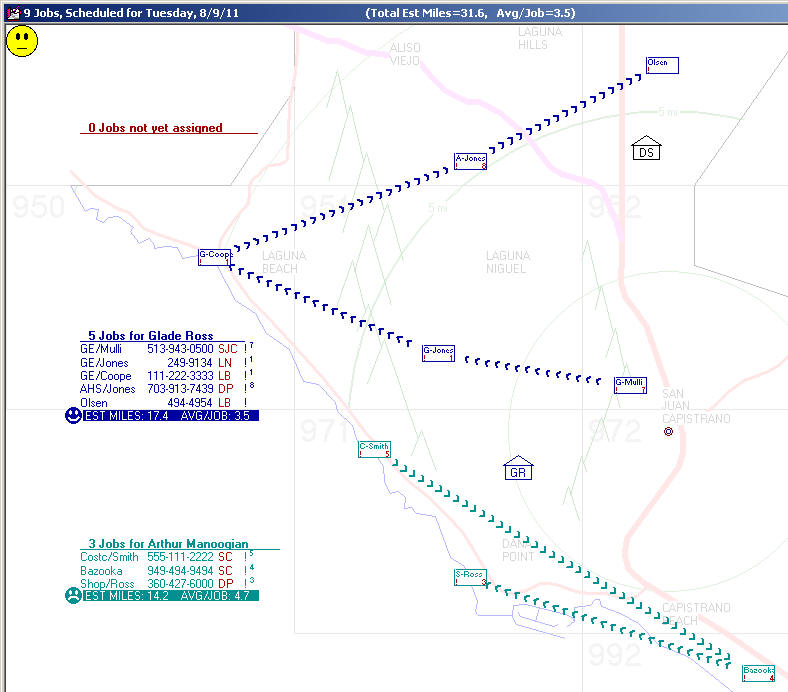
If those new objects are not jumping out at you, look
specifically for smiley faces (though, actually, not all are smiling).
There are three of them. They are the new feature being announced here.
What are they for?
Quite simply, they are to equip the person who arranges your
technicians' scheduling and routes with a feedback mechanism that encourages
real diligence in achieving optimization. It makes a lot of difference to
your operation's profitability, after all, if those routes are efficiently
arranged. It makes a huge difference. Since pretty much the
beginning in ServiceDesk, we have provided mileage figures within the
DispatchMap, hoping operators would use such numbers as a means to self-score
their finesse, seeking (we've always hoped) to whittle each tech's
average-miles-per-job figure to the smallest level possible. But (and
alas), the sad news is many simply ignore those figures. For such
reason, something more concrete has been needed by way of encouragement -- to
reach into the operator's psyche, as it were, with a more pungent encouragement
to optimize.
That's exactly what the smiley faces are for. Next to
the mileage-summary at the bottom of each tech's listing of jobs, you may now
have a smiley face (varying between happy, neutral and sad) that applies to that
particular tech's route. In the top-left corner of the map as a whole is
another, larger smiley face, which similarly varies in expression depending on
whether the day's entire roster of jobs meets specified targets for
mileage efficiency.
Based on the above, anyone in the office can have instant and
obvious visual feedback regarding whether efficient routing has been achieved.
Even more concretely, they can be encouraged to fix things.
Just a glance at the frowny face in the above image, for example, suggests that
Arthur Manoogian's route needs a fix. Look over at his route, and you can
see, instead of sending him from the Smith job to Bazooka to Ross, it would be
more efficient to put Ross in the middle. A quick mouse action would do
this . . . and, instantly . . . his mileage-summary's frowny face would turn to
a smile!
To implement this new capability requires a little setup on
your part. Specifically, ServiceDesk cannot know what "mood" to put on a
particular smiley face without knowing what is a reasonable mileage target, for
efficiency, as applied to the tech involved (techs that work in predominantly
rural rural areas will obviously have higher per-job "par" figures than those
working in condensed metropolitan areas). You're going to provide that
information to ServiceDesk in a new box as available within the
Technician-Properties window of the Settings form. To bring
up this window, go to your ServiceDesk Settings form (Ctrl-F1), look in
the Tech-Roster section, and click on the technician of interest. That
opens his Properties window. The new box to fill-in is shown
here:
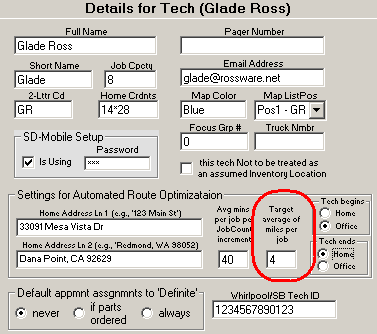
Just to be clear, what we're referring to here is what you
want your operators to consider as a par figure, for the tech involved, in terms
of average per-job-miles in his route. For example, if you were to
estimate that 80 miles is typically about what the driving distance should be
for ten jobs, you'd figure an average of 8 miles-per-job, and place that figure
(i.e., 8) into the above box.
Beyond setup is the matter of how the system actually works,
within the DispatchMap.
In such regard, please be aware that smiley faces will not
appear for any tech for whom you have not specified (as per above) a "Target
average miles" figure.
But how does the system decide what mood to put on the face?
Very simple. If, for the tech's actual route as planned,
the system predicts an average miles-per-job figure that's within 10% of the
tech's target figure, ServiceDesk will present a neutral face for that tech.
If the predicted figure is better than that 10% margin, it will present a happy
face. If it's worse, it will present a frowny face. A similar
strategy inheres for the larger, roster-wide smiley face in the Map's top-left
corner. The difference there is that it's roster-wide comparisons that are
made, so you can judge if on average a particular day's routes merit a
smile, a neutral face, or worse.
As a further aid, the system offers supplemental information
if you float your mousepointer over one of the visual indicators. If you
float your pointer over a tech's mileage summary area (or the smiley face
itself), for example, you'll get a tooltip that informs you of what is the
target figure for that tech (for easy and quick comparison to the
actual/operational figure):

Similarly, if you float your pointer over the smiley face in
the map's top-left, you'll get a cogent summary regard the data underlying its
"mood:"

We hope you'll make extensive use of this new tool, and profit
exceedingly from it.
Installment Two on Improved Specification for Tech's Begin-Route and
End-Route Locations:
Since we added automated route-optimization
via-call-to-MapPoint, some few years back (see entry here accompanying Rel.
4.3.76), there's been a mechanism to specify, for any given tech, whether you
want the system to figure his driving begins at his home, at the office, or at
the first job otherwise picked for him. Same thing, essentially, in
respect to where his driving ends for the day (both specifications can be
referred to as "route end-nodes). This specification was actually part of
the route-optimization dialog. Just a few releases back, though (see entry
accompanying Rel. 4.5.25), we announced an improved method that makes the
specification independent of the routine dialogue.
It turns out that was a short-lived improvement, for it's
superseded by what's announced here. Both prior incarnations of this
feature saved the relevant settings to the applicable station's local registry,
which meant it was a local setting only, and even if set at one
station, there'd be no effect on what happened at others. For the new
"Smiley Face" feature, we needed better than that. In fact, prior to this
release, all of the per-tech mileage estimates have assumed each tech begins and
ends at the office (regardless of settings for route-optimization) -- an
assumption that in this age is increasingly untrue. We needed to fix that
to make this feature all that it should be, and with such expanded use it was
also important that such specifications take effect throughout all stations in
your network, and not just locally.
That is the precise improvement that's being described in this
entry. A few short paragraphs above (scroll up a tiny bit to see), we
highlighted a particular new control within the Settings form's
Tech-Properties window. Right next to it are two others, now
highlighted here:

As above hinted, this is now the place where you can make
specifications system-wide, regarding expected end-nodes in a tech's
route. Indeed, though on the face of the new controls it appears you can
only select from among two options ("Home" or "Office"), you are in
fact free to select neither, which in effect gives you a third choice. (if
you've prior selected one and want to de-select, just click again). If you
do select neither, the system will refrain from implicitly adding such a leg to
the tech's route.
Regardless of what you pick for a tech, the system will apply
your selection when: (1) calling to MapPoint for its automated
route-optimization; (2) calling to MapPoint to load and display a route; (3)
calling to GoogleMaps to load and display a route; (4) exporting route
data to a file; and/or (5) calculating a tech's predicted total miles and
average-miles-per-job.
Please finally be advised that, from this release forward,
ServiceDesk will ignore any such local specification on a tech's
route-end-nodes as was formerly provided. If you have in the past been
relying on such specs, we strongly suggest you go into your Settings
form, click on each tech, and re-specify what's wanted for him.
4.5.28 (7/25/11):
Nothing Major:
With almost five weeks since the last prior entry here, you'd
expect a more celebratory headline. It just didn't happen that way.
We've been totally busy with tweaks and minor fixes. For example, we just
learned that the AHS-dispatch-insertion feature was broken. It's fixed.
We just realized today that the POS system could be improved if, when
creating a s/o request via the POS context, the sell-for price was auto-inserted
to the underling PartsProcess record. That's presently done. Last
week we were pressed (this required a lot of time) to better accommodate the
situation in some Canadian provinces where two elements of tax must be
separated. That's presently done. Etc. Etc. Etc.
4.5.27 (6/21/11):
Debit Transactions Now Available in the Virtual Terminal:
Y'all can thank Perry at A-1 Appliance, in Pearl, Mississippi,
for this one. Debit cards (as distinguished from "Credit" cards) are
becoming increasingly common. Our Virtual Terminal has been programmed to
process sales as Credit-Type transactions, even if a Debit card is
what's actually involved. In some instances, it's preferable to have the
sale configured as Debit-Type instead, and from this release forward you can do
that.
Of course, one of the critical elements in making a Debit-Type
transaction fit the definition is that a PIN (Personal Identification Number)
must be obtained from the customer. More than merely obtained, it must be
punched in via an accepted PinPad entry machine (in other words, it is not
possible to simply punch-in the number on your computer's keyboard; the credit
card industry does not permit that). This means, bottom-line, if you want
to run transactions as Debit-Type you must do more than merely update to this
release (or later) of ServiceDesk: you also need an appropriate PinPad entry
device.
Which particular device do you need?
In a nutshell, I have done my programming to integrate with a
Verifone PINPad 1000SE, with it connecting to the computer via
serial port). So far as I know, it's possible other PinPad devices
might also work (at least assuming they also connect via serial port), but I
make no guarantee; nor have I any present intent to expand the programming to
accommodate other machines. Regardless, you may obtain the Verifone model
in question direct from Merchant Warehouse at a reasonable price ($79).
Once you have your device, you'll need to determine what port
number it's connecting on. With that number in mind, click on the Virtual
Terminal's new Setup button:
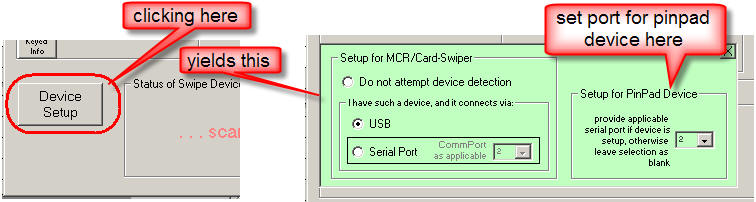
That will open the new Setup frame, where you can set that
port number accordingly.
With the above done, you should be ready to do Debit
transactions. At this point, we've not provided a special button for the
purpose. Instead, please signify you're choosing the Debit (as
opposed to Credit) method by choosing to Right-Click
on the Execute Sale button, as opposed to the standard Left-Click.
If you float your mousepointer over, a tooltip will remind you:

Please note that you cannot run a keyed-in transaction as
Debit-Type. It requires a swipe.
4.5.26 (6/13/11):
More "TAT" Work:
Again, TAT is an acronym for Turn-Around-Time, and of
course an objective in the service business is to keep your TATs as tiny as
possible. Four releases back (see entry accompanying Ver. 4.5.22), we
introduced a new "Quiescing" feature, associated with the JobsPerusal form
(Shift-F7), and designed as a powerful new tool to assist in minimizing TATs.
This release features two more such tools.
First, the JobsPerusal form now
has a new filtering category, as shown in this comparison:
| Secondary Filtering Options from Old |
Secondary Filtering Options from New |
 |
 |
Second, we have added a
"day-counter" window the the JobRecords-current form (F7). In its
bottom-center area, it will display a box indicating how many days-old the job
is. The indicator will change in color and emphasis, depending on quantity
of days old (the coloring/emphasis scheme is based on age categories as listed
in the dropdown shown above):
Again, this "day-counter" box will appear in the bottom-center
of every still-pending JobRecord.
Overall, the first new option (as provided with this release)
gives you the chance to easily review jobs within particular age categories.
The second provides an on-its-face reminder, any time you glance at a job, of
how old it is, plus provides an increasingly-acute visual alarm, as the job gets
older and older. Overall (and if appropriately used), we think these two
new tools can do much more to assist you in making your TATs as tiny as they can
be.
4.5.25 (6/8/11):
"Signatures" and Font-Selection Now Available on Non-review-first
Emails:
Potentially (depending on in what degree you've chosen to use
automation), ServiceDesk and its utilities can be involved in sending many
kinds of emails to your customers.
These emails fall into two broad categories: those that are
reviewed first (i.e., the email is first opened into a "Compose" window, where
the user may review, add comments, etc., before clicking on Send); and those
that simply go, without intervening user review.
In the first category, there has always been built-in
potential for your emails to be formatted according to preference. In
other words, you may pick the wanted font, setup for a specialized "signature"
at the bottom, etc. (the capacity is automatically built-in, because its
programmed into the email compose window that's opened for user review).
This has not been the case, however, for non-reviewed-first emails.
Whether sent via the Windows Mail Client (old method) or via the Rossware-Direct
method, these emails have sported plain-text only, and no signature. We
simply had not created technology that allowed otherwise in that context.
Indeed, when we recently added the ability to include a "signature" when working
via the Rossware-Direct method, application involved review-first emails only:
not direct-sent items.
Now we have added such customization options to the
direct-sent (i.e., non-reviewed-first) context -- at least assuming you use the
Rossware-Direct (as opposed to the Windows Mail Client) method.
It can mean a significant difference in the quality of imagery
as presented to your customer.
| Old email as customer might receive, plain text and
no "signature-area" inclusion |
Email with a possible configuration as customer
might now receive. Note "signature-added" space at bottom (please
ignore that's it's a Rossware rather than a service company logo: I was
lazy in the setup). Also please note the font is
specifically-selected, which allows a more modern and appealing look.
|
 |
 |
We have even included options that allow you to specify
different "signatures" for different kinds of emails -- so that, in other words,
the signature that's used for a particular context can be highly customized to
that context. It allows you huge flexibility.
In such regard, one of the factors that drove us to make this
improvement was a user (not to mention any names, but it was Tanner Andrews)
explaining how he wanted to do things, within his email "signature," such as
advertising specials, inviting customers to go to his website to purchase
accessories, or to answer a survey, etc. Even, potentially, including
coupons for future service. Of course, to fulfill so ambitious a strategy
the signatures need to be selectable for context, so that is exactly what we've
setup the system to allow.
In particular, with this release ServiceDesk itself is
configured to accommodate two different "signatures," depending on context, and
SD-MobileLink (with simultaneous release) three added signature contexts (SD-CyberLink
has not yet received the improvement). Details are in the (also
newly-revised)
Email-Integration Handbook, available via the reference just provided, or
via a linking button within the Email-Setup Window as
available from within any applicable Rossware application. (The particular
pages there that are most applicable to these enhanced capabilities are 10-13.)
If you're wondering, by the way, why the word "signature" is
often placed in quotes here, it's because in the context involved the word does
not have its normal meaning. It does not mean your name in cursive (though
it might in fact include that). It refers to the entire section
that may optionally be inserted/added at bottom of an email. Typically,
this section (if added) has your company's logo, website reference, perhaps
telephone numbers, etc. Sometimes it has disclaimers, injunctions
regarding confidentiality, etc. It can be as big or small, simple or
involved, as you want to make it.
4.5.24 (6/5/11):
New "Link from-JobRecord to Appointment-in-Map"
Feature:
As you likely know, all of ServiceDesk's operative
appointment info is stored in what we call the ScheduleList. Two
interfaces are used to directly view and manipulate this data. One, the
(F6) "ScheduleList form," is textual in orientation. The other, the (F5)
DispatchMap, is more graphical, and offers several kinds of manipulation not
available within the first. Regardless, either may be used to achieve a
variety of appointment-editing results. And, no matter which is used, it's
the exact same underlying data (i.e., from within that ScheduleList file) that's
being accessed and managed.
A number of other forms have links to those two specific ones,
as needed to conveniently invoke various of their management functions.
From a Callsheet, for example, you may right-click on an address to view its
location within the DispatchMap, and may then setup a new appointment from there
(this is called the "ItemLocate" feature). You may do the same from a
current JobRecord. Also from a current JobRecord (F7), you may invoke it's
"scheduling" option This provides a link to an underlying appointment (if
any) as loaded for you within the ScheduleList form. There you may easily
edit it, or create a new one.
What's been lacking (until now) is a similar
from-the-JobRecord link to an already pending appointment
as-loaded-within the DispatchMap.
In other words, suppose you're looking at a JobRecord in the
F7 form; it has a pending appointment; and you decide you want to see (or do
something to) that appointment -- not within the ScheduleList form, but within
the DispatchMap. (Perhaps you want to see it because you want to check-off
that the customer confirmed, for example, which is not a function the
ScheduleList form is setup for.) Until now, there was no direct method for
that. Instead, you had to independently open the DispatchMap (i.e., hit
F5), page to the day of the appointment, pan to the needed TechList area, then
eyeball-search to find the appointment's reference.
That is what this update answers.
The control we are using to invoke this new link, within the
JobRecords form, is its Appointment box.
Prior to now, that box had just one operative
function, and it was superfluous (exactly the same as when you click on the
form's dedicated "Scheduling" button). Why have we had two different
objects on this form produce the same result? If interested, please read
here:
Historical
Background
(read if wanted for context;
otherwise skip)
|
|
The appointment box in ServiceDesk's current JobRecords form
has a "history."
By design, it was intended as nothing more than a
historical artifact, reflecting whatever text as had existed in the
equivalent position of its originating Callsheet. It had no
operative function, and none was intended.
This sometimes caused confusion for new users, who --
seeing text there -- expected it to always reflect whatever was the
current appointment (as a historical artifact, text there never changed,
even if the actual appointment did). Worse still, the uninitiated
sometimes thought -- erroneously -- they were changing the actual
appointment by editing contents in this box.
Our first step to ameliorate this (several years back)
was to make the JobRecord's appointment box non-editable (users can't
erroneously think they're changing the appointment via edits in that box
if they can't edit that box).
However, this led to a new problem. Now we
sometimes had new users who, still failing to realize the correct method
for appointment manipulation, insisted on attempting to edit
text in that box. Finding such a course impossible, they'd call
and complain the system would "not let them change the appointment."
We even put in dialog boxes to inform them (as they attempted) they were
on the wrong path, and explained what the correct path is. Sadly,
some either did not read or failed to understand these dialogs.
Enter our second step in solution. We made it so
a click in that appointment box (as when a user thinks he is
going to edit there) has the same function as if he had instead clicked
on the form's "Scheduling" button. Just take them to the correct
place to do what they're evidently wanting to do, in other words.
In general, it's worked much better. The one down side is we end
up with two objects on the same form that, when a user simply clicks,
produce exactly the same result.
At least, you now have explanation for the inelegance
as involved in this redundancy. Plus, we want to mention one more
historical change in that box.
Even when we pushed new users to the correct venue for
changing or adding appointments, some continued to be dismayed when text
in that box did not update to reflect their (now correctly made)
changes. We initially dismissed such concerns, and endeavored
simply to teach that text in that box means nothing. However, it
was a losing battle. Functional or not, people wanted to see
currently-applicable text there. So, we added coding so that, as
pending appointments are changed or new ones added (from within the
correct venues, of course), behind the scenes, ServiceDesk reaches back
into that box, to update its text accordingly. There was
still no real functionality involved, but at least the updating keeps
people happier.
|
Regardless, the JobRecord's Appointment box now has a real
(and not merely duplicative of another button) function: it's to serve as a
link to the underlying appointment in the DispatchMap (it's something of a
mirror, in other words, of the Link-to-appointment-within-the-ScheduleList-form
function that's been there, now, for years).
1. For simple such
linking, do a right-click in the box. ServiceDesk
will find the underlying appointment (on whatever day it happens to fall), and
display it in the DispatchMap for you.
2. If the action you want in the
DispatchMap is one of changing the appointment's check-off
status (e.g., checking off that the customer confirmed, or anything
similar), do a Shift-Click in the appointment box. This
is the same action you'd do, if already within the DispatchMap, for the same
result there.
3. If you want to
invoke the DispatchMap's "Dispatching Options" list (i.e., as
specifically connected with the appointment, but without going to the Map
first), do a Ctrl/Alt-Right/Click in the appointment box.
Again, this is the same action as is involved for the same result, if done
within the DispatchMap itself and clicking directly on the appointment reference
there.
So, those are the new "Link" functions as now available on the
F7 form's appointment box. If you float your mousepointer over the box,
there is a ToolTip to remind you. Please enjoy.
4.5.23 (5/26/11):
New "Open-Route-in-Google" Feature:
Since release of Ver. 4.3.76 some three years back,
ServiceDesk has had the ability to integrate with Microsoft's MapPoint to
optimize the sequence of jobs within a route, and to simply load/open that route
within MapPoint. Those are great features, though with one significant
negative: most folks don't already own MapPoint, and it's somewhat pricey to
obtain. It wasn't so bad three years ago, when typically you
could buy the program once (typically about $300) and install on as many
computers as you wanted, but since then Microsoft tightened the internal
mechanisms as designed to force you into buying added licenses.
In the meantime, Microsoft's main competitor and threat,
Google, has continued to improve its online (and free) mapping system, called
GoogleMaps, and we decided it was time to integrate with it. In fact, we
already added such integration into SD-Mobile (so, with a single button
click from their mobile apps, your techs can open their entire routes into
GoogleMaps), with result that a webpage such as the following shows, and within
but a second or so:
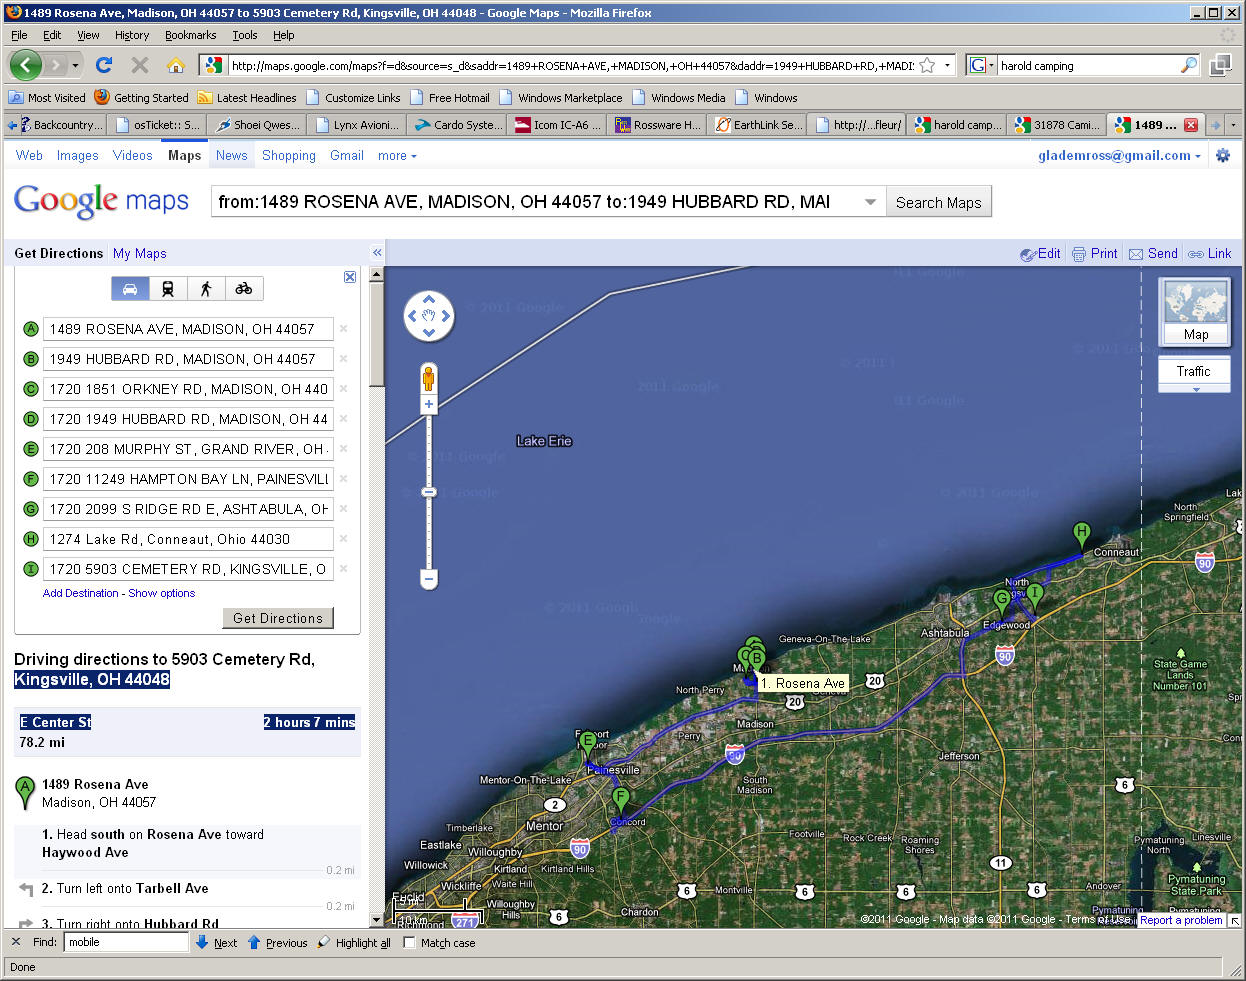
This release brings the capability into ServiceDesk itself.
Improved Route Treatment:
A longstanding feature in the DispatchMap is the ability to
export the tech's route (essentially the list of addresses he is expected to
visit) to a file. This file may be plugged into any mapping program or
even into a GPS system that's setup for such import.
Another longstanding feature (associated with the
above-described MapPoint integration) is the ability to add beginning and ending
waypoints to a route, consisting (at the user's option) of either, in each
instance, the office location or the tech's home. This makes it so such
routing features may accommodate the full route, starting at whichever location
he actually begins at, and terminating at whichever he actually ends at.
With this release, your specification of these add-on
beginning and ending waypoints (sometimes I simply call them "end nodes") is no
longer limited to MapPoint integration. The specification interface is
separated from those specific actions, made independent, and now what you
specify there will apply not merely to the MapPoint integration, but also to
what's loaded into GoogleMaps (if/when you use that option) and to what's
exported to the above-described file.
Another improvement, in regard to what's stuck into an
exported file or loaded into MapPoint or GoogleMaps, is if the underlying job is
specified as a ShopJob, it will be the office address that's used, and not the
consumer's.
Modified Menu and QuickKey Arrangements:
It was impossible for us to add all of the above-described
improvements without altering some of the corresponding access methods, as
involved in the DispatchMap. Here are changes as made in the DispatchMap's
CheatSheet (accessed by right-clicking in any otherwise inoperative DispatchMap
space):
The Dispatch-Options menu (as arises when you click
on a tech's name at the top of his roster of jobs) is also changed
Instead of explicitly describing here which commands have
changed, we urge you please to just examine the above illustrations.
4.5.22 (5/22/11):
New "Quiesce" Feature in JobsPerusal Form:
Do you know what TAT is?
It's a nice acronym for turn-around-time. It's the
quantity of days between when you receive a job order and when you complete the
job. The shorter your average TAT, obviously, the better. This is
particularly true if you have one or more large clients that score you on TAT,
and dispatch more jobs to you when your TAT is tiny.
This new feature is about helping you trim your TAT to the
very smallest possible size. Rather than telling you more here, we'll
simply suggest you read the micro-manual we also created to acquaint you with
this feature. There's a button on which you can click, for this
micro-manual, from within the (Shift-F7) JobsPerusal form:
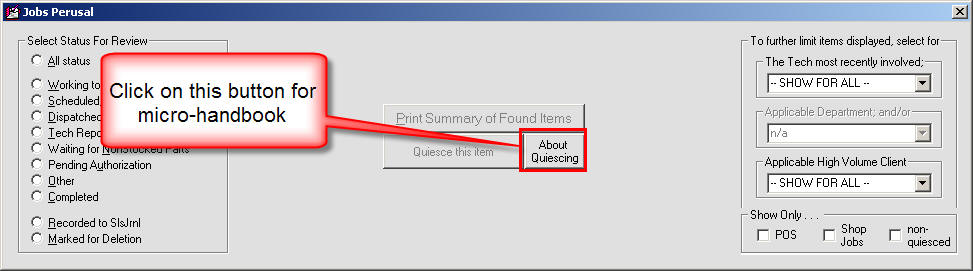
Or, you may click on
this link.
Further Development on ShopJobs:
I confess.
The new feature (announced three releases back) that exposes
within the DispatchMap when an "appointment" is connected to a ShopJob ended up
being a little less than perfect. I won't bore you with details explaining
why, but the bottom line is that a number of users ended up with a number
appointments in the DispatchMap claiming to be ShopJobs, when in fact they were
not.
That's fixed with this release.
More importantly, there is also now better integration with
SD-Mobile (also requires updates in SD-Mobile and SD-MobileLink). It will
now be very visible to the tech using Mobile if a particular appointment is
setup as a ShopJob (no more mistakenly driving to the customer's location).
Improved SB-DispatchLink, and Connected Improved Handling on N.E.W. Jobs:
In the SB-DispatchLink program, for a long time, we've been
capturing a maximum of two phone numbers, and no email address. It's all
we could get, based on the fact ServiceBench's communication protocol
did not provide more. Or, rather, their old protocol did not.
A while back, however, they came out with a new protocol that added several
fields not formerly available (among them, a third telephone number and email
address). We needed to re-program the SB-DispatchLink program to use this
new protocol. With SB-DispatchLink Ver. 4.5.0, that is done. If the
dispatch from ServiceBench has a third telephone number and/or email address
(and assuming you've appropriately updated), those will now be plugged in for
you.
That's not all.
In regard to work that comes from NEW (and if you're a
servicer who does such work), we were formerly handicapped (with that old
communication protocol) in regard to our ability to get some extra fields that
are "kind-of" needed for NEW claims. Owing to the absence of those fields,
NEW claims have involved some extra work for users. Yes, as core
philosophy we hate extra work, and are very sorry you had to endure that.
Anyway, the good news is that Ver. 4.5.0 of SB-DispatchLink
(using that new communication protocol) is now able to grab the extra fields as
needed for NEW claims. It puts these in the ExtraNotes section of the
Callsheet it creates. They get transferred from there to the JobRecord
when you make one, and when ServiceDesk fills-in the on-screen NARDA for you
(preparatory to transmitting a claim), they'll be placed into its needed boxes,
such that when you transmit, everything needed should go appropriately to its
needed place, just as with claims to OEMs.
In other words (if you did not get the above), there is now no
need for you to separately obtain NEW's AuthoNumber, or to re-arrange how any of
the NEW-specific fields are setup for you. In fact, it's important that
you do not re-arrange them. Leave them just as inserted by the
SB-DispatchLink program. Based on that precise arrangement, ServiceDesk's
insertion to the on-screen NARDA will be just as it needs to be (in regard to
those particular elements, at least) for a successful claim.
If you're a SB-DispatchLink user, please assure you update to
4.5.0 (or newer if present when you get there). Dispatches as received via
pre-4.5.0 versions will not grab the extra data, as needed for fully-automated
NEW claims.
If you're interested in how the specific "mapping" works, it's
like this:
1. SBDL places NEW's CRM/SR # and
its Authorization # (embedded within what is esentially narrative text)
into the ExtraNotes section of the underlying Callsheet (from whence, of course,
it gets transferred to the JobRecord).
2. When SD auto-fills the on-screen NARDA
from such a job, it extracts those two numbers (i.e., from the underlying
ExtraNotes, and inserts, respectively, into the NARDA's Contract/Service
Agreement Number and Special Authorization # fields.
3. Those boxes, in turn (and upon
transmitting a claim), insert into SB's Service Agreement Number and
Authorization Number fields
4. At the SB end, those two
claims-transmission pockets get translated as needed right back into NEW.
4.5.21 (5/16/11):
Improved Deletion Management on Dropdown Lists in UIS Form:
The form that manages our UnitInfoSheets (Shift-F12) has long
had facility for editing the dropdown lists of item Types, Makes and Selling
Dealer. In other words, you may add new listings, change existing ones, or
delete existing ones. Typically, that last operation requires a little
more than just requesting deletion, because often the item you want to delete
already has underlying data sheets claiming it as their applicable Type, Make or
Dealer. The system can't permit you to simply delete it, because then any
such "sheets" would be missing their references. So, the system formerly
put you through a clumsy dialog, instructing you to pick the substitute listing
that any such prior dependencies would be switched to. This release fixes
the "clumsiness" in that dialog, making the process much more obvious, and with
fewer intruding message boxes:
| First dialog after deletion request |
Graphic as appears after hitting OK |
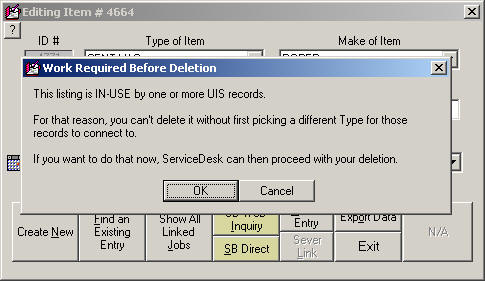 |
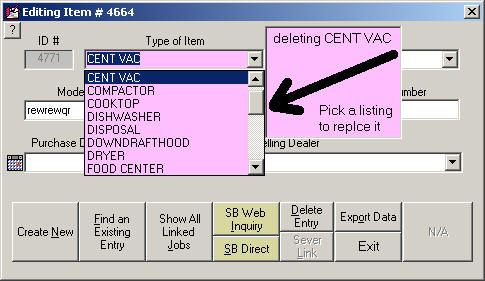 |
New Diagnostic for Network File-Share Issue:
We recently encountered a client who had a very weird problem
in his network that severely impacted ServiceDesk performance.
In terms of symptoms, throughout the day users would
frequently see the infamous "pink screen" (the one that announces ServiceDesk is
waiting to access a file). And, there were often significant other pauses
in performance. Bottom line, with these issues, is that one or more
stations in the network were lagging for significant periods as they opened and
closed files. To help isolate which stations were causing the issue (at
least as applicable to the condition as was occurring in this client's network),
we developed a diagnostic tool. It proved to be so definitively helpful,
we decided to improve it's interface, and incorporate it directly into
ServiceDesk:
| Selection for new
tool is in "Diagnostics" branch off MainMenu |
Actual tool is very simple
(please note the "About this test" button; it opens a small
document that explains details) |
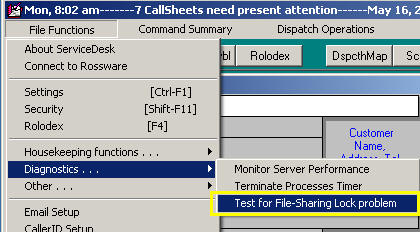 |
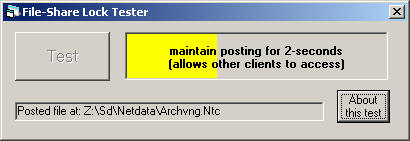 |
If you're running with multiple stations and think there's
even a chance you may be subject to a similar network issue, we suggest you run
this test at each station -- and, in particular, read the document as available
via its "About this test" button.
Update on SD-Dealer with
Improved Password Control:
Mary at Landers' Appliance said their operation needed more
fine-tuned control on password protections within the SD-Dealer program (prior
design had all password requests demanding the Master password). Within
ServiceDesk's "Security" form (Shift-F11), you may find three new
listings:

The effect of what you do with those, of course, is felt
within the Dealer program itself, and you'll need to update it as well (Ver.
1.0.37) to experience the improvement there.
4.5.19 (5/8/11):
EmailedDispatchReceiver Now Upgraded in Two Respects:
If you do not know, this is our utility (abbreviated as "EDR")
for automating reception of dispatches that are received by email. This
morning we release Ver. 4.5.0 of that utility, featuring these major
improvements:
1. Integration with the
Rossware Direct-Mail Agent:
If you've been reading here, you know that, since introducing
our new, direct-mail option, we've gradually increased the scope of Rossware
office applications that offer it. Just a month or so ago, we filled-in
the roster to include all such applications that send mail. This
left out our EDR, for its use of emails is not sending; it's receiving,
and that's a very different function.
Regardless, we have now added the direct-mail option there.
We think, in fact, it will be particularly useful there, because integration
with the standard Windows Mail Client, for receiving purposes, has become
increasingly problematic in recent years. Our direct-mail agent promises,
in contrast, to be completely problem- and hassle-free.
If you're an EDR user, we strongly urge you to update, and
switch to use of the direct-mail agent. There are some particular things
you need to know about the transition. They are covered in a newly-added
section of the
Rossware
Email-Users Handbook. Look for Section F in Chapter 3, beginning at
the bottom of Page 12.
2. Warrantech Added to
Roster of Companies Whose Dispatches May be Parsed:
The heading speaks pretty much for itself. FYI, the
roster of dispatch formats the EDR is prepared to parse now include: Custom
Answering Service format, American Home Shield, National Electronic Warranty,
Fidelity National Home Warranty, Old Republic, PC Richard and (with this
release) Warrantech. The latter is also offered (with this release of
ServiceDesk) in the QuickEntryTemplate's list of company Types (something you'll
need for perfect integration with Warrantech dispatches via the EDR).
Another "Who Done It?" Log, and Related Improvements:
One of the improvements announced in the last-prior release
concerned a new underlying log the system maintains. Its a log that
typically you'd have no interaction with. But if, after the fact, you
wanted to do some investigation seeking to determine who looked up (or changed)
part numbers as involved in special-order parts, it's there for you. In
announcing that feature, I volunteered that, having built the machinery for that
log, it would be relatively easy for us to add logs into other processes, and I
invited requests.
The first request came fast.
We have now added a second underlying log. This one will
have entries indicating changes as made in the SalesJournal, FundsJournal and
A/R records. As with the log prior announced, there is one file where
entries as made during the course of a day get entered, and then a long-term
file. For this new log, the files are called SlsAndFndsEdits.txt
and SlsAndFndsEdits_Archv.txt, respectively.
Since it appears we're going to end up with a whole set
of such log files, we also deemed it best to make, and start placing them
into, their own folder. Thus, instead of using the common \sd\netdata
folder; henceforth, these files will be placed (and used within) a new subfolder
called \sd\LogFiles. Please look for them there.
4.5.18 (5/6/11):
ShopJobs now Show as such in DispatchMap:
Not far back (see Ver. 4.3.62 entry from 4/18/10) we vastly
improved our method for designating those particular jobs that involve in-shop
(as opposed to in-field) work. Since then, we've made occasional additions
to the operations where ServiceDesk appropriately distinguishes between ShopJobs
versus not. This is a related such improvement.
Specifically, someone pointed out that you should be able to
readily distinguish, within the DispatchMap, between references to appointments
that involve in-shop work, versus those that do not. And, if you're
wondering, yes, many operations do schedule in-shop work.
For those operations that lack a dedicated, in-shop technician, it's often found
that scheduling the work is the only way to get it done.
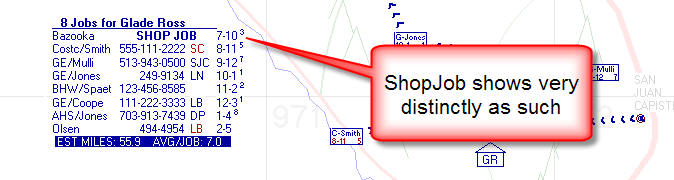
Based on this improvement, you'll now see ready visual,
within-DispatchMap distinctions, as per above.
"Who Done It?" Log Now Available for PartsProcess PartNumber Work:
We heard from a particular client they'd just lost a a
thousand bucks based on having ordered a wrong part (someone looked up the part
number wrong, and the item was not returnable) from Viking.
Oooouuuuucccchhh!
Understandably, this client wanted the ability to determine
precisely who had actually done the lookup on the part number, and who may have
edited it thereafter (if, in fact, anyone had). As all seasoned users
know, a wide variety of events are automatically documented in the narrative
history as applicable to any underlying JobRecord. The kind of event as
we're discussing here could, in theory, also be placed there, but as a matter of
general strategy we want maintain that narrative in a form that reads well (and
easily) as a broad overview of major events, and without so much
excessive detail as to defeat that as its purpose. Thus, we needed such
historical documentation elsewhere.
Enter the "Log" file. From this release forward,
ServiceDesk will write to a file (called PartsProcessWorkLog.txt and
located in the \sd\netdata folder on your server) each time any user creates or
edits a part number in the PartsProcess system. Each entry will indicate
the operator involved, date and time of the event, and precisely what the
operator did. At the conclusion of each day, entries in this file will be
moved to a more permanent file (PartsProcessWorkLog_Archv.txt, also
located in the same \sd\netdata folder on your server).
Based on the above, if you need to find out after the fact who
specifically is responsible for having provided (or changed) particular part
numbers that were involved in the PartsProcess system, you should be able to
easily determine the answer by looking in one of the above-described files (the
first one if you're looking for actions that occurred in the current day, the
second if looking for actions more in the past).
Having created the machinery for this particular log, we
invite you to let us know of operational areas where you think there'd be a
significant reward for creating similar logs. The way we've structured the
machinery, there is almost zero overhead involved, as cost in such logging
efforts.
4.5.17 (5/5/11):
"Default-To-Definite" (on Appointment-Assignments) Now Available on a
Per-Tech Basis:
This addition was prompted by a call from JD at Guinco Service
in Texas. That operation has some techs working in remote regions, and as
JD in the office pre-screens jobs he'll often order parts before the tech ever
goes out. Pointedly, he has the vendor ship said parts directly to the
particular tech -- a factor that, obviously, makes it rather important that when
an appointment is created for that tech, its assignment status be set as
"Definite," as opposed to "Tentative."
To accommodate this kind of need, you'll now see a new
settings area within any tech's Profile sheet, as displays when you click on his
name within the TechRoster section of the Settings form:
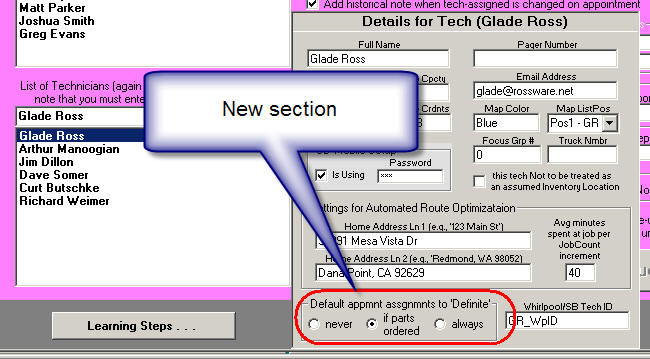
At least with benefit of description as above-provided, I
believe meanings in these new options are obvious. The default selection
("never") leaves functions the same as always. It's only be selecting
another option that you'll notice any change in operation.
In the title of this entry, you'll notice, when
referring to this new default-setting option, we're ballyhooing the fact it can
be done on a "per-tech" basis. The reason for this specific
"ballyhoo" is because (and we need to explain it here for full context), a
couple of years back (see Ver. 4.3.40 entry from 12/10/09, below) we added on
option where, from the Create-Job/Sale form, you can change the default as
applies in all instances (i.e., across-the-board). That old (much more of
a "blunt knife") option still persists. And it's true, obviously, that If
you did have your default set to "Definite" via that old/broad method, any
new-option setting via individual techs would be superfluous.
New "Email" Search in Current-JobRecords Form:
Credit for this one goes to Krystle at Folsom Lake Appliance,
in California. Krystle was sometimes getting email replies from customers,
triggered by them (and generally containing specific inquiries) on the basis of
emailed tickets as generated via SD-Mobile. The replies did not contain
the originally attached ticket, and it's that ticket (in the context of these
emails) that would contain information disclosing who the customer is.
Absent knowing who the inquiring customer was, it was difficult for Krystle to
respond. Indeed, her only basis for identification in this context was the
customer's email address.
In regard to such email addresses, ServiceDesk of course has
fields to track them very nicely. However, it's often the case that you do
not have the customer's email address prior to sending the tech out. In
such a case (and assuming he's using SD-Mobile, and using e-tickets within
SD-Mobile), he will acquire the customer's email address in-the-field, as a
pre-requisite to sending the e-ticket. This email is then automatically
inserted back into the JobRecord, via operations of the SD-MobileLink program.
So, in theory, when Krystle receives the customer's email
reply, she should be able to find the JobRecord in ServiceDesk that contains the
sender's email address. That will then be the correct customer.
Problem is, though email addresses have in general been fully searchable in
ServiceDesk, the ability has depended solely on the CstmrDbase Index set, which
is typically updated once each night. Thus, if the email had just
barely/same-day been obtained (via the tech's getting it for sake of sending the
e-ticket), that email address would not yet be discoverable via the
long-standing search method. That's why we added a new option to the
record-by-record searches, as offered from within the F7 form:
| segment from the Current-JobRecords form showing old
search options at left |
 |
| segment from now-revised form showing search options
with new addition |
 |
As intimated, this new item is one of the set of searches that
does not depend on the once-per-night-updated Index set, and thus it can locate
an applicable JobRecord on basis of email address even if that address was only
added in the current day. In regard to all these searches, please always
bear in mind that you are permitted to type only a portion of the search target.
Often we see people thinking they have to type the entire thing. That's
too much work.
Other:
As is the case with most every release, this one too contains
improvements you should manage to enjoy without needing to first learn of their
existence, via reading here. In general, we don't announce such matters
here, as there is little need. But some matters are almost the opposite,
in that you might think something is wrong, absent an explanation here.
One is as suggested by Adam at Fred's Appliance. As you open a current
JobRecord, the history box will now automatically scroll down (if needed) to
show the bottom/most-recent entries. Please don't think this is a
malfunction. It is intended.
4.5.15 (4/23/11):
All Features in CyberOffice
Now Functional:
Yes, this one gets a much bigger announcement-heading than
most, because it truly is BIG NEWS.
It was some four years ago when we introduced our
CyberOffice suite of functions, which involve Rossware-provided plug-in
interfaces for your website, combined in several instances with emailed
hotlinks. From almost the get-go, we envisioned six core elements in the
system: (1) initial online booking of jobs by a customers who browse to your
website; (2) online scheduling of first visit on basis of hotlink-equipped email
(e.g., you get an order from a third-party for the service and email the
location-party with a hotlink to schedule); (3) re-booking appointments after
parts arrive; (4) confirming appointments on the day or evening prior; (5)
online job-status checking by customers; and (6) online technician
tracking by customers.
Scenarios 1 through 4 (as above-listed) were working with our
very first roll-out of CyberOffice. We'd intended to add scenarios 5 and 6
soon after, but complications with our online programmer and other priorities
intervened. Of course, we did not forget -- and, though later than
expected, we are now very pleased and proud to announce that our full
CyberOffice vision is now deployed and ready for your use, enjoyment and profit.
Scenarios 5 and 6 have been added, and they are beautiful.
In fact, Job-Status checking has been available for about two
months, and we have just now opened Tech-Tracking to general use. Here is
a comment received after our first beta user had been using the feature for just
four days:
"Glade, we started using the technician tracking tool
this week and we already have had 119 people visit this page!!! We have
also had several compliments from customers who have used this tool. I
figured you might like to hear."
Yes, I indeed do love to hear such good news, and I
encourage the rest of you to make haste in the effort to likewise benefit via
the implementation of these great new features.
For more detailed information, we invite you to consult
resources. The first is our
CyberOffice
Handbook. Second (especially if you are not already familiar with
kinds of interfaces that CyberOffice offers your customers) is the
CyberOffice section on our website.
This particular release of ServiceDesk is especially pertinent
to announcing such new capabilities in CyberOffice, by the way, because it
includes an internal enhancement to fully accommodate the last fundamental
element. Specifically, when emailing the customer with a request to
confirm the next day's appointment, it now uploads a couple of added data
elements. It's on the basis of these that, when the customer confirms, the
SD-CyberLink program is then able to email the customer a follow-up.
Essentially, that follow-up says:
"Thank you for confirming . . . and,
by the way, if you are curious how your tech is running tomorrow, click on this
link [link actually provided in genuine email]. You'll see progress in his
route on the way to you."
The actual tracking page, the user will see, looks something
like this:
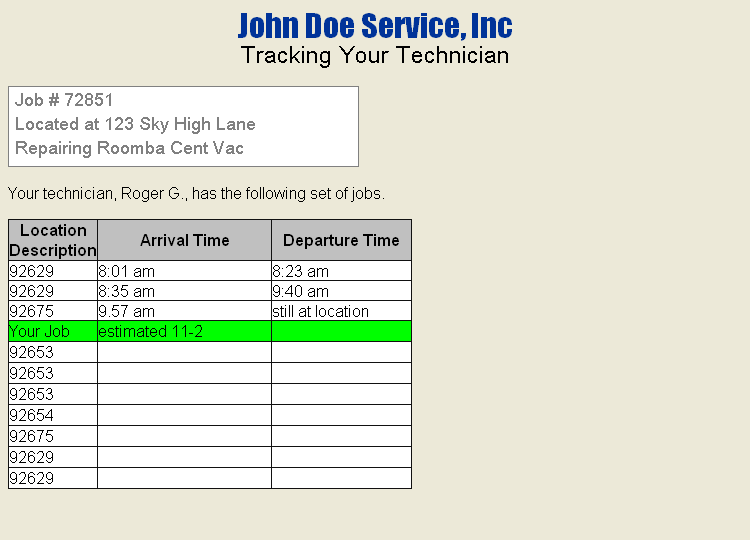
Of course, the actual list
and details will vary according to the actual situation.
Rossware Direct-Mail-Agent Now in
SD-CyberLink:
Simultaneous with the above-announced release of ServiceDesk,
we are also releasing Ver. 4.5.0 of the SD-CyberLink program.
Besides itself accommodating the above-described email response when a customer
confirms, it also now adds integration with the Rossware-Direct Email Agent.
This is the alternate emailing system that we added several
months ago as an option in SD-MobileLink, after that into ServiceDesk itself for
non-user-reviewed emails, and just recently (two releases back) we enhanced its
implementation to accommodate user-reviewed, compose-window-needed emails.
To review, this facility allows emails to be sent using solely
Rossware programming, and without reliance on the Windows mail client. It
thereby circumvents all the frustrations that were in some instances associated
with using the Windows mail client. Much as in the SD-MobileLink program,
the new SD-CyberLink features an "Email Setup" button on which you may click to
specify your preference to use the Rossware Direct-Mail-Agent, in preference to
the default Windows client.
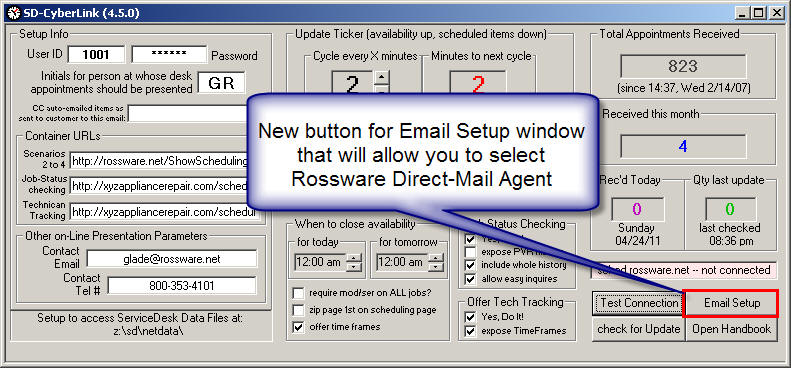
Based on feedback from those who've switched to using the the
direct-mail agent, we can certify it is a great advancement over using the
standard Windows mail client.
4.5.14 (4/21/11):
New Method/Option for Ordering Inventory/Stock Replenishment:
The inventory system has long offered three methods via which
to order stock replenishment. In the F10 form, you may choose to order on
the basis of: (1) deficiencies (i.e., where stocked quantities have fallen below
planned minimums; (2) recent usage (i.e., simply re-fill based on what was used
in a recent/defined period; or (3) simply by picking from the general stock plan
the particular items you want to order.
Our new option concerns what is actually an enhancement to the
second method. It's designed to fulfill a purpose as revealed by
user who does a lot of its work for AHS and NEW, under accounts that require
ordering all replacement parts via their own particularly-authorized avenues.
To further complicate, this company stocks its trucks very well, and on a high
proportion of its jobs (as performed for these clients) the tech uses a
part directly from stock. Typically, the particular parts as used from
stock was not prior-acquired via the authorized channel for the underlying
client -- which means, to effectively acquire payment for the part as used, the
company must order its replenishment on that part (i.e., its replenishment
back into stock) via the client's particularly authorized channel.
This complicates the stock-replenishment scenario vastly, because in general
(and until now) it's been designed with the assumption that stock replenishment
will be ordered from the vendor who happens at the time to be most "convenient"
in terms of pricing and similar factors. Now, regarding particular items
as used, replenishment on those particular items must come from particular
vendors, and with the order including, too, provision of the underlying client's
SWO Number as attached to job on which the prior part was used.
In sum, this client has a need -- in regard to re-stocking
inventory -- making a situation that very much resembles special-ordering parts,
yet the situation nevertheless involves replenishing stocked inventory, and its
after job-completion, rather than during the course of it. In a
nutshell, it's a "hybrid" situation: not quite special-order parts, and not just
stock inventory, either.
Our solution of the moment is what this new feature is about.
Again, it's an enhancement on the prior-existing method for ordering stock
replenishment on the basis of items recently used. If you select that
option in the F10 form now (i.e., after this update; the series of
keystroke-shortcuts to get there is F10, "O", then "R"), you'll see a new
sub-option:
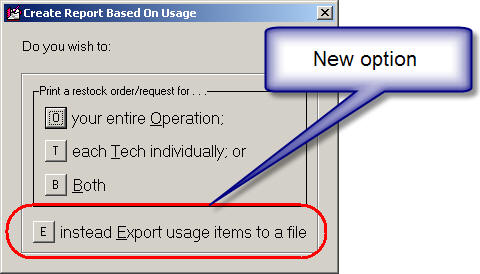
While the prior sub-options are designed to print or fax an
order request for your vendor, the new one (as its wording implies) creates a
file that may be opened in a spreadsheet, and this contains added fields that
allow you to see who was the HighVolumeClient (if any) in regard to the prior
parts as used, and as connected with each item that now needs ordered for
re-stock. Plus there is a fields for the applicable client's SWO Number on
the job where used, and for which tech used the part (and hence, presumably
needs re-stocked). Our thinking is you can use the spreadsheet to
determine which parts you have to go through AHS to replenish, which you must go
through NEW, etc. The additional information allows you to frame your
orders with needed underlying SWO Numbers, etc. We think, with creative
use of the spreadsheet machinery (particularly if you're a bit adept in using
Excel or similar), you can likely make this work very well.
4.5.13 (4/18/11):
Review-First-and-Compose, Direct-Send Emails:
Many readers know that, historically, Rossware systems have
"farmed-out" email functions. Rather than handling them directly in other
words, they've "called" on Windows to perform wanted email tasks. Windows,
in turn, calls on whatever email program is installed and setup as default, if
any.
This is precisely how Microsoft has long intended that
applications should manage their email-related functions, and in
general it works, albeit with occasional frustrations as encountered within
particular installations (in other words, you may or may not be fine with that
scheme, depending on your setup).
In the effort to once and for all overcome all potential
obstacles, last year we introduced a direct-send option. When
using this method, Rossware systems perform email tasks directly, using their
own mechanisms, and without calling on the Windows Mail Client in any manner.
It was first introduced in the SD-MobileLink program, then added to ServiceDesk
itself with Rel. 4.4.93 (you may search below to find that release
announcement).
At that point, however, there was a limitation. The
direct-send method only worked for emails that were sent-off for you directly,
behind-the-scenes, and without user-first review. In other words, it did
not work for those emails that ServiceDesk opens for you first, in a compose
Window, for you to review, perhaps add your own text, and then send. This
limitation was because we simply had no compose window of our own, and thus had
to refer you to the Windows Mail Client, for use of its compose window.
That is changed with this release.
We have now created our own, ServiceDesk Compose-Email Window,
which will be applicable if you opt in the Email Setup form to use the
Direct method. Here is what it looks like:
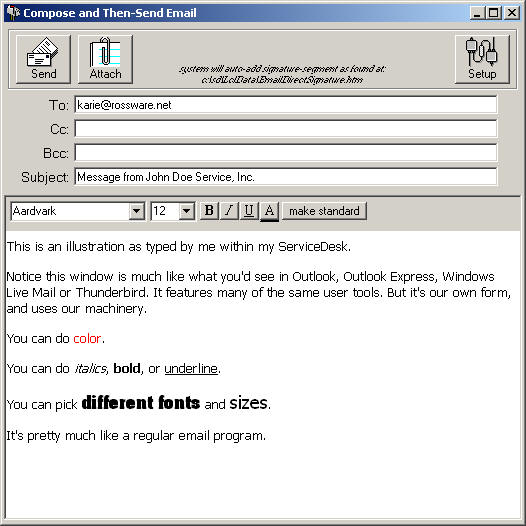
With this addition, you can now totally abandon use of the
Windows Mail Client for all emailing as associated with ServiceDesk. It's
quite flexible. You can even include electronic signatures. All
details are in an also-revised Email Handbook, accessible via button from within
ServiceDesk's Email Setup form, or from
this link.
4.5.11 (4/2/11):
A Series of Improvements in the New "PartsPick" On-Screen Management Window:
You might notice there have been five releases since the last
prior (just below) announcement here. These have included been many small,
incremental improvements (and in multiple areas). In particular regard to
the new PartsPick interface, experience disclosed certain initial weaknesses (in
particular, circumstances where the system might have indicated a potential need
for a part to be returned by a tech, but did not), that have now each been
addressed. Additionally, Adam Butcher pointed out that it would be nice to
see the Bin/Hold Location of a part, right within the interface. That now
occurs. Assuming such a field is applicable, as you float your
mousepointer over any parts-listed item,
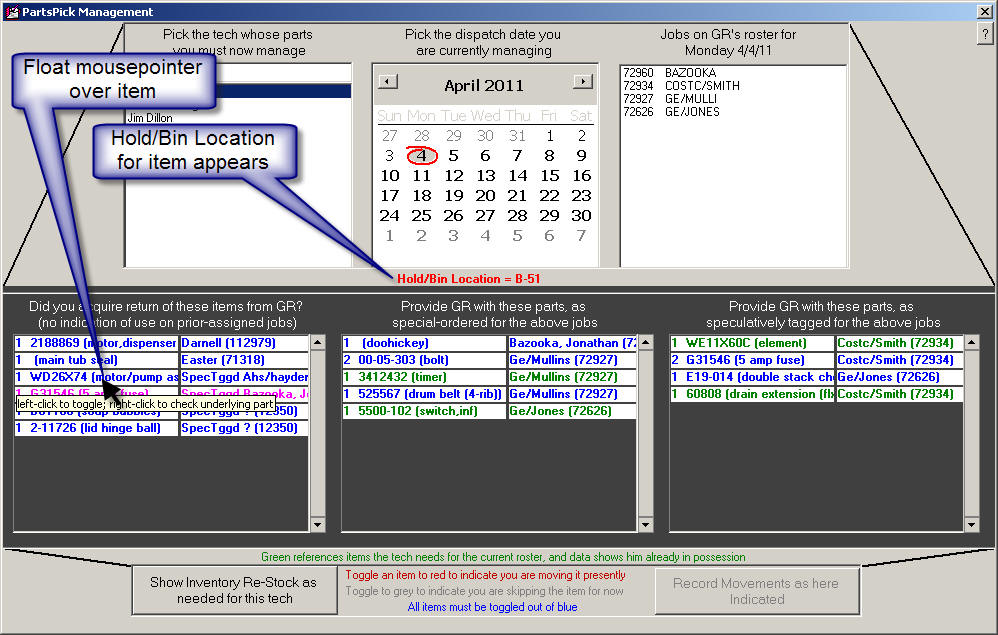
4.5.6 (3/7/11):
Finally! A "PartsPick" On-Screen Management Window:
For those of you who attended Glade Ross's class at the ASTI
convention, this is the feature Steve Merriam has been seeking for three long
years (the one in connection with which he told the class: "Don't hold your
breath!").
I do apologize, Steve (and likewise to everyone else who
should have been enjoying the benefits of this kind of tool) that it's taken so
long. I have two excuses. First, it really was a very large project.
Second, it truly needed as foundation the kind of improvements I've made, in
underlying structure, during the past half year or so (see the many, many
entries below regarding that series of improvements).
This new interface can be accessed via the Main Menu (under
the Parts Management heading), as follows:

Or, as you can see via the menu-item listing itself, the
QuickKey shortcut is Ctrl-Shift/F8.
The basic idea in this new interface is it gives you a single
location to see all parts that need assembled for going out with a particular
tech for a particular day's work, and to indicate by simple clicking action if
in fact you're moving each such item from office to the tech. It further
provides a basis, within the same interface, to see what should be coming back
from the tech, and to likewise indicate via single click if in fact such items
came back.
Here's what it looks like:
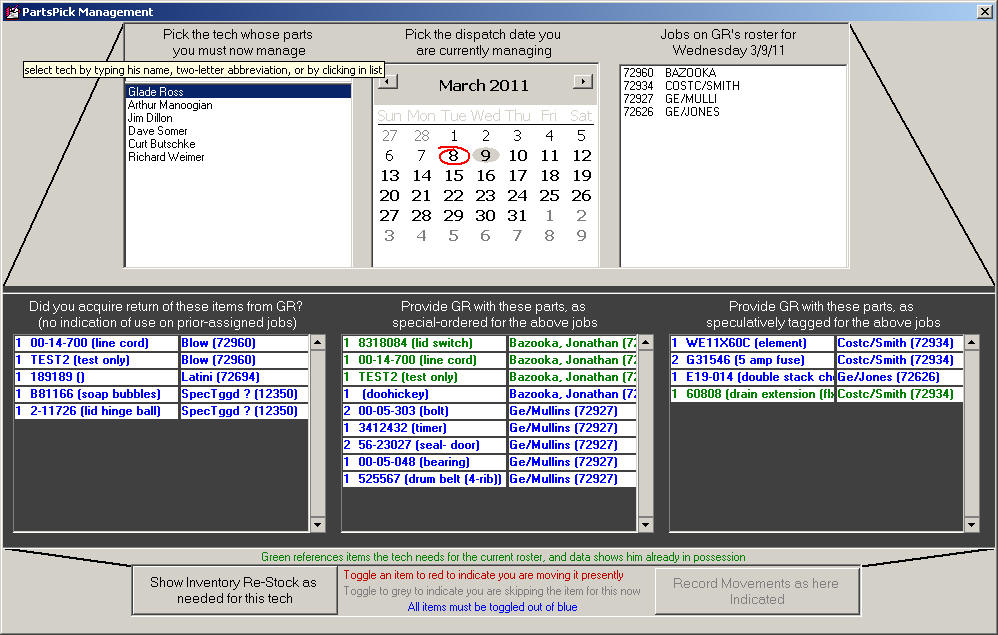
We believe that overall this brand new interface is a huge --
nea massive -- improvement over what SD systems prior afforded in regard to
these particular processes. In fact, we likely should increase the cost of
our support in exchange for bringing such a huge improvement to you. Nah.
Just kidding.
Seriously, there's a real and serious reason why Steve Merriam
has campaigned so assiduously for this feature. He had the vision, way
back, realizing what a value it could have. And, now, his vision is
realized. Please be sure you take advantage of it.
To use the new interface -- we think -- will be fairly
self-explanatory. There are a plethora of tooltips within it, if you just
float your mousepointer over various objects (we urge you to do this, as you'll
learn things as you do). There are links and cross-links to virtually
anything your heart might desire. I'll shortly be adding a section in the
manual describing more specifically how all the details work, but I'll bet most
of you can figure it out regardless. I'll place a new entry here
indicating when the manual revision is ready.
4.5.4 (2/23/11):
A PartsProcess, Non-Usage Analysis:
A couple of months ago, we introduced mechanisms via which
techs are required, if they do not end up using a special-ordered part, to
indicate the specific reason why not (see, e.g., notes accompanying Rel.
4.4.88). With that new element of data having since been in a state of
being constantly generated, a few users got to thinking they'd like to see an
at-a-glance, across the board analysis of which techs were ordering parts
without using them, at what rates for each, and for what reasons.
We now have a report to provide that.
Much like its cousin, the Usage Analysis report, this
new report is accessed from the archived-PartsProcess form (Ctrl-F8):
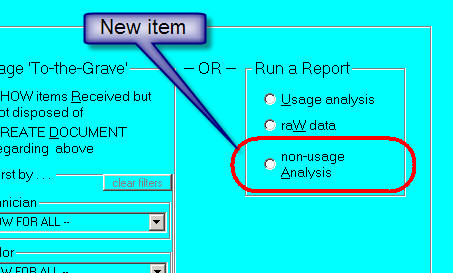
Simply pick the new option, follow the prompts, and in a
moment you'll be looking at the new analysis.
One note: Just like the Sales Tax Liability Report as
just-prior-to-this introduced, this one also requires Excel or similar
spreadsheet program for good viewing. Please be sure to open the results
within such a viewer.
4.5.3 (2/21/11):
Finally, a Compiled, Sales Tax Liability Report:
Another area we've been a little slow with ServiceDesk is in
management of sales tax liabilities. This likely stems from the fact that
in SD's germinating office there was but a single tax jurisdiction (and
corresponding single tax-rate scheme) to worry about. For this, a simple
SD-management structure was totally adequate. Most other users have not
had it so easy. For the sake of our very first new users, we made an
option where, in the Settings form, you can indicate that you have varying rates
depending on location, but until Rel. 4.4.5 there was no provision for you to
explicitly inform ServiceDesk as to what rate existed in each particular locale
(instead, ServiceDesk simply relied on the amounts as filled in to any ticket by
the tech at the location).
That provision -- for jurisdiction specific rates -- was added
just over two years ago. However, we left a significant hole. While
ServiceDesk could now know the rate that should properly apply depending on job
location, it did not give you any kind of compiled report informing you of what
your accrued liabilities were for each jurisdiction. Instead, the interim
expectation was that you'd export the underlying and nearly raw data (via Sales
Summary add-on in the F11 form), then manipulate in a spreadsheet to
self-calculate your various liabilities.
This release fills that hole.
Specifically, if you first run a Sales Summary report
in the F11 form (for any period of interest), then click on its "Export with
Extended Data" button, you'll see the options as then presented have gone .
. .
| from this: |
to this: |
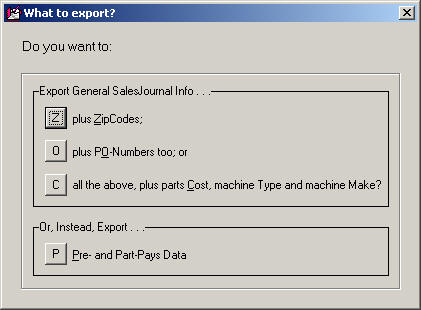 |
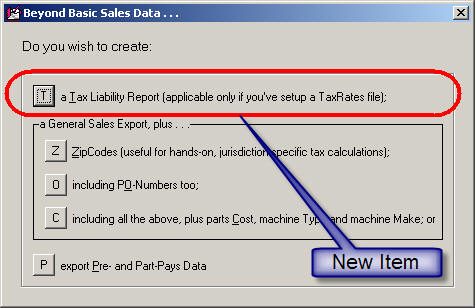 |
The newly-added option will create a compiled report detailing
your total tax obligations in each jurisdiction (as per specification in your
TaxRatesFile, which is the provision we added a couple of years ago). For
instructions on how that file is setup, you can click on the little button as
provided in your Settings form:
or
here too is a link.
The compiled report is too big to illustrate here. But
we think you'll like it. One thing you'll notice is that, unlike all our
other compiled reports, this one is deliberately made to display within a
spreadsheet program, such as Excel or similar. If you attempt to display
it otherwise, you're not likely to get good results.
Another note: though the compiled report is designed to give
you segregated liabilities among multiple jurisdictions, even a company that
reports to a single jurisdiction might find it useful. If yours is such an
operation and you'd like to try the report, you'll need to create that
TaxRatesFile first. Just because you have but a single jurisdiction,
doesn't mean you cannot create the file regardless.
4.5.1 (2/13/11):
All Moderate-Level Requests Fulfilled (as per List of Items Requested in
My ASTI Class):
Last Tuesday in San Diego, we had a fantastic set of three
classes at the United Servicer's Association annual convention (aka the
Appliance Service Training Institute, or ASTI). In my own class (and
as is now tradition), discussion brought out the need for a number of
improvements. Michael Basich (of Michaelson's Appliance Repair of Tampa)
kindly tallied 16 such requests, and emailed me the list. Though I only
got back on Friday afternoon, I've already mostly killed the list. Here is
my general report:
Out of 16 items tallied, 4 involved supplementary products
rather than ServiceDesk (and I still must get to those). One involves a
very large project I intend to conquer soon. Two were for fixes that, upon
going to address, I found ServiceDesk was already behaving exactly in the manner
requested (read near bottom of this entry for details on those). This
leaves nine items, total, that I was able to conquer this weekend, as now
available in this (Monday morning's) release:
1. DTR-Viewer Now
Functional Even for TimeCards Not Done via SD-Mobile:
In the class, I always show-off new features as added since
the prior class a year earlier. When I showed the new DTR-Viewer (see
entry as pertaining to Rel.
4.4.68), someone pointed out that the Viewer works only for TimeCards as
compiled by a tech working in SD-Mobile, and not for someone that does his
TimeCard punches via ServiceDesk itself. I'd not intended such a
limitation when I created the feature, and was surprised by the report. On
review, I found the Viewer's disability in regard to within-ServiceDesk created
TimeCards was the unintended consequence of a coding variation, which has now
been addressed.
2. Auto-Add to
JobRecord Historical Narratives When User Changes Tech Assigned to Appointment:
Suppose you're in the DispatchMap and change the tech
assigned to an appointment. I've never thought this kind of event should
be automatically documented to the JobRecord's history, because to me it's not
particularly significant as concerns performance on the job. But many have
asked for it, and in the class I was persuaded to at least make it an option.
So now, if you go to your Settings form (Ctrl-F11), you'll see a new checkbox
where you can set to activate this new offering:
| Applicable section as prior offered |
Now with new option |
 |
 |
Obviously, if you go to your Settings form and check that new
option, you should see these new historical narratives added, any time someone
changes the tech as assigned to an appointment.
3. DispatchMap
Auto-Popups Moved to Right:
We also discussed the DispatchMap's auto-popup feature, as
added with Rel.
4.4.53. During discussion it was agreed the popup would be better if moved
to the right of the underlying text:
| Showing popup as traditionally prior located |
As now moved to the right |
 |
 |
4. Add
Password-Protection Security for Edits in the MasterPartsPlan:
I was surprised to learn that, somehow, I'd evidently
neglected add an option to enable the above-indicated protection. It's
there now. Just open your Security-Actions form (Shift-F11), and click on
the Actions radio button. If you sort on the Action/Process
column, you'll see there already were, in fact, several categories of optional
protection as applicable to the MasterPartsPlan, but only now (with addition of
the highlighted item below) is there one to optionally protect against editing,
there, in general.
You'll need to toggle the password protection on this item to
True, if you want it to take effect (default is False).
5. Prevent ServiceDesk
from Emailing an Appointment Confirmation Reminder When the Underlying Item is
Designated as a ShopJob:
The above pretty much speaks for itself.
6. Allow for Deletion
of Daughter Bands as Added to Archived-PartsProcess Records:
Ditto.
7. Make a More Simple
QuickKey Access for the SD-Rolodex:
For obvious reasons, I'm always reluctant to change QuickKey
or Mouse action users have become accustomed to. However, since adding the
SD-Rolodex feature about a year ago, I've often felt it deserves its own direct
F-Key access (i.e., without combination with a modifier key). For a form
that a user wants to so frequently bring up, Shift-F3 (the action to-date)
seemed way too difficult. At the same time, I did not think the
SalesViewer form needed access all that often, and so did not think it really
deserved F4 sweet spot it's always (until this date) enjoyed. Given the
above, I put it to the class, asking how they'd feel if I swapped the two.
They voted in favor, so now it's a reality. F4 gives you the SD-Rolodex.
Shift-F3 gives you the SalesViewer form.
8. Flag
JobRecords in ServiceDesk if/when Connected to an SDRB Account:
SDRB stands for SD-RevenueBuilder. If you do
not know, it's a supplemental program designed to assist you in managing your
own service contracts and/or maintenance agreements, and to integrate with
ServiceDesk while doing so. More than a year ago, someone mentioned that a
tech in the SD-Mobile should have a visual indicator if the property that he's
working at is subject to an SDRB account. We added a visual indicator
there, but for some reason did not think of doing the same within ServiceDesk
itself. That oversight has now been corrected. Specifically, any
current JobRecord that's subject to a pending SDRB contract at the address in
question will show with a visual indicator as follows:
This indicator will appear next to whichever section
(Paying-Party or Go-To) as has the matching address. As another benefit,
you can simply click on the reference to immediately link
to the SDRB account in question.
9. Archived-JobRecords
Now Packed More Loosely:
In the interest of using data space efficiently, ServiceDesk
packs JobRecords somewhat tightly when moving them to the Archive.
Specifically, for the last two or three years, its been leaving just 250 spaces
between each record -- 250 spaces where characters can be added, if, after the
record is archived, you find yourself wanting to add new text (in any context
aside from AfterNotes, which don't count because they are stored separately).
In the class we talked about how sometimes this is less room than needed for
some purposes. Since storage space is so much more liberally available
today, we decided it was time to be less stingy. Now, JobRecords will be
packed to the archive with 500 extra spaces allotted for each.
As mentioned, there were two items in the list that,
upon going to address, I found ServiceDesk was already doing precisely as
requested. At least, it sure did so far as my testing is concerned.
It's possible users have found contexts where it's otherwise, and I describe the
items here so that, if so, hopefully such users can tell me how to replicate
whatever failure they are experiencing:
10. Exclude POS
Transactions from the Profitability Report:
With release of Ver.
4.4.72 we added a new Profitability Report. Someone in the class said the
report was including values of parts sales as conducted across-the-counter --
which would not make good sense, since the report is intended to analyze
profitability of service operations. On reviewing, though, I found my
program code was already very deliberately written to exclude POS transactions.
If anyone truly encounters any experience to suggest otherwise, please let me
know.
11. When Scheduling a
ShopJob, There Should be No Dialog Complaining about Absence of Grid Coordinates:
Someone said they got this dialog. I found my program
code specifically designed to prevent its occurrence in the ShopJob situation,
and my tests show it working. Again, if you can find a scenario where it's
otherwise, please let me know.
To remind, there were 16 items from the class total.
Another four (work still pending) involve programs other than ServiceDesk.
The remaining one is a big project, one which I happen to have actually been
working toward for three years now. I'm hoping to have it out soon.
4.4.99 (1/23/11):
New Accommodation for Techs Without Inventory:
In its standard default mode, ServiceDesk assumes each tech as
listed in its TechRoster is an inventory location (or, more properly, that he
drives a truck that's an inventory location). For a good share of
companies, this assumption works great. For those companies where the
assumption fails, we have long had an option whereby you can turn off that
default by instead explicitly listing your inventory locations.
That's the background for our new feature. It arose when
we got a call from a new client whose techs (or, rather, some of them) own and
use their own inventory. When items are used by these techs, it's the
office's duty to "reimburse" them by replacing the part they've used. But
the office is not otherwise tracking what's on these techs' trucks, so how can
it easily manage this replacement process?
My first answer was to suggest using the re-stock method (in
the F10 InventoryControl form) that reviews usages and generates a re-stock list
on that basis (i.e., rather than comparing remaining stock to minimums, as is
the more typical method). But there was a catch. If the tech
attempts to indicate he used a part from stock, and if the system doesn't
recognize he has the part (because, obviously, it's not tracking his inventory
as all), it's going to balk at the claimed usage. Moreover, if you'll
actually be pulling from the office to replace what the tech used, that's from
whence the indicated usage must come (so that, in other words, there's an
appropriate reduction of stock there).
We have accommodated the above-expressed need via a new
option, as below indicated, in the (Ctrl-F1) Settings form:
If you check that box for a particular tech, ServiceDesk then
knows to NOT treat him as an inventory location. This works independently
of the feature that allows you to explicitly list locations, and in response to
the setting here, if in a PVR a tech claims to have used a part from inventory,
the system will assume it was actually office inventory he used, rather than
seeking to find it within his own (non-existing) inventory.
Behind the scenes (and for the above-described
scenario) ServiceDesk will actually be making two simultaneous entries in the
Journal of Inventory Movements. One moves the item from the Office
inventory to the tech in question. The other, instantaneously thereafter,
moves it from the tech to sale on the job in question.
While instigated by that new client (and to accommodate the
need to replace parts as used by technicians who carry their own inventory),
this solution should also be effective for shop techs -- who typically do not
have their own inventory and are regularly pulling from office stock regardless.
Either way, we think you'll find it a great solution.
BTW, the MobileLink program has also been modified to
recognize and appropriately respond to this new option (so that tech's working
via the Mobile interface, and designated as having no inventory, can likewise
benefit). You will need to be updated to Ver. 1.4.46 of MobileLink to have
the benefit there.
New Usages Report/Export:
For quite a long while we've had a report in the archived-JobRecords
form that's designed to provide you with analysis and data regarding your
frequency of use for all parts, both stocking and special order. Turns out
some folks have wanted to do some kinds of analysis that do not exist in the
report directly, and wanted more item-by-item type raw data than the existing
report provided. So, we created a new option:
If you're interested in more extended analysis in this area,
check it out.
4.4.98 (1/16/11):
Interim Search Results within the Archived-PartsProcess Form:
When a little while back we improved the method of displaying
search results in this context (making the interface more one of paging up and
down), we produced an unintended downside. Turns out the old and less
sophisticated interface had one benefit. If your data set is so large so
there's a long delay before the entire file is searched, and if your search
target finds matches within the data so infrequently that it takes a significant
wait before a page is filled, it turns out you could wait quite a while before
seeing any search results.
This release addresses that. Now, the system will show
interim search results just as it did before (but with a background color of
pink, to make it visually apparent that you're not yet seeing a formatted page).
If you see what you're seeking and want to terminate the search, just strike
Enter on your keyboard.
Many Other Improvements:
You might notice it's been five releases since the last-prior
announced one. Sometimes, I go through a stage where I'm very busy making
a large series of small, behind-the-scenes improvements, but with none so
noticeable to the typical user as to really warrant description here.
That's been largely the case during the last 30 days, encompassing the prior
four releases.
4.4.93 (12/16/10):
Direct Emailing -- a Beautiful Bypass Around the
Windows Mail Client:
Several Rossware applications use email (I'm referring to
normal, internet/based mail here, rather than to ServiceDesk's internal "SD-Mail"
system). Always, Rossware email access has been via what's called the
Windows Mail Client -- which is simply the email program you have
installed, at the station in question, to manage emails, and which is designated
within Windows as its "default" email program.
To put the above another way, Rossware programs have never
directly performed email-related tasks. Instead, they hand the task
off to Windows, which (in turn) hands it off to the separate email program
(e.g., Outlook Express, Outlook, Eudora, etc.) -- if any -- that you have setup
for the purpose.
Given the above, if you have not appropriately setup such
another program at any particular station, Rossware programs cannot perform
email tasks at that station. Even then, there may be issues, because (and
for a number of reasons) such other programs may refuse to cooperate as
perfectly as wanted.
This release provides a direct bypass around any/all such
issues. Now ServiceDesk can perform email tasks directly, without relying
on the Windows Mail Client. Or, if you prefer, you may continue in the
traditional fashion.
To invoke (or even just explore) the new option, click on
File Functions within the ServiceDesk MainMenu, and pick the new menu item
now listed there:

In response, you'll see the following new form:
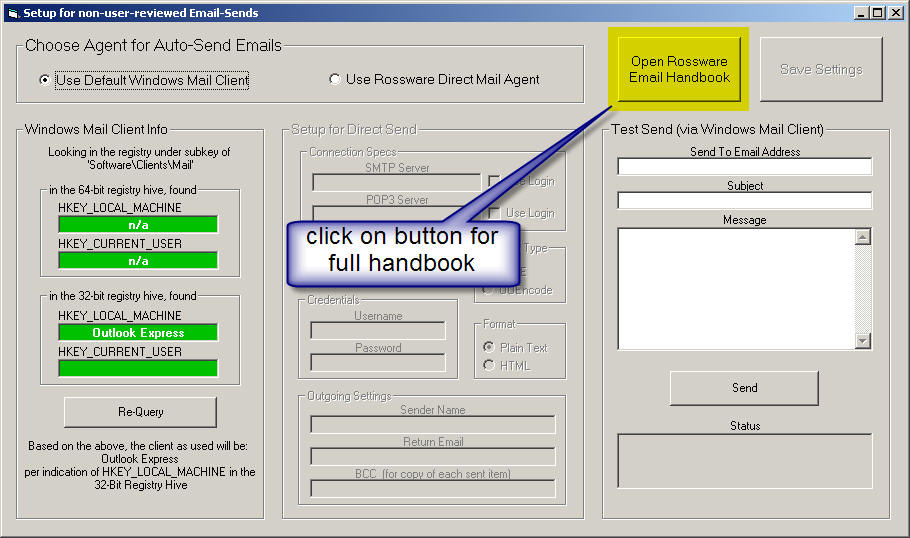
This is where you can change from the default email mode
(i.e., using the Windows Mail Client) to using the direct method instead.
Please also note there is a large button you can click, which opens a
handbook that explains greater detail.
4.4.92 (12/13/10):
More Enhancements -- Still -- in the PartsProcess System:
1. Added still another search-and-report
criteria in our "To-the-Grave" management/monitoring system (as available from
the Ctrl-F8 archived-PartsProcess form). This is for items that have been
sent back to the vendor, and which are "Past-Due" for credit being
received. Since this increased the quantity of such criteria to nine, we
also added some categorization to the relevant menu sections, so as to improve
ease of review/choice:
| Prior options as available just prior to this
release |
With new option added, plus improved organization |
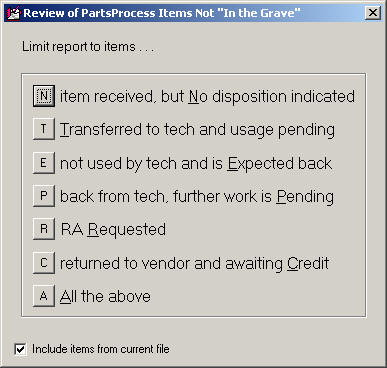 |
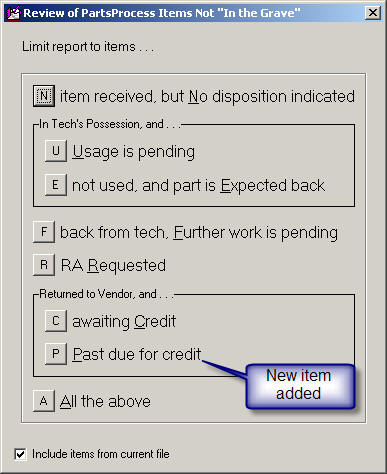 |
We think it's an improvement not only operationally, but
visually too.
2. Improved the new "Manage-Return"
daughter-band creation (see #4 in entry for 4.4.89) with the following dialog:
| Old |
New |
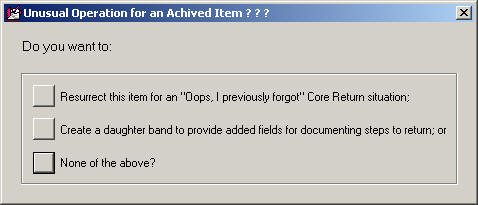 |
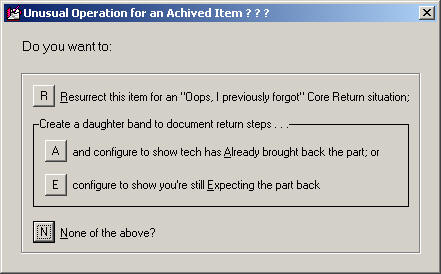 |
The middle option, from the old, has been replaced with two
options in the new. The effect is self-explanatory, if you simply read the
text.
3. Reconfigured supplementary filtering, in
the archived context, to encompass both the view/search and
create-document modes of managing items "to-the-grave"
| relevant section from prior MainMenu section |
from Just-Improved |
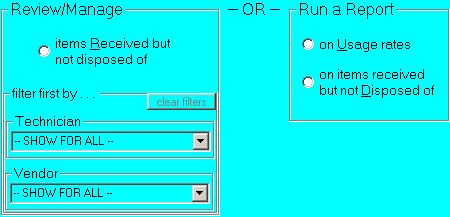 |
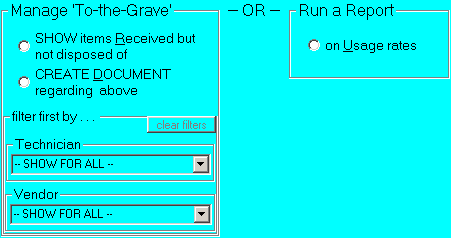 |
4. Re-Allowed type-in targets for all
filtering modes.
This one requires some background. As the first item
under Rel. 4.4.89, you'll see where we announced "much enhanced filtering."
In general, it was much enhanced. However, with the transition to
a more modern interface we unwittingly gave up something. In the older
methods, you'd typically be typing in your filtering targets. Under the
new, we only made ability for you to pick from dropdowns (such as, for example,
illustrated under item #3 above). This robbed you of the flexibility
that's involved in entering a target that does not exist in the dropdown.
That's fixed with this release. If you want a target that's not in the
dropdown, just type it into the dropdown box.
4.4.91 (12/8/10):
Another Enhancement in the PartsProcess System:
I'm sure we'll get though this series of improvements some
day, but it turns out we're not actually done yet. The latest improvement
involves how ServiceDesk presents search results in the archived PartsProcess
form (Ctrl-F8). Since it's showing you search results, and since
the search direction has historically been programmed to begin at the
bottom/most-recent position in the data, the traditional method of presentation
has been as follows:
As the system reads in the file and finds each match to your
search target, it displays the first match at top of the form. The second
match displays in the next line position, and so on, until a page of matches is
filled (assuming there are enough matches to fill a page or more).
At that point the search pauses, giving you a chance to examine the page.
With press of any key, the search resumes, potentially filling a new page, and
so on. This method had several disadvantages if you're doing intensive
work in the archive -- in particular, the kind of work that our prior recent
improvements have now made practical.
Given that we're now doing serious work in the archive, we
realized there is now serious need for a better method of reviewing searched
archive results. This release provides that.
Most importantly, you can now use PgUp and PgDn on your
keyboard to move up and down within search results (i.e., it's no longer limited
to pressing any key for the sake of moving up only).
Additionally, under the old method results were always
inverted in comparison to the order items were archived (i.e., newer items were
at the top of any display, progressing to older toward the bottom). This
was backward from how the items actually fit in the file, and as you progressed
to the next page (presenting successively older items), it resulted in repeated
inversions between the order in which the pages came and the order of specific
items as presented on each page. With the present improvement, each page
shows its member items in exactly the correct sequence, regardless of whether
the page is reached by perusing in PgUp or PgDn mode.
Improved Claims Formulation for LG:
We recently learned of some particular fields as involved in
LG claims that could be better formulated to achieve successful processing.
This applies particularly on the CE side. That applicable TranslationTip-ToolTips
have been revised to guide you regarding the improved treatments.
4.4.89 (12/5/10):
Continuing/Further Enhancements in the PartsProcess System:
We must thank David and Paul Manning, at Sharper Electronics
in Portland, for this continuing series of improvements. Their intense
need, for perfect and complete PartsProcess management, is what's spurred this
flurry of activity. Aside from one added report (to tally reasons why
ordered parts ended up not being used), I believe this installment fulfills
their needs -- and likely almost anyone else's, as well.
1. We now have much-enhanced secondary
filtering of items displayed, in both the current PartsProcess form
(F8) and for when reviewing items "not-yet-in-the-grave" via the archived
PartsProcess form (Ctrl-F8). To properly accommodate these enhancements,
there was a need to totally re-do the menu system as applicable in both
contexts. It is, indeed, now much modernized. Here's a comparison in
the current context:
| Old Menu in the F8 form |
New Menu in the F8 form |
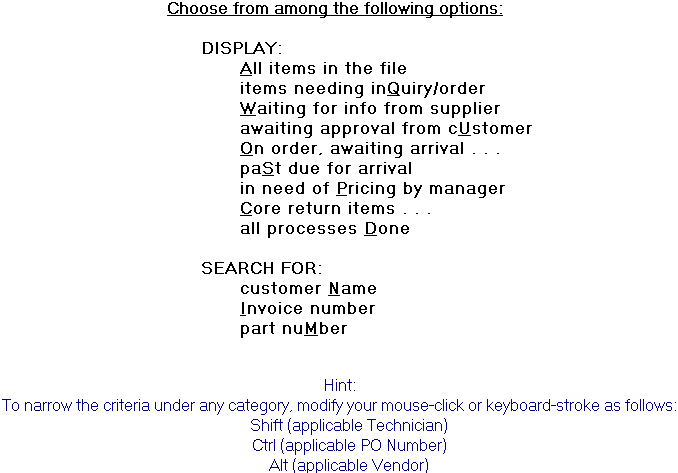 |
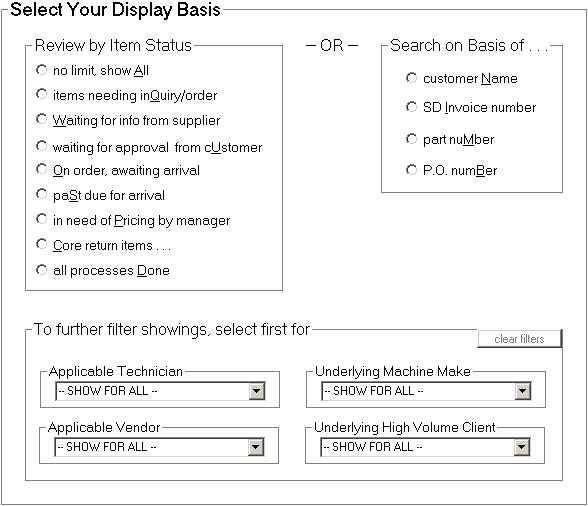 |
The archived context is similarly changed, though in
a manner unique to that venue. In lieu of illustrating here, please, just
check it live, yourself.
2. Core-return management has been added to
the SD-Mobile context. When we first created explicit core-return
management back in August, we intended to immediately follow by placing into the
Mobile context some corresponding functions. For example, if for any part
you've created a core-return daughter band within ServiceDesk, it's logical that
if a tech working via Mobile indicates usage on the part, he should immediately
be confronted with an extremely strong message informing him that it's a
core-return item, and soliciting his affirmation that he has indeed retrieved
the old part for return. As it happened, I got sidetracked on other
projects and did immediately get this related work done. However, it is
done presently.
3. Created a "Resurrection"
facility to deal with the situation where you forgot to add a core-return
daughter band, and the parent process item was already archived. Just
locate the archived item in the archived PartsProcess form (Ctrl-F8),
right-click within the right two-thirds of the info-band, then follow the
prompts.
4. Created a "New-Daughter-Band-In-Archive"
facility to assist in better tracking of steps as taken in managing a needed
parts return. The general idea is that you can use the various date boxes,
and such, in a manner that parallels what you do in managing a core return
(i.e., document when you requested an RMA, when when you shipped, tracking
number, precisely when credit was received (and on what invoice number), etc. --
all via an added daughter-band that you add for the purpose. To invoke,
begin by using precisely the same click action as described for #3, above, then
just follow the menu in an appropriate alternate fashion.
4.4.88 (12/1/10):
Still More Enhancements in the PartsProcess System:
In the last release we made a new category for parts
disposition: "RA Rqstd" (see Item 4 in the entry below, from 11/30/10).
But we did not make a new search category for it. That oversight is now
corrected. In fact, while in the course of of adding that as another
search criteria, we overhauled the overall organization as involved in those
criteria selections. The sequence now has greater logic and clarity:
| Just barely old |
Now the new, new |
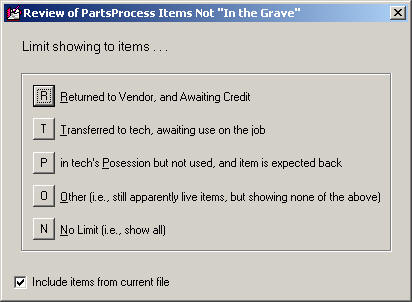 |
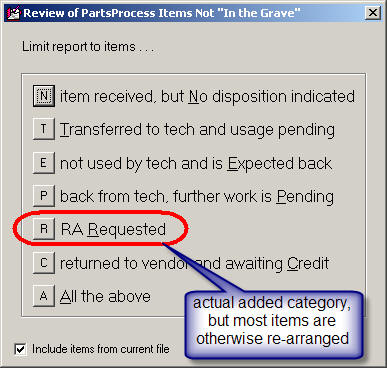 |
Also tweaked a few things as connected with the recent
add-ons. Example: a user discovered that the "Returned to Vendor and
Awaiting Credit" category improperly included items marked with the new "RA
Rqstd" designation. That (among other things) has been finessed.
As another improvement, there is a new dropdown via which
office persons can insert reasons why a tech did not use a part (see 10/12/10
entry in the SD-Mobile WorkDiary for
explanation of how we there created provision for a tech to explain his reason
for non-use).
| float your mouse for a tooltip reminder |
a double-click produces the actual dropdown |
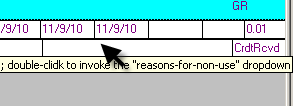 |
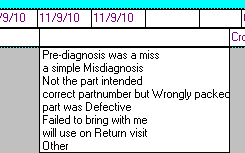 |
If you float your mousepointer over the Notes editing box, the
Tooltip will inform you of the method to get the new dropdown (just
double-click). Once you, do the dropdown appears, and all you must do is
select from it.
4.4.87 (11/30/10):
More Enhancements for the PartsProcess System:
1. We discovered that if you're doing a
search function in the archived-PartsProcess form (Ctrl-F10), and if you tried
to PgUp or PgDn after reaching the final page of search results, the system
erroneously went into an attempted (but not properly-operational) page-change
mode. Fixed.
2. Also in the archived-PartsProcess form
(Ctrl-F10), added a new search/selection criteria to the "Review Items Not
Disposed Of" category.
| Old |
New |
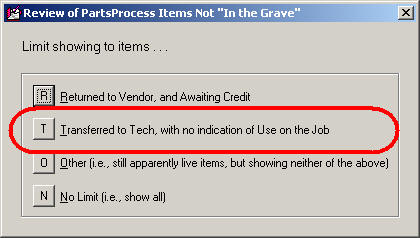 |
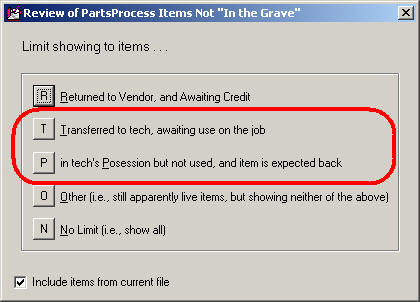 |
More specifically, we took what had been a single category
selection (above-left), and split it into two more specific categories
(above-right). The above labelling is likely self-explanatory.
3. As another refinement connected with the
above-circled category, the system now properly excludes from the result items
that are shown as in possession of the office (OF).
4. Added a new category to the that provides
potential insertions to the bin-loc/status box.

As is likely obvious, this is used to indicate that you're
requested a Return Authorization from your vendor.
5. For Core Returns (current PartsProcess
form, F8), added a new display category, as follows:
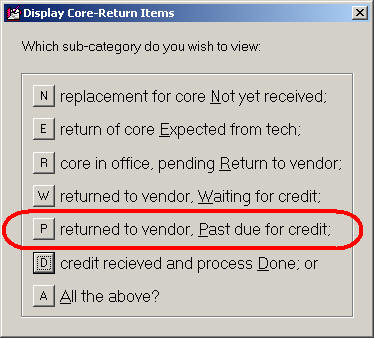
Again, the function is likely self-explanatory, if you simply
look at the above.
6. Also in regard to Core Returns, modified
the applicable filtering to prevent the second category (in this listing as
above shown) from including items where the tech has not yet used the parent
part.
4.4.86 (11/14/10):
A Fix for "The Best-Laid Plans of Mice and Men":
That above-quoted and familiar phrase is from an 18th century
poem by Robert Burns. I'm not normally one to like poetry (actually,
never), but when I was thinking about the subject of this entry the indicated
phrase entered my mind as seeming apt. The notion the phrase evokes, of
course, is that, whether you're a mouse or man, you can lay very grand plans,
and yet in spite of all determination and hope, they may nevertheless come to
naught. I'll get to that actual happenstance (as regards a couple of
schemes within ServiceDesk) in a moment, but first, more about the poem.
Probably like you, I had no idea where that "Best-Laid Plans"
phrase came from, so I Googled it, and quickly arrived at
http://en.wikipedia.org/wiki/To_a_Mouse.
It revealed the origin, and provides full text of the short poem (both original
and translated into more modern English). I read the modern translation,
and, dang, I like it. It's a really cool poem. Check it out.
Now, to the real topic.
In the last few months, I've made some major improvements in
the PartsProcess system's "To-the-Grave" elements of management. Notably,
in such regard:
-
In the archived view of the PartsProcess form
(Ctrl-F8), I added the option to visually review items that do not show a
complete and final disposition (whether it's use on the job, being returned
to the vendor and credit received, etc. Or, you can create an export
containing the same information.
-
In the current view of the PartsProcess form
(F8), I added the option to create Core-Return daughter bands, and to
visually review each item that contains any such band as may still be
pending (i.e., core credit not yet received).
Here is where my rodent-brain scheming went awry.
It turns out that when you add a core-return daughter band to
a parent PartsProcess request (pursuing Number 2, above), it prevents the parent
from being moved to the archive -- until, of course, the core-return daughter in
itself is complete and ready for such movement. This is perfectly fine so
far as managing the core is concerned, but throws a wrench into the works of
reviewing received items to assure all reach a proper destination (Number 1
above). At least, this is true if you use the new core-return
function.
The reason for this frustration is because (and until now) the
review-non-fully-disposed-of-items function has been designed to look solely at
items in the PartsProcess archive. This formerly made perfect
sense, because items received and appropriately priced are automatically moved
to the archive, and there they are ready for the indicated type of review.
The problem is that the added/new core-return strategy prevents applicable items
from being so moved -- for the duration of the time it takes to get the core
returned and credit received. In the meantime, there may be unused and
un-returned items that are not showing up in the very review where you want to
see them.
Hopefully, you can now see how these two schemes collided.
We can thank Paul and David Manning at Sharper Electronics for bringing the
matter to light (they ploughed up my nest, so to speak).
So, what is the fix?
In a nutshell, the review-non-fully-disposed-of-items function
(Number 1 above) will now look in both archived and current
PartsProcess locations.
For the export/report option, making the report function
additionally look in the current PartsProcess file is a simple,
behind-the-scenes change (you'll simply see more stuff, if applicable, in the
resulting report).
For the on-screen review mode, it's more complex. The
archived view of the PartsProcess form is designed solely to show
archived records, and vice versa in regard to the current view of the
form -- yet, you need to see results (for the review we're concerned with here)
from both sources at once. In theory, we could make a hybridized
machinery that would simultaneously show records from both and within a single
form view (plus allow editing, etc.), but the mechanisms would be very difficult
from a programming perspective. Also, the result might be confusing to the
user.
Instead, we've added an option. When, from the
archived view of the PartsProcess form you pick the display category "items
Received but not disposed of," you'll now have a checkbox option labeled "Include
items from current file."
If you proceed with that option checked, the ServiceDesk
interface will maximize to use the entirety of your screen. This is to
make room for both archived and current views of the PartsProcess form to
simultaneously display (and without one covering the other), each in a mode to
show you items-not-fully-disposed-of. Thus, you can truly see (and work
upon) the entire set of such items at once.
Take that, you unforgiving universe. Perhaps we should
now consider a new title for this section: maybe "Rodent Brain Strikes Back!"
4.4.85 (11/8/10):
"Hlpng" Expression Added to Appointment Drop-Down:
In the ServiceDesk ScheduleList form (F6), the box as normally
used for the customer's name can serve an occasional alternate purpose. If
you want to make an entry indicating that a tech will be absent, for example,
particular expressions can be used to fit the situation. Historically,
there was a quick-key shortcut for inserting these, but about eight months ago
we made easy insertion available via a dropdown (see second description accompanying
release of Ver. 4.4.55).
Recently, we realized that our new dropdown should
have included another special expression:
You can see our new addition (as the fourth/bottom item) in
the dropdown illustrated above.
The "Hlpng" expression has been a tool in ServiceDesk for a
long, long time. It's used where you're sending a second (or third or
fourth) tech to a job, and need to make an appointment entry for that tech.
However, you want this entry to be distinguished in a manner that shows the
involved tech's role is secondary -- one of merely "helping" the primary tech.
It also tells ServiceDesk that, in connection with that particular appointment
entry, there should be no expectation of a PostVisitReport, and things of that
nature.
The fact is, any of these expressions could always be
typed in. However, the dropdown gives you an easier means of
insertion, along with assurance that the expression will be inserted with
precisely the spelling, as required (vowels eliminated), via which ServiceDesk
will recognize the intended operative purpose. In specific regard to the "Hlpng"
expression, BTW, you will find it helpful to add (via your own typing) an
applicable two-letter abbreviation for the primary tech who's being "helped"
(for example, the full resulting text might read "Hlpng DS" where a guy
named Dave Somer is the primary tech).
Other:
Yes, if you check the prior release/version number, you'll see
we did two whole releases with no announcements here. Rest assured, there
were indeed improvements -- just none that warranted particular descriptions
here. The more announcement-worthy improvements during this period have
been on the Mobile side (for details, see our
Mobile-WorkDiary).
4.4.82 (10/18/10):
Date-Picker Type Calendars Added to Some New Locations:
One of our newer users (David Lange from Oak Valley Appliance)
doesn't like to type in dates (can't blame him really), and noticed a few places
the system could have (but did not) provide a date-picker calendar. We
have now added the accommodation to those locations, as follows:
In the UnitInfo form's Purchase Date box:
In the Hibernate form's Sleep Until . . . box:
And, in the PartsProcess form's Date Expected box:
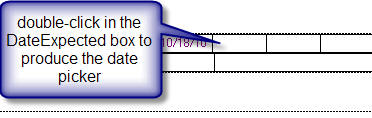
This last context has always had the "date-hence" option (type
"3d" for example, and the system inserts a date 3 days in the future), but for
some situations the calendar is likely to be easier.
LG-Formatted Parts Order File:
This one is also from David Lange. Turns out (we did not
know this), LG evidently has a method via which you can upload a file specifying
the items you wish to order -- as the simplified means of creating an
order. Since we're always fond of any means for creating labor-saving
automation, we quickly created an option to create an order file in LG's format.
The above option is obtained, from the PartsProcess form (F8),
by selecting items to order in the standard fashion, then hitting Enter to
proceed with the order.
Folder Segmentation Now an Option
for Your HLinks Folder:
Some three-plus years ago (see announcement accompanying Rel.
4.3.11) we introduced our Hyperlink feature: the ability to have in-text links
in a variety of ServiceDesk venues that reference other objects (picture files,
text files, websites, etc.). You can drag and drop and create such links,
and a simple double-click on any such link (once it's created) opens the object
for you.
In general, the system creates files for the objects as linked
to a subfolder of the \sd folder on your server. The subfolder is called
HLinks (thus, if ServiceDesk is installed on your server's c:
drive, the full path for the folder would be c:\sd\HLinks).
As time has passed, some of our users have accumulated tens of
thousands of files within their HLinks folders. Typically, most of these
files are images of tickets as created by SD-Mobile. Regardless, when a
large a quantity of such files are of images, a potential issue is born.
It's because many image viewers (the programs that open such a file and display
the image for you) do something behind the scenes, when asked to open a
particular file. This "something," evidently, involves surveying all other
image files within the same folder. Where there many thousands of
them, the opening operation can become rather (perhaps even unbelievably) slow.
With this release of ServiceDesk, you can now create
subfolders within your HLinks folder (as many as you like, and named in whatever
manner you like), and move some portion of the files into each. If it was
us, we'd likely use a strategy such as making a subfolder for each past year
(labeled as such), and move all the files as created within that year to that
subfolder.
Naturally, even prior to this release you could have created
such subfolders, and moved some portion of the file population into each.
The difference with this release is that, prior, ServiceDesk would look for a
file only within the root level of the HLinks folder. From this release
forward, it will look both within the root level, and within immediate
subfolders it happens to find there.
Please notice the emphasis, above, on the word "immediate."
ServiceDesk will not look to subfolders of subfolders. If you bury files
in hierarchy that deep, ServiceDesk will not find them.
4.4.81 (10/11/10):
"Down Boy, Down!" Improved Overbooking Alert Now Tamed:
Two releases back, we described an improvement in how the
system looks at availability, via the ZoneScheduling system, to decide whether
to warn an operator against overbooking. Specifically, we'd found that if
day-portion vacancies (i.e., morning or afternoon) were available for a
particular zone/day socket, but not all-day vacancies, the alert would trigger
if an operator attempted to schedule an all-day appointment. This didn't
seem logical, since all-day appointments are more liberal to internal management
than mere day-portion ones, if day-portion slots are available, it stands to
reason, a fortiori, that all-day ones should be permitted.
So (and via a significant internal rebuild) we fixed it.
Then we got calls. Lots of them.
Turns out the old system had been being liberal in the
opposite way (one that, arguably, logic dictates against). Specifically,
it had been permitting (without alert) scheduling of day-portion appointments in
the presence of available all-day allocations, but absent any applicable
day-portion allocation. Our rebuild incidentally fixed this. In
other words, via the improvements as made, an operator could no longer schedule
for a day portion, absent warning, unless there were unused allocations for that
day-portion.
Logical or not, people did not like this "improvement."
So, with this release, the old (arguably less logical) liberality is back.
Regardless, the new and added (more logical) liberality, as added two releases
back, of course endures.
4.4.80 (10/6/10):
Customizable Text for Emailed Appointment
Reminder/Request-for-Confirmation:
For a few years now, ServiceDesk has had the ability to
auto-email appointment reminders (and corresponding requests for confirmation)
to your customers. It works great, whether configured so the email asks
the customer to confirm via email/phone reply, or via on-line interface as part
of the CyberOffice system.
A small rough spot, however, has concerned verbiage as
used in the email. About a year ago, we received reports that some
customers were not taking the request to confirm with sufficient seriousness.
In response, we strengthened the language, adding a statement indicating that if
a response was not forthcoming, the appointment might not be held open.
After that, we received reports that some customers were offended by the
"threat." Aside from such difficulties in our own efforts to get the
language "just right," there's also the fact you might want to have elements in
the language that are particular to your own policies, preferences and
situation.
Given such matters, we have now added this email context to
the array of those you can customize, according to your own company preference.
For details on how, please see the
CyberOffice
Handbook, beginning in the section that starts (about two-thirds down) on
its Page 13.
Aside from allowing you to now completely customize, we
have also improved the stock language (with the language having been at
first too nice, and then too mean, we believe we may now have stopped the
pendulum about right in the middle, where it should be):
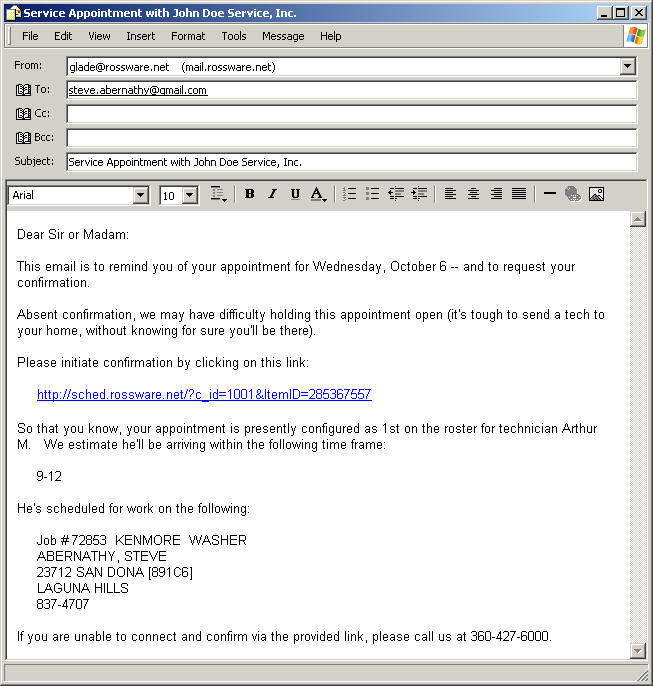
Perhaps, with this improved stock language, you may not feel
there is any need to customize. But, at least if you want, customization
is definitely now available.
4.4.79 (10/5/10):
NSA Export:
NSA is the National Service Alliance, an organization formed
by a consortium of leading servicers in the CE industry to perform a package of
services that, in some respects is, is similar to those performed by
ServiceBench and ServicePower. At any rate, member servicers have the need
to regularly upload certain elements of data concerning job status to the NSA
server. This new export is meant to facilitate that. It's accessed
via the Export Customer Data form (Alt-F3).
Presently, the export is configured to create references
solely to jobs that are setup with "COSTCO" or "SONY" as the underlying client
(it's possible in the future we'll need to make this client-filter customizable,
but for now it's hard-coded). It will also be necessary, at present, for
you to manually upload/ftp this file to NSA (we'll create a self-FTPer as our
next improvement).
Please also note that, while the dialog asks you to specify a
name/path for the main output file, the process will actually build
that file, plus two others. NSA wants three files in total: the main one,
plus a second that details parts-on-order, and a third that details parts-used.
You'll find the added files named similarly to the main one, and in the same
folder location.
Improved Zone-Overbooking Alert:
Yesterday it came to my attention you could have the following
scenario:
For a particular date and zone, you have slots open for AM
and/or slots open for PM, but none allocated for All-Day. A call-taker
wants to book a job for all-day. As he attempts to do so, he gets a
warning that indicates no slots are available.
The above is thinly rational -- in the very technical
sense that, indeed, no specifically-designated all-day slots are
available. But, as a matter of practicality, if I have morning or
afternoon-specific slots available, I ought to be able to book all-day
without the system complaining.
This is, obviously, a really basic matter, and considering how
long the Zone-Scheduling system has been in play it seems pretty shocking that
it never prior came up -- so shocking that when it did come to my attention
yesterday, I felt determined to address it immediately. As part of the
improvement, I rebuilt a great deal of the underlying program code (what with
flowing pipes, and all, it's very complicated stuff) and improved the overall dialog
that results when an overbooking situation exists.
4.4.77 and 4.4.78 (9/13/10 and 9/19/10):
Miscellaneous Fixes, Improvements and Tweaks:
Sometimes, it's just a series of things that are too small and
too numerous to merit individual description, within a venue like this.
That was the case with these releases.
4.4.76 (8/29/10):
Further Improvements in the "To-Grave" Segment of our "Cradle-to-Grave"
Parts Management System:
Back with release of Ver. 4.3.99 (posted 8/31/08, you may
peruse below to find), I thought I'd completing programming per the subject as
described in this section's heading. As it turns, however, we've
periodically learned of need for added improvements. This release
introduces four more:
"To-Grave" Improvement #1.
Among the "final disposition" checkoff categories we allowed for in Ver. 4.3.99
design, there was one called "RtrnCrdt" -- intended to show,
alternatively, either that a part had been returned with expectation that you'd
receive credit, or that return credit had actually been received (the choice of
which way to use it was up to you). I should have realized at the time
this was really a poor design. You need to be able to distinguish between
the two modes. To that end, the "RtrnCrdt" choice has now been
eliminated. In its place are two options: "RtToVndr" and "CrdtRcvd"
(why couldn't I have been that smart from the start?).
| Old Dropdown |
New Dropdown |
 |
 |
You should note there is an important distinction between the
old "RtrnCrdt" designator, and the pair of new ones. The old one
was an in-the-grave categorization. So is one of the new designators ("CrdtRcvd").
The other ("RtToVndr"), however, is not. This latter is considered a still
living-in-the-system, still in-process category.
FYI, any old records that have already been recorded with the
old designator will stay as such, but from here on out you can use either of the
much more descriptive pair (depending on which applies). For
reporting/review purposes (see below), the system will treat the old designation
as equivalent to "CrdtRcvd" (meaning, for those older items, it will
still be up to you to verify via other means that credit was actually
forthcoming).
"To-Grave" Improvement #2.
As part of the above-described Ver. 4.3.99 release, we introduced a new filter
and new report in the archived-PartsProcess form (Ctrl-F8) -- a pair designed to
let you review, for appropriate management, those particular s/o items that had
been ordered and received, but had no entries indicating a final and proper
disposition. As per original design, those showings were somewhat general
in that they included all items not yet in the grave, without
segregation as to category. With this release, segregation is now offered.
Specifically, when you pick either of those options, you'll next see a dropdown
that asks what sub-categorization you'd like.
| This menu option |
This one |
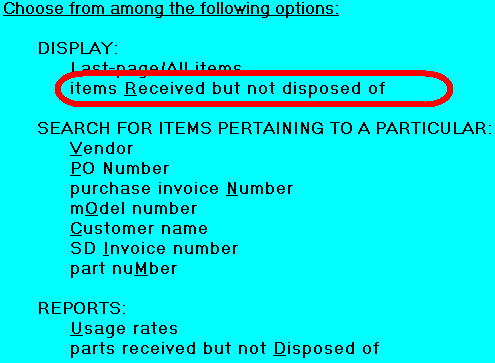 |
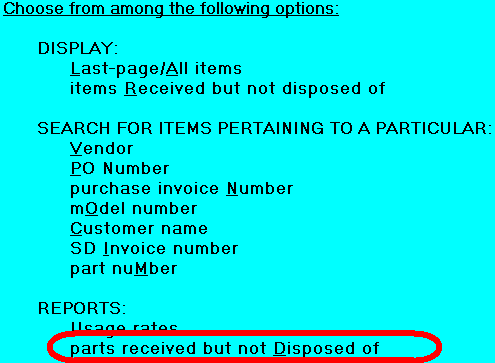 |
| Leads to this |
Leads to this |
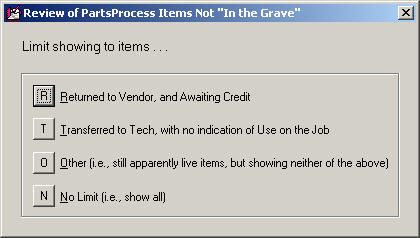 |
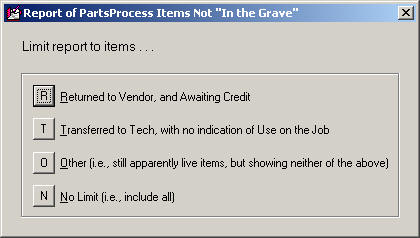 |
Thus (and as an example), if you want to specifically review
items that have been returned to the vendor and on which you're awaiting credit,
that specific category can be selected.
This brings up the point: to effectively harness the benefits
as provided by Improvement #1 (described above), you should make it a practice,
as you box up and send items back to your vendor for return credit, be sure to
place them into the "RtToVndr" category. And, when you receive
credit, be sure to go into the "RtToVndr" review category, eyeball the
items on which you've received credit, and change their categorization to "CrdtRcvd"(this
is the way to internally police, and truly assure the part is finally and fully
"put to bed" every time, with credit having truly been received).
"To-Grave" Improvement #3.
Recently a client pointed out that it would be very valuable to have a "Reverse
PartsPickList." I was immediately and highly enamored of the concept.
The notion is, it's a simple list (as provided to you on Tuesday morning, say)
that shows everything that should be coming back from the tech, because not used
from his work on Monday. Great -- I'd even say fantastic -- concept.
I was immediately thinking, "Man, I want to make this ASAP!" But
then, I thought, our "Parts Received But Not Disposed Of" report (above
discussed) might actually (indeed, already) fulfill almost the same purpose.
I pointed this out to the client, and he agreed that, yes, likely it would.
However, he called back a short while later (having in the interim tried it),
and indicated it really was not effective for the purpose -- by reason of the
fact between techs that should have come back from the tech, versus others in
the not-yet-in-grave category.
To redress that, besides the new sub-categorization described
above, this release adds another: "In Tech's Possession" (see
illustration above). It's not quite a Reverse PartsPickList, but (and for
the time-being) it's a reasonably close facsimile.
Of course, there is the matter of how is the system to know
that you actually (and physically) moved an item into the tech's possession?
Until this release, there has been no formal designator of such fact built into
ServiceDesk. However, many users have used the same BinLoc box (e.g., as
used for designating "RtrnCrdt") for the purpose. More
specifically, as they transfer a s/o part to a tech, they change that reference
to his simple two-letter abbreviation. With this release, ServiceDesk will
now recognize such a designator -- in particular, when applying the
reporting/display filter that is the main subject of our "To-Grave Improvement
#3."
FYI, as soon as I can do it, I'll create a new PartsPickList
on-screen interface -- where you can simply click to indicate that items are
being moved into the tech's possession, or back again. I'll also make a
purpose-built Reverse-PartsPickList (as requested by that fine client) into an
inherent part of it. Until then, you'll just have to do those changes
manually.
"To-Grave" Improvement #4.
This one, actually, goes beyond "to-the-grave" matters, but it was requested by
another very clever client in the context of such concerns. He expressed
the need for a method via which a tech can document why he ends up not using a
part as prior ordered. My initial thinking is that such comments will
likely go into the underlying Request-Item's Notes section.
Thinking about that particular Note section's use (for this
added purpose), brought to mind two complaints users have made in its regard.
To clarify, I'm referring to the large Notes section as found in the
underlying Request (Alt-F8 form), not the smaller Notes section as
found within a Process-Item (F8) band. One complaint has been that, when
you're in the PartsProcess area, that larger section (which may have info you
really need to know about) is not readily or automatically visible (you have to
right-click in the Reference section to bring up its containing/underlying
request). Another is that, once the Request item is archived (Ctrl-F8
form), those larger notes are no longer available at all.
This release address both matters. Regardless of whether
you're in the Current- or Archived-PartsProcess forms, ServiceDesk will now
display any underlying Request-Notes, in a ToolTip-type fashion, as your mouse
floats over a process-band to which such notes are applicable.

Provision for the tech to document why he did not use an
ordered part will be made in SD-Mobile (watch for updates there, along with
mechanisms for such info to also auto-insert into these now much more available
Notes.
Improved Item Selection When Printing Inventory Parts Labels:
When you're checking a shipment of new inventory via the F10
form, the dialog asks if you want to print labels for the items checked in.
As a rule, it's best to do the printing at this point, because we've lacked a
means to specify specific/particular items for label-printing thereafter.
To clarify, you've been perfectly able -- after the fact -- to print labels for
all of the parts in a given location, or all of a particular part number.
You could even print one label as pertaining to a particular number, but with no
ability to specify which instance (of multiples you might have in stock) that
particular printout would pertain to.
This release solves that. Specifically, when you choose
to print labels as pertaining to a particular part number (from the F10 form use the
option sequence "Review existing inventory" and "Find qty and locs of specific
item," pick an item, then click on the "Print list/labels" button), you'll get a
list showing each instance.
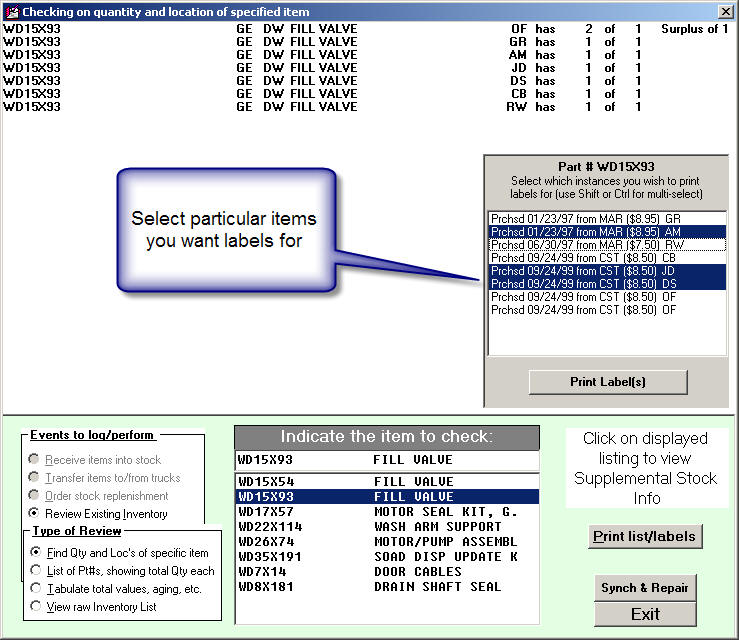
Just pick the particular listings you want labels for.
To select multiple items, user the standard Windows multi-select tricks (i.e,
use Shift-Click on other item to select a range, Ctrl-Click to include or
exclude an added item individually).
Font Color and Other Options Added to the Up-Front Ticket-Printing Setup:
These days technology moves fast, and we'll admit that even
here at Rossware we are somewhat surprised to have so soon reached the point
where -- viewing you guys out there -- we see printing tickets for service (at
least prospectively from the office) as a bit quaint and old-fashioned.
Most modern, we feel, is to have no paper tickets at all, and instead E-Tickets
are provided to the customer via Mobile (a shameless plug here for that
product). A large number of users have migrated to this model, and,
if you have not, we encourage you to do so.
Regardless, we're not yet ready to stop injecting improvements
into such tried and true methods as printing a beautiful ticket in the office,
and sending the tech out with it. For a comparison, eye glasses are now a
very old technology. But if you're going to use eye glasses, certainly you
want the best that current technology can deliver.
Recently a user pointed out that it would be useful if he
could specify particular colors for particular items of text within the up-front
ticket. It seemed to make a lot of sense. Current updates in both
ServiceDesk and the SD-Tools utility allow you to do this (both will need
updated, the latter to Ver. 4.3.7; it's part of the SD-Update download unzip,
but unlike ServiceDesk itself will not automatically copy from station to
station). Additionally, you can now specify
FontUnderline and FontStrikeThrough as
characteristics. Just use SD-Tools for such setup, as per standard.
Of course (we should not need to say this, but you'd be surprised),
you'll need to use a color printer to make it work.
4.4.75 (8/25/10):
Password-Protected SD-LogIns:
Occasionally, we've had requests to make ServiceDesk operation
subject to a password protected LogIn (i.e., you can't open it unless you
provide a LogIn password). This release adds the option to setup any
station to operate in such manner.
The setup and operation is similar to a function we added a
few years back, to allow password protection for a particular tech's LogIn to
TechWindow mode (see notes accompanying Release 4.2.22).
Basically, you need to go to the Security/Password
form (Shift-F11). Within that form's Users page, provide a unique
password for each/any user whose SD-LogIn you wish to protect. In the second
column (next to each such password), type the user's name precisely as it's
listed in the Settings form (Ctrl-F11).
That's all that is required for setup. To test, go to
the station as setup for any person for whom you've just
done the above. When you go to open ServiceDesk, you should find there's a
demand to present the password as setup for that user, or ServiceDesk will not
open. (Actually, your Master password will also work, and potentially some
others for other-user-LogIn purposes; see below.)
Improved "Hot Bunking":
We've also had occasional requests from users to better
accommodate the situation where you have a single computer that's used by
multiple persons (e.g., on the morning shift it's Sue, while on the afternoon
it's Bill).
For nomenclature context, a parallel situation arises
sometimes on vessels at sea (ships, submarines, etc.) where there are fewer
bunks than sailors. What happens is, two (or potentially even three)
sailors end up sharing the same bunk. But not at the same time. :)
Each of the bunk mates has staggered "watch" times -- so that, as one sailor
goes off watch, he awakens his bunk-mate, who tumbles out as he tumbles in.
This has historically been called "hot bunking," and of course you hope your
bunk mate has excellent hygiene.
ServiceDesk has long had various forms of hot bunking.
There, is, for example, the Temporary Desk Reassignment feature
(Alt-K). It's also easy to change the directly-registered user via the
Settings form, on an as-frequently-as-needed basis. And, you can
handle such needs via the Windows Users feature, where -- under any
particular Windows LogIn -- ServiceDesk recognizes a unique setup/user,
as tied to the Windows User, and reacts accordingly.
But aside from and beyond the above, some users have wanted
ServiceDesk to offer the ability to do a direct LogIn -- to itself and under one
and same Windows "User" LogIn -- wherein the ServiceDesk LogIn, in itself,
recognizes a unique ServiceDesk user. This likely should be called "Native"
hot bunking.
This release allows you to optionally setup for that.
To implement, just setup your hot-bunking station with a
general Password-Protected LogIn (i.e., for a primary user, as described above).
Make sure the intended bunk mates are in your Settings' form "List
of Station Names," and that you've setup the same kind of unique password
for each.
That's it. No more setup required. However,
a tiny explanation might be.
Here is the trick. Let's suppose Sue is setup as the
primary/designated user at your hot-bunking station. Sue does her morning
shift and closes ServiceDesk. Bill arrives for his shift, and goes to
start ServiceDesk. He's presented with the demand for Sue's password.
He doesn't know Sue's password, so obviously cannot present it. He does
know his own, however, and so types it instead. ServiceDesk, upon seeing
Bill's password, knows that it cannot open itself with Sue as a user, but
figures -- "Hey, I might as well open with Bill as the user," and does so.
It's that simple.
Except . . . one more thing. You might want to advise
Sue that, if she doesn't want to get blamed for things that stupid Bill does
during his shift, she'd better be sure she closes SD as she leaves (otherwise,
of course, Bill might happily work under her LogIn).
Integrated Time-Card Punch-Ins:
One more matter, closely aligned with the above two
improvements, concerns the fact that some people have wanted to have the
Time-Card punch-in tied to logging into ServiceDesk. That's another thing
that will happen with this release forward -- assuming just two simple elements
in your setup: (1) you must setup the user for password-protected
login, as per description above; and (2) you must have them designated, within
the Earnings Rate form (Alt-F2), as an employee who is paid on an
"hourly" basis.
Fix for "Auto-check old items as fully processed":
Back with release of Ver. 4.4.57, we added feature in our
"to-the-grave" parts management system where, if you were an established user
and been processing parts in an earlier era, you could auto-clean your old
legacy history, so items not marked as fully sent to the grave -- back then
(there was not mechanism for doing so back then) -- would not come up in a
current report. It turned out that cleanup process did not fully do the
intended job in some circumstances. That is now addressed. You can
access the check-off procedure from the PartsProcess form's (F8)
CheatSheet (right-click in any otherwise unused space of the form, then
look for the very bottom item in the menu).
4.4.73 (8/2/10):
New "Core Return" Functionality:
In the last couple of years, we've been
working with increased vigor to "invade" the CE market. We feel
determined, eventually at least, to attain the same dominance there that we've worked so hard to earn on the
appliance side. Yet, even on the appliance side we've been subject
to a small deficiency in that ServiceDesk has had no element specifically designed to manage
core returns. Since core returns are relatively uncommon with appliances, it's not been a
major fault there (back door approaches, though less than ideal,
have largely sufficed). But on the CE side, by contrast, core returns (and
whether they're managed with competence versus poorly) can easily make or break
a company. HUGE dollars can be tied up in cores, so the lack of a feature
explicitly designed to manage cores has been a serious matter.
This
release addresses that.
To specifically acquaint you with how the matter is addressed,
we have added a new section to the manual's chapter-division on the PartsProcess system.
As it happens, this particular division is already excerpted for you in a .pdf document that's
contextually convenient by
clicking on a little provided button in the top-left corner of the F8 form (look for
the last sub-section within the document), or here's a
hyperlink. Please read the added section in that division, as it will provide
all needed details.
4.4.72 (7/28/10):
New "Jobs Profitability" Report:
We thank Don at Dependable Services for this addition. He
insisted that a method was needed to have an instant snapshot of profitability
on each job. Makes sense when you think about it. Man, you mean we
didn't have that?
The new report is available from the Reports form (F11).
At this time the report should be considered Ver. 1.0.
On the one hand, it may presently have flaws. On the other hand, it will
likely be subject to significant improvements as time goes by. We expect
to have input on both matters, and updates in the future.
One thing to note is that, like many of the reports, this one
also features an export. The export offers some details that are not in
the direct printout.
4.4.71 (7/18/10):
New "CE" Customization for UnitInfo Form:
If you do not know, "CE" stands for Consumer Electronics
(these days, mostly big-screen TVs).
You likely do know that, in general, ServiceDesk was born and
bred within an appliance service operation -- a fact which (and with
apology to the rest of you) gives it something of a bias in that direction.
This is also a factor we are endeavoring to overcome. We are very
determined, in other words, to make ServiceDesk just as perfectly suited for
other industries (in particular, HVAC and CE service) as it is for appliance
repair.
Quite a while back, we learned that HVAC servicers wanted some
other fields in the UnitInfo form (shortcut access for that form is via
Shift-F12) -- fields to keep track of details such as unit fuel type (gas,
electric, etc.), flow direction (up, down, sideways), and so on. To accommodate,
we made the UnitInfo form vertically expandable (via a little arrow button at
the bottom), and added the desired fields within the expanded space.
Recently we realized CE servicers need a field to keep track
of particular units' Chassis Numbers (considered a model sub number), and the ability to search on
that field as well. To accommodate this, we figured we needed to make the
expansion area work in an alternate fashion: to show supplemental fields as
needed for an HVAC operation if that was the kind of user, or to show
CE-supplemental fields if that was the kind of user (or perhaps no expansion at
all if neither user-type was applicable).
To implement this strategy, ServiceDesk needed a means by
which to be informed as to the type of user applicable. For that
reason, in this release we revise the Settings form (Ctrl-F1) to
accommodate a new setting:
Depending on which option you pick for the above new setting, the UnitInfo form will be
expandable (or not) in an appropriate manner. If, specifically, you pick
"CE," it will be expandable (from this release forward) as follows:
If you are either an HVAC or CE servicer, please be sure to
activate that new setting option as needed.
Improvement for "Anticipatory Parts Transfers" (Now Titled "Pre-Screened
Parts Tagging"):
Way back in '05 (in Ver. 4.1.103), we introduced a mechanism
that allows you to speculatively transfer parts, from your in-office inventory
and to a tech, for potential use on a particular job. The notion is you
may have items on the shelf, not normally kept on the tech's truck, and during
the pre-screening process you may realize that a particular job will very likely
need such a part -- making it sensible to pull it from the shelf and send the
tech out with it.
Over time it's become evident that, though very beneficial,
there were elements in this system we might have designed better. In
particular, the implementation sequence invited you to transfer the part to a
tech, at the same time you were tagging it (for potential/speculative use) on a
particular job. This was based on the notion you'd likely know, at the
time, which tech would be doing the job. As it turns out, however, this
assumption was very flawed.
In reaction to the above, some of our more savvy users have
taken to performing a little trick. When in the process and invited to
pick a "Transfer To" target (i.e., which tech's inventory location the item is
being moved to, from the office, for speculative use on the job), they've picked
the office itself (i.e., "OF"). This results in no net transfer of
location, but nevertheless allows the other part of the process (tagging
the part to the job) to nevertheless take hold. It's a great expedient,
but is also one that the involved language and processes would not normally lead
a person to consider. This is so true that, even here at Rossware (and
when consulted on the conundrum which the expedient solves) we have sometimes
failed to remember it, and have occasionally instead been misled -- ourselves --
into thinking the structure allowed no such solution.
Because of the above, this release makes some changes.
First, we have changed the
caption as found on the button, within the JobsCurrent (F7) form, that initiates
the involved process. The old caption ("Antcptry Prts Trnsfr")
was misleading for a process where, in immediate consequence at least, no true
"transfer" was necessarily involved. Now the button instead reads "Tag
Part for Visit" -- a phrase that much more accurately suggests that your
purpose, when clicking on the button, is (necessarily) to tag a part in such
manner as to facilitate its presence with the tech -- with any tech -- when he
next goes to the site on that job.
| Old |
New |
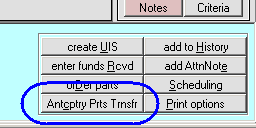 |
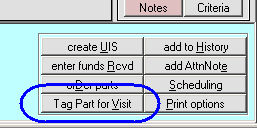 |
Second, as title for the overall
set of processes, we are changing from the term "Anticipatory Parts Transfer"
(or sometimes "Speculative Parts Transfer") to the more accurately descriptive:
"Pre-Screened Parts Tagging" (as per title/header for this WorkDiary
entry).
Third, when you actually click on
the involved button, there is a new query, as follows:
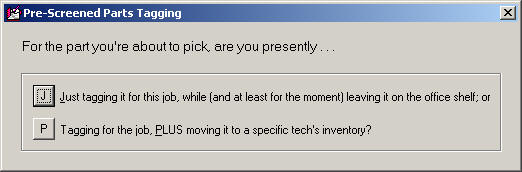
As you can see, you are now invited to choose, explicitly,
whether you want presently to Tag-Only, or Tag-plus-Transfer. This makes
the alternate potentials much more apparent.
Fourth, if you choose the Tag-Only
option, the system will (logically) skip what was otherwise a following window
in which your were formerly asked to pick the "Transfer-To" location.
Fifth (and perhaps most
importantly), there is a newly-augmented process as now connected to the system.
Assuming that in fact you've "Tagged-Only" while pre-screening, this process
recognizes a subsequent need. Specifically, sometime prior to the tech
heading out on any particular day's set of jobs, you'll likely be printing a
PartsPickList, and using it as the basis to actually pull tagged items from
the office, placing them into an applicable tech's pickup bin. Once this
is done, it's imperative to inform the system of this physical transfer
event (i.e., so it can properly tally where the item is now at -- referring,
specifically, to those instances where you did not claim a transfer initially).
Ultimately, what we really need to do to -- to optimally
accommodate this purpose -- is to have an interface that will likely be called
(at least something like) the "PartsPickList-Reconcile" form. The
vision is for this form to provide a one-stop place for a parts-puller to assure
he's assembled all the parts a tech should be taking with him for his day of
jobs, whether as special-ordered, speculative-tagged, or simply needing restock
to inventory (and, of course, to seamlessly document the movements from one
location to another). It may be that the current Parts-Crossover
form can be optimally adapted for this purpose, rather than creating a new
interface in its entirety.
Regardless, in an anxiousness to "deliver" on the current
project, we have for now refrained from creating an entirely new interface.
Instead, we've added enhanced functionality to a pre-existing function.
Specifically, in the InventoryControl form (F10)
there has long been a function to facilitate transferring parts to a tech for
the purpose of restock (in particular, using as basis examination of items on
which he's fallen below minimums). It's a very smooth and well-developed
process. Our new function allows you, simply, to use this same set of
mechanisms, but in a context that's augmented so that the system lists not only
regular inventory items as needed, but also any items as tagged for jobs the
technician will be doing for the day in question (and which have not already
been marked as transferred to him). Thus, it's a solution that allows you
to (please pardon the cliche) "kill two birds with one stone" (accommodate
ordinary re-stock, plus appropriately move items speculatively tagged).
To invoke this augmented process, you'll notice that when you
choose to print a PartsPickList from the DispatchMap, there is a new
option box in the resulting Printer-Selection form:
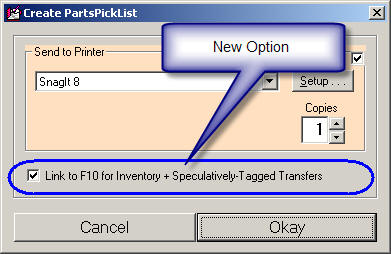
If you print with that new option box checked, you'll find
that, besides printing the traditional list, the system takes you directly into
the InventoryControl form's newly/specially augmented Transfer-for-Restock mode.
In this mode, it will list not only normally-needed restock items (as it always
has), but also ones that need moved to him because they've been tagged to a job
that is on his schedule for the applicable day. Such items will be
distinguished, from normal restock items, via the text being in
red.
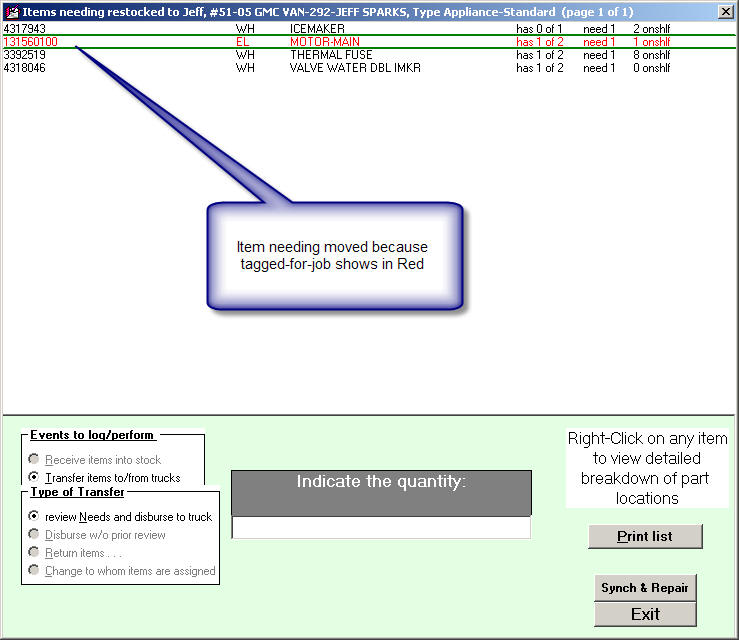
From that display you can use traditional/normal means to
transfer all items, both normal restock and job-tagged items, to the tech as
needed.
Besides those particulars above-described, a few other
elements of language and interface have likewise been appropriately changed.
Even so, please note we have not entirely dropped the "speculative transfer"
language. This is because, even if you do not transfer to a tech while
tagging a part, you very likely DO transfer the evening prior (or morning of)
his dispatch on the job. For such particular operations, the older
language is retained.
BTW, we realize there's a downside in changing terminology.
Please be assured, we resist doing so except when there's a large purpose to be
served. We believe this instance strongly qualifies.
Enhancement for POS-Context Special-Ordered Parts:
Until now, there's been no distinction by the system when you
check-in the final part, as ordered on any ticket -- as to whether it was
a POS-context (versus more standard repair context) order. It turns out the
distinction is important. Among other things, if in repair context it's
natural to assume that, once all parts are in, the underlying JobRecord should
be placed into "WorkingToSchedule" status. Not so if it's a POS-context
order, where there's no return/repair appointment needing to be scheduled.
Similarly, any dialog (such as in an auto-generated email as designed to inform
the customer of part arrival) needs to be appropriately different, if it's a
POS-context order.
Prior to improvements as made in this release, the system
acted as though every order was a repair-context order. But now, with
improvements as presently made, the system will distinguish the two contexts, and
handle the POS variety much more adroitly. (For the distinction,
incidentally, the system looks simply to the underlying JobRecord's narrative
history for the phrase "(POS context)"; if that's found, it deduces
accordingly.)
4.4.70 (7/11/10):
Enhancement to DispatchMap's Show-JobsNeedingScheduled Feature:
Now Includes JobsWhereCustomers"Want-Sooner":
A few people have asked for this over the years, and finally
we did it.
First, the general Callsheet/JobRecord structure has a new
little check-off square. It's similar (and in fact right below) another
tiny check-off that we added a few months back (see entry accompanying release
of Ver. 4.4.62). That one was added for the purpose of denoting if a job
should be classified as an in-shop repair (i.e., "ShopJob"). This new one is
designed to denote if, though having accepted a particular appointment, the
customer would nevertheless like to be moved sooner, if possible.
| Prior to most recent addition |
With most recent addition |
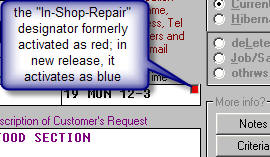 |
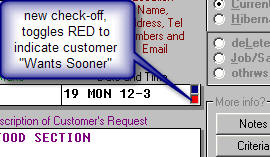 |
You may note (by reading notations in the above illustration),
the RED color as formerly used for the in-shop designator has been usurped
by the new check-off (though at least its physical position remains
constant). In general, we hate to change a functional color, but it seemed
that red made eminently more sense for a designator that really should attract
notice (this customer would like to be re-scheduled for sooner) -- as
compared to something mundane like designating 'in-shop' status. Thus, the
old designator now gets blue.
So far as on-screen labeling and reminders go, just as with
the first designator, there are ToolTips available to assist (just float your
mousepointer over either item, and the ToolTip should appear).
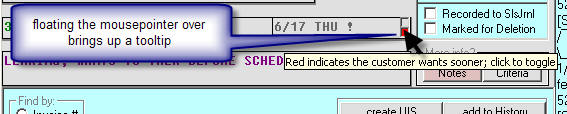
Now, for actual benefit . . .
Aside from toggling the new designator (again, to indicate the
customer "Wants Sooner"), you're going to want to employ those toggles.
In your DispatchMap (F5), there has long been a "View-JobsNeedingScheduled"
feature. The idea behind it: at any moment and on any day's schedule, you
can toggle-on a view of jobs that need to be scheduled. So, if you're
looking at a schedule and needing to fill it in (or at the fact some tech is
driving a long distance and you'd schedule more jobs in that vector to make his
trip more worthwhile), this feature can show you good candidates. The item
references appear as little orange "pumpkins" on your map, and you can click on
any to display the full/underlying JobRecord.
The feature is toggled on (or off) by hitting "J" on your
keyboard (think "J" for "J"obs) . The DispatchMap's contextual
"Cheat-Sheet" has long had a little hint reminding of this method (right-click
on any otherwise unused position in the DispatchMap to display). That
particular hint has now been changed, however, to describe a broader purpose.
| Old description from Cheat-Sheet |
New description |
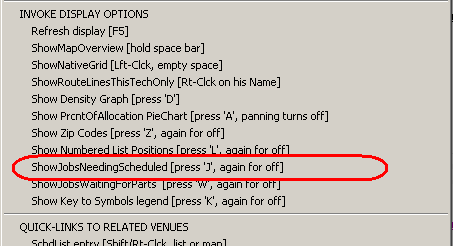 |
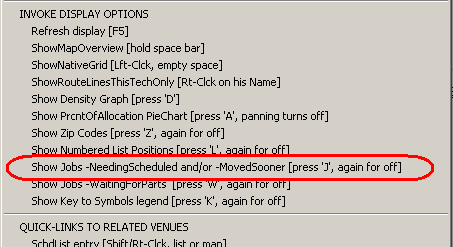 |
Put simply, the old "ShowJobsNeedingScheduled" feature now
does more than to show you just the orange pumpkins.
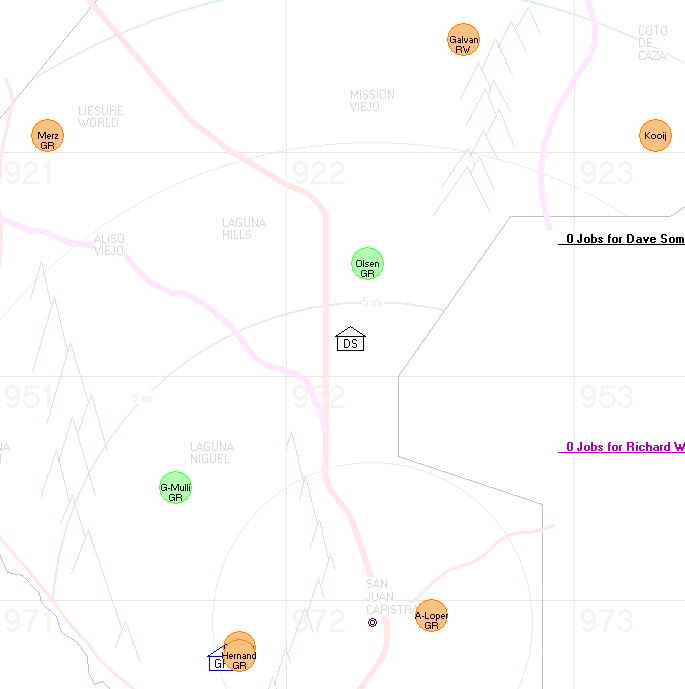
As you can see from this example, the system now shows
green pumpkins too. These new pumpkins represent jobs that are
presently scheduled, but where the customer would love to be moved to a sooner
date ("Wants-Sooner"). Aside from noting that simple difference, you can
use them much the same as you do the orange pumpkins.
Two Small Tweaks:
First, tweak one. A couple of years back, ServiceDesk's
Printer-Select form was enhanced to allow (in appropriate contexts)
destinations other than actual printing for the the product destination:
specifically, Email or File.
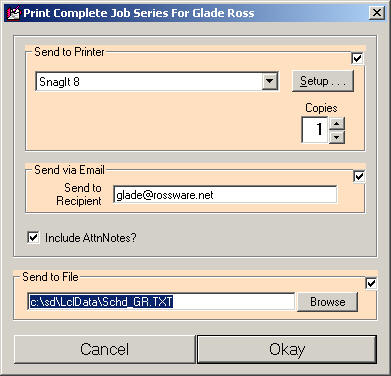
At the time, it was setup so that any of the three potential
destinations could be independently checked, or not, as to whether the product
would go there. In other words, it was not setup to "toggle," such that if
your picked Email, say, it automatically un-checked Printer. The thinking
was, you might want to do both (or perhaps all three), so the check/activation
for each was independent.
That was fine in theory, but in practice it was much more
typical that you'd want one function only, which made it kind of a nuisance
that, if the form prior had Printer selected, and you now wanted to switch to
Email, you needed to do two things: un-check Printer, then check Email.
This release addresses that. Now, selection of any of
the three alternates un-checks the others for you. If, in fact, you want
to do multiples at the same time, simply hold down Ctrl on your keyboard, while
making added selections.
Now, tweak two. If you examine your Callsheets (and
assuming you're in an office with multiple users), you're likely to notice a
small difference. Callsheets as assigned to others will show with all text
in a grey color. This makes it more evident when a Callsheet is not
assigned to you, and we think you'll like the difference.
4.4.68 (5/24/10):
Exciting New DTR-Viewer:
What is a DTR-Viewer?
First, DTR stands for "Daily Time Report."
Second, the improvement builds on a feature I added to
SD-Mobile some six months ago. There, I made it so each of your techs can
easily see (and optionally certify as accurate) a graphic overview of their time
spent during the day -- a beautiful image that provides a "mental picture" of
the time periods spent "Punched In" on the clock, and -- of that Punched-In time
-- which portions were spent working at actual jobs.
When I made the above-described improvement in the mobile
interface, it was my intent to quickly provide the same visual overview for
managers in the office. Though it's taken me a while, that next step is
now ready for your enjoyment.
To use the new DTR-Viewer, first go to your DispatchMap (F5).
Page-up to view any past/prior day, then hit Alt-T on your keyboard (think 'T'
for 'T'imeCard). In result, you should see something similar to the
following:
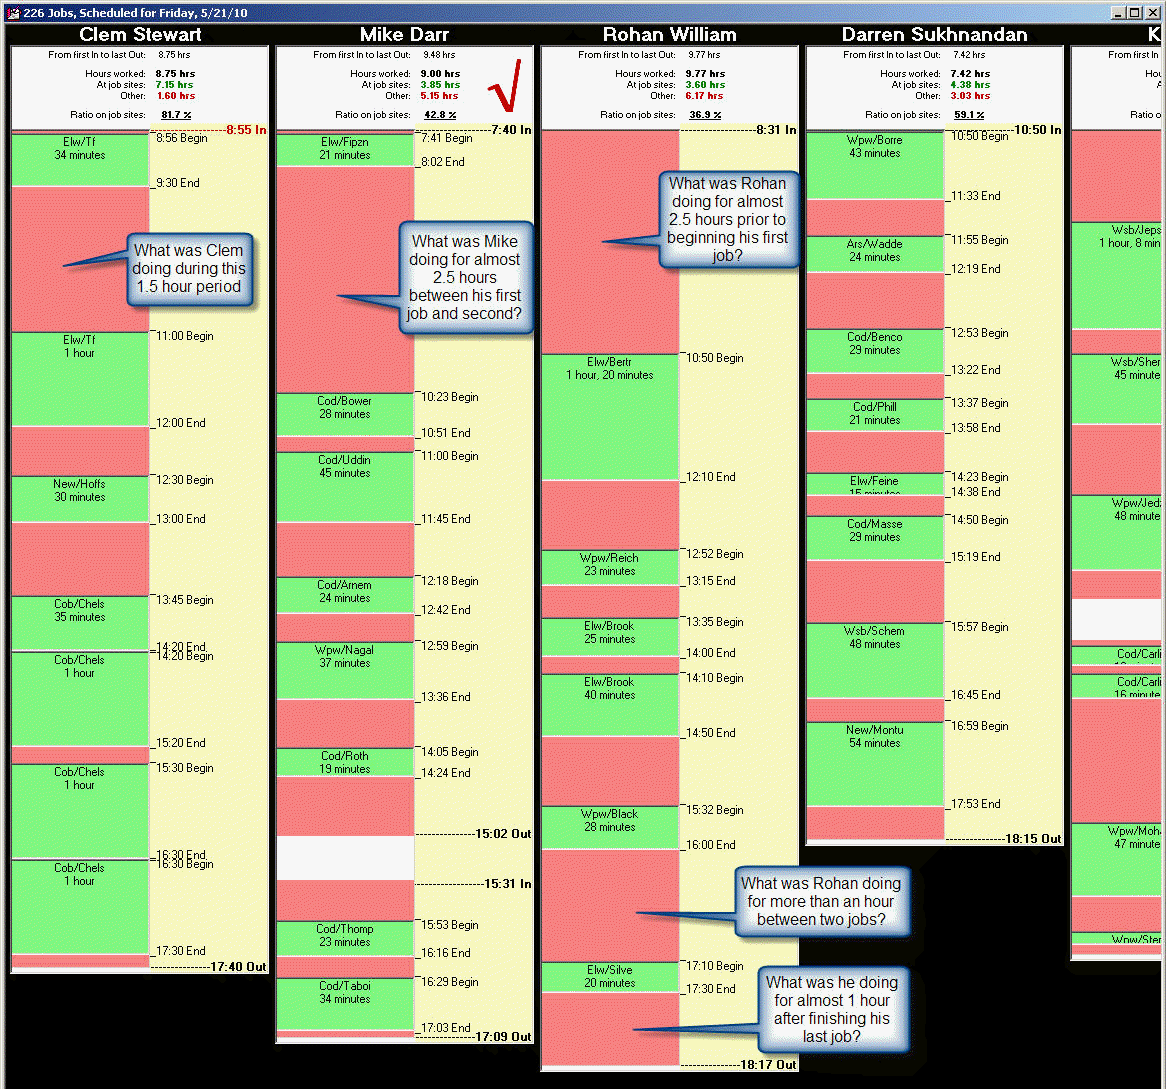
As you can see, there is a TimeBar for each tech, showing all
Punch-Ins and Punch-Outs for the day, with time "on-the-clock" showing in red
(any breaks between first punch-In and punch-Out, such as for lunch, are shown
in white). Time at actual jobsites is shown via green inserts,
appropriately labeled for the jobs to which they pertain. Given this
dynamic, you can easily gauge (and at a glance) if, when and where your techs
spent significant amounts of time on-the-clock, but not working at actual jobs.
In other words, look for large areas of red (such areas being
NOT a good thing). Wherever you see such areas, you may logically be
prompted to inquire as to whether the tech properly should have been
"on-the-clock" during such time.
There are also helpful statistics at the top. Among
other things, these help you compare between techs to see which are being the
most efficient with their on-the-clock time.
There are more tools still. If a tech manually inputted
a punch-In or punch-Out, for example (i.e., rather than allowing the TimeCard
system to go by his computer's internal time when he punched In or Out), the
corresponding time notation will show in red, to signify this fact. If the
technician used the SD-Mobile mechanism to certify accuracy in his DTR (a
practice we suggest you insist upon), you'll see a very large check-mark in the
white space immediately above the TimeBar itself (just to the right of the
statistics). In fact, the check-mark will be green if the presently
calculated total of time agrees with the indicated time when he certified, or
red if there is now a discrepancy. If you want to change the day that's
displayed, use PageUp and PageDn from your keyboard, just like when inside the
DispatchMap.
We think you're going to find this is a more than fantastic
tool. And don't worry about memorizing the shortcut key to access it.
A reminder is in the DispatchMap's CheatSheet.

As one more (and super-handy) feature, if you're looking at
any particular job notation (green rectangular insert) and are curious to see
details about the actual job, just click on the notation. Instantly, the
underlying JobRecord will display for you.
4.4.67 (5/10/10):
QuickLink to Particular/Underlying A/R-Item via A/R-Dunning Form:
For the last three or four years, just about every time I'm
working on the line-items list in the A/R-Dunning form (Ctrl-F3), I find myself
having the natural urge to be able to right-click on any particular line-item,
and have displayed the complete A/R record which underlies it. Sometimes,
after all, as you see the simple line-item summary, you want to know more
details about that particular A/R. It's just not right that you have to
hit F3 (to bring up the A/R form) then conduct a search in it for the item of
relevance.
Finally, I made the time to program in this
"should-have-been-there" convenience.
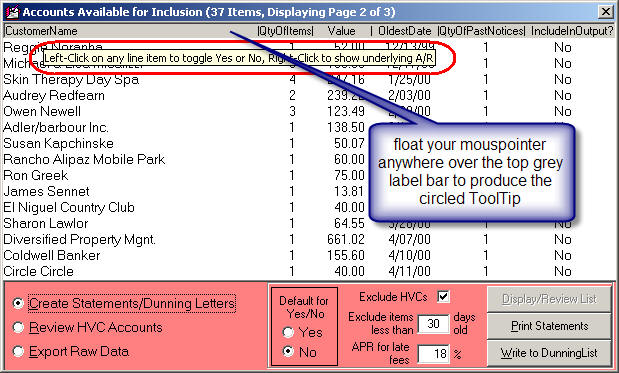
As you can see from the illustration, a ToolTip is now
available to remind you of the new convenience. Just float your
mousepointer on the little grey label area at top of the form, and the
ToolTip will appear.
As a moderate little enhancement of this feature, if the
line-item that you click on happens to reference multiple A/Rs (i.e., rather
than a single one, as is more typically the case), the first quick-linked
item as displayed will be the first/oldest. However, the A/R form will
be pre-configured for you in "Search" mode, with the 'Resume Search" button
showing and pre-selected. This means, to rotate to other A/Rs as
applicable to the line-item linked from, all you need to do is hit Enter on
your keyboard.
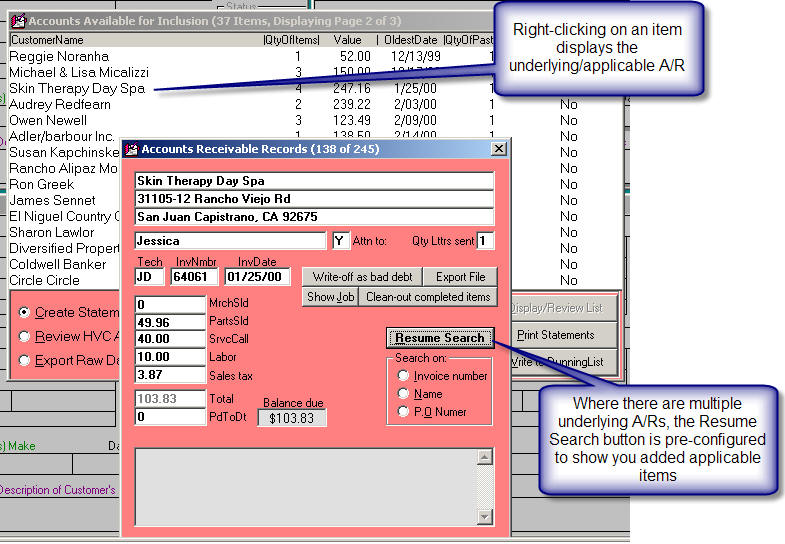
Thus, you have quick and easy access, even to multiple
A/Rs as connected with any single Dunning List line-item.
4.4.66 (5/6/10):
Solution for Multiple Mfrs Who Use Identical Part Numbers::
We've been informed that, increasingly, servicers are running
into situations where different manufacturers happen to end up using precisely
the same part numbers as one another -- but of course each for their own (and
different) parts. The underlying structure of SD's inventory system is one
that uses the part number as a controlling entity, and without regard to
applicable make. This means part number duplication, between
manufacturers, has been a potential issue.
This release introduces a solution, though perhaps not quite
so perfect as user might have otherwise desired. It's sort of a
work-around.
What you need to do, for any part where you're stocking
different items but of the same part number for different manufacturers, is
append one or both instances with an asterisk then a single letter that
indicates the applicable manufacturer.
For example, suppose both Toshiba and Sony have parts bearing
part number 123456, and you want to stock each. For the one from Sony,
make your within-the-MasterPartsPlan number "123456*S". For the one from
Toshiba, make it "123456*T".
The above is, of course, an expedient you could have been
using all along, but with one downside. When ServiceDesk fills-in the
on-screen Narda for a warranty claim, it uses your part number as provided.
Sony won't likely provide credit on claimed use of part number "123456*S".
That's where the improvement (as present in this release) comes in.
Specifically, with the enhancement as introduced with this
release, when ServiceDesk fills in the on-screen Narda, it will look for part
numbers with a "*X" suffix on the end (where "X" is any possible letter).
For any found, it will delete the suffix -- thereby smoothing the way to a
successful claim on such parts.
Fix for "Split A/Rs" ending up in presentation of multiple "tickets" to
consumer:
There have been prior references in this blog to "The Law of
Unintended Consequences," and it is, sadly, a merciless (if sometimes
slow-to-present-itself) taskmaster. Slightly less than five years ago (see
entry for Rel. 4.1.74), I introduced the ability to make interim sales
entries: entries to the sales journal for a portion of the
sale as already earned, and prior to a completing entry, for the balance, which
actually closes out the job. Turns out there as a down side to using this
practice. If the interim entries were for billed work, and if you later
sent the client a statement for outstanding A/Rs which involved such multiple
entries, it was possible for the statement to have multiple line items for what
was really a single job. This could potentially be confusing to the
customer, and cause unwelcome objection. On top of that, if you happened
to be creating a new job for such a customer, there's that little feature that
offers to add a note about presently unpaid A/Rs. That note could end up
claiming there were multiple A/Rs, even if all involved a single job (and again
result in confusion with the customer).
This release remedies both issues. In either of the
contexts described, ServiceDesk will combine the multiple A/Rs (as under a
single ticket number) and present them as though one.
Fix for Un-Indexed Secondary-Party Info as Connected to Shop Jobs:
There are, of course, "two" party-info sections in SD's
general Callsheet/JobRecord structure. The second is only used (at least
for actual party info) in the event a job actually involves two parties (one for
billing, and the second for go-to). Of course, when not used for official
party-info purposes, the second section is sometimes used (and at least by some
folks) as extra space for added notes. This particular fact creates a
quandary for the system when it updates the CstmrDbase Index set each night.
If extraneous notes are in the second party-info section, we do not want to have
such notes indexed as though they consist of a party's name, address and
telephone number, etc.
The solution has been that the Index-updating machinery is
programmed to ignore text within the second party-info section -- unless if
finds (in the address box) a set of brackets, as involved in the grid coordinate
that's inevitably put in if you're sending a tech to a location as involved in
that section (bear in mind, while it's easy for a human to look at text and
distinguish between text that describes a name, address and telephone numbers,
computers are much less capable of so simple a task).
The above works fine, except where you're doing a
bill-to-another-party Shop Job (typically, involving a TPA payer). In that
case, you need the second party-info section to describe the owner of the
merchandise you're repairing, but you do not need brackets in the address line,
because there's no need for grid coordinates on an address you're not sending a
tech to. For that particular situation, our trusty old strategy fails.
In solution, this release introduces a change. From here
on out, the system looks to see if the first-section party info describes a
HighVolumeClient. If so, it will index text in the second section, even if
no brackets are found there.
4.4.65 (5/2/10):
Improved Mailing-List Export:
One of the oldest exports in ServiceDesk is the
MailingList export (available as the first option in the Alt-F3 form).
As time has gone by, I've improved my overall export-programming standards.
The present standard allows you any of three formats (.csv [comma-delimited],
.txt [tab delimited] or .xls (Excel format). Plus, it offers to open the
file for you, upon its creation. I recently discovered this old export had
not been brought up to the current standard. That is now addressed.
Vastly Overhauled and Improved
Connections to the Mobile Ticket:
Back in November of last year (with release of Ver. 4.4.38) we
added the ability to directly review and edit, in the ServiceDesk
FinishedForms context, tickets as created by the tech when operating in
SD-Mobile (simple image-based review had always been available). This was
a major step forward in terms of integration between the two systems.
However, we found there were occasional glitches in the technology we were
using to make the connection between ServiceDesk and the remote database that
serves as a common information point between ServiceDesk and the Mobile techs.
This sometimes resulted in difficulty when seeking such direct-access of the
mobile tickets.
With this release, we have switched to an entirely new
technology for such connection purposes, and it promises to be much more
reliable and fast.
While testing operability of this new technology, I noticed
some shockingly severe defects in how the program code was prior loading data
into the FinishedForm tickets, and sometimes in saving edits too. I am
embarrassed, frankly, to have discovered such large defects were there, and had
evidently been there since September. They also have now been fixed.
4.4.64 (4/27/10):
New "Quick-Link" in Inventory-System Forms:
There's long been ability in both the InventoryControl
form (F10) and MasterPartsPlan form (Ctrl-F10) to do a Ctrl/Right-Click
on any line item to invoke an immediate show as to locations and quantities for
that item. It's extremely handy. Say, for example, you're looking in
the F10 form at items that need to be restocked, and you want to how many you've
got an where; a simply Ctrl/Right-Click on the line-item will tell you. Or
maybe you're reviewing items in your MasterPartsPlan, and are curious to know
for a particular line item what you've got and where. Again, a simple
Ctrl/Right-Click will tell you.
Recently, I realized another/similar quick-link would be very
useful. Instead of instantly showing you locations and quantities for a
particular item, it will instead instantly show you the history of movements
(purchases, sales and transfers). The command for this new link is
Shift/Right-Click.
Don't feel any need to memorize that command on the basis of
description here. It's been added to the contextual "Cheat-Sheet" (as
applicable in either of the two forms), as follows:
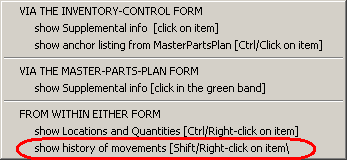
Remember this cheat-sheet (and others in their own applicable
contexts) can be displayed by simply right-clicking with your mouse in any
otherwise non-functional location on an applicable form.
4.4.63 (4/25/10):
New Filters in the Jobs-Perusal Form:
We find some people don't even know about this form.
It's accessed via Shift-F7. The general idea of the form is it allows you
to review a limited set of jobs -- such as, for example, only those that are in
Working-to-Schedule status. The main filters (i.e., criteria by which to
limit the set of reviewed jobs) are JobStatus, but there have long been others,
such as applicable technician, for example. If you haven't used this form,
we highly suggest checking it out, as it's very handy.
This improvement concerns two brand new filters:
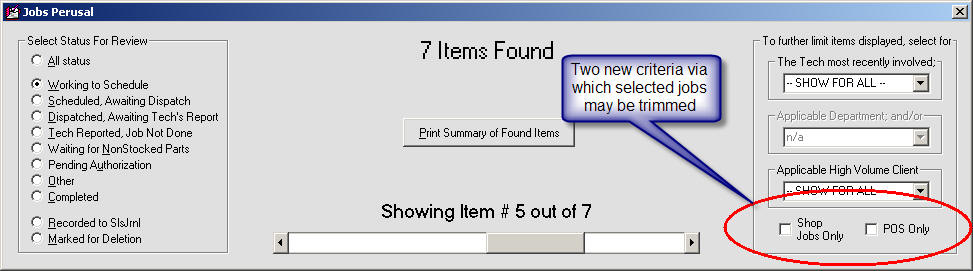
The above illustration is really sufficient, in itself, to
tell you what the new filters are.
4.4.62 (4/18/10):
Improved Designator for "ShopJobs":
Until about 30 months ago, there was nothing in ServiceDesk
functionality to operationally distinguish between jobs as setup for in-shop
work versus those setup for in-field/on-site service. However, a few
servicers described the need for certain kinds of distinguishing treatment, so
the program code was enhanced to provide the same (see description accompanying
Release 4.3.45). At the time, we used kind of a "cheat" method to
facilitate designation, of any particular job, as being in-shop (as opposed to
the default assumption of on-site). Quite simply, in the LocationName box
you'd type the magic phrase "SHOP JOB." In result of seeing such text
there, ServiceDesk would realize it was a shop-job, and react accordingly.
This has been the solution until now. It's worked fine,
except for the fact the designation method was perceived by some as -- shall we
say -- inelegant. Certainly, it has been less elegant than would be having
an actual checkbox for the purpose, and that is the matter now addressed.
In fact, I began working on the graphic interface for this
improvement a few weeks back (since real-estate in the applicable forms is
already tight, I could not simply add-in in a normally-labeled checkbox for the
purpose; the applicable forms do not have space for that). You may have
noticed my tentative solution when a couple of tiny new boxes appeared in the
Callsheets. These were otherwise not-yet-operational, and there was no
notice explaining their purpose. It was nevertheless my intent to program
the first to default with a checkmark indicating the job was intended for
on-site service, while providing the option to user-check the second, instead,
to designate the item as a shop job. Initially, I got as far as making
that graphic, but did not get any of the underlying programming done.
This past weekend I finally found time to do the underlying
programming. Initially, I'd intended to go ahead and use the graphic
interface as above described, but soon decided two checkboxes make less sense
than a single one (why do you need a box indicating normal status, anyway?).
The final scheme is, this single box defaults to a neutral color to indicate a
normal, in-field-service job -- but can be user/click-toggled to red for the
purpose of indicating in-shop service instead. So, that's what we've ended
up with (with, as you'll note, the final/operational box also moved to a
slightly different location, as compared to original intent).
| Applicable Callsheet section without any check-off
designator |
 |
With interim/abandoned modification, showing
boxes as intended for toggled/alternate checkmarks |
 |
Design as finally settled upon (here shown with
new checkbox NOT toggled) |
 |
Also showing new/actual design, but with new box
toggled to indicate job is intended for in-shop work |
 |
Naturally, this new little designator has been added not just
in Callsheets, but in JobRecords (current and archived) too. Simply click
on the little box in any such context, to toggle it red, any time you wish to
designate the job is intended for management as in-shop work. Or, click
again to toggle back out. Again, it will show in a neutral color (same
color as the surrounding background) if it's a standard job, or as red if
toggled for in-shop. Also, if you float your mousepointer over the new
little box, you'll see a ToolTip come up to remind you of its purpose.
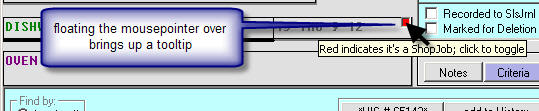
Ideally, it would have been good for me to include with this
release conversion code that would go through all present and past jobs, search
for the old mode of designation (i.e., the phrase "SHOP JOB" in the applicable
location), and change the new designator to match. Alas, I did not find
time for that. However, for a reasonable transition period ServiceDesk
will recognize either old or new designator methods as legitimate. In
other words, whether it finds the phrase "SHOP JOB" in the expected box, or if
you've toggled the new little checkbox to red -- either way it will see the job
as being intended for in-shop management. From this point forth, of
course, you should use the new designator, and abandon the old.
4.4.60 (4/11/10):
Fix 1
for Built-in Self-Protection on Filing Warranty Claims:
The "Law of Unintended Consequences" is the
programmer's eternal enemy. Turns out, the scheme (as described immediate
below) was great for most servicers in most circumstances, but resulted in
unnecessary annoyance for others. The biggest immediate issue concerned
claims as submitted on extended service contracts, where a purchase date more
than one year ago is not an issue.
With this release, the system should detect when it's an
extended service contract situation, and refrain from making the
"purchase-date-more-than-one-year-ago" warning, if so.
Another issue involves servicers that do large amounts of
work for premium companies, such as Sub Zero, where the typical warranty period
is more than one year. My intended solution (it will be "Fix 2") for that
is to provide a new box, in the Quick-Entry templates, where you can indicate
for each manufacturer what their typical warranty period is. Alas, I have
not yet been able to get to that added project.
4.4.59 (4/7/10):
Built-in Self-Protection on
Filing Warranty Claims:
ServiceDesk has long made rudimentary checks as you go to
file a warranty claim via the on-screen Narda. It cannot, of course, fully
predict if the underlying processor will accept your claim, but at the least it
can look for (and warn you about) a few common errors. As mentioned, it
has long had this facility.
However, it was recently pointed out there were a few logical
(and relatively rudimentary) checks it was not making. Specifically, it
was not looking at the DateOfJobInception, DateOfCompletion and PurchaseDate
fields -- to cross-compare between those and with the current date --
to assure such date comparisons would not be likely to result in claim rejection
and/or embarrassment. Those checks are now made, and (assuming the
comparisons indicate a likely issue) can result in messages such as the
following:
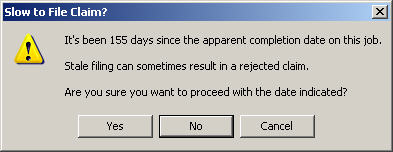
I'll confess that manufacturers, on seeing we've done the
above, might suspect the effort is aimed at facilitating cheating by you, the
servicers. Let me assure, however, that is not the case. At
Rossware, we generally find our users have a high level of integrity. The
real concern is that accidentally-inserted erroneous dates can result
in claim rejection and/or embarrassment. These messages give you the
opportunity to consider if less-than-sanguine dates might in fact be erroneous,
and to advance correct (i.e., prior to actual submission), if so.
4.4.58 (4/1/10):
Facilitated Parts Returns:
In conjunction with Whirlpool Corporation, we have
implemented a system to facilitate returning, to them, parts they need back for
fault analysis. Basically, any time you check-in or go make a claim on any
part within a particular "we-want-it-back" return list, ServiceDesk will
automatically produce a message telling you Whirlpool wants it back, and
offering to print documents to facilitate the return (specifically, a packing
list and postage-paid shipping label).
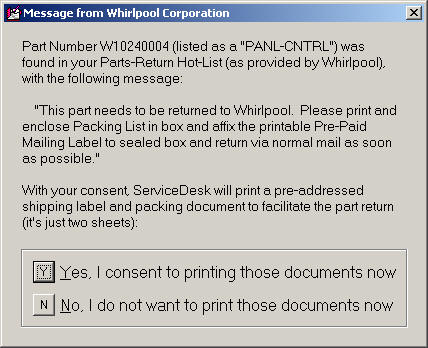
We believe, in result of this work with Whirlpool, we've
created a model of facilitated returns that may eventually be used by other
manufacturers, both in appliance service and other repair industries.
4.4.57 (3/27/10):
Improved
"Cheat Sheets":
ServiceDesk has long possessed a Command Summary in
its main menu. A listing of commands is particularly needed for some
contexts, because in some (such as the DispatchMap, for example) display space
is so much at a premium for operative purposes, and the operations that we wish
to do are so many, it simply is not practical to provide on-screen command
buttons for every purpose. Instead (and in such forms), we offer a
plethora of powerful tricks and tools via various combinations of keyboard and
mouse. Among other things (and for each such context), the Command Summary
lists what these actions are.
Augmenting that main-menu listing, it has long been easy in
several such operative areas to quickly bring up the particular section, from
the Command Summary, that's applicable to the context in question. When
the apt section is brought up in such manner, we have taken to calling it a "CheatSheet."
These CheatSheets can be very, very handy.
Gradually, some of these CheatSheets have been improved for
greater organization and clarity, but until now some were still somewhat lousy,
and we needed some new CheatSheets in places we did not yet have them.
Plus, for each context where a CheatSheet was potentially available, you needed
to at least remember the particular magic place, where you could right-click
with your mouse, to bring up the Cheat Sheet as applicable there.
With this release, there is a big general improvement.
In any context that offers a CheatSheet, you can now right-click in
virtually any otherwise un-operative space, and get the CheatSheet as
applicable there. The contexts that offer such CheatSheets are as follows:
Callsheets;
DispatchMap;
PartsProcess form;
ScheduleList form;
Inventory Control form; and
MasterPartsPlan
Please note that the last two forms are new, in terms of
their CheatSheet participation. For those two contexts (and for some
time), we've needed reminders of two or three potential commands in each, and
those are now provided in these particular new CheatSheets (if you check in
those contexts, you'll see some handy actions you likely did not even know
were available).
Please also remember, a right-click in any otherwise
un-operative space, in any of these forms, will produce the CheatSheet as
applicable there.
In addition to the above general improvement (and added
CheatSheet contexts), the CheatSheet as applicable to the PartsProcess form has
been strongly improved, in terms of the clarity of its organization:
| Old PartsProcess CheatSheet |
New PartsProcess CheatSheet |
 |
 |
While the new layout may look a bit more intimidating in
size, if you look briefly, you should see it
will be a great deal easier to find what you're seeking when you want it.
New "Wholesale Check-Off" for
PartsProcess-Items-Disposed-Of:
A year or so ago we completed the "to-grave" portion of our
cradle-to-grave PartsProcess system. Specifically, we provided a report
that explicitly lists items not checked off as having reached a proper
disposition (i.e., used on the job, returned to the vendor, etc.). This
was to provide you the basis assure no such items slip through the cracks --
that, ultimately, all reach an appropriate final destination.
For those transitioning from prior times, however, we
discovered an issue. If you had not prior been doing check-offs, and yet
wanted to use the report, you could find it filled with old items of which
you're no longer truly concerned.
To address this, the CheatSheet for the PartsProcess form now
has a new option (see bottom item in illustration of "New" above). If you
click it, you can run a process to address the above-described concern.
Added Link-Convenience in
DispatchMap Auto-Popups:
On the first of this month, we added popups in the
DispatchMap. If you float your mousepointer over any job reference, a
popup shows a bit of added detail regarding the underlying job (InvoiceNumber,
and Type and Make of machine being serviced). Based on popular request, we
just added a new element. If you do a simple click on the little popup, it
will open the underlying JobRecord for you. To be sure, a Ctrl/Right-Click
on the underlying reference will do the same thing, but in some instances you
may find it just a little handier (and perhaps more intuitive) to do the simple
left-click on the popup instead.
4.4.56 (3/16/10):
Miscellaneous:
Nothing terribly notable in this release so far as new
features, but it contains a ton of small fixes and tweaks.
4.4.55 (3/5/10):
Enhanced Internal Backups:
Virtually from its inception, each ServiceDesk package has
included a superb backup utility called SD-Backup. The design
intent is for this utility to run continuously at any computer aside from the
server. In such a state, it automatically maintains five layers of backup
(hourly, daily, weekly, monthly and yearly). As just one tool in your
backups arsenal, it's an excellent system, and positively should be in
deployed in every ServiceDesk office. If you have not been using
SD-Backup, please fix that fact now!
Sadly, SD-Backup does not solve every need-for-backup
situation. One problem is, some people (in spite of the fact ServiceDesk
almost constantly pesters otherwise) choose not to run it. Seriously,
we've had numerous people who suffered data loss -- then, to add insult to
injury, they had to face our scolding for the fact that, though pestered every
day by ServiceDesk to run SD-Backup, they'd still refused to do so. In
some cases these folks had other backup systems in place, which they thought
obviated the need for SD-Backup. However, the other systems proved to have
not been doing what they claimed. Please, do not NOT use SD-Backup.
Of course, even when you're faithfully running SD-Backup just
as you should, it may fail to provide a wanted salvation. This is
particularly true because each hourly backup overwrites the previous hourly, and
each daily overwrites the previous one in its class, and so on. Because of
this, if you don't notice there's a fault in data prior to such an automatic
backup, its class of backup will have replaced -- what was formerly a good
backup -- with a defective copy. It's one of the Achilles' heels of
automated backup systems (because of this, if you notice a major fault in any
data, it's a good idea to momentarily terminate the SD-Backup program, pending
immediate investigation and resolution).
Regardless of whether the issue is SD-Backup having not been
running, or because it's already replaced a prior good backup with now defective
data, we've often found another salvation when users have had data faults occur
(no software, by the way, is immune from data failures when the underlying
system hiccups in any of several possible ways). It's based on the
fact that many processes in ServiceDesk make their own, in-process
backup as the process runs (as a rule, these backups go into the LclData folder
for station that's running the process). Virtually all the archiving
processes do this, for example (Callsheets, JobRecords, ScheduleList,
PartsProcess, etc.). Because of this, it's often been true that when we
could not find an optimum backup anywhere elsewhere to use, we were nevertheless
able to find a good in-process backup, and restore a user to good operating
condition.
Even here, however, the results have sometimes not been as
good as wanted. The major problem has been that, after having discovered a
data fault, the user again runs a procedure where the same in-process backup is
made. This overwrites the prior (and formerly good) in-process backup with
a copy of the now defective data -- and very much frustrates our effort to make
a good restoration.
This release will directly remedy that occasional deficiency.
Specifically, each station's LclData folder will now receive
seven sub-folders, one for each day of the week. All in-process backups
will to go the sub-folder that pertains to the day on which the process is
running (meaning if there's a fault today and you already overwrote today's
previous good in-process backup, there should still be backups in yesterday's
sub-folder to look to, and so on).
And that's not all. Within each days' in-process
backups folder, instead of each backup (as for that day) overwriting its
predecessor (assuming its from the same calendar day), it makes a new one
(appended with 001, 003, etc.).
Based on this, any occasion where we can't turn to an
in-process backup for these critical files should now be very rare indeed.
You still should/must be running SD-Backup as well (when it comes to backups,
it's hard to have too many layers), and you positively should also have an
off-site backup system as well (we recommend burning critical data to a CD on a
daily or weekly basis, and taking those home, assuming home is not the same
place as the office).
Improved "Unvlbl" Entries in
the ScheduleList:
Another very old ServiceDesk feature involves the fact that,
in the ScheduleList form (F6), you can create entries denoting times when a tech
is unavailable. The method is to place, in what's normally the customer
name space, any of three potential text strings:
(a) "Unvlbl"
(for denoting a time-frame in which the tech can't work;
(b) "Unvlbl
Until" (for denoting he'll not arrive on the indicated day until a
particular time); or
(c) "Unvlbl After" (to indicate he'll be
ending work at a particular time).
Also very old was a shortcut for
inserting these key phrases. It involved typing either "U", "UU" or "UA",
then hitting Shift-F3 on your keybaord, which made ServiceDesk change the short
string into the somewhat longer full one. To be candid, in the last many
years I've been embarrassed to show people how this feature works, because the
method is so clumsy and un-Windows-like. I'd made the feature in my
earliest programming days, when I still had a rather DOS-oriented mindset.
Anyhow, we recently co-opted the Shift-F3 command for
displaying the new Rolodex, without realizing it messed up use of the same
function for the above-described purpose. This made a perfect opportunity
for modernizing the latter. Now, when you're in the F6 form's CustomerName
box, you'll see a drop-down with the three magical options, and all you need is
to select one.
New Boxes added to
Hyperlink-Capable set:
We introduced drag-and-drop hyperlink creation a couple of
years ago, and imbued several of the textboxes (in various ServiceDesk locales)
with the capability. We also said, if people wanted the capability in
other boxes, let us know. Recently Scott at Carter Services asked for the
capability in two new places: (a) the Notes box of the PartsRequest form
(Alt-F8); and (b) the Notes box of a SpecialSituationsAdvisory (Alt-F11).
The ability is now added to those boxes.
4.4.53 (3/1/10):
Find Funds Received
and Find Parts Special-Ordered buttons added to Archived-JobRecords
form:
For quite a while, we've had a couple of handy, half-hidden
functions in the Current-JobRecords form (F7). Some of the buttons there
do alternate duty if right-clicked on, instead of the standard left-click.
Of particular note here, the "enter funds Rcvd" button can be
right-clicked for an instant viewing of all monies collected on the job; or you
can right-click on the "orDer parts" button for an instant viewing of
all connected parts-process items (you can float your mousepointer over other
buttons to review their alternate functions, where applicable).
Last week, I got an email from Allison at Dependable Services
asking for similar capabilities in the Archived-JobRecords form (Ctrl-F7).
It made too much sense to resist, so now has been added (please understand,
these are in-context, convenience searches; the same searches have
always been available from within their own operational contexts,
elsewhere). In the new context (and as you can see below), these "Show Me"
functions are not alternate/back-door operations for the buttons involved.
They are the exclusive, on-the-face purpose for each.
| Before |
After |
 |
 |
Since the updated form has the same quantity of buttons
as before, you may wonder what we did with the functions those same button
positions used to provide. On consideration, we realized those old
functions did not need to be in this form. One of them ("Dbs Index
Utility") already had separate access via the MainMenu, and we moved access
to the other function there as well.
| Old "File Functions" Menu |
Improved and Simplified "File Functions" Menu |
 |
 |
In fact, we did not want to just keep adding items to that
menu section (it was already a sufficiently long list as to be potentially
confusing). Honoring that concern, you'll notice that an added element of
work was to reorganize File Functions, placing several items into fly-out
subcategories. This considerably simplifies the main list.
New Auto-Popups
in DispatchMap:
I was given this idea by Steve at Gulgren's Appliance.
You're likely familiar with Windows ToolTips: little clues and hints
that pop up when you float your mousepointer over various objects (we use them a
lot in ServiceDesk). We are now using something similar in the
DispatchMap. If your mousepointer floats for more than 1/10th of a second
over any job reference there (either graphic or list type), a ToolTip-like
window will display, showing some added details on the job.

Currently (as you can see in the example above), the popup
provides job InvoiceNumber, along with Type and Make of machine being serviced.
I suspect there may be requests to add some more details, which I'll certainly
be willing to consider. Please bear in mind, though, all it takes is a
Ctrl-right/click to see the entire job, so it certainly makes sense to keep
what's shown in this popup comparatively limited.
Improved Emailing of FinishedForm Tickets:
A couple of years ago we added the ability to direct-email
tickets from the FinishedForms context (Alt-F4). Occasionally since, we've
had complaints about legibility and clarity in the emailed images. It was
generally an issue only if the image included very small graphic-based print, as
in the disclaimer section of an underlying ticket image. This release
addresses those clarity concerns. In addition to the fact that such tiny
print will now be legible, the image files (as attached to the emails which the
method produces) will be now be in .PNG format, instead of the .JPG format as
was formerly used. PNG is a newer and more efficient graphic standard.
Even with much better resolution, it allows use of smaller file sizes.
4.4.52 (2/25/10):
Integrated PartsProcess
Work:
When you're creating an internal PartsRequest via the Alt-F8
PartsRequest form (this is most typically done while in the context of
a PostVisitReport Type-2), it's possible you are not merely the person
creating the request: you may also be the one who needs to do the subsequent
processing (i.e., inquiring with and/or ordering with a vendor). And it
may be the case that rather than taking care of all pending on orders later, as
a batch, you'd rather do it directly in-line with creation of the request.
If so, this new feature is for you.
Quite simply, if you want to link directly from the creation
of the request itself -- to processing of the request -- simply hold down your
Ctrl key while completing the request (in other words, while clicking on its
"Save" button). On the basis of this variation, the system will take you
right to the same item, as loaded into the PartsProcess form, for appropriate
further processing.
If you happen to forget the above variation, just float your
mousepointer over the form's "Save" button. A tooltip will appear for
purpose of reminder:
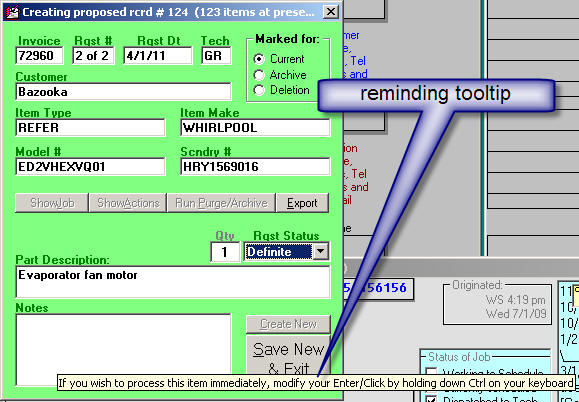
A few improvements in the new SD-Rolodex:
Early adopters found a few small faults in the new Rolodex,
which have been addressed in this release. Most significantly, I realized,
for the two yellow Notes boxes that fit to the left, respectively, of the
Companies and Persons lists, I'd initially forgotten to put in vertical
scrollbars (in case you have lots of notes and need to scroll), and the ability
to drag in hyperlinked objects. With the latter fix, you can now drag
pictures, documents and files into either note box. As one example of such
use, with respect to any company with whom you have a contract, I suspect you
may want to drag in a hyperlink to that contract.
Improvement in the new SD-TimeClock function
A few weeks ago I overhauled ServiceDesk's TimeClock
function, where your employees can punch-in and out on an electronic TimeCard.
Afterwards, it became apparent I'd left out an important ability: to punch-in or
out on the basis of an entered time, as opposed to the computer's
system time. This can be needed, for example, if an employee forgets to
punch-in on first arriving, and realizes it later in the day. To invoke
the method, simply right-click on the applicable "Punch" button, rather than
left-click (a ToolTip will remind you of this method if you simply float your
mouse-pointer over).
A dialog then ensues for entry of the manual time -- and,
when it's inserted to the TimeCard, it's with a flag advertising that the time
was manually entered (this is to provide the owner/manager with a method of
policing, if the event that an In or Out time happens to become suspect).
4.4.51 (2/24/10):
Announcing . . . (drum roll please) . . . the SD-Rolodex
!!!!!!
Though we recently acquired its maker, fact is we've been
converting users from our former competitor's system, LogiSERV, for a long time.
These "converts" to ServiceDesk have, of course, been very happy with their
conversion -- with a particular and notable exception. Many have lamented
the fact ServiceDesk has lacked its own equivalent to a Rolodex-type
function that's long been built into LogiSERV. In fact, more than one
former LogiSERV user has made it a point to periodically tell me their office
continues to run LogiSERV, in the background (even while using ServiceDesk for
main operations) -- solely for the sake of using its superb Rolodex.
With this release of ServiceDesk, finally, those users can
turn off their old LogiSERV -- and stay exclusively in ServiceDesk.
Yes (and as previewed at the ASTI convention), we now have
our own Rolodex-type function.
We are, furthermore, betting users will find our new Rolodex
is structured with a far more rewarding, flexible and powerful interface as
compared to LogiSERV's, or any surviving competitor's present
equivalent. Here's what it looks like:
To bring up this new feature, you can click on File
Functions in ServiceDesk's MainMenu and look down about nine items to the
menu option titled Rolodex:
Either that, or directly use the suggested quick-key combo,
Shift-F3. Upon bringing up the new interface, please note there is a
button in its bottom-center area titled "open Mini-Manual." If
you click on that button, it will open a little five-page handbook (same as
via this link) that
provides all needed details regarding how to use this awesome new feature.
4.4.50 (2/10/10):
Internal "Pay for
Performance" Reporting
Approximately one year ago, Whirlpool introduced a program
(often abbreviated as "P4P") that financially rewards servicers if they meet a
very simple set of metrics. Yesterday, a certain user suggested it would
be helpful if servicers could analyze internally, to see how they are
progressing on that precise set of metrics. Seemed very sensible,
so we have a new report:
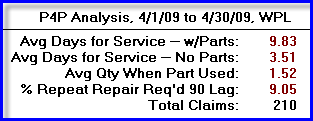
It is the very same set of metrics Whirlpool measures, but
may be gleaned at any time you want from your internal, ServiceDesk data.
This new report is available from within ServiceDesk's Reports form
(F11). Simply go there, pick the 'Performance - Clients' radio
button, then 'Pay for Performance.'
4.4.49 (2/9/10):
Technician Performance
Reports -- Announcing . . . "The Mother of all Overhauls!"
You asked, we listened (okay, I was sloooowwwwww to listen,
but I did).
We've long had a suite of "powerful" technician performance
reports (five in all). They've been subject to occasional incremental
improvements over the years, though nothing since their initial inception to (as
my dad used to say) "write home about." Please notice, I put the word
"powerful" in quotes. It's because these reports were drab, all textual,
mono-color and with no graphics. Sure, they worked great if you happened
to have the kind of mind that can look at a large quantity of raw numbers and
easily divine real and substantive meaning from them -- but most minds don't
work that way. So, not everyone celebrated these reports.
I took a first step toward major improvement with Rel.
4.4.43, just a while back. But that was tiny compared to what I've now
accomplished. This release includes a true and major overhaul. It
will produce tech-performance reports that, finally, are designed for the every
man. The basic set of reports has not changed, nor has the data (with some
few exceptions) that goes into them. What's really changed is the
presentation.
Here, for example, is a Tech's-Revenue report as generated in
SD Ver. 4.4.48:
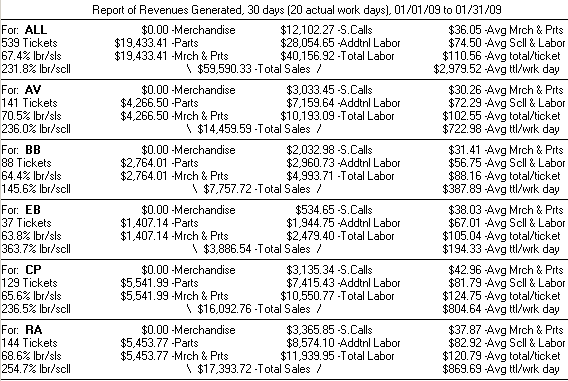
And here is the very same report, Ver. 4.4.49 style:
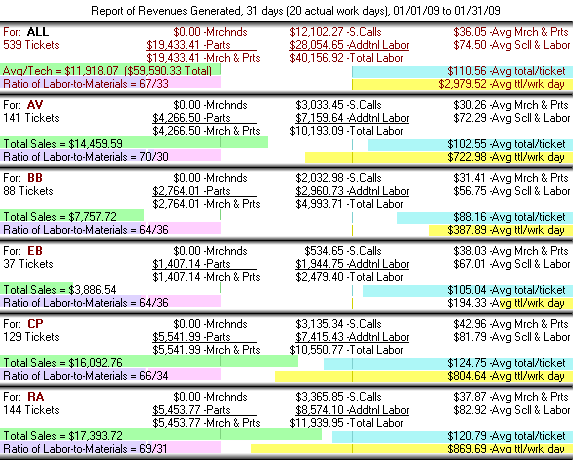
As you can see, it's the same raw numbers at play, but the
revised version presents them with a whole lot more pizzazz. And the
pizzazz is much more than mere fluff. Color differences, between the first
section and others, make much more intuitive the distinction between
company-wide figures (i.e., "ALL" in the top section) and the figures in
following sections that pertain to specific techs. The colorful and
integrated graphs are even more powerful.
In such regard (and using this
particular report as an example for potential analysis), please notice the four
graphs in the top section provide company-wide (or ”par”) geometries for each
key measure, and each tech's graph is purposely arranged to allow easy direct
comparison.
Glancing at the green graphs, for example, you can
see that three of the techs in this report are performing well above-par in
regard to total sales (CP looks particularly impressive).
Their average totals-per-work-day (yellow graphs)
mirror the same fact.
However, one of the techs who's strong in total
sales, is not so strong in average total-per-ticket (AV, blue graph).
The leftward purple/violet graph is particularly interesting in its ratio-type
comparison between labor and materials sold.
Glancing at this graph in AV's section may give an immediate clue as to
why his average total-per-ticket is below par.
It appears, simply, that in comparison to others he is underselling on
parts. Perhaps that is all he needs to
amend.
Anyhow, the general concept is that
with the addition of such integrated graphs and other enhanced visual cuing,
these reports can now be a joy to peruse, literally thrusting large elements of
meaningful analysis into your brain (and at a mere glance), rather than making
you toil to scavenge small elements of meaning.
All five reports in the Tech-Performance series (those
reports in the F11-form and under that title) have been similarly upgraded,
though the particular visual scheme in each is unique to its purposes. I
urge you, please, explore these reports. I think you will be positively
delighted by what you find. Please know, too, I have updated the
corresponding On-Line Report-Handbook. There is a button to load this
handbook in the bottom-right corner of the F11-form, but here also is a
link.
Discussion about these particular reports begins in that Handbook on page 14.
In regard to two of the upgraded reports (Technician
Recall Rates, Unit-Info Method and Technician Recall Rates, Key-Word
Method), I did much more than enhance the resulting visuals. In
regard to those in particular, I totally re-did the underlying infrastructure.
Formerly, these were reports that could take (depending on circumstances) a
long, long, long time to run. They are now at least ten times faster.
Better still, they're much more logical in their underlying methodology.
I'm betting you're now going to be very fond of these reports. For details
of what's different, please read in the appropriate section of that On-Line
Reports-Handbook.
Now that we have truly outstanding visuals in regard to
these reports, I'm betting people are going to want corresponding upgrades
on other reports. Alas, my work never ends!
4.4.47 (2/1/10):
New "Report on Funds
Deposited " now available in the FundsControl form:
A while back (see entry accompanying Rel. 4.4.7) we added a
spiffy new report in the (Ctrl-F9) FundsControl form. Called the
Reconcile Items Collected Report, its purpose is to summarize all
items of money as ostensibly received (typically on the prior day) -- for the
purpose of comparing to monies as actually found in hand, to assure you actually
got all the monies you were supposed to.
With this release, we add a beautiful new companion report.
As its title (indicated in this section's heading) suggests, its purpose is to
provide a summary of all items that were ostensibly deposited to the bank,
within any period (typically, we expect, it will be used on a daily or weekly
basis). This can: (a) provide a simplified basis for you to enter the
amount in your checking ledger; and (b) provide an added cross-check for
comparison purposes.
Here is a basic image of the report:
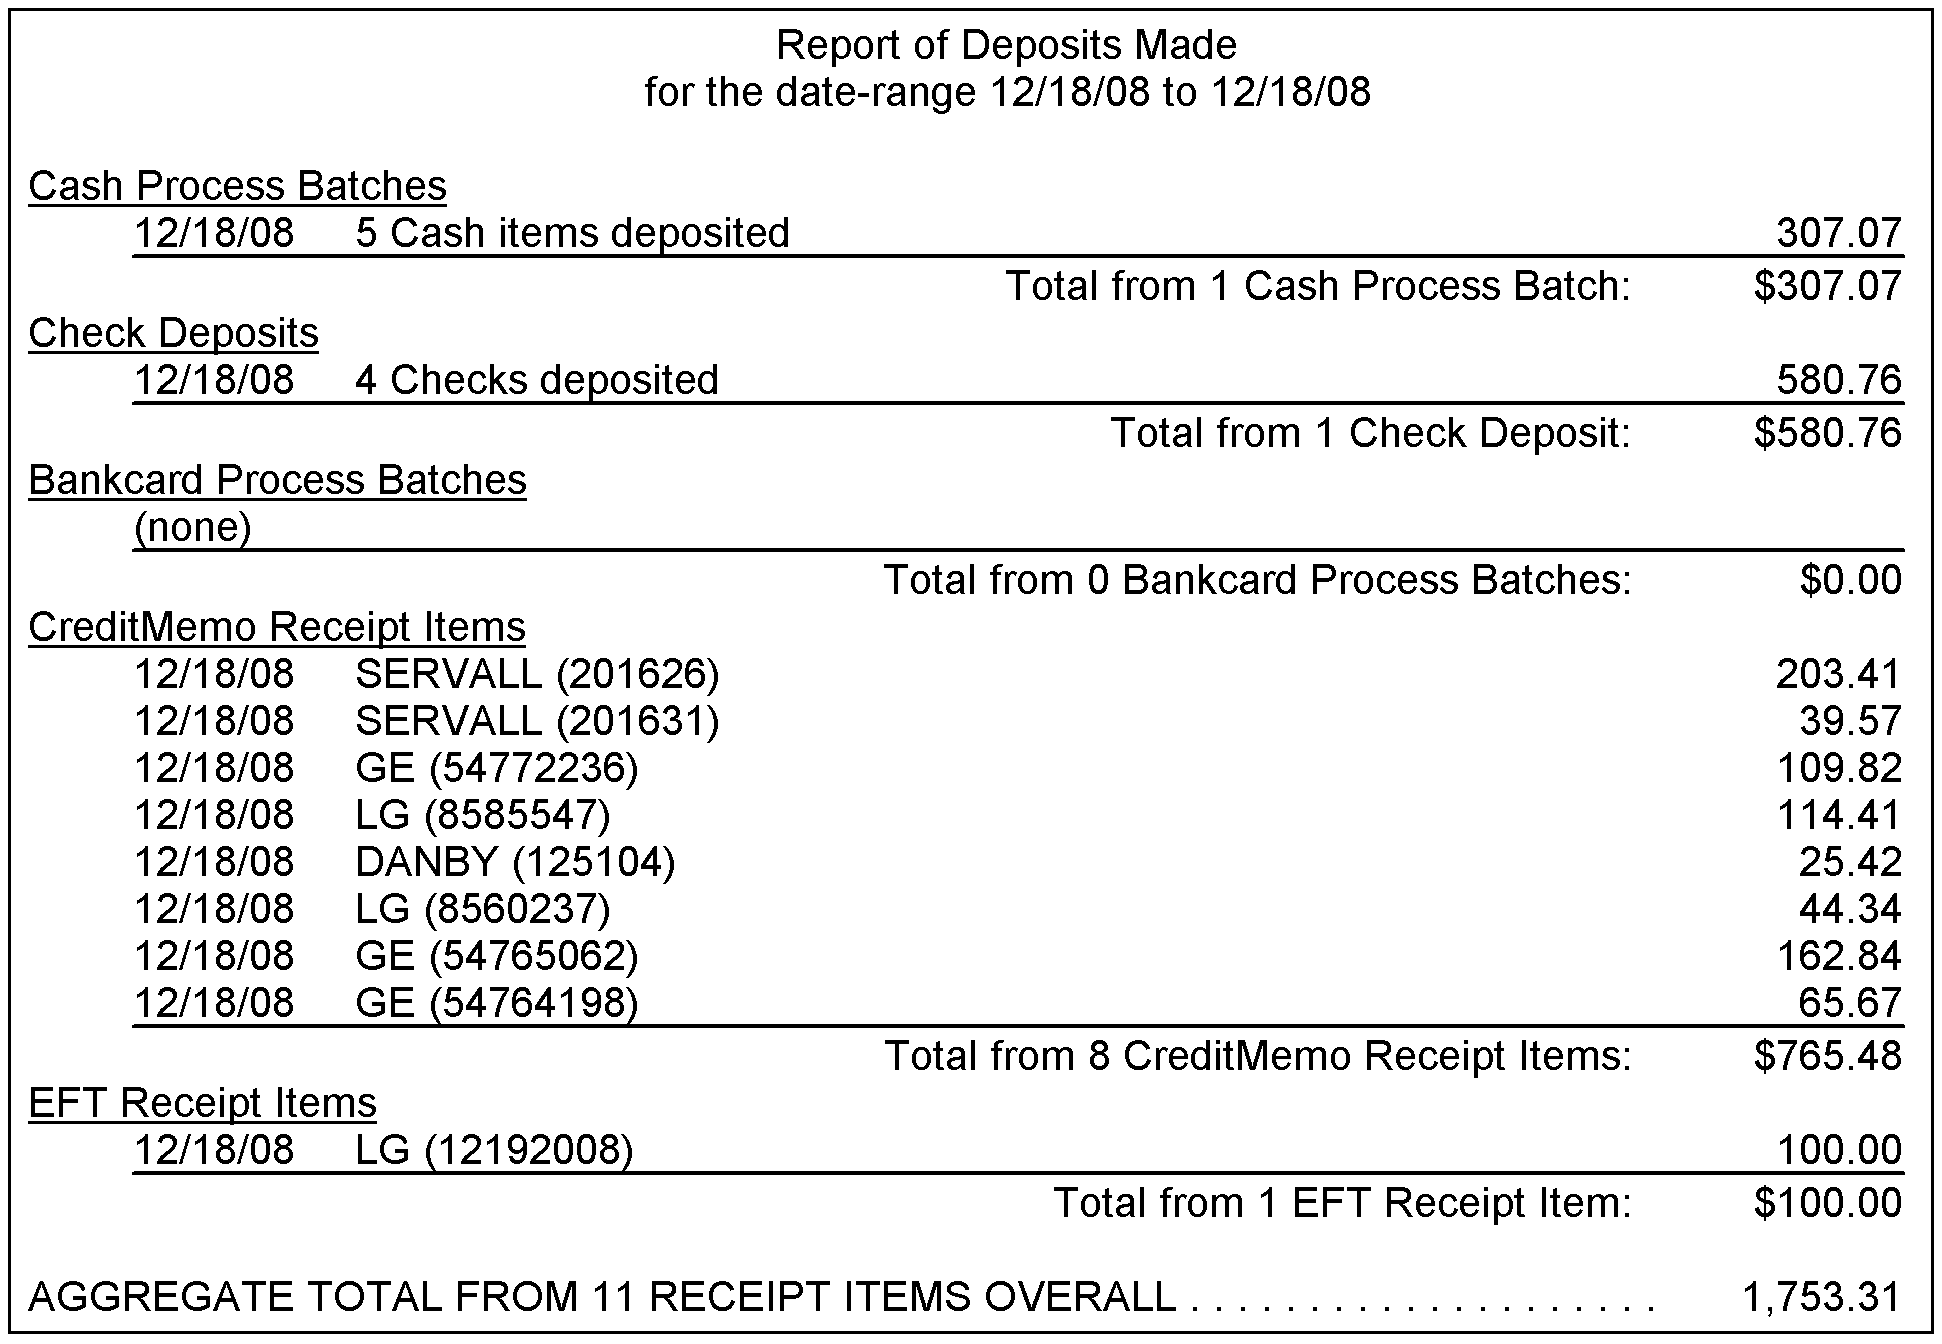
With addition of this report, we had to once again do some
re-arranging of the option-selections as initially presented in the FundsControl
form. There are now, simply, too many options to place in the initial
listing. Instead, two of the initially-presented options will bring up
sub-menu options. The one as applicable to this report is logically titled
"Deposit-related functions.
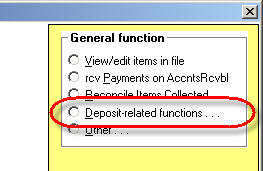
When you select that, you'll see the sub-options as follows:
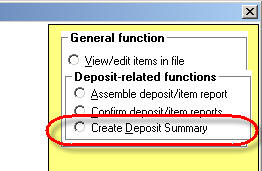
Please note this is where to find the new report, and is also
the place to now find the "Assemble Deposit" and "Confirm Deposit" functions,
which used to be on the initial menu.
Keyboard-Based Upgrade
for New Checkoff-Status Methods in DispatchMap:
It's very difficult to please everyone
all the time. It's also true, we've found, that while new users sometimes
complain about ServiceDesk being too keyboard-centric (i.e., not enough
dependency on the mouse), whenever we make an established function depend more
on the mouse, established users quickly lodge a loud chorus in protest.
This happened in regard to the enhanced Checkoff methods, as
introduced in Ver. 4.4.45 (see third item in prior entry, as pertaining to that
release). In response, I've done the following:
(a) With the list of Checkoff statuses
displayed (standard means to invoke is by doing a Shift-Click on the item,
within the tech's list of jobs, you want to check off), you can use your
keyboard's Up and Down cursor keys to move the mousepointer from one item to the
next.
(b) With the mousepointer over any
particular item in the Checkoff list, you can hit Enter on your keyboard to make
the selection.
(c) There's is also a new/alternate means
to first display the Checkoff list. With the mousepointer over a tech's
list-item job reference (yes, this particular mousepointer positioning you must
do with the mouse), hit Shift-Enter on your keyboard.
Hopefully, these improvements will allow everyone (on both
sides of the mouse-vs.-keyboard divide) to be happy.
I should mention (while simultaneously
placing a pitch here for two of our major supplementary products), I somewhat
resisted making the investment (it consumed a whole morning) programming this
very minor tweak. It's because, those of you who are still doing manual
check-offs for routine dispatch-related events, in my opinion, should not be!
Optimally, requests for confirmation
and check-offs of confirmation should all be handled via automation as
facilitated via SD-CyberOffice.
When you use that system as intended, these check-offs occur automatically,
without any per-item effort required by office personnel.
Similarly,
confirmation of dispatching to the techs, check-offs of arrival and departure,
and check-off of PVR status should, optimally, all occur via automation with the
techs as facilitated by SD-Mobile. In my humble opinion, you should not be
consuming separate resources to manually handle these mundane (albeit important)
tasks. Automation is much smarter.
To put it another way, this improvement involved polishing
the edge on a tool which -- for the fully-advanced user -- has been largely
superseded regardless.
4.4.45 (1/3/10):
New
LG "GSFS" Claim Submission Format:
Effective on this date, LG has ended
its former "CLS" integration system (which provided direct integration, between
servicers and themselves, on both dispatch processes and claims)
-- in favor of a new system called "GSFS." It's our understanding they
have also ended integration via ServiceBench. Most alarmingly, their new
system has no "handles" to facilitate the direct integrations (for dispatch
processes and direct claims transmission) that were formerly enjoyed.
In fact, all that is available now, for integration (at least as we understand
it), is the ability for you to upload claims via the old-fashioned
file/batch-upload method -- though as connected to the new GSFS system (i.e., SD
puts the claim information into a file, and you have to separately upload it via
login to the GSFS website).
We don't know anyone that's happy with this, but (and at the least) here at
Rossware we've provided you with a "just-in-time" update to facilitate claims
creation in LG's new format. Assuming you make your first GSFS claims on
the morning of Monday the 4th, we believe it will work. Our output has
been tested with LG, and verified to be in the correct format.
New
Samsung Claim Submission Format:
So long as I was busy creating a new claim submission format
for LG, I figured I might as well tackle another item on my long, long, long
list of projects -- which was to create a submission format for Samsung (in case
it's not obvious to you, every claim processing entity has its own format into
which claim data must be forced; each format is unique, and it requires a lot of
program coding to make the data conform perfectly to each).

In regard to this newly-added format for Samsung, I'm
considerably less certain you'll enjoy immediate claim-submission success.
Samsung's documentation (detailing what's expected for their format) is very
sparse in regard to a number of the needed fields -- leaving considerable
ambiguity in terms of what must placed where. I suspect further finessing
will be required before we reach total success. This finessing will likely
depend on feedback from you (we've had no direct testing with Samsung, such as
we have indeed had with LG). I encourage you to use the on-screen NARDA's
"Translation Tips" to see how, specifically, we are presently
translating boxes from the NARDA into Samsung's claim format. Again, I'll
look forward to your feedback.
Enhanced
Appointment-Check-Off Scheme in DispatchMap -- Including New
JobHasBeenPreScreened and
JobHasBeenPostScreened CheckOffs:
Evolution is not always the best
designer. Way back in the early days of the DispatchMap, we realized it
would be good to have a "Check-Off" there -- to visually indicate, in respect to
an appointment, if it had been dispatched to the tech (i.e., actually given to
him, so it was known that he had it). We used an actual check-mark symbol
for this purpose, and a simple Shift/Click action as the means for toggling an
appointment to show it with check-mark, or not.
That was terrific, except we soon realized it would be nice
to have a somewhat similar (but different) action and symbol to indicate the
tech had actually arrived at an appointment, and another to indicate he'd
finished there. So, we made added key/mouse-click combinations for these
purposes (Ctrl/Click and Alt/Click), along with added associated symbols.
That wasn't too bad: three different (and simple)
key/mouse-click combinations, and three different associated symbols. But
if it's good to have indicators for those statuses, isn't it better to have
indicators for more?
What about showing, for example, if an appointment's PVR was
done. Hmmm. That means another symbol (or symbols), and another
key/mouse-click combination to toggle. Now, with the simple
key/mouse-click combinations already used, we had to resort to a more complex
combination. We chose Ctrl-Alt/Click.
Still, a good concept can't quit growing. Before long,
someone suggested it would be good to have a check-off action to show a customer
had been contacted (typically the evening prior) to confirm their expectation of
the next day's appointment. So, we added a "Confirmed-With-Customer"
check-off (Shift-Ctrl/Click). Then, as people began using that, they
realized it would be good to have a different check-off to indicate confirmation
had been sought (i.e.,. voice message left by telephone, email request sent,
CyberOffice processes initiated, etc.). We used Shift-Alt/Click.
Finally, someone suggested it would be good to check-off to
indicate the tech had arrived on a job, only to face a "No-Show" by the customer
(Shift-Ctrl-Alt/Click).
As you may gather, it reached the point where we'd used all
the potential key/mouse-click combinations (see illustration of old DispatchMap
Cheat-Sheet, about a page-down below), and if a user was interested in doing any
of the check-offs manually (in truth, the need for this was typically limited by
the fact many check-offs occur via automated means), it was a confusing
combination of key/mouse-click combinations to remember. There was of
course an always-on-hand, easy-to-instantly access cheat-sheet to remind, but
still, the inelegance of all those combinations was undeniable.
And, wouldn't you know it, people eventually wanted still
more check-offs.
In particular, many companies have a person who advance
screens each appointment, seeking to predict if particular parts are likely to
be needed (intending to send the tech out with such parts, if so). Some
such companies asked for a check-off to indicate when such "pre-screening"
had been performed.
Many other companies do what might be called
"post-screening." That is, periodically throughout each day, someone in
the office scans the DispatchMap looking for jobs on which the PVR has been
done, but on which the job is not yet complete (i.e., those showing with a
circle-X symbol). That person opens the JobRecord, and immediately
orders the parts -- which, presumably, the technician requested. This is a
rather brilliant practice, because it shortens completion times, and impresses
the heck out of your customers. Anyhow, these companies asked for a "this-job-has-been-post-screened"
check-off.
As noted, we'd already used all possible key-modifier
combinations (as potentially combined with a left mouse-click; right
mouse-clicks are used for other things) -- so there was a clear need to change
our methods -- if we were going to accommodate such added check-offs.
What I've done is to eliminate all items in that former zoo
of key/mouse-click combinations -- except the initial and original one: the
simple Shift/Click. Now, when you want to toggle any check-off
status on any appointment (in all cases, we're referring to its list
reference under the tech to whom it's assigned), do a simple Shift/Click.
In result, the system will display a list of all possible check-offs, and you
simply must do one more click to pick the one wanted.
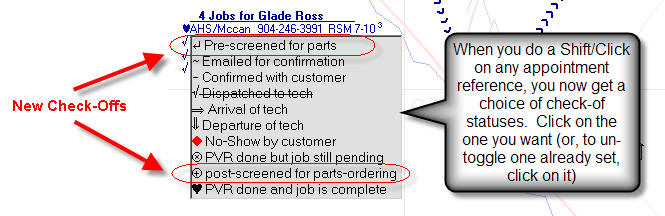
Please note that any appointment's existing check-off status
will show in the list with a line through it. If you want to un-toggle
that check-off (i.e, put the appointment back into a check-off status of
nothing), click on the lined-through listing.
Besides the fact you can now use those two new
check-off statuses, there is obviously much added simplicity. The
DispatchMap's contextual Cheat-Sheet (right-click in any empty space to bring it
up) reflects this.
| Old DispatchMap Cheat-Sheet |
New DispatchMap Cheat-Sheet |
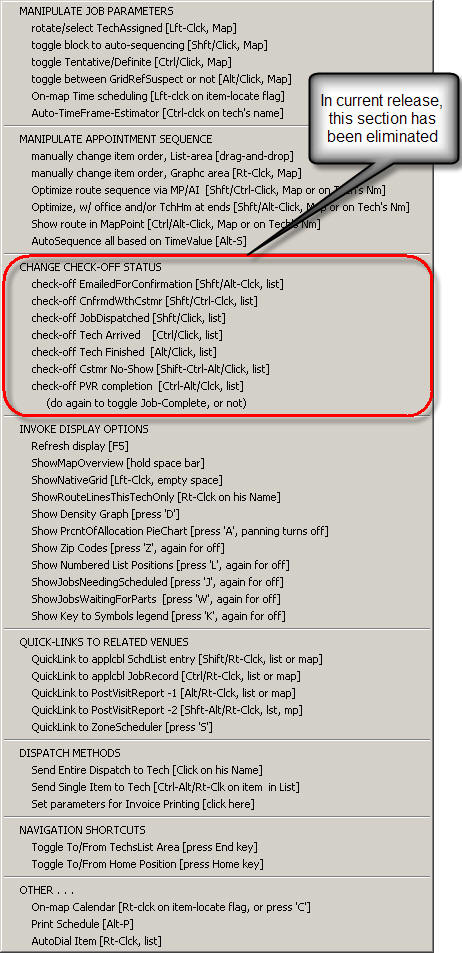 |
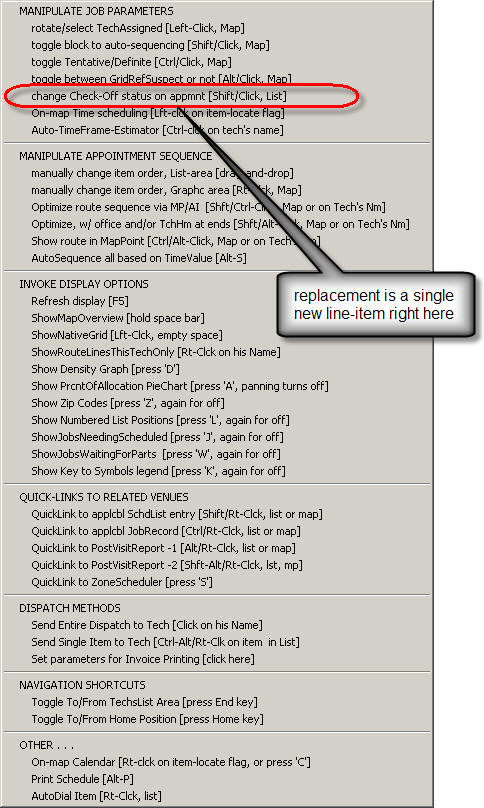 |
In our view, a shorter Cheat-Sheet (that nevertheless accommodates more
functions) is an improvement indeed.
Please note, if you're using SD-Mobile, it's important with this update to also
update SD-MobileLink to Ver 1.3.33 or above. Prior versions will not know
what to make of the new check-off statuses.
4.4.44 (12/31/09):
WageReport Updated to
Work with New TimeCard structure:
As mentioned in the prior entry, we
updated the TimeCard structure, but had not yet updated the WageReport
to work with the new structure. This created a brief window of time (turns
out it was just two days) in which you could not run wage reports.
This release fixes that (i.e., you can again run the reports, and they should
work perfectly with the new data structure).
4.4.43 (12/29/09):
Changed
Nomenclature for the Problem Customer Advisory:
The Problem Customer Advisory (Alt-F11)
no longer exists -- at least, not under that name. Turns out, we
discovered, many people were using this tool to notate situations with customers
who were not "problems." In particular, the tool was sometimes being used
to denote customers who were VIPs, and deserving of special, red-carpet
treatment. Given such broader use, we decided the name of the tool needed
changing. Thus, it's name is now the Special
Situations Advisory. You should feel free to use it in
connection with any customer that needs to be flagged for something special or
unusual in their regard.
Upgraded TimeClock System:
The TimeClock function in ServiceDesk (via which employees may Punch-In
and Punch-Out on electronic time cards) is one of its oldest
functions, and had received virtually no modernization over the space of many
years. In the meantime, upon creating a complimentary TimeClock function
in SD-Mobile (a year or so ago), we deemed the data-format as used by the
SD-TimeClock system too archaic, and so designed Mobile's system with an
improved, more modern structure. In result, we had two incompatible
TimeCard structures. SD's WageReport continued to work with the old
format, while if you wanted to do WageReports for techs using Mobile's TimeCard,
you had to open that data in Excel and do some manual work there. It was a
situation crying for correction, and this release gets us almost there (the next
release will complete the process).
Specifically, with this release ServiceDesk itself switches to use of the same
modernized data structure, for each employee's electronic TimeCard, as SD-Mobile
has been using for the last year or so. Upon first punching In or
Out for any employee, the system will automatically convert that
person's TimeCard file from old format to new (more specifically, a new file is
made in the new format, with filename TimeClock.xx.TXT [where "xx" is the
employee's two-letter abbreviation], and the old file is changed by appending
the word ".OLD" to its name [thus changing, for example, TimeLog.xx to
TimeLog.xx.Old]). All future punch Ins and Outs will now
be done to the new files in the new data format.
The TimeClock form itself has also been substantially improved, for better
overall appearance and functionality.
| Old Form Interface |
New/Improved Form Interface |
 |
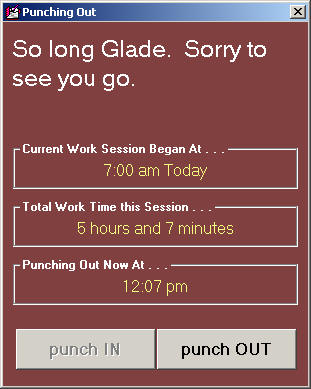 |
Please note the improved simplicity of now having only two buttons, and it's
only the button that reflects the expected action that's enabled (in prior
design, the "Okay" button did double duty for both actions, depending on the
circumstance -- which sometimes led to be people getting off-synch, thinking
they were punching In when punching Out, and vice versa). The new system
also has a much improved method for coping with a forgotten prior-punch event
(e.g., I need to punch In this morning, but it turns out I forgot punch Out last
night, or vice versa). The old system would permit the present needed
punch (via its bottom-center button), while leaving as unresolved the prior (and
forgotten) opposite punch. With the new system, even though the unexpected
of the two buttons appears to be disabled ("punch IN" in the above example) it
will still accept a click. If you click on the disabled button, it invokes
a dialog where a forgotten "punch" event can be manually provided. In this
event the TimeCard file is appropriately marked to indicate that that punch was
input manually (thus, as a manager you can know to potentially consider that
punch as suspect).
There is one further element of work we did not get to with this release,
and that is the WageReport. It has not yet been re-written to work with
the new data format. We'll do another release, very shortly, that has that
improvement.
Improved Performance Analysis Reports:
It was, in fact, our effort to improve the overall set of reports as available
in the F11 form that led to upgrading the TimeClock system, as above-described.
Specifically, upon having made several other reporting improvements, I reached
the point where I wanted to add a new report to provide specific comparisons
between time spent on jobs by a tech as compared to time on-the-clock. To
do this, I needed to finally unify SD's internal TimeCard use with what's in
Mobile -- which led to the above-described changes. Prior to
reaching that point, however, I'd already made several improvements.
In particular, all of the performance reports have been upgraded in some degree.
There are presently six such reports overall. Two under "Performance --
Clients," and four more under "Performance -- Techs" (the illustration shows
only the two headings, which must be clicked to see the lists of respective
reports from which to choose).
In several of the reports, overall appearance has been changed for
improved readability and understanding. In some cases, new figures have
been added and/or tweaked. In all cases, we have added an "Export
Check Data" function. It's a new button that will appear (to the
lower-right within the form) as the report displays. If you click on the
button, it will create an export file that contains elements of data as relevant
to compilation of the report in question. It will even offer to open the
file for you (typically in Excel). The purpose is to permit you -- if you
have any questions about how the report figures resulted or as to their
reliability -- to look at the actual data that produced those figures. You
may, if you like, to further analysis on their basis as well.
4.4.41 (12/13/09):
Improved Updating of ServiceDesk:
Until now, there's been a significant
potential nuisance when updating ServiceDesk. It arises if you're
installed in thin-client mode, meaning a setup where several stations operate
from a single SD installation.
The difficulty is that the SD program file can't be replaced with the intended
newer copy (Windows will not permit it) so long as ServiceDesk is running from
any station that depends on that instance of the program file. Thus, it's
always been necessary to close ServiceDesk at any and all stations that may be
running from the instance of the program file one is attempting to replace.
Particularly for large operations (i.e., with many stations) this necessity has
sometimes posed a nuisance.
Our favorite geek here at Rossware, Matt, came up with a solution. Turns
out, while Windows will not permit you to remove or replace a program file
that's in-use, it will (at least on those systems where we've tested it) permit
you to re-name the file. So, we've now re-programmed the little
ServiceDeskUpdaterX utility to perform some behind-the-scenes
sleight-of-hand." This is, essentially, the utility that opens the
Winzip Self-Excractor update file after ServiceDesk closes following the
update download, and re-opens ServiceDesk after the unzip. The new version
of this utility does more. Behind the scenes (and without you even needing
to be aware) it re-names the ServiceDesk program file (specifically, to "servdesk_temp.exe").
Thus, when the Winzip Self-Extractor seeks to replace the normal ServiceDesk
program file ("servdesk.exe"), there is no objection from Windows
because a file by that name is no longer there, and in the way. After the
unzip, the temporarily re-named old file is deleted (no objection from Windows,
since it's not the file that's being run from). We're pretty sure
Microsoft did not intend to permit this loophole through which we're wriggling,
but it seems to work regardless.
You will need a new copy of the ServiceDeskUpdaterX utility to take
advantage of this improvement. It cannot be included in the standard
download/update file -- by reason of the fact it's the very utility that must be
running to facilitate opening of that standard download (and thus would be in
the way of its own replacement). However, if you watch the dialog upon
doing your next update (i.e., the next one after this one), it will
coach you through this replacement. Either that, or do it directly now by
downloading "Updater Utilities" from the
ServiceDesk downloads page.
New "Customer's PO-Number" Field Added to
ScheduleJobsReport-Type3 Export:
The Alt-F3 form in ServiceDesk has gradually expanded form
its initial role, which was simply to create a customer mailing list. Now
it offers a variety of exports.
It's been out habit, in respect to these exports, to add particular fields on an
as-requested basis. The heading describes what was just added, pursuant to
precisely that long-established pattern.
BTW, this same particular
export can be used to more deeply analyze revenues as connected with customers
who are obtained via various marketing avenues. I've occasionally been
asked if our system allow matching revenue to advertising source, and (I now
realize) erroneously answered no. Turns out (I've discovered upon
reviewing this report/export for the sake of adding the new field, it has (and
has long had) other fields to facilitate precisely that kind of analysis.
I hate it when I forget about capabilities that exists in my own system, and I
myself created. :)
Password Protection (as
described in first-preceding entry below) extended upon:
The provisions as described just below work fine to protect against unwanted
changes in tech assignments when made via the DispatchMap (F5), but do not
protect when such changes are made from the ScheduleList form (F6). That
loophole is addressed with this release. Also, if you've set the chevrons
to indicate a default of "Definite' for tech assignments as made from the
Create-Job/Sale form, the same default will apply when making appointments from
existing jobs, via the F6 form.
4.4.40 (12/10/09):
Password
Protection When Changing Tech on Appointment Where Prior Assignment was Definite:
The caption pretty much says it. Until now, if in the
DispatchMap you wanted to change the tech assigned on a particular appointment,
the system would simply warn
you if the prior assignment had been marked as "Definite." It would not
prohibit the action.
Now, besides a warning, it will optionally require provision of a password
before allowing you to proceed. The default setting for this password
protection is "ON" -- meaning, if that's your preference, just leave it as is.
If your preference is against having the password protection turned on, you'll
need to go the Security form and turn it off.
FYI, the immediate impetus in creating this was the need
expressed by a company in Vancouver
B.C. This company has each of their techs working directly in ServiceDesk
via remote Desktop. We vastly prefer to see techs working via the
SD-Mobile program. We have not designed ServiceDesk itself with any intent
that technicians should work directly within it (well, outside the restricted
TechWindow mode), but that is, nonetheless, how this company does it. The
problem they were having was techs reassigning jobs, via the DispatchMap, for
their own self-interested purposes. The solution we came up with was for
all tech assignments, on appointments, to be made Definite, and to then password
protect against changes.
In this regard, there is a connected/added new feature.
To make the solution effective for the Vancouver
company, they'll need to have the assignment status on all jobs set as Definite.
For this purpose, there's a new default variance in the
Create Job/Sale form, as follows:
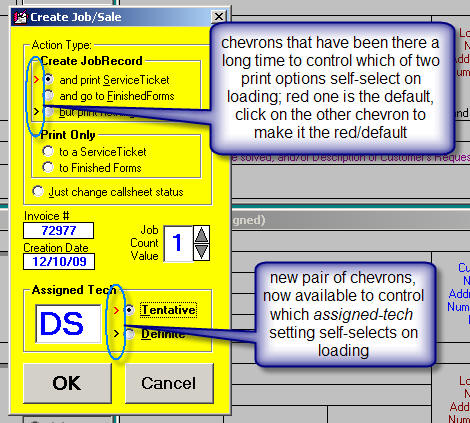

We don't think picking Definite as the default will be optimum
for any companies except those few that pursue practices such as the one in
Vancouver. However, if you are one of them, it's
there for you.
4.4.38 (11/16/09):
Dramatically-Improved Integration with Mobile Tickets:
We have now completed a massive upgrade of Ticket/Invoice
management within the Mobile context (includes features such as
"Previewing and Editing, Separate Saves, Re-Loading Prior (and Appending
with Present), Save-Same or Save-New," etc.). The Mobile-side
elements are described, in depth, in the most recent
entry of SD-Mobile WorkDiary, and we encourage
you read there, for full understanding.
On the ServiceDesk side (and as announced a couple of releases
back), there's a new Mobile form, as one of the options within the
FinishedForms (Alt-F4) context. It can be used to review any/all tickets
as created within the Mobile context, to revise them for re-use by Mobile, and
even to create new tickets, in house, for use by the tech when he goes out later
on a job.
| New form option in Alt-F4 |
User picks which of multiple saves should be loaded |
 |
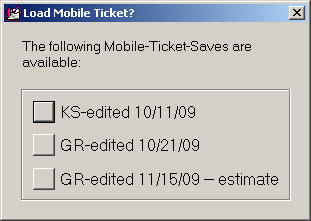 |
Perhaps most usefully, the new FinishedForms Mobile
ticket can be used to facilitate making a SaleJournal entry, direct from the
Mobile ticket -- eliminating any and all need for an operator to re-type figures
as already created by the tech in the field.
There are two small caveats, in regard to this
ServiceDesk-side use:
One is that, unlike the other FinishedForms, the new
Mobile one does not
presently offer to import data (into its various boxes) from underlying ServiceDesk data
(as do the other forms).
The second caveat concerns a matter of slight ambiguity, when
using the Mobile ticket to populate a SalesJournal entry. It's a
question of which of its summation figures (Parts-Total, Labor, Other, Sales-Tax
and Total-Ticket) get translated (aka "mapped") into which fields of the offered entry. In particular, while the Mobile ticket has a Labor and
an Other field, the SalesJournal entry has a ServiceCall and OtherLabor field.
It's not necessarily obvious how these fields, with their disparate labeling, should
correspond. The answer is, (as presently programmed) they feed in the
sequence as just recited. If you need different "mapping," please
let us know.
A tiny further caveat is that versions of SD-Mobile prior to
1.3.18 did not include a dedicated InvoiceNumber field, and in consequence will not show up via this
new path in ServiceDesk. In other words, any Mobile ticket created in
Mobile Ver. 1.1.17 or older will not be offered for you an SD Mobile
ticket.
Improved Scaling
in SD Interface:
Though Windows is a nice environment
to program in, not everything is perfectly easy. With ServiceDesk's layout
in particular, it's been a challenge to make sure the four Callsheets
consistently fit with perfection within the framed space. What makes it
difficult is, depending on preference settings in Windows, the thickness of the
surrounding border can vary, as can the caption bar height, and also menu
height. If all were known and constant, it would be easy to set an
external size that would perfectly accommodate interior elements, with
confidence all would consistently fit. But the sizes vary, and it's a
matter we've somewhat struggled with (in result, you may or may not have noticed
imperfect fits of the Callsheets within their spaces). With this release,
I think we've got it perfect, and you'll likely see the Callsheets fitting
perfectly in place, regardless of your preference settings.
4.4.37 (10/27/09):
Now a
Second/Alternate Whirlpool/ServiceBench Warranty-Entitlement Inquiry:
Six weeks ago (and amid significant fanfare) we
introduced a near-instantaneous, single-click method for obtaining a
warranty-entitlement and product-history
report, on virtually any Whirlpool Corporation-related product. A short
time later, we added the same capability, for techs, in SD-Mobile. In
either context, it's great -- albeit subject to a small limitation. The
entitlement info, as provided by the standard inquiry, is less detailed than may
sometimes be wanted, particularly with respect to extended warranties.
To address that limitation, we've now added a second inquiry.
Access to this new function, like the original, is via a button on any
applicable UIS sheet (i.e., within the UnitInfo form). In fact, we've now
fit both buttons into the same space as the original:
| Old Button Arrangement |
New Button Arrangement |
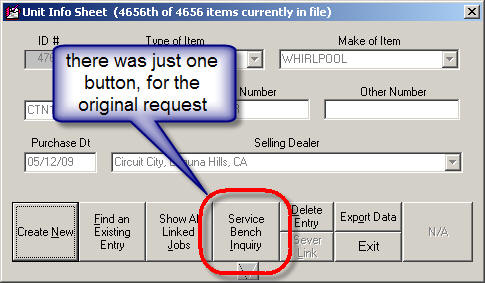 |
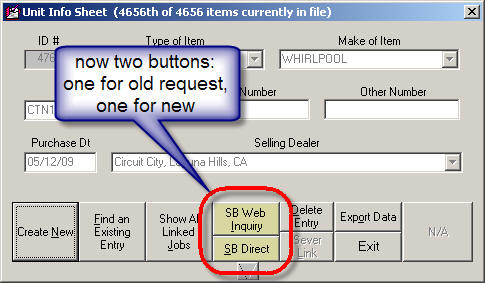 |
As you can see, we've also colored the buttons, to more
effectively distinguish them from others on the form.
Please go ahead and try
the new button (it's the one labeled "SB Web Inquiry"). Be sure
to do it on a UIS that involves a Whirlpool-related product.
You'll see it opens a very nice web-page that contains a lot of
entitlement-related data. Unlike the other inquiry, however, there is no
product history. It seems that no matter what (and like the saying goes),
you just can't have your cake and eat it too.
Special-Order
Parts Management -- A Dramatically Improved Manual Section:
Do you ever have to
write something, and you just can't figure out how to do it?
That was the case with me, some ten years ago, when I
first wrote the manual's section describing how to use the Special-Order
PartsProcess system.
I knew how it worked, but
for some reason could not think of a good strategy for communicating my
understanding. In the absence of a better solution, I settled on a
description I always knew was lousy. And, I apologize. I think many
users have had a tougher time, getting the essence of how to use that element in
the system -- than they otherwise would have -- if I'd managed a better
description.
The good news is, I
finally did it. Though many times (in the intervening years since) I've
wanted to do the re-do, it was not until now that I mustered the energy, time
and vision to finally make it right. I think the new section does a very
nice job. It will be found, contextually, in future publications of the
manual, but you can also access it as just an excerpt, right now. I've
added a button for the purpose in the top-left corner of the PartsProcess form:
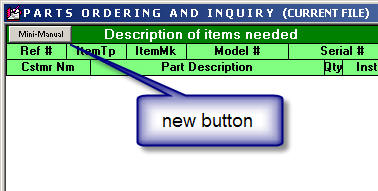
Or, if you want to check out the new section without first
going into ServiceDesk,
here's a direct link.
4.4.36 (10/22/09):
New: Ability to
Open -- and Edit -- SD-Mobile Tickets in SD:
For details on this,
please see entry in SD-Mobile WorkDiary.
4.4.35 (10/14/09):
ANOTHER MAJOR DRUM
ROLL
PLEASE . . .
Single-Click
Parts Inquiry and Pricing -- via
Revolutionary MyPartsHelp Service:
Here at Rossware, it's
our goal to do stupendous things, and on a frequent basis.
Usually, we do pretty well via offerings produced totally 'in house.'
Sometimes, however, the most awesome stuff involves partnering with
others.
Within the last year,
for example, we partnered with Merchant Warehouse for integrated credit
card processing, then with Whirlpool/ServiceBench to provide single-click warranty entitlement and product history reports.
With this release, we
announce a new partnership -- with possibly the most awesome result yet.
For background, over
the last year a group of your peers (other retail-level servicers) pooled their
financial resources to develop a new technology, and a new company to manage it.
The company is Service Company Solutions, LLC.
The technology is called
MyPartsHelp.
What does MyPartsHelp
do?
Quite simply, it links
with ServiceDesk, and on the basis of a single click connects to each of your
preferred vendors to inquire about pricing and availability on a given part
(i.e., the part you clicked on, within ServiceDesk).
It displays the result back to you inside of about one second.
Really, you won't believe how effective it is, until trying it.
For each vendor, it not
only shows if they have it; it shows how many they have, and at each of their
locations. And it's not the
vendor's standard/published price that's shown; it's your own particular account
price. That's not, remotely, all.
Another click (and just
a couple seconds more) shows you
nationwide availability on the part.
It does so by polling vendors from around the country.
You won't believe how often you're able to find NLA parts or someone
who's stocking an otherwise backordered item -- with just two clicks, and less
than five seconds wait time.
But it gets better
still (do I sound like one of those TV ads?).
You likely know about
RepairClinic.com, and how when you lookup a part on that website you're
instantly provided with a set of very clear photos showing the part from several
angles (dramatically helps to reduce mis-orders).
Guess what. That same set of
photos shows (along with everything else) in the MyPartsHelp, single-click
lookup. On top of that, as one of
your MyPartHelp membership benefits, you can order those
can't-possibly-get-anywhere-else parts at 15 percent off the price everyone else
must pay.
Do I sound like I'm
excited to announce this product?
I am (and, as in a few
other instances, I apologize to those of you who are in fields other than
appliances).
On top of all the other
good news, the MyPartsHelp service is downright cheap (about $20/month).
Even better than that, it costs nothing to try (also, in a while it may
also be available in the electronics field, and after that, who knows?).
Oh, and did I say there's more?
There is. Right
now you have the opportunity to get in on the ground floor.
For a brief time only, MyPartsHelp accounts are being offered in beta
(which is why the pricing is presently so low).
Features are great already, but are destined to grow, and pricing may
too. I suggest getting in while
it's cheap.
To begin usage, you can go to this website:
http://mypartshelp.com/public/
Or, better yet, let ServiceDesk take you there. For this
purpose, open your ServiceDesk
PartsProcess form (Ctrl-F8), and right-click in the colorful label area at
top to display its contextual "CheatSheet:"
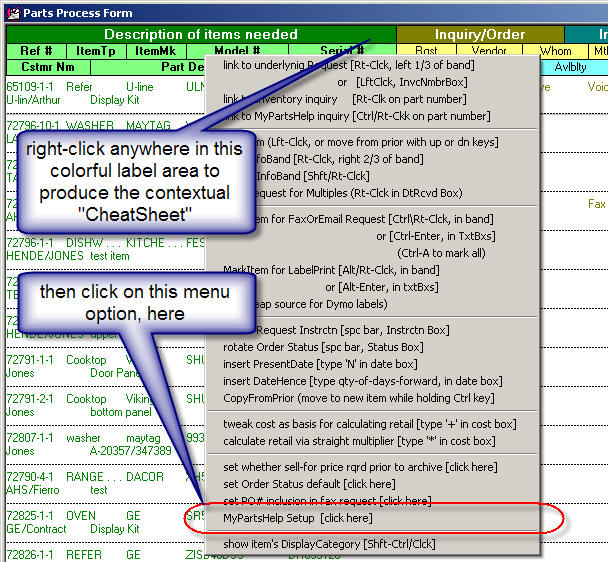
Now pick the menu option labeled "MyPartsHelp Setup."
This produces an option where you can choose either to link to the MyPartsHelp
account setup page, or to enter your MyPartsHelp login credentials. First,
of course, you'll need to do the account setup (after all, you'll have no login
credentials until you do). After that's done, go back to the same venue --
only this time choose to enter your login credentials. Now, pat yourself
on the back, and say Hurrah, because you're ready to use MyPartsHelp.
Actual use could not be more simple, or require less work.
Just do the normal stuff, that you'd normally do, within the
ServiceDesk PartsProcess form (i.e., responding to internal requests to acquire
parts that are not stocked, as displayed for you via line-item listings within
that form). Only, when you're looking at any particular line-item (and with
part number already determined and inserted), don't go to a vendor's website to
ascertain availability and price. Don't call. Don't email or fax an
inquiry. Instead, just do a simple Ctrl/Right-Click on
the part number.
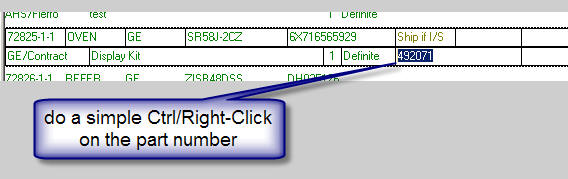
That's all it takes, and --
inside of a second -- you'll see the magical result!
This is an image capture -- from an actual, single-click display result
(assuming particular vendors, as shown, where setup as those preferred, and with
a particular servicer account number for each vendor, etc.). Actual
pricing is blurred, because the actual page (as used for this image) showed
pricing as specific to a particular servicer's account.
Please notice, among other things, only Automatic Appliance
has this part in stock -- a fact MyPartsHelp reveals inside of a second --
instead of forcing you to spend who-knows-how-much time making who-knows-how-many-telephone calls
otherwise seeking to find it. Please notice, further, there's a
"Nationwide Search" button in the top-right corner; if the initial display had
not shown any vendor stocking it, the Nationwide Search would stand a good
chance, still, of doing so. Finally, please notice it's only for your
preferred-setup vendors that the system displays cost; MyPartsHelp is intended as a
lookup tool only -- not as a price-shopping tool.
Assuming you're an appliance servicer, please, do not fail to
do this. I feel certain you will
love the service. It's going to be
great for your business.
4.4.32 (10/2/09):
New
Sharing of Merchant Credentials for
Virtual Terminal:
Hopefully, you are using the Virtual Terminal
feature (internal credit card processing) that was added (both in ServiceDesk
itself and SD-Mobile) many months back. If not, be assured that you
should be using it. It will save you money, directly, via reduced
merchant fees. It will save you, indirectly via reduced time in conducting
transactions, and because of increased accuracy resulting from its direct
integration with other processes. It will also make it just a lot more
fun, convenient and easy to conduct credit card transactions.
As one element in that system's design, we made it so each
station in ServiceDesk could be configured with a different set of merchant
credentials. This was, in particular, to accomodate the situation where
you may want to use a different merchant account at different SD stations.
However, that's certainly not the typical case. For most users, it's nice
to have the same credentials setup at every station, and a nuisance to have to
individually enter at each
With this release, that nuisance is
eliminated. When the user at one station saves credentials, the system
offers to make the same credentials available to other stations. From the
point forward, if at another station you even click in a box to begin entering
credentials, the system will offer to insert the other-saved credentials for
you. By this means, we preserve the potential to have unique credentials
at particular staions, if wanted, while simultaneously making it much easier to
enter the same set at each station, if that is preferred.
4.4.30 (9/24/09):
New MyCriteria
Feature allows you to create your own Add-On-Info Template for Callsheets and
JobRecords:
A few releases back (with Ver.
4.4.24) we announced improved formatting in the general Callsheet/JobRecord
interface. Among other things, a new button was added:
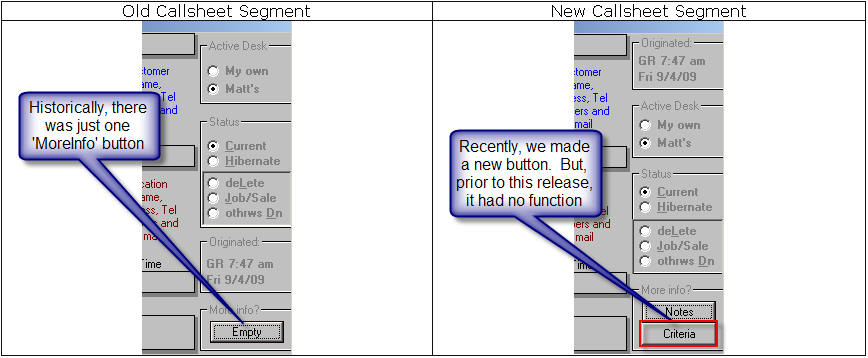
We explained that, though this
new button did not yet have a function -- in fact, the whole design improvement
had been undertaken for the very purpose of accommodating it (or, more
accurately, the function it would ultimately fulfill). We promised to
create that new function soon (i.e., to give the new button its purpose).
That promise is fulfilled with
this release.
Rather than taking space, here,
to describe details, we'll instead link you to a
new little Handbook that
describes both purpose and implementation. The purpose is described on its
first page. If it's not a purpose you want to pursue, that's all you'll
need to read.
4.4.28 (9/14/09):
MAJOR DRUM ROLL PLEASE . . .
Single-Click Service Entitlement and
Product History Inquiries via ServiceBench:
For the last three months, or
so, there's been a new (but inoperative) button in
the UnitInfo (Shift-F12) form. It's been there, with ready-to-go
machinery that's designed to let you request -- with a single click -- service
entitlement and product history from ServiceBench -- specifically, as connected
to any products fitting under the Whirlpool umbrella (e.g., Whirlpool,
KitchenAid, Maytag, etc.). We've been waiting, essentially, for the
"switch" to be turned on at ServiceBench.
The great news: as of the
Tuesday morning, 9/15/09, that switch is turned on!
Now, in the ServiceDesk UnitInfo
form, that new button is NOT inoperative any more:
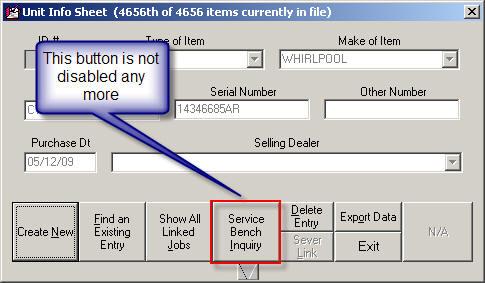
Try it. So long as you
have a valid Whirlpool account as registered with ServiceBench (and assuming you
click on this new button when an appropriate Whirlpool-family product is
displayed), you'll quickly get a response from ServiceBench, giving you
beautiful information. The UnitInfo form expands vertically to display it
for you, as follows:
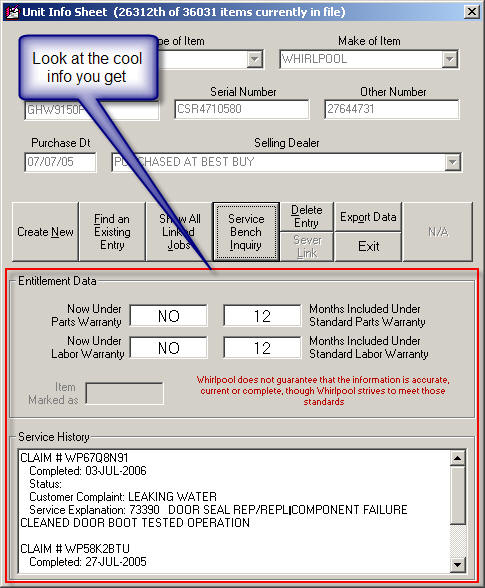
Is this hot, or what?
For those of you who are in fact
Whirlpool servicers, may I suggest giving great thanks to your Whirlpool rep for
the fact Whirlpool worked behind the scenes, with ServiceBench, to make this
great capability available.
Further improvements in
Archived-PartsProcess, including a New PO-Number Search:
In conjunction with the last set
of improvements (see prior entry, first-item below), we'd intended to add a new
search option to the Ctrl-F8 archived-PartsProcess environment: a search on your
own purchase order number. Sadly, we discovered this particular element of
data was not being saved in the archive -- a matter that had to be addressed
before a meaningful search could be created. That is done with this
release -- meaning that new search is now also available:
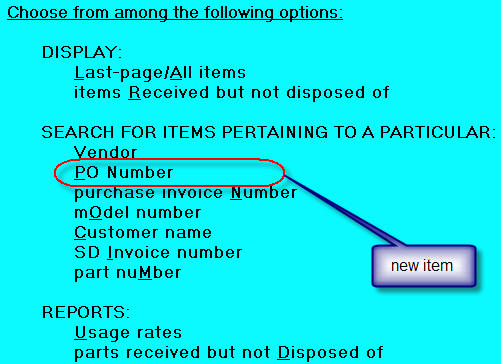
While we were at it, we improved
editing in this context a bit more. In particular, when you click on an
item to edit (and then the edit boxes display), the boxes that are not going to
permit an edit will show in grey rather than white, providing an on-its-face
indication of non-editability.
As with the last entry, please
note there is also a
caveat here. The searches on your own purchase order numbers will only
work for items archived after this update.
4.4.27 (9/13/09):
Improved Editing in
Archived-PartsProcess Records:
By their nature, archived
records are usually at least somewhat resistant to editing. This is
because we deliberately pack the data tight, to minimize resource usage.
Even so, it's been our practice to expand editing opportunities when users
express a demand for it. In this regard, editing is now more available --
as compared to before -- in the Ctrl-F8 archived-PartsProcess context.
Regardless of how many characters were there when archived, you'll always have
at least 50 characters of space available in the Notes section, at least 16 in
the PartNumber section, and at least 16 in the PurchaseInvoiceNumber section.
Additionally, any of the date and/or numeric fields will be fully editable (at
least, assuming you're appropriately using a numeric or date value).
Please note there is one small
caveat. The extra space for editing will apply only to items as archived
after you've made this update. In other words, older-archived items
are still packed as tightly as before, and will not offer the extra edit space.
4.4.25 (9/10/09):
Small change in
DispatchMap's DispatchOptions menu:
There's long been an option in
the DispatchMap's DispatchOptions menu that produces, for applicable
jobs, essentially the same output as offered directly via a JobRecord's
PrintOptions menu -- and (for the latter) under the title "Job Description/Report."
However, labeling for that option in the DispatchMap was not remotely similar.
We realized it would aid clarity if it was. So, it's been changed in the
DispatchMap's DispatchOptions as follows:
| Old item
description |
New item
description |
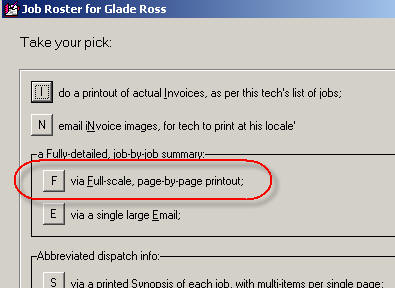 |
 |
As you'll note, the quick-key
letter for this option has been changed from "F" to "J" (please pay attention if
you've been using "F"). Also, the option has increased power.
It used to be, when you picked the option and the SelectPrinter dialog box came
up, there was no option (i.e., from within that box) to choose email. Now
there is.
4.4.24 (9/8/09):
New "Parts-Window" Mode:
Since (basically) forever, ServiceDesk has had a
"Tech-Window" mode. It's a mode into which you can put ServiceDesk that's
designed to limit its interface only to those locales that you're likely to want
a technician to access (PostVisitReports, JobHistory searches, etc.). You
can place it in this mode by hitting Alt-W on your keyboard (think "W"
for Window), or, from the Settings form, you can even specify that a
particular station will automatically go into such a mode immediately upon
startup:
Recently, we've had some users that wanted to limit the
SD interface, at certain stations, to just those ServiceDesk interfaces that relate
to parts management. So, we've created a new special-Window mode for that
purpose (it's called, aptly enough, "Parts-Window" mode).
As you can see below, we've now modified the Settings
form so that you can (if desired) make a choice between having a station
auto-start itself in Tech-Window mode or Parts-Window mode, if either
happens to fit your need.
Likewise, you'll notice that now if you hit Alt-W on
your keyboard, you'll get a choice as to the type of restricted mode you wish to
enter.
Just like in the Tech-Window mode, the new Parts-Window
mode requires use of a password if the user wishes to exit back into the full
ServiceDesk interface.
Substantially Upgraded Interface for Callsheets
and JobRecords, Combined with New Button for Expanded Future Capability:
Over the years I've received a number of requests for
the ability to attach various kinds of added information to Callsheets (of
course with expected carry-through, of such info, to the JobRecords that result
from them). There have been so many different requests -- for so many
different kinds of added information -- that, to individually accommodate all
that's been asked for, we could potentially have a Callsheet (and associated
JobRecord) design that is three times as large and with ten times as many boxes
in it. Since that, of course, is not practical, I have sought another
solution. I've decided the general strategy will be to allow customization
of input (i.e., you design the added info you want) as triggered by a single new
button on these forms.
First step in going down this path was to assure I could
artfully accommodate that new button (these forms are already pretty crowded,
after all). I began experimenting, and one thing led to another. Via
a little re-arranging, I accommodated the new button nicely, and (I believe)
improved organization overall.
|
Old Callsheet Segment |
New Callsheet Segment |
|

|
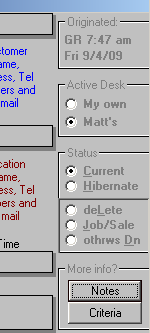
|
As you'll note, the new button (bottom-right) is labeled
"Criteria." It is not yet functional. That's another step down the
road.
Also, the old MoreInfo button, instead of being labeled
"Empty" when no contents are present (and "Yes" when there are some), is instead
merely labeled "Notes" (just as before, however, it will turn a "warm pink" when
contents are present).
Aside from the new button, notice that origin
information is now at the top, which is a bit more logical than having it near
the bottom.
JobRecords are changed somewhat similarly.
|
Old JobRecord Segment |
New JobRecord Segment |
|
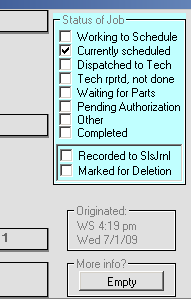
|
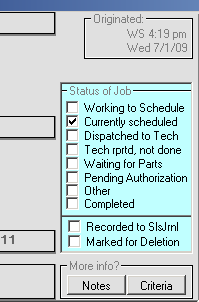
|
While I was in the process of doctoring these aesthetics
and organization, it occurred to me I might improve the visual cues as involved
in a page of Callsheets that involves one or more Callsheets not-yet-used, one
that is not-yet-used but has the Windows focus (and therefore is primed for
use), and perhaps one or more that are used. By "visual cues," I
mean making more intuitively obvious the distinction between these varying
Callsheet states. You'll see the result after updating, and I'll not
comment further here.
New export provided in ExportCustomerData
form, new Handbook about exports, etc:
Over the years I've been very amenable to creating new
exports for particular items of data, whenever something new was wanted.
In result, ServiceDesk offers a ton of exports, with interfaces (to access them)
spread contextually over a multitude of areas. There are so many that even
I can lose track, particularly in regard to knowing what are the detailed fields
that each export offers.
Recently we had a request from Whirlpool-NarSouth (it's
Whirlpool's Latin America division) for several added fields as connected with
an export they've been using. They did not identify the particular export,
and the only other basis I had to determine which was by running a bunch of
exports to see which matched, or by looking laboriously in my program code.
Neither was an attractive solution, so I decided better clarity into the exports
picture was needed.
To that end, I've created another little "Handbook."
If you've not noticed, I've grown rather fond of these in the last couple of
years. They're simple little documents that describe a particular area of
interest, and can be contextually opened from places within Rossware programs,
as needed.
This handbook is called, simply,
Exports as
Provided in ServiceDesk. As you can see, a simple click (on the link
here) will open it for you.
Once having that little handbook assembled, I could
easily see that the export in present use by Whirlpool-NarSouth was the
ScheduledJobsReport-Type1, as accessed via the ExportCustomerData form
(Alt-F3). Given that that export was working well for those employing it,
I decided to leave it alone, and create a new export called
ScheduledJobsReport-Type3. If you check the handbook, you'll see this
new export has "really a lot" of fields -- so many it can be employed for all
kinds of fun analysis, if you're so inclined.
While I was at it, I made several other improvements in
the ExportCustomerData form, including substitution of the former 'Exit'
button (who needs that?), with a button to load that new little handbook:
| Segment from right-side old form |
Segment from right-side new form |
|
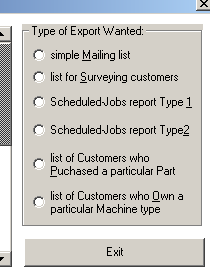
|
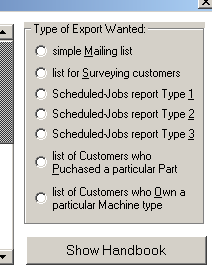
|
If you run the new export right with this release,
you'll find that three of the new fields are not yet functional. That
should be addressed soon.
New integration with DealerInventory via
as-you-type dropdown in POS context:
This is for those servicers who are also dealers, and
using our SD-Dealer serialized inventory control program. Until
now, when you were selling dealer items and using the ServiceDesk POS to do it,
the method for inserting items to the POS form (e.g., I'm selling a
refrigerator) was to select the items (as being sold) via the SD-Dealer
interface, then in the ServiceDesk POS do a keyboard Alt-D function
(think 'D' as in Dealer). This would insert, to be sold, each of
the items you'd selected.
That old method still works, but there's a new one now.
When, in the POS interface, you click into any box in
the part-number/model-number column, and when the little 'Integrate input
from' box comes up, go ahead and select "Serialized Inventory."
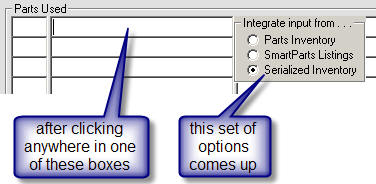
Next, just begin typing any model number (as exists
within your inventory) into the part-number/model-number column. You'll
see a dropdown, as illustrated here.
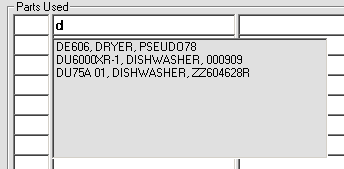
Select from the dropdown just as you would if picking a
part from the internal parts inventory or SmartParts dropdowns. You'll get
an insertion, just as nice.

4.4.23 (9/3/09):
New Search Functions in archived-PartsProcess form:
Prior to this release, the menu options in the archived
PartsProcess form (Ctrl-F8) looked like this:
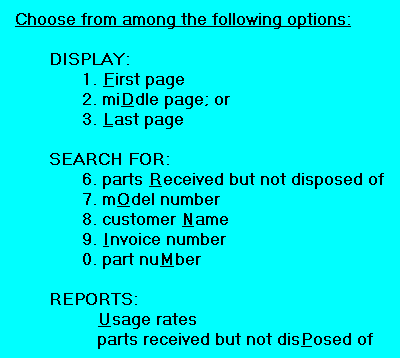
We had requests for a couple of new search capabilities
-- specifically, to search via Vendor-Invoice-Number and Vendor-Name. To
accommodate this, we re-arranged the menu, as follows:
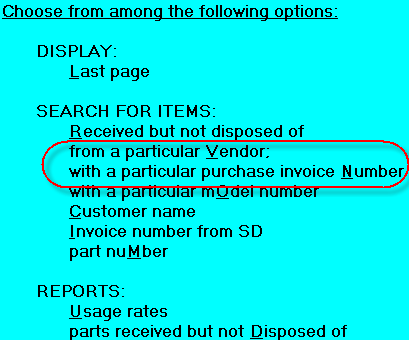
As you can see, the new search methods have been added
near the middle. There has been a little other re-arranging as well,
and some of the QuickKeys have been changed to accommodate the new lineup (for
example, a Customer-Name search is now "C" rather than "N"). Please pay
attention if you're accustomed to using the QuickKeys on any item now changed
(we know, you'll have to do some adjusting, but sometimes that's the price of
progress).
Of particular note is the fact old items 1 and 2 are now
gone (for specific-page choices, only "Last page" remains). We figured
those were little (if at all) used options, and the first page can still be
quickly accessed simply by picking "Last page," then using the Windows universal
First-Page command (Ctrl-Home).
4.4.22 (9/1/09):
New Fields in DispatchMap's ScheduleList Export
Functions:
For some time there have been exports available from the
DispatchMap for basic schedule information. Just display the map for any
not-in-the-past day of interest, then hit Alt-P on your keyboard.
In response, you get this set of options:
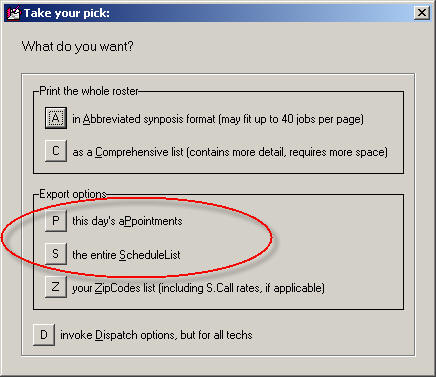
The two as circled are self-explanatory, and have been
used by some servicers to create a list which then feeds into an auto-dialer
program to automatically telephone customers with an electronic voice (sometimes
called "robo-calling") to remind them about the next day's appointments.
One difficulty for such users has been that ServiceDesk format for indicating an
appointment (e.g., "31 MON 2-5") is not easily translated, to voice, by robo-calling
programs.
To be candid, we've felt slightly reluctant to help with
this -- based on conviction that our CyberOffice method of reminding is
infinitely more modern and efficient.
However (and following Burger King's "Have it your way"
motto) we believe in accommodating whatever methods of operation our clients
choose (at least mostly). For that reason, we've added three new fields to
the above-exports, as illustrated here:
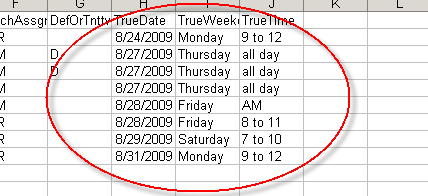
To again emphasize, we think you'll be much better off
using CyberOffice to confirm your appointments, but if you insist on using a
robo-caller, these new fields should help.
New "Print-Job-Label/Sticker" Function:
A new user (thank you Jeff, at Intrepid) asked for a
function that would print a Dymo-type label for attaching to merchandise that's
in the shop for repair. It seemed logical to add this to the set of
options as offered via the 'Print Options' button in the (F7) current JobRecords
form. In fact, we needed to do an overhaul in that option set regardless.
The reason is, among the existing "print" options, there
was one to print a Job-Description/Report, and another to email
the same. Though differing only in respect to where the text went (i.e.,
printer vs. email), the two options were (illogically) not even next-to one
another in the list of choices. On top of that, there was no longer a
logical need to have the emailing option as a separate item. This is
because, since it was placed there, we'd developed a more uniform method of
offering to email an otherwise printable item, as opposed to sending it to the
printer. This new method is via the PrinterSelect form itself (see entry
accompanying release 4.3.97 for info on how and when this form was enhanced to
allow such flexibility).
Give the above, we've now changed the old set of
options, which looked this:
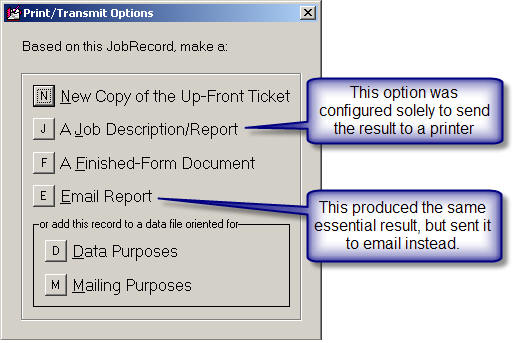
to a somewhat different set, looking now like this:
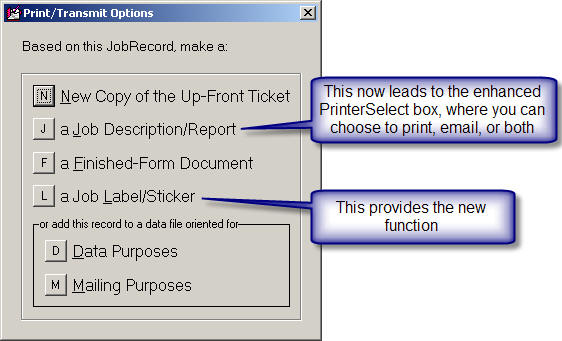
As you can see, the email option slot is replaced with
the option for the new feature (which, really, is what this Diary entry
primarily announces). Now, if you wish to email a Job-Description/Report,
you'll pick the general Job-Description/Report option, then, in the resulting
PrinterSelect box, just indicate that emailing is the method you want to use.
Now, about the new Print-Job-Label/Sticker feature:
It's configured solely for the Dymo 30252 label, as
printed from a Dymo printer. That's all you have to know. Aside from
that, just use it.
New "ScheduleList-Archive" Export:
There's an interface few people ever use. It's
called the ScheduleList-Archive form. It is available under the 'Dispatch
Operations' heading on the MainMenu (i.e., no quickkey). In the very
early days of ServiceDesk this form had significant use, but other and better
functions have relegated it to near uselessness. Nevertheless, we recently
had an odd need to see, in table format, contents of the ScheduleList-Archive
file (this is where your DispatchMap looks when displaying appointments for past
days). Until now, this vestigial form only allowed the ability to
search within that old data. For our own needs, we added a full-export
function. It's now available from within that form, should any have any
need to use it.
4.4.21 (8/3/09):
New "Route Performance Summary":
We've had a few people who wanted a separate export, for
use outside of ServiceDesk, where they could quickly review what happened, for
each tech, in regard to each of the jobs assigned to him on a prior day.
That export is now available. To reach it, simply go to your DispatchMap
(F5), and "PageUp" to the past day of interest (typically, it's likely to be
just yesterday). With the day-of-interest displayed, hit Alt-P on your
keyboard. That will expose a PrintOptions dialog box, now altered as
follows:
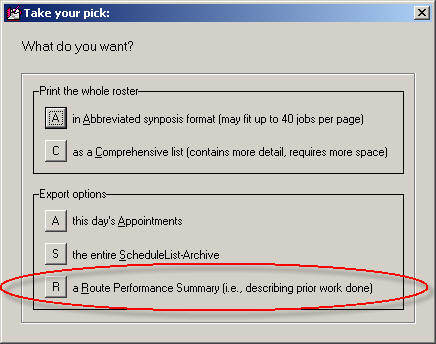
The circled item is the new option. Just pick it,
and follow the dialog to create your new export. You'll see the resulting
file has fields for applicable Date, InvoiceNumber, Customer Name, Tech, Start
Time, End Time, Money Collected, Whether the job was completed, and the
Descriptive narrative as pertaining to his PostVisitReport.
Email Method Now Direct-Offered for
Particular-UIS-Item Product History:
Long ago we added a method in the UIS form
(Shift-F12) where you can easily printout a complete history of service
involving a particular machine -- even if the machine happened to have been
serviced for a succession of different owners and/or at a succession of
different addresses. It's a very nice looking (and informative) printout.
To get to it, just find and display the particular UnitInfoSheet that's
applicable to the machine in question then click on its 'Show All Linked Jobs'
button [1]. This displays a little listing of Invoice Numbers referencing
each applicable job [2]. You've always been able to click on any such
reference to see the job, or to click on the 'Print Summary' button at
bottom of the list [3] to create the above-described printout.
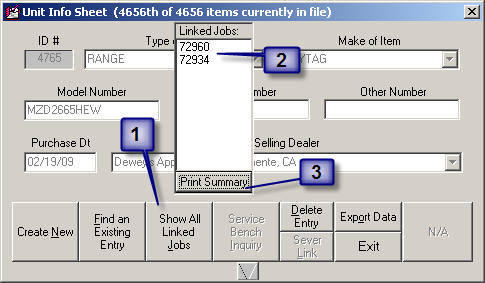
Now, when you do the above and the Printer Selection
dialog box comes up, it has a new section that can be checked -- for the sake of
directing the output to email instead of (or in addition to) a printer.

Make your choice just the same as you do in any other
ServiceDesk context that offers this kind of option.
4.4.20 (7/27/09):
Other-Than-Mfr-Claims-Filing Fixed for
KPI/ServicePower:
General Electric has long had a "contract service"
program via which they dispatch for service repairs on non-GE products.
Many ServiceDesk users are involved in such work, but we only recently became
aware there is a problem when auto-filing claims for that situation. The
FinishedForms auto-claim-formatting system was designed to list, as
"manufacturer," whatever is applicable to the brand of machine being
worked on. For OEM warranty work, that strategy is perfectly successful.
However, when in a situation like that involving GE contract service (and
assuming the underlying machine is not a GE product), it fails. This is
because KPI/ServicePower uses the "manufacturer" field to determine which of
their clients is ultimately paying.
So (and in short), under our longstanding strategy, if
you worked on, say, an LG product under a GE service contract, KPI/ServicePower
would end up interpreting your claim as being one for reimbursement from LG.
Since LG is not a KPI/ServicePower client, you can't imagine (or perhaps you
can) just how fast this resulted in rejection of your claim.
To fix the above, ServiceDesk will now look at the
CustomerName (i.e., top box in the underlying JobRecord) to see if it is
rendered as "GE," or if it contains the strings "G.E." or "GENERAL ELECTRIC."
If it finds any of the above, it will configure your claim to list General
Electric as the "manufacturer," even if the underlying "brand" is LG, Whirlpool,
Maytag, or whatever (and don't worry, for there is a separate "brand" field in
which the actual brand will still be listed).
As it happens, a very similar situation exists with
respect to ServiceNet. This is another KPI/ServicePower client, and
as we understand it is the entity that took over Maytag service contracts after
Whirlpool bought the remainder of that institution. Just as with the GE
contract service situation, for a successful claim, ServiceNet must be listed
(in the underlying claim string that ServiceDesk assembles) as the
"manufacturer," in spite of the product's actual brand. To accomplish
this, please be certain that the underlying CustomerName (in any applicable
JobRecord) is -- simply -- "SERVICENET."
Added a 'MAKE' Field to Parts Usage Rates
Report:
By special request, the Parts Usage Rates Report
(menu option from Ctrl-F8 form) has a new field: Make. You can also sort
on this new field.
4.4.19 (7/12/09):
Sell-For Pricing No Longer Required in
PartsProcess:
For several years, we've gotten phone calls with people
wondering why PartsProcess items (F8 form) -- where they've ordered the part,
checked it in, and used it -- do not get moved to the archive. Over and
over, the answer has been because they were failing to put in the 'Sell-For'
price, and the system was waiting for this little duty to be performed.
With this release, you can now choose whether the system waits, or not. In
fact, from this point forward the system will default to not wait.
In other words, the new, unless-you-change-it-otherwise protocol is that the
system will not require sell-for pricing, and will go ahead and archive when
everything else is done, even if that element is not.
If you have any desire to change this new default, it's easy.
Just bring up the PartsProcess form's "CheatSheet" (right-click anywhere in the
colorful label area on top), and click on the new provided menu option:
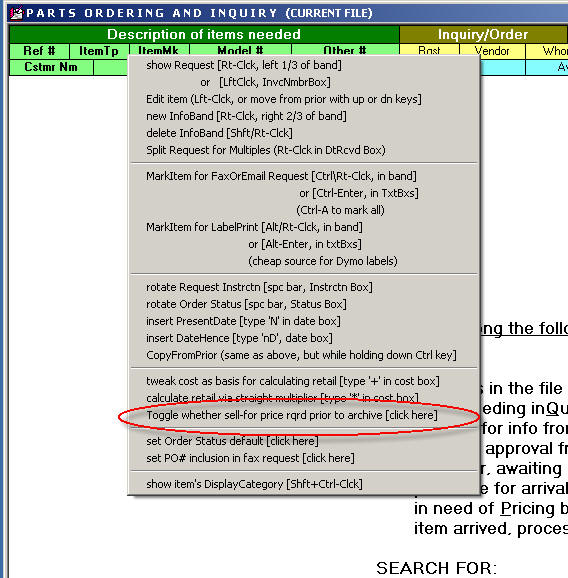
In response, the system will present a dialog where
you're permitted to choose whether 'Sell-For' pricing is required, or not.
4.4.16 (6/15/09):
Moderate New Convenience in Archived JobRecord's
History Section:
Someone pointed that, if you're looking at an
archived-JobRecord that includes several (or a single large) AttnNote, such
notes will typically cover significant portions of the narrative history, making
the latter difficult to read (until and unless such notes are slid out of the
way, which may leave them in a position different than where you ultimately want
them, unless they are slid back). Now, to bring the historical narrative
to the front, simply click down on it with your mouse, and hold. It will
remain at the front (i.e., AttnNotes hidden behind) until you release your mouse
button.
'Notes' Box in MasterPartsPlan's Supplemental-Info
box Now Hyperlink Enabled:
The title says it all -- at least in regard to this
enhancement. I'll take this occasion, though, to remind that for any
textbox that you wish to have hyperlink-enabled, it's pretty simple underlying
programming to for me to make it happen. Just ask.
4.4.15 (6/1/09):
New "CheckOff Status" for Appointments in
DispatchMap:
The DispatchMap has long used a series of symbols,
displayed next to each appointment's reference, to indicate the status the
appointment is in (i.e., whether confirmation has been requested from the
customer, whether confirmation has been received, whether dispatched to the
tech, whether the tech has arrived, finished, and/or completed his PVR, etc.).
If you did not know, from your DispatchMap you can display a Map Legend (or Key)
to show and explain each of these symbols. From the DispatchMap, simply
strike 'K' on your keyboard (for Map Legend/Key), and you'll see the
following:
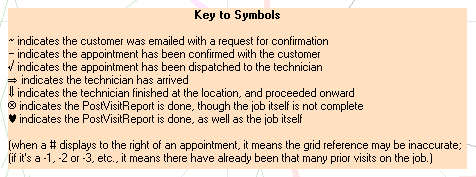
At least, that's what you would have seen prior
to this release. If you try it with this update (or later), however, your
Key to Symbols will look like this:
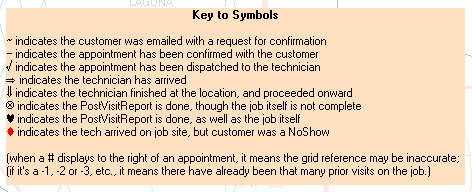
As you can see, there's a new symbol. It's a red
diamond, and is used to indicate the technician encountered a customer-NoShow
when arriving for the job. The thinking is, if your dispatch manager is
appropriately keeping tabs on the progression of jobs throughout each day (via
the DispatchMap), the red diamond will allow her to easily see when and where a
tech has been "stood up," and realize in such instances the tech may very likely
have capacity for added jobs.
Please note the above symbols are specifically what's
used next to each appointment's list-based reference in the DispatchMap.
In addition to such variations in the listings, there are also variations in how
the small-rectangular geographic references are displayed -- depending on
CheckOff status (e.g., when a tech is at a jobsite its geographic reference
shows with a yellow background; if he's completed the visit but has not done a
PVR it shows with a large X through it., etc.). To designate this new "NoShow"
status, the geographic reference will display with a single slash through it (as
seen toward the top-right corner of the following illustration):
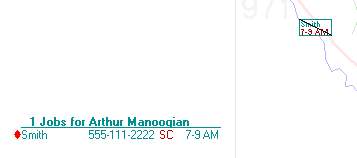
As a final note of explanation, please be sure to
realize that, as a general rule, these CheckOff statuses are managed for you, as
you simply do appropriate underlying actions in ServiceDesk (i.e., with
each action, SD appropriately changes the CheckOff status for you). For
example, if you do a PostVisitReport and appropriately therein indicate the
customer was a NoShow, the appointment's status will automatically be so marked
within the DispatchMap. However (and as a potential exception from this),
if you ever need to manually change an appointment's CheckOff status,
that ability is also there. The DispatchMap's 'Cheat-Sheet' (available by
right-clicking in any empty space therein) has full details per subsection below
circled:

Just look for the handy reminder-of-method there, if you
ever need to do a manual CheckOff status change. Otherwise, don't worry
about it.
Improvements in the UnitInfoSheet Form:
I've long been slightly embarrassed by the UIS form.
In its initial design, I followed the more typical database-interface
conventions (instead of going more my own way as in every other SD context).
Thus (and for example), if you wanted to edit an existing record in that form,
you had to first click on an 'Edit' button. And there was an explicit
'Save' button for saving edits. Pretty much everywhere else in SD, you
just make the change you want. It's bothered me that the UIS form has
these extra encumbrances, and I've long been anxious to bring it up to the
prevailing SD standard. That is done with this release. Gone are the
'Edit' and 'Save' buttons. Now, to make a change, just do it. And
don't worry about saving. It's automatic.
New Option to Alphabetize Sequence of Printed
Statements:
When printing statements in ServiceDesk via the
A/R-Dunning form (Ctrl-F3), the printed output has always been in the same
sequence that line-items are displayed in, which is oldest A/Rs to newest.
We had a request to make the statements print, instead, in alphabetical sequence
(i.e., sorted by customer name). When you go to print the statements,
there's now an option (in the Printer-Selection dialog box) to choose that
result:
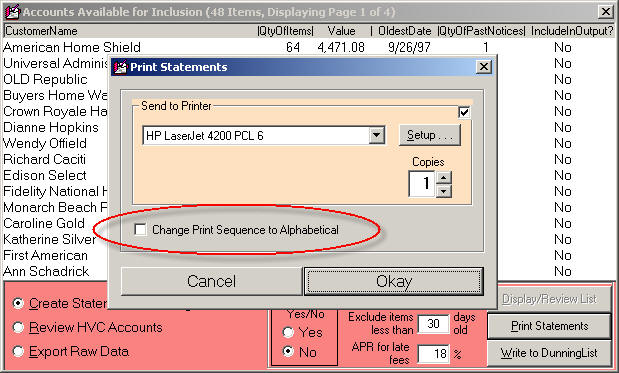
4.4.14 (5/10/09):
New "Parts-CrossOver" Form:
As all users know, unlike in any other service
management system, ServiceDesk treats special-order parts as animals belonging
on a totally different planet than do stocking parts (aka "Inventory"). We
have entirely separate sets of machinery for managing these disparate animals --
so separate that (and to borrow a phrase) "never the twain shall meet" (at
least, that's been almost true, though small connections have indeed been added over
time).
Well, guess what?
You figured it out, didn't you.
Yes, we now have a very explicit (and strong) connection
between those two worlds (Shift-F8 is the quick-key command).
It happens in a new form called (appropriately) the
Parts-CrossOver form.
At this point it has one major function. It is to
address the situation faced by offices that carry inventory items, within the
storeroom/warehouse, that are not stocked on the technicians' trucks.
Until now, though there were mechanisms for dealing with this, they were less
than smoothly streamlined.
Now the basic plan, when your office has a significant
quantity of what we might call "extra stock," is to let your techs go ahead and
"special order" items they do not carry on their trucks, even if such items are
included within the office's "extra stock." Then, your office person will
use the Part-CrossOver form to display such items. Essentially (and under
its first-offered display category) this form's underlying machinery will go
through all special-order requests. For each that are in
needing-inquiry status, it will look to see if there is "extra stock" in the
office storeroom/warehouse to satisfy the request, and for each such item
display to the user. The user can then select items of interest, and
employ mechanisms to generate a "Pull Items from Warehouse" request or a
"Tech Acknowledge Receipt" form. He/she can further use mechanisms
to check-off selected items as having been "Requested from the Warehouse," as
having been "Moved to the Tech's Waiting Bin" or as having been "Moved to the
Tech's Possession."
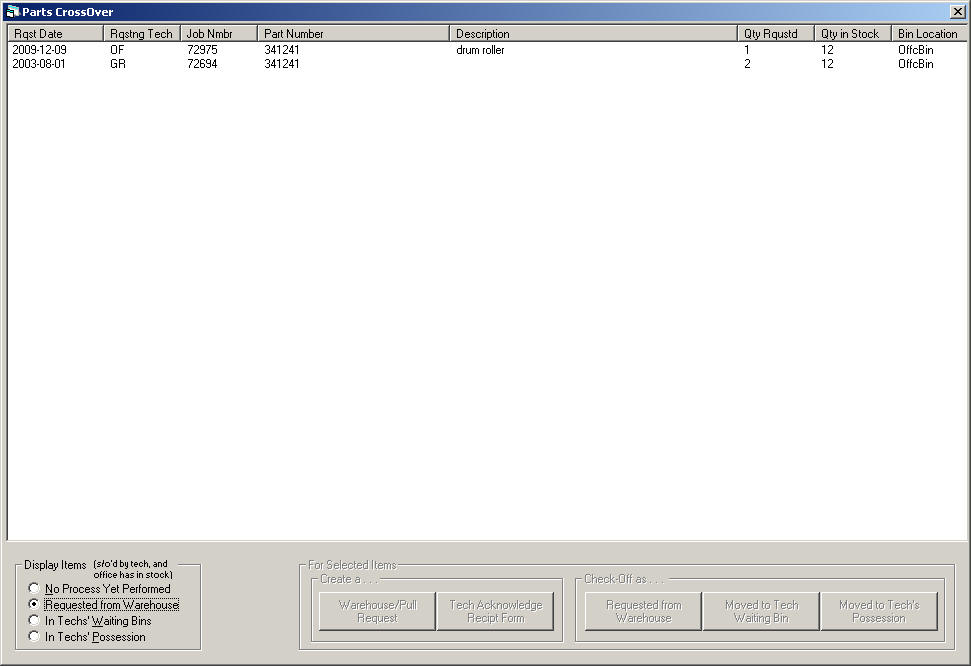
In other words, this form facilitates what is
essentially a process of special-ordering from within the office's own warehouse
(an internal special order, you might call it). With very simple clicks,
it does all the underlying entries within each applicable PartsProcess record --
and where appropriate also interacts with the inventory system, to document
items as used. It's a true integration between the two contexts.
We think usage of the form is mostly self-explanatory
(at least with foundation of the above explanation), but we'll plan to write
(and add) a mini-handbook regardless. In the meantime, please simply note
that -- to perform any action on a displayed line-item (or set of line-items),
you must first use standard Windows selection tools to select the
particular line item (or set of line items) that you wish to include in the
action. Then, simply click on a button to perform the action of choice.
Also please note the interface allows you to instantly
sort on any column by clicking on column header (or to reverse-sort by clicking
a second time).
4.4.13 (4/28/09):
If you're ordering a part and indicate a 'Request'
status of Tentative, the system will now offer to put the Job into 'Pending
Autho' status. If further provides the option to have this happen in all
such cases automatically (i.e., versus in the present instance). And, if
you don't want the option at all, you can choose the 'Don't show me this again'
option. Numerous other small fixes.
4.4.12 (4/20/09):
Miscellaneous fixes and improvements (both for this
release and preceding, which has no note). A somewhat notable improvement,
with this release, is that now if you're doing an update and inadvertently UnZip
to c:\sd (even though the correct path would have
been elsewhere) the system will detect your error, and help you fix it.
Another matter: you can now add notes to the archived PartsProcess records (but
only for items archived with this version and newer).
4.4.10 (4/5/09):
Major Overhaul in the 'Reports' (F11) Form:
(1) There is now a very nice document that
explains the general purpose and methodology behind each of the various reports,
as available from within the Reports form. There is also a new
button, within the form, that will open this document for you:
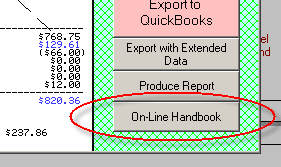
Just click on that new button, and the new on-line "Reports"
handbook will open for you.
(2) There is a very nice enhancement to the
Tech's Performance "Percent of Completion" Report. Besides the figures
previously provided, that report will now provide 'Total-Completes' for each
tech, 'Avg-Completes/Bus-Day', and "Avg-Days-Start-to-Finish'.
(3) Made significant improvements 'Export with
Extended Data' feature. Among other things, it will now better-treat
Paycode 4 and 5 inclusions.
Miscellaneous Fixes:
Found and fixed a fault in the "Tech's Time On Job"
report. This fault resulted in the fact that, for some situations,
applicable visits failed to show up in the report (this resulted in
under-counting; in some situations it was potentially severe).
Found and fixed a fault where, when a JobRecord is
archived, the system failed to copy to the archived version more than one
Hyperlink/StickyNote (i.e., any quantity greater than one was simply dropped).
Found and fixed a fault where, when doing a SalesSummary
as connected to a particular department, the Adjustments sections
included erroneous numbers that did actually pertain to the department in
question.
4.4.9 (3/27/09):
Added Option in the New 'Remove No-Longer Stocking
Items' Feature:
Two releases back we announced a new feature, in the
MasterPartsPlan, for auto-removing items that are no longer wanted in stock.
There were actually a couple of variations on the option (from which you'd
choose, as a user, when picking it), but almost immediately someone pointed out
we'd missed one of the most logical: to remove only items where both specified
minimums were zero and items remaining in stock were also zero. That
option is added with this release.
4.4.7 (3/4/09):
New "Reconcile Funds Received" Report in
the FundsControl form:
This was a bigger project than I'd hoped. The idea
is, you need a quick summary of all the items of money that supposedly came in,
during a given day, so you can make sure you actually have such items at the end
of the day. More concretely, you need a list of all the items of money
that a tech should have turned in, so you can make sure all such items were in
fact turned in.
It's not that we have not previously had very robust
mechanisms for assuring that all items of money do not eventually reach the
proper location, and, if not, that you're informed of it. We've had such
mechanisms since long before ServiceDesk was first marketed. But, we've
lacked anything designed with the specific immediacy of direct purpose as
described in the first paragraph.
But not anymore. In the FundsControl form
(Ctrl-F9), there is a new radio-button (in grouping or radio buttons in the
top-right corner) labeled "Reconcile Items Collected." Please
simply click on the button, and follow the prompts. This is a feature many
of you have asked for, and we think you'll enjoy it.
As an aside, you'll notice we've re-arranged the buttons
on this form, slightly, for improved simplicity and logic. Please notice,
in particular, the "Search/Find" function has been changed from a
radio-button (in the top-right corner) to a command button (in the bottom-right
corner).
4.4.6 (3/1/09):
Improved Features in MasterPartsPlan:
First, we've simplified the button set as offered in the
bottom-right corner of the Ctrl-F10 form. There were seven (so many as to
make confusion more likely). Now there are just four, including one
entitled 'House Keeping . . .' Four of the buttons that were
formerly on the face of the form will now appear as a subcategory -- when this
'House Keeping' button is selected. They are items that reasonably
fit under such a "catch-all" description.
A new operation was also added (it's the fifth item in
the new sub-category and is labeled 'Remove No-Longer Stocking Items'.
What it offers is sort of a cleanup process. If, for whatever reason, you
find yourself with a MasterPartsPlan that has a lot of entries for items you
really do not want to stock (and, for such reason, you've set the minimums at
zero), and now feel you'd like to remove those items from the listing -- but
there are so many it would be laborious to go through and do each individually
-- this new button offers a solution. It will run a process that does the
task for you. Plus (and optionally), if you still have any actual items in
inventory, it can create PartsHotList entries for them -- which can then serve
as a means of, hopefully, getting such items used in the future, even though
(and so far as official accounting is concerned) you've "removed" them from
inventory.
Another enhancement is a new sorting scheme. If
you pick the new 'House Keeping' button, then 'Set Sorting Scheme',
you'll see that among the schemes offered is a new fifth, which sorts (by order
of hierarchy) by Type, Make then PartNumber.
Last but not least (in fact, this is probably the
greatest enhancement as just made to this form), if you click on the
'Print Options' button you'll see there's a brand new offering there.
It is to print labels for your parts bins. The labels will be very much
like standard parts labels, but configured specifically to place on the
front of each bin where the corresponding parts will be located.
Improved Handling When a Job is Done Early:
Some of you guys sometimes fulfill an appointment on a
day prior to when it was scheduled for. When you go to do a
PostVisitReport on such an appointment (and you're doing it, still, on a date
prior to the date of the appointment), ServiceDesk gives you a bit of a hard
time (it's the Nobel-Prize/Time-Travel message). Still, understanding that
sometimes the job is indeed performed early, ServiceDesk permits you to go ahead
-- only there was a small, secondary problem. There was nothing built into
the system that would automatically change the appointment to the date it was
early-performed -- with result that it remained on the scheduled for the
originally-scheduled date, and showed still for that date when displayed to the
DispatchMap. This release addresses that.
4.4.5 (2/8/09):
Further Enhancement in Virtual Terminal:
With its original release, our new "Virtual Terminal"
facility was programmed to work with three different categories of swiping
devices (aka "magnetic card readers, or MCRs): standard USB, devices that
via USB but use keyboard emulation, and the Printek-brand printer/reader design that
connects via Bluetooth. For each different device, different programming
is required for Virtual Terminal to connect. Since that first release, we added the ability
for our Virtual Terminal to work with devices that use keyboard emulation but do
not broadcast a signature via which the underlying software can recognize their
presence.
With this release, we've now added the ability to work
with serial-port devices.
A little explanation in regard to this last. We
had thought our Virtual Terminal would already work with serial port
devices. This is because the Printek-brand Bluetooth devices connect
through a virtual serial port, and we figured since we'd programmed to
work with those, other serial port devices would work on the same basis.
We were wrong. Standard serial port devices require different programming,
which is now provided, with this release.
We are, by the way, developing quite a collection of
swiping devices here, since we must acquire one of each type in order to assure
successful programming with it.
New Method for Initiating a
SalesJournal Entry:
Originally, in ServiceDesk, there just one way to
initiate a SalesJournal entry: via direct action in the F9 form.
Eventually we added a mechanism that automatically creates a -Zero- SalesJournal
entry if you're canceling an appointment along with the underlying job.
Around the same time, we added a mechanism that links to the SalesJournal
entry from the FinishedForm context. The thing that's particularly nice
about this last method is that it auto-fills the SalesEntry line for you, based
on what's already in the FinishedForm (making it child's play to hit Enter and
complete your entry).
Earlier this week I was connected with a gentleman who,
while looking at an actual JobRecord in the F7 form, had the mistaken notion
that if he clicked (in the 'JobStatus' area) on the checkbox labeled "Rcrdd-to-SlsJrnl,"
that in itself would perform the underlying act (i.e., would actually record
to the SalesJournal rather than merely changing the check-off status
of the job). This gave me an idea.
I'd long thought it frustrating that, when you're
looking at a job in the F7 form and want to make a SalesJournal entry on it (and
do not want to do it via the FinishedForms context), you have to hit F9 (to load
the SalesEnter form), then manually type a technician abbreviation, customer
name and invoice number in the entry line, when the same already existed in the
context you were just at.
I might have created a special button in the F7 form to
deal with the above, but I think most long-time readers are well aware that I
try hard to avoid run-away button-itis (there is only so much room on a form for
so many buttons, after all). So, when this particular gentleman was
thinking that the status checkbox had a button-like operative effect, it
gave me the idea.
As of this release, when you click on the F7 form's 'Rcrdd-to-SlsJrnl'
status checkbox, you'll have an option as to whether you want to just manually
set the status as such (not a normal occurrence), or initiate an actual
SalesJournal entry. If you pick the latter, the F9 form will load for you
-- with the first three fields (applicable tech abbreviation, customer name and
invoice number) appropriately pre-filled.
Jurisdiction-Specific Tax Rates !!!!!!!!!!!!!:
Though incredibly strong in many areas, ServiceDesk has
simultaneously had a few longstanding weaknesses. One by one, we've slowly
addressed these. This announcement concerns a big one.
ServiceDesk was born in an office where all our work was
done within a single tax jurisdiction, involving a single rate setup for sales
tax. It was on that basis that the original sales-tax-handling system in
ServiceDesk was designed. Unfortunately, that didn't work too well for
companies that must report to different jurisdictions, involving different tax
rates. My early solution (which was still current until this release), was
to allow you to tell ServiceDesk, basically, to bow out of the tax-calculation
business (at least for other-than POS situations), leaving the matter of
calculations to be done by the user. It's worked all this time, and not
too terribly, but has been less than ideal.
Well, I finally addressed it. You can now create a
simple document that tells ServiceDesk what the applicable tax rates are for
each zipcode in your area. ServiceDesk will read the document, and know
just what to do.
For instructions on how to make this document (and a bit
about how it works), please go to your ServiceDesk Settings form, and
look for a new little button that's placed between the two boxes where you've
traditionally set your sale tax rates:
A click on that little question-mark button (that
particular one, not any other) will open a .pdf booklet that contains all the
details you'll need.
4.4.4 (1/25/09):
New Mode for Checking-Off Final Disposition of S/O
Part When in POS:
It was recently pointed out to us that, while we
thought we'd finally completed the "To-Grave" portion in our
"Cradle-To-Grave" system of managing special-order parts (see 8/31/08 entry), we
missed an element. Specifically, since that prior improvement, the
"To-Grave" portion has been good in respect to parts used on a job (i.e.,
in that context there are good mechanisms to "check-off" whether a special order
part was indeed used). However (a recent caller forced to realize), we'd
not similarly added mechanisms to "check-off" that a POS special-ordered part
was indeed (and ultimately) delivered to the customer. So, we've now added
such a mechanism.
It works is as follows:
When ServiceDesk loads data into any FinishedForm (POS
or otherwise), if it loads into a parts row a special-order part that has not
prior been checked off as having been delivered to the customer, it will append
the part number with two carets, as illustrated in the second row, below:

It will also insert a ToolTip to the box, so that if you
float your mouse-pointer over it you'll see the following:
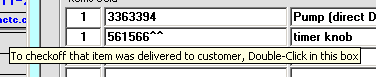
As per the ToolTip's instructions, all you need to do is
Double-Click in the box to check-off that the item was indeed provided to the
customer. When you do so (and confirm in a little dialog that you want to
proceed), the text will change as per the following:

Please note that the two carets are removed, and the
reference indicating final disposition is added after the part description.
That's it. It's all it takes, and you're done.
New Quick-Key for UIS-Creation Link from a Callsheet:
As any SD user likely knows, at Rossware we're big
advocates for the improved efficiency that results from keeping one's hands on
the keyboard, for actions that may, at the user's option, be done via done via
either keyboard or mouse. Because of this, we felt "caught with our pants
down" when it was recently pointed out (by a very keyboard-dedicated
user) that virtually any task in a Callsheet can be done via keyboard alone --
except linking to the UIS form for the sake of creating and connecting a
UIS-Sheet. There was no way to perform that function except by
right-clicking in the Item-Make box. So, we've added one.
The simple method is, if you've typed the first few
characters of a make -- to the point where you see the drop-down and the make
you actually want is auto-selected, instead of simply hitting Enter to insert
that make, modify your action by hitting Shift-Enter instead.
In response, ServiceDesk will go ahead and insert the full make in the box (as
per normal), but now it will also open the UIS form, ready and poised for
creation of a new Model/Serial set.
Don't worry about memorizing that action here.
It's been added to the Callsheet "Cheat-Sheet." Hopefully, you're aware
you can bring up that "Cheat-Sheet" by simply right-clicking in little
blue-label area, as shown here:
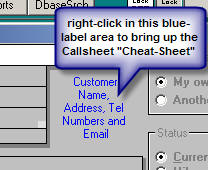
We've found many people are not aware of the above (and
long-standing) "Cheat-Sheet" feature, so thought we'd emphasize it here.
Improved "Synopsis of Jobs":
When you click on a tech's name at the top of this
list-of-jobs, in the DispatchMap, one of the resulting print options is as
follows:

This release offers significant improvements in
formatting of that synopsis, including the fact that note fields, as associated
with customer telephone numbers, are now included in the printout.
4.4.3 (1/19/09):
Enhanced Mode For Keyed-Entry in Virtual Terminal:
If you're using the new Virtual Terminal, from
within ServiceDesk, and doing a "keyed" (as opposed to "swiped") entry -- and
assuming there's an underlying JobRecord that's linked to your entry -- you'll
see three added (and little yellow) boxes appear, there, when you open the
keyed-entry window, as follows:
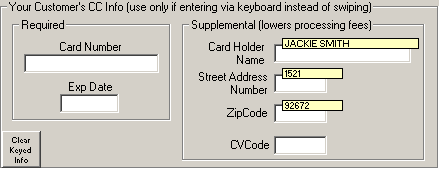
The simple idea is, those little yellow boxes are
populated, for you, with customer name, number-for-street-address, and zipcode
(as pulled from the underlying JobRecord). The system refrains from simply
inserting this text to applicable boxes -- based on the fact the underlying card
may have different credentials than involved in the JobRecord. So, the
little yellow boxes serve as a prompt for your operator to ask the customer, for
example, "Is the name on the card 'Jackie Smith.'" If the customer
answers yes, then your operator should simply click on the little yellow box,
at which point Virtual Terminal will insert that name to the operable box
(otherwise, your operator should simply type the correct name as per
normal). Same thing is true in regard to number-for-street-address and
zipcode boxes.
Quite simply, we're trying to make it as easy as
possible to insert the info, while nevertheless prompting the operator to verify
its accuracy for the particular card that's involved.
Enhancements for New On-The-Fly Entries to
MasterPartsPlan:
Two updates back, we announced that, if you're in the
InventoryControl form (F10) and using its facility to check-in a shipment of
stocking parts, and if you happen to attempt to check-in an item that's not yet
got an anchor in your MasterPartsPlan, you can now create that anchor listing
"on-the-fly." An early adopter then pointed out that, though the added
convenience in itself was great, it remained less than convenient to use the
MasterPartsPlan's auto-pricing feature (i.e., the one that inserts a "sell-for"
price on the basis of your underlying markup-from-cost formula) -- in part,
because cost info is not collected until slightly later in the "check-in" dialog
that's going on back in the F10 form. We've now done two things to rectify
that:
- If you have applicable SmartParts data installed, and
if the part number that's involved is in that SmartParts data, the system will
automatically find the applicable entry and do appropriate insertions for you;
and
- Otherwise (and, also, regardless), you can now place
your cursor in the "sell-for/retail" box, and (with it there) hold down your
keyboard's Ctrl key. With it so held down, type your cost figure.
As you type, you'll see that the "sell-for/retail" box automatically fills
with an appropriate resulting retail. Please note this will work for
any context where you're adding a new listing in the MasterPartsPlan.
Please also note that a ToolTip will appear, describing how to do this, if you
simply float your mouse pointer over the textbox where you'd otherwise type
your retail price.
"Printer-Registration" Enhancements as Connected to
New Parts-Label Printing:
Again, two updates back, we announced improved printing
of parts labels. Quickly, we heard from one client that, when using the
option to print onto 8 1/2 by 11" sheets, the intended contents for each label
failed to properly line-up with the label's actual positions. Upon
investigation, we found the problem stemmed from: (1) the particular printer
driver, as used by this client, is simply off by a few fractions of an inch --
in regard to where it actually prints as compared to where it's told
to print; and (2) our new formatting attempts to print much closer to the label
margins, making for a situation where precision is more critical.
To address this dilemma, we've now added an option
whereby you can correct for your printer's inaccuracy, if any.
Specifically, when you're printing labels (in particular, to that 8 1/2 by 11"
sheet size) and the form comes up from which you pick the applicable printer,
you'll see there's a new button in the form.
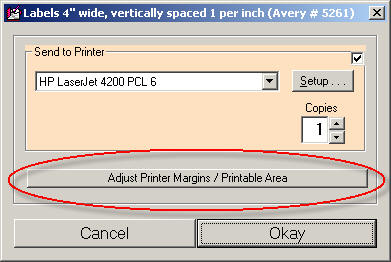
Just click on the new button, and it will take you to a
self-explanatory form where you can make the needed adjustments (please note
this a "local" setting, meaning other stations are not affected by what's done
at any particular station) At present, this option is offered only in
connection with printing labels to 8 1/2 by 11" sheets. If you think you
need it for other printing modes, please let us know.
HOPEFUL FIX -- NUMBER TWO -- FOR
NEWER ServiceBench CLAIMS TRANSMISSION FORMAT.
Three entries back, we announced that we thought
we'd accomplished a fix for the fact that the newer ServiceBench claims format
sometimes fails. Turned out our fix failed. However, with this
release we truly and strongly believe the issue is solved. Please let us
know if you encounter any evidence otherwise.
4.4.2 (1/8/09):
New Quick-Link to MasterPartsPlan Entry from
Inventory Control:
Recently, I was doing some work in the
InventoryControl form (F10). As I was looking at a line item or two, I
wanted to go the applicable anchor listing in MasterPartsPlan (I wanted
to change a minimum quantity). At such a point, I realized, this was not
as convenient as it should be (the requirement was to hit Ctrl-F10 to bring up
that form, then do a search function for the actual part number).
So, I fixed it.
Now, if you're in the F10 form, looking at any line item
and want to go instantly to the applicable MasterPartsPlan anchor listing, just
do a Ctrl-Click on the item. You'll likely find it's very
convenient.
4.4.1 (1/2/09):
Direct BarCode Printing for PartsLabels:
Since virtually the beginning, ServiceDesk has allowed
you to print parts labels that include barcodes. However, it did not do
the actual barcode printing itself. Instead, it allowed you to export the
parts label data, and merge it into a separate scheme that incorporated
barcodes. It worked, and was not difficult if you were somewhat
technically inclined, and maybe a tinkerer. However, for everyone else, it
was less than optimum.
With this release, ServiceDesk parts label printing is
truly optimized. Not only do the labels now include barcodes, but the
whole arrangement and formatting has been dramatically improved.
Here are two labels done in the old
format (one is for a stocking part, the other for a special order):

Here is the same pair, done in the new
format:

As you can see, the new arrangement is more artistic.
And, besides the addition of the barcode, the stocking parts label now
accommodates more alternate part numbers (up to six).
Two limitations: (1) You won't get the new format
without installing the needed barcode font (don't worry, ServiceDesk will prompt
you for this, and make the process easy); and (2) The new formatting is NOT
offered under any of the dot-matrix-printer/pin-fed-label options.
Among other factors, we don't believe dot matrix printers can print with the
needed clarity to make the barcodes work, or to make some of the smaller print,
as used in the upgraded formatting, legible.
On-The-Fly Additions to the MasterPartsPlan,
While Checking in Inventory.
Historically, new entries were added to the
MasterPartsPlan by going directly to that form (Ctrl-F10), and deliberately
using facilities there provided for the purpose. And, you had to first
have such an anchor listing, there, prior to doing anything (in the
inventory control system) having to do with such a part.
Two or three years ago, some folks asked us to make it
so, if you were using a part from stock that had not previously been
entered to the MasterPartsPlan, you could go ahead and indicate the use, and
make the anchor/MasterPartsPlan listing on the fly. We did that
(specifically, for when stock usage is indicated via a PostVisitReport Type-II).
Recently, other folks asked us to make it so you can,
somewhat similarly, make on-the-fly additions when checking in parts (i.e., when
receiving a shipment of inventory items). That is done with this release.
Quite simply, if you're using the InventoryControl (F10) form's function to
Receive Items into Inventory, and if you indicate a part number that's not
in the MasterPlan, the system will offer the opportunity to do an on-the-fly
addition.
New Link-To-Handbook in Virtual Terminal.
We are continuing to make improvement to our new Virtual
Terminal. The latest is its inclusion of a new button, on which you can
click to go directly to the underlying
Handbook.
BTW, initial reports from early adopters indicate that
not only are they finding our Virtual Terminal to be joyously convenient; they
are already saving big in terms of their net merchant-fee/processing costs.
The processor that we've teamed up with (Merchant Warehouse) is truly doing a
bang up job.
4.4.0 (12/15/08):
Upgrades on New Virtual CC Terminal.
No sooner did we release our new Virtual CC Terminal
(see two entries back) than certain folks suggested added operational contexts
in which, from within ServiceDesk, it should be available. This release
accommodates some of those, as follows:
(1) The system will now offer to run
the bankcard transaction, via Virtual Terminal, when: (a) you use the 'Receive
Payments on A/Rs' function in the F9 form; and (b) you've indicated that the
type of money received is, in fact, a bankcard.
(2) You can now bring up the Virtual
Terminal, direct and outside of any integrated process, via Shift-F9
(it's in the menu under "Work-In-Progress" in case you forget).
You'll likely notice that with this release we changed
the center number in ServiceDesk's Version label (i.e., we've gone from
the 4.3.x series to 4.4.x). We generally change that number to designate
there's been a change in the structure of one or more underlying files. In
this case, we accommodated a need for change in the the Applications Journal,
and related EDA files. The system will automatically convert these files
on first use in the new version.
4.3.113 (12/10/08):
HOPEFUL FIX FOR
NEWER ServiceBench CLAIMS TRANSMISSION FORMAT.
Back in July, we released Ver. 4.3.89, programmed to
upload claims to ServiceBench in a new format that overcame the old 80-character
limit for description of work performed. That limitation had been
imposed by the old transmission format, as defined by ServiceBench; it was not
something we could get around until they provided a new format, that allotted
more space. They created the new one based on our request, and we quickly
changed our output to match it.
But there was a sad downside. It turned out that
on some uploaded claims, some of the text fields ended up getting
scrambled on ServiceBench's end. Evidently, there was some fault in their
server's parsing engine, as relating to this new format. Because of that,
we brought back the old format, as an option, for anyone experiencing such a
problem. In result, ServiceDesk has since offered you two direct
transmission options, for ServiceBench, as follows:
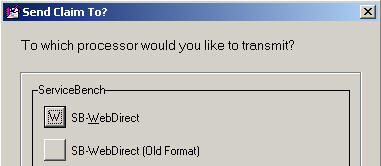
The first option sends to ServiceBench in the new format (escaping that nasty
old 80-character limit); the second in the reliable (but 80-character-limited)
old format.
Anyway, with the above explanation out of the way, I can
now further explain that, since July, we've been anxiously waiting for
ServiceBench to fix the intermittent problem, on their end, in terms of
reliably parsing claims in the new format. Just yesterday, we finally
learned the problem was evidently caused by return characters in some of the
text, as evidently inserted by users (that's you guys hitting 'Enter' on your
keyboard while in some string of text). Given this, we can actually solve
the problem on our end -- simply by programming ServiceDesk to look for any such
return characters, and remove them prior to transmission.
That is done in this release.
It means the new format (top option in the list of
options) should now work with reliable perfection.
My emphasis is on the word "should," because it's not
yet been proven. Assuming we hear, in the coming few weeks, that claims
are now going through reliably in the new format, we'll quietly remove the
old-format option.
4.3.112 (12/3/08):
VIRTUAL CC TERMINAL NOW INTEGRATED INTO SERVICEDESK,
SD-MOBILE, ETC.
It's been a few months since the last entry here that
was worthy of big drum rolls, but this one definitely measures up.
It measures up BIG.
You no longer need any separate software, or separate
physical "terminals," to run your credit card transactions. You can do it
all directly from within the actual operations you're performing anyway --
within ServiceDesk, SD-Mobile or SD-RevenueBuilder.
On top of that, we've made arrangements with a payment
gateway (a credit processing company) that will very likely reduce the merchant
fees you've been paying (at bare minimum, it will at least meet your current
rates).
If you're using SD-Mobile, it will allow your techs to
swipe cards directly (after investing in a less than $50 simple swipe device),
resulting in large added savings in your bottom-line merchant fees.
Best yet, there is no setup cost (from the payment
gateway or Rossware), no contract to bother with, and no added fees of any kind.
We've created a little
nine-page handbook that provides all the details and how-to. Please
just click on the link to open the handbook, and learn. We hope you'll be
enjoying this terrific power (and major cost savings) very soon. Today, if
not sooner.
4.3.111 (11/24/08):
You may note that no entry was made for Ver. 4.3.110.
It included only a series of minor tweaks and improvements: nothing to write
home about. The same goes for this release -- except, if you're interested
in using or enhancing the use of graphics within any of the FinishedForms,
there's a new mini-manual on the topic.
If interested, open the FinishedForm interface (Alt-F4),
and (prior to selecting any particular form), look at the set of buttons in the
lower-right corner. There's a new one labeled "How to employ Graphics."
Just click to open the document.
If you're curious, the reason for this lapse in
introduction of dramatic new stuff to ServiceDesk is because I've been working
on a terrific new functionality, to be introduced shortly. It will be
added to both ServiceDesk and SD-Mobile, and will significantly enhance both.
I'm referring to built-in Credit Card Processing. You'll no longer have to
turn to a separate application -- and, more importantly, your field techs will
be able to swipe cards live, significantly reducing your bank processing fees.
Development is almost complete within SD-Mobile. Watch for it soon.
4.3.109 (11/2/08):
NEW "MARGIN ANALYSIS" REPORT:
There's a new
report now available in the F11 form. It's similar in format to the
longstanding QOS Report, and is accessed via nearly the sequence of menu
choices. But its purpose is to help you analyze what kind of margin (aka
direct operating profit) you're receiving from jobs as a whole, non-HVC jobs,
all HVC jobs combined, then from each HVC client in particular.
Since it has to
go through the system and find all parts as applicable to each job (in order
tally parts cost), the report runs pretty slow, depending on how much history
you've asked it to go through. But, so long as you allot it sufficient
time, you should find the results are highly rewarding.
SELECTION OF "DEPARTMENT" NOW AVAILABLE IN QOS
REPORT:
The heading says
it all.
AUTO-CLOSING OF PARTS REQUESTS:
We've heard from
numerous people that they're closing out jobs (owing to cancellation of the
underlying customer request) on which parts requests have been created (and are
in the PartsProcess system awaiting work). When the jobs are closed (and
without further processing of the underlying parts requests), the latter are
left hanging, and eventually clog the system.
To address the
above, the system now checks when a SalesJournal entry is made to see if any
items are pending, and, if so, offers to show the operator such items,
auto-close them if appropriate, etc.
Similarly, though
there was also a similar check connected with the offer to auto-zero-sale a job
when its appointment is canceled, that check did not offer to auto-close the
underlying parts requests (i.e., it just informed the user of their existence).
That procedure is now modified to do so.
4.3.108 (10/23/08):
POSSIBLE PERFORMANCE IMPROVEMENT:
From "day one"
when developing ServiceDesk, we've made it an extremely high priority to make
all actions as near instantaneous as possible. We are constantly looking
for ways to avoid any perceptible delay. Computers are the servants; they
should wait for you, and not vice versa.
Recently we
discovered that when the computer we use as a server is mapped to itself (and
it's the mapped drive letter that ServiceDesk uses for file access), there is a
very severe performance hit. It's bad, really bad. It seems odd,
because the mapped path should translate just the same (one would think) as a
direct path. But it doesn't. Windows is obviously doing something
odd (and unexpected) behind the scenes.
Given the above,
we got to wondering if there might be some performance hit, in general, when
accessing files via a mapped path as opposed to a direct one. We did some
testing with our networked computers here, trying various operations with the
server accessed via a mapped drive letter, then again via a directly
specified network path (an example of the distinction would be:
z:\ vs.
\\DellServer\c).
For some
operations at least, the directly-specified-network-path seems to be faster.
We're not sure to what extent the difference, if any, will result in noticeably
snappier performance, but given what seems to be a possibility at least, we
decided to offer the option of having ServiceDesk use the direct-path option.
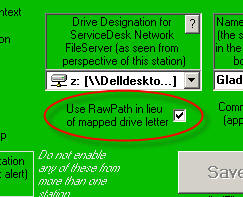
If you want to
try this, go to the Settings form (Ctrl-F1). You'll see a new checkbox,
just below the box where you designate the drive letter for the server.
Assuming it's a networked drive you're connecting to (i.e., not a local one),
check the box, save, and see if you notice a difference. We'll be
interested in any feedback.
4.3.107 (10/20/08):
UP-FRONT TICKET MAY NOW BE FORMULATED AS WORK-ORDER,
WITH INCLUSION OF SHOP-TAG AND CUSTOMER CLAIM-TICKET TEAR-OFFS:
If you do a
significant amount of shop work, you've likely thought it would be nice if, in
addition to printing a standard ticket, ServiceDesk would also print a "tag" to
go on the machine, and a "claim ticket" to give the customer. We've now
added provision to make the above easy to achieve.
The basic idea
is, design a new form image with all the graphics you want, including tear-off
regions appropriate to your purposes (whatever regions you want are just fine).
Next, use the
SD-Tools utility to modify your username.PRG file for text to print in
spaces, where and in the format wanted, for the the non-tear-off regions of your
form (this step is precisely the same as it would be for any normal ticket
design, as specifically described in the first section of the manual's
appendix).
Now, use SD-Tools
again to assemble the particular text-to-print fields that you want, in the
particular places that you want them for the first tear-off. But, instead
of saving this work as username.PRG (as you did for the first and normal file),
save it instead (same folder location) as TearOff1.PRG.
Finally, do
precisely the same for your second tear-off area, only this time call the
resulting file TearOff2.PRG.
The result is
simple. ServiceDesk is now programmed so that, when printing an up-front
ticket, it looks for TearOff1.PRG and TearOff2.PRG files. To the extent it
finds either, it adds to the printout text fields as specified therein.
AUTO-LINK FOR MONEY-RECEIPTS NOW IN CURRENT-JOBRECORDS
FORM:
The current-JobRecords
form has a grouping of eight buttons in the bottom-center region. As time
has gone by, we've encountered the need for more functions, without having
reasonable space for more buttons. So, we began to make some of the
buttons do double-duty.
For example, the
'add AttnNote' button may alternatively be used to create the particular
kind of attention note that consists of a JobLink. The 'Scheduling'
button may alternatively be used to initiate an emailed request for the customer
to schedule (whether via return call or web interface). And the 'orDer
parts' button may alternatively be used to request an instant display of items
already ordered for the job.
Just recently, we
realized that another of the eight buttons was all but crying out for a similar
second duty. Specifically, the 'enter funds Rcvd' button is
designed for the odd situation where you need to apply money on a job that's not
been closed but you're not involved in the more typical context of doing either
a PVR or POS (and, since the job's not been closed out, obviously, you're also
not applying the money to a A/R record).
Admittedly, it's
an odd and unusually need that that button is there to satisfy, and there's a
probably more typical need where you're looking at a job and suddenly feel
curious to know what funds have been collected on it. To satisfy that
curiosity (and until this release), you had to separately open the
FundsControl form (Ctrl-F9), and work though a series of options there to
initiate a search on the underlying invoice number of interest. Now that
is changed. Our new, second function for this button does it for you
instantly instead.
The secondary
functions on all these buttons can be accessed in one of two ways: (a) instead
of left-clicking with your mouse on any such button, for the secondary function
simply right-click instead; or (b) instead of using Alt-X as the keyboard
shortcut (where X is the designated shortcut/letter for the button), use
Ctrl-X instead (thus, for the new feature on the 'enter funds Rcvd'
button, the shortcut is Ctrl-R).
Don't worry about
advance memorization in regard to any of these dual functions. If you need
a reminder, just float your mouse pointer above any such button. A little
ToolTip will appear, explaining the details.
APPROPRIATE HANDLING FOR DEPARTMENTALIZATION NOW
ADDED TO DIRECT-POS:
(If you do not
use ServiceDesk's Departmentalization feature, please don't bother with this
entry. Also don't bother if you don't use the relatively new direct-POS
system.)
Back in March (it
was Rel. 4.3.74, if you want to look) we introduced a vastly upgraded POS
system. Among other things, it eliminates the need to initiate the sale
process in a Callsheet, to go through Job/Sale sequence, etc. -- allowing you to
instead do everything directly from the new POS form.
Sadly, we left
something out. On making the new capability, we failed to consider
operations that use ServiceDesk's Departmentalization feature. If
yours is such an operation (and if you're using the new POS system), you've
likely found that POS sales have not been getting assigned to any
particular department. This release fixes that.
Specifically, the
system assumes direct-POS sales should be assigned to a department called
"Counter Sales." If you have the departmentalization feature turned on and
yet do not presently have such a department (i.e., one called "Counter Sales"),
ServiceDesk will volunteer to create it on the first occasion you go to order
parts via the new POS system. Or, you can take the initiative and just do
it in the normal, manual manner.
Regardless of how
the new department is added (or if it's already there), most of your past
direct-POS operations will now be included, in ServiceDesk's SalesSummary
report, as belonging to the "Counter Sales" department. This is in spite
of the fact they were not officially assigned to that department when done.
It will work, simply, on basis of the fact that direct-POS sales are assigned a
negative invoice number. On that simple basis, the SalesSummary machinery
will deduce that a sale belongs to the "Counter Sales" department.
At least, the
above works for direct-POS operations as done prior to this release that did not
involve ordering parts. However, for direct-POS sales that did
involve ordering parts (where the assigned invoice number was not negative) the
past data will, sadly, remain inaccurate -- so far as assignment to the "Counter
Sales" department is concerned. But all sales henceforth will be perfect.
4.3.105 (10/5/08):
FORM/BACKGROUND IMAGE NOW AVAILABLE FOR WARRANTY
CLAIM DATA:
As you likely
know, when we created our on-screen form in which ServiceDesk assembles (and
allows you to review and/or edit) claim information prior to transmittal of
warranty claims, we used the same essential layout as is found in the Narda 360.
We did this for two reasons: (a) it's the format in which many folks were already in
a habit of assembling claim info; and (b) it facilitated actual printing
to a true Narda, for any circumstance where that might be wanted.
As time's gone
by, some folks have wanted to print this info to plain paper (i.e., rather than
to an actual Narda). But the plain paper printout (i.e., without any kind
of form imagery in the background) never looked good. We've now addressed
that. We could not copy the true Narda (it's copyrighted), but we've
created a similar-looking image that allows you to print your
warranty-claim text to previously blank paper, with a result that is
very presentable.
If you'd like to
implement this new capability, click here to download the needed file (which
should be copied to the \sd\netdata folder of your server).
TWO NEW REPORT/EXPORTS:
A.
Report on Rate-of-Parts-Used, Combining Results from Both PartsProcess and
InventoryControl Systems:
This new report
derives from an earlier one (the former Usage-Rates report in the
ArchivedPartsProcess form). But it's totally new in respect to its
inclusion of data from the InventoryControl system, and is vastly improved even
in terms of its original scope. To use it, go to your ArchivedPartsProcess
form (Ctrl-F8), and choose the 'Usage Rates' option (same menu title, but much
expanded result).
B. Export
List of Customers who Own a Particular Machine Type:
This export is
designed to let you formulate a list of all those customers who own machines of
a particular make, or type, or with some portion of their model number matching
a particular string, or any combination of the above. Access it via the
ExportCustomerData form (Alt-F3).
DIRECT LINK TO PART-ORDER PROCESSING VIA
REQUEST-CREATION FORM:
From its
inception, the general scheme in ServiceDesk's PartsProcess system (i.e., that
manages special order parts) has embodied a clear separation between the act of
creating an internal request (typically via a PostVisitReport) versus processing
that request after creation (via facilities in the F8 form). Depending on
your office setup and its flow structure, this may or may not have been optimum.
Now we've created
a new option.
If you're in the
PartsRequest form (direct access is Alt-F8, but you'll usually find yourself
there in the context of making a PostVisitReport), have entered data for
creation of a request, and are about to save/create the request, hold down Ctrl
button on your keyboard as you hit Enter or click on the Save/Create button.
This tells the system you want to begin processing that item immediately, rather
than waiting for later or for someone else to do it.
In result,
ServiceDesk will immediately take you to that item in the PartsProcess form,
ready for your immediate processing. It will even auto-unload the
PartsProcess form when you record your work on the item, auto-returning you to
the prior context. This should make immediate processing maximally
convenient.
4.3.104 (9/25/08):
IMPROVED MAPPOINT-BASED ROUTE-OPTIMIZATION:
A few months back
we introduced a system whereby the sequence of jobs, as involving any tech's
roster for a given day, can be automatically optimized on the basis of actual
road paths and traffic conditions (see entries posted from 4/12 to 4/15).
In days of $4/gallon gas, this can be a huge money saver. However, it
turned out usage was sometimes frustrating. If any address in the
tech's roster could not be resolved by the underlying MapPoint optimization
engine, it threw a monkey wrench into the process.
We've now
overcome that.
Specifically, in
the event that an address cannot be resolved, ServiceDesk program code now asks
the optimization engine to proceed on the basis of zipcode alone. In
testing, this seems to resolve the problem very well.
If you've not yet
used the optimization feature (or if you tried and stopped because of the
above-described frustration), we highly recommend that you try it now.
It's an extremely powerful tool -- and is even better now!
NEW AUTOMATED INSERTION OF MODEL, SERIAL, ETC., TO
UNIT-INFO-SHEET:
First, the
background: If you are using any of our automated DispatchLink utilities (SB-DispatchLink,
SP-DispatchLink, etc.) you are familiar with the fact that, when these
utilities take a dispatch and insert it to a Callsheet, they DO NOT
simultaneously create a UIS for the model, serial, and so forth. The
reason is because, when the dispatching entities provide Make, Type and
SellingDealer info, they do so sloppily -- in the specific sense that
"RANGE," say, might be described in 25 different ways. If we auto-created
UnitInfoSheets on the basis of such descriptions, your lists of Types and Makes
would soon be corrupted with all these disparate (and many times miss-spelled)
descriptions. To avoid that, the DispatchLink utilities have been
programmed to place UIS-related info (Model, Serial, PurchaseDate and Selling
Dealer) into the ExtraNotes sections of the Callsheets into which dispatches are
otherwise inserted.
Given this
method, there's been a slight burden on you, the user, when wanting to have a
UIS based on such info as found in those ExtraNotes. In a nutshell, you've
had to create and fill it in manually (and, of course, using the benefit of
using your human intelligence to avoid corrupting your lists). Hopefully,
you've made the task somewhat easier by using copy and paste to move
provided models and serials into your new UIS, but regardless, it's likely been
a nuisance.
Our new function
rescues you from this burden. Now, if you have a DispatchLink-created
Callsheet that contains these kinds of data in the ExtraNotes section, just do a
simple Ctrl-Click on any text in that section. ServiceDesk will
then read through those notes for you, pull Model, Serial, PurchaseDate and
SellingDealer (to the extent any such is provided), open a new UIS for you, and
plug those items in. You may need to do a little work to pick the
particular Type, Make and Dealer descriptions as preferred, from your drop-down
lists, but overall UIS-creation for this context should be much easier.
4.3.102 (9/12/08):
For any among you that have mice equipped with
scroll wheels (and if you don't, why not?) you may have found that in
certain ServiceDesk contexts, where you'd expect a reaction to scroll wheel
rotation, nothing happens. I won't bore you with the technical reasons,
but with many mouse drivers ServiceDesk did not receive any Windows message
indicating that the scroll wheel had been rotated. We've now overcome that
technical hurdle, and so now should be able to give you appropriate scroll wheel
reaction in all expected contexts, and regardless of what mouse driver is installed on your machine.
Most particularly, you should notice that the scroll
bars in both the FinishedForm context (Alt-F4) and JobsPerusal
form (Shift-F7) will now react, per expectation, to scroll wheel rotation (which
will be a nice change, if in fact you were not encountering that before).
If you notice other contexts that need to be fixed, please let us know.
Much more dramatically, we've now added Mouse-Scroll-Wheel/Reaction
in a place that has no scroll bars, and never before had even a potential scroll
wheel reaction: the
DispatchMap (if you're curious, we deliberately refrain from placing
scroll bars there, because for that context we consider screen space more
valuable for displaying elements of your territory and schedule). You can now pan vertically within the map via a simple
rotation of your mouse's scroll wheel. To pan horizonatally, move the mouse
pointer to any edge of the map, where the pointer image turns to a four-arrows
symbol, then rotate the wheel. Please try it. We think you'll love
it. It makes moving in the map into a
significantly more intuitive operation.
Also in the DispatchMap, we significantly enhanced the
appearance of the MiniMap, and gave you the ability to drag it to any position
where you'd like it to display. If you had the option to display that
feature turned off (it's in the green section of the Settings form, Ctrl-F1),
you might want to turn it back on, and see if you don't now like having the
MiniMap displayed.
Improved the format and wording of confirmation emails.
Improved printing of MachineHistory AddOn when printing
tickets from the DispatchMap. Now it will include PVR portions of
applicable histories only, and will refrain from printing any MachineHistory
AddOn unless there were, in fact, prior jobs.
4.3.101 (9/4/08):
Aside from numerous fixes, there's a new convenience.
If you're doing PVRs and auto-linking from there to the claims-submission
process, the system will now (once the claim is transmitted) automatically take
you back to your PVR form, ready for the next item.
This update also includes a new version of SD-Backup.
It will take care of any notices, you may be receiving, in regard to the old
version expiring. Be sure, when you do the 'Unzip,' that SD-Backup is not
running. Windows will not permit an in-use program to be replaced.
You'll get the infamous "Can't create output file" message.
4.3.100 (9/3/08):
(1) I notice that a lot of
these entries, lately, refer to "next-step-taken" type work, as regarding
elements that were first added quite far back. This one does too.
Way back with rel. 4.1.123 (3/3/06), I created the ability to cross-link two or
more jobs (i.e., "tie them together"). We call these JobLinks, and for
details please go back to the entry pertaining to that release (scroll in this
document a bit past half-way down, or search on the word "JobLinks").
Anyway, until now nothing in ServiceDesk operation
explicitly took advantage of these links (they informed you as a user of the
linkage, and that was it). Now, an important operation does.
Specifically, prior to now, when a special-order part
was checked in and the system looked to see if any other items were pending, it
looked only in regard to the particular job the part was ordered for. If
it found no other parts still on order for that job, it would suggest the job
should be placed in "Working to Schedule" status, offer to email the customer
asking them to schedule, etc. That was generally great -- except for one
situation: What if you had other jobs for the same address that were still
waiting for parts, and you really wanted to hold off on booking the returning
appointment until you had the parts in for all jobs, and thus could send the
tech back to complete all in one and the same trip? If that was the case,
the system (i.e., as ruling up until now), would erroneously suggest that the
one job (on which all parts had already arrived) should be scheduled now.
Our new feature fixes that. Specifically, before
suggesting you should implement mechanisms to schedule the job on which all
parts have now arrived, it first looks to see if it's linked to any other jobs
(not yet ready for scheduling), and behaves appropriately on that basis.
(2) In the ExportCustomers form
(Alt-F3), added a new export that will create a table listing all customers who
purchased a particular part. The idea, for example, is suppose you want to
send out postcards telling all persons who've purchased a particular water
filter that it's time for them to replace it. This export will serve the
purpose.
(3) In the DispatchMap, if you
click on a tech's name at the top his list of jobs and choose 'E' (for "Email
a fully-detailed, job-by-job summary"), there's now the option to include a
comprehensive history of prior service on each involved machine.
(4) I'm a devil, I know.
Many have complained about the plethora of messages ServiceDesk presents (not to
mention their being sometimes long-winded).
In other programs, you've probably seen where some
messages have a little checkbox in the bottom-left corner on which you can click
to tell the system to refrain from showing you that message again. I've
wanted to do the same, but the Visual Basic programming environment (in which
all my programming is done) does not naturally offer that capability.
Given the above, I've now independently created the
ability myself. At this point, I've converted a bunch of messages to the
new style (i.e., you'll see that checkbox in the bottom-left corner, and if you
click on it, that message will be gone for good). I plan to convert other
messages over as I become aware of more contexts in which the option is
sensible.
If you'd like to nominate any particular messages for
inclusion of the "Don't Show this Message Again" checkbox, please email
me with sufficient info to identify your candidate. Though I may not in
every instance accede, I promise to give every nomination serious consideration.
4.3.99 (8/31/08):
Way back and a long time ago (if you don't believe just
how long, see notes accompanying rel. 4.2.27 on 10/29/06), we
introduced a mechanism whereby, as you use and install special-order parts, the
system checks off that fact. Among other things, this was intended as the
first step in making our PartsProcess system (i.e., for managing
special-order parts) a full-fledged, "cradle-to-grave" system -- in
other words, a system that manages every detail for every part, from "birth" of
the internal request, all the way to assuring it's actually installed on a
customer's machine, or that it's returned and you get credit for it, or you
deliberately determine to move into stocking inventory, or that it reaches some
similar final, "in-the-grave" disposition.
To summarize, since forever we've had cradle-to-"elderly
life" management for such parts, but nothing that assures every item ultimately
reaches "the grave" as it should.
ANNOUNCING . . . Completion of the "To-Grave" process.
There are now two new menu options in the
archived-PartsProcess form (Ctrl-F8). Under one, the system will
search for and display items that do not indicate any final disposition.
Under the other, it will create a report (for either printout, file-export, or
both) that lists such items.
If you need some slight review, when you indicate via a
PostVisitReport that a prior-ordered part was appropriately used on the job for
which it was ordered, ServiceDesk inserts simple text in the underlying PartProcess record's BinLoc box, to indicate the same. The simple
text consists of the tech's two-letter abbreviation, followed by a hyphen, then
a month/date reference (e.g., "GR-8/30"). That's how the
majority of PartsProcess items are (or should be) "put in the grave." And
that's been going on for some time.
Now, with addition of what we just released, you can use
either of the above-described means to review items that never were, via such
normal processes, put in the grave. You can then assure they go to the
grave via some other appropriate means (such a being returned and credit
received, for example). And when this latter is done, you can then
mark off the underlying record according to the manner in which you finally
killed it.
Specifically, if you bring up any "process" item from
the archive-PartsProcess form, you'll find that when you click in it's BinLoc
box there's a simple drop-down. It has three items, as follows:
RtnCrdtd
(to signify that you've returned it, and appropriately received credit)
MvdToStk (to signify a deliberate was made to move the
item into stocking inventory)
WriteOff (to signify a deliberate decision was made to
count the part as a loss)
The idea is, you can put an item (not otherwise used by
the tech) into the grave by selecting any of these three criteria, as
appropriate. For example, if you've returned the item and got credit,
you'll select the first, then that item will no longer appear when you go to
review, or report on, items not yet shoved into the grave.
The larger idea is, you can easily assure that all your
special-ordered parts are reaching appropriate disposition by occasionally
reviewing items not yet in the grave (using the new mechanisms), and responding
to items that should have been placed there, but have not. For example, a
simple review might show several items that should have been returned to the
vendor, but are still sitting around somewhere. Upon discovering this,
you'd make the returns, and when the credit came mark each item appropriately.
Then, when you next ran the report, the items would not show, and you'd be
privileged to have a big smile on your face.
The underlying principle is quite simple, and I hope it
makes sense to you.
4.3.98 (8/29/08):
A while back, we added a new feature in
PrintTicketsFromDispatchMap function. It was an option to include an added
sheet of paper (and addendum to the invoice, if you will) that details history
on the machine involved. For some users, there was a problem. If
you're using pre-printed forms for your invoices, and if the addendums are sent
to the same printer location, the addendums end up printing on those forms,
which is not a good thing.
To address the above, there is now an option to print
the addendums to a different printer than the invoices themselves.
Also, we've now added an option to include the same
addendums if you're choosing to email the invoice images to your techs.
4.3.97 (8/25/08):
In the last large while, there have been a lot of people
wanting things that, because of constraints in the existing system, were kind of
hard to do. For example, people have wanted the option email to rather
than direct-print in a number of contexts, where there was no easy method (i.e.,
w/o unduly cluttering the interface) to add the option. In other cases,
people have wanted new flexibility/change-options when printing existing stuff,
and we'd already used all the options space built into the Printer/Setup form.
To address these needs, a major overhaul was needed, and that's now been
accomplished.
What we have now is a totally rebuilt
Printer-Select/Options form. Its nice looking, but more important is way
more robust than the prior version.
Most significantly, wherever we design it to do so, this
new Printer-Select/Options form will include the option to email the
"printed" output rather than sending it to an actual physical printer. At
this point, it's been programmed to do so if you opt to print from the
FinishedForm context. It's our intent to add the direct/print/email option
to other context, per request as made by you as users (now that we've got the
interface and underlying machinery built up, the task of adding the ability to
new venues is relatively small).
Another benefit is, if it happens to be one of those
contexts where, formerly, there was a little option/checkbox that you click to
send the output to a file (i.e., rather than a printer), the same option is now
presented with an on-its-face place to select the filespec where you want to
save the data. This eliminates what was formerly a second step in the
process.
A caveat, in regard to these new capabilities, is we're
now using a new and more efficient underlying method to keep track of what your
preferences were, for each context, when prior choosing print options.
Because of this new method, the systems memory of old preferences will be lost.
Thus, when now printing for the first time from any context, you'll get the
built-in defaults. After the first time, the system will remember what you
selected, and default to it the next time around (these defaults are stored
locally and are unique to each computer, so please keep that in mind).
4.3.96 (8/19/08):
In the FinishedForms context (Alt-F4), the
Generic form has long been equipped with a box that lists payments received
and balance due. The Custom form has not had such a box.
We've now made a new Custom form that includes such a box. Since the new
box is a single-line in height (unlike the box in the Generic form which
is multi-line), this release of ServiceDesk includes a modification in
code that will recognize the distinction, and configure text for the new box in
a manner that's appropriately suited for a single line.
To obtain the new custom form, open the standard update
folder (i.e., when you're doing the update and the Winzip Self-Extractor
form appears), and copy the file Custom.frm from there into the \sd\netdata
folder on your server, overwriting the pre-existing file of same name that's
already there.
4.3.95 (7/28/08):
When you print service tickets via the DispatchMap,
there's now a new option (it shows as a checkbox in the Printer-Select form).
It's labeled 'Add sheets with machine history,' and it means what it says.
If you check this option, besides printing the requested tickets, the system
will also print separate sheets that detail any prior history on the machines
involved.
4.3.94 (7/27/08):
New, super flexible SourceOfBusiness Survey.
There's a been a growing clamor
out there for a more flexible SourceOfBusiness Survey. The long-standing
system allows you to customize your list of YellowPage ads, but aside from that
the categories and question/answer structures are pre-canned. It's a
fixed, take-it-or-leave it approach.
Responding to that growing
clamor, there is now a brand-new SourceOfBusiness survey system that can be
completely designed (at least in terms of the question and answer structure)
according to your preference. For a little three-page handbook on how to
use this new system,
click here.
On a totally unrelated subject (this one related to the
POS system), if you've wanted to add your own disclaimer (or other statement) to
the POS form, you may now do so. Simply create the text you want and save
it in a plain-text file named PosDisclaimer.TXT. Locate it in the \sd\netdata
folder on your server. ServiceDesk will do the rest.
4.3.93 (7/25/08):
On 7/5 we happily announced that, finally, ServiceBench
had given us a new claims-transmission format that transcended the old
80-character limit on description of work performed (Ver. 4.3.89 was changed to
use this new format). Well, it turns out ServiceBench did not quite have
things perfected on their end. On some claims as done in the new
format (some, but not all), their system fails to accurately parse the data.
To help you cope, this release of ServiceDesk gives you two ServiceBench "WebDirect"
options (i.e., as appear when you go to transmit):
1. The standard/normal option uses ServiceBench's new format (i.e., no 80-character limit, but on some claims their
system will goof up); and
2. A temporarily-added option labeled
"SB-WebDirect (Old Format)". This will do exactly as it says (i.e.,
transmit in the old and reliable format, albeit with an 80-character limit).
We're sorry that we can't presently provide you with
perfection on this, but we're waiting for ServiceBench to iron things out on
their end. They are aware of the problem and are working on it.
4.3.90 (7/15/08):
New "Server Performance Monitor." If
you're like me, you want processes on every computer to be absolutely snappy.
If you must wait even a second on routine operations, it's very annoying.
If you do experience such delays, it's often tough to pin down the cause.
Is it in the local computer, or is it in communication with the server?
We've now added a tool to help make the determination.
This tool is accessed by clicking (in ServiceDesk) on
File Functions, then Monitor Server Performance. After doing
this, look near the top-right corner of your ServiceDesk screen. You'll
see a flashing reference. Once per flash, ServiceDesk "pings" your server,
and reports whether the ping was successful, and how many milliseconds it took.
To help you with evaluation of the numbers, in our own
network (which is NOT super high-end), ping times are ranging from .04 to .22
milliseconds (the lower figure translates as 4/100000 of a second, so it's not
much time). We've been connected with users who've had figures ranging up
to 5 and 6 milliseconds, still with good performance. Our present
suspicion is your network/server performance is probably reasonable so long as
you're averaging pings of less than 10 milliseconds (that number translates to
1/100 of a second). If your average is higher, there's likely a
performance barrier you should address.
4.3.89 (7/5/08):
Big news for those making warranty claims via
ServiceBench. For several years, we've not been able to include more
than 80 characters in the description of work performed, for ServiceBench
claims, because their
electronic transmission format did not allow it. We've been waiting and
waiting for them to provide a new, more liberal format. Finally, they did,
and this release of ServiceDesk is modified to use it.
If you're using the direct-upload method for
transmitting claims (and if you're not, why not?), there's no need to change a
thing -- aside from ceasing to worry about the 80-character limit.
If you're using the comparatively old-fashioned,
save-first-to-file-then-upload-your-file method (and if you are, why?), you
will need from this version forward to specify a different format for the
uploaded file. Be sure that, rather than specifying "ServiceDesk
Warranty Claims," you instead pick "ServiceDesk
Warranty Claims Delimited."
4.3.88 (6/24/08):
Major overhaul of mechanisms that react to server
connection faults. If a fault occurs, the system will now detect the
matter more quickly (i.e., shorter period of freeze-up). In addition,
unless new data access is imperative, it will continue to run (and refrain from
bothering you) even in the absence of a connection. And, finally, if
forced to bother you (i.e., it's not getting access to data that it must have
for some operation), it will delineate whether the fault is in the local
computer's network connection, or if it's instead at the server itself.
This will provide an invaluable aid for your own diagnostic efforts.
In the Settings form, there is a new button (with "?"
symbol) inside the frame/box area where you designate the server drive.
It's function: if you click on it, it opens your Windows "Map Network Drive"
dialog box.
Upgraded Remaining Two Reports (in F11 Reports
form) that still had not been brought up to Full-Compliance Standard.
For background, in the now
somewhat distant past when I was asked to create some new report, I often did
kind of a "quick-and-dirty" approach. Simply, I was able to code for the
report more quickly by skipping the stage where you'd input the start and end
dates for inclusion. Instead, I wrote several of these reports to simply
ask "How many records back?" you wanted to include. Also, I did not code
them to allow specification as to whether the output would be printer or screen
bound (it all went to the screen, and if you wanted a printout you were
relegated to printing, simply, what was on the screen).
Over time someone would ask me
to upgrade some particular such report, bringing it up to the standard wherein
the user can specify actual date range, and output can be directed in a
dedicated manner to either screen or printer. It's kind of been a
one-by-one process. Last week I received still another such request (this
one for the CompletionAnalysis report). Upon going to fulfill that
request, I found there was only one other remaining report that had not so been
upgraded (the TimeOnJob report), and so figured I'd get it out of the way
too.
Now, there should be no
remaining reports (in the F11 Reports form) that don't fully comply with
such standards.
New and Improved Connection Tool. For the
last fifteen months, we've been using a service called GoToAssist for the
mechanism that allows you to click a button, and within moments we can be
working on your screen with you. It was a good service, but we think we've
found a better one (provided by the LogMeIn.com people, it's called
LogMeInRescue). With this change, we made the connect button in
ServiceDesk look much nicer, as follows:
To access this tool, click on FileFunctions, and
you'll find it as the second option down.
4.3.87 (6/19/08):
In the Settings form, there is a new button (with "?"
symbol) above the 'Save Local Values' button. It's function: if you
are interested in configuring our ServiceDesk network in thin-client mode
(rather than the more typical thick-client), it opens a document that
provides the details.
If you're not aware, the fundamental difference, between
the two modes, is having ServiceDesk installed solely on the server (with all
stations operating solely off that single install), rather than independently
installed (and sharing data only) throughout your network. We've reached
the conclusion that pros outweigh the cons, for that setup, if you have more
than just a few computers in your network.
This update included many other small improvements, each
too minor to warrant description here
4.3.86 (6/12/08):
1. Added ability to clone zipcodes in
the .zpc file. For details on this feature, open the ServiceDesk
StreetList form (Ctrl-F5), and click on the 'Clone a Zip' button.
2. Added ability, for special-order
parts, to import a shopping cart as downloaded when ordering on-line from a
parts vendor. The general idea is, you're going on-line to a vendor's
website to place your part orders. Prior to now, you've needed to manually
enter (in SD's F8 form) all the details about your on-line order. Now, if
you vendor's web interface allows you to download a file summarizing your order
(and assuming the file is in the expected format), ServiceDesk can auto-plug the
information into your internal parts requests. It can save a significant
amount of labor. For specific information on how to use this feature,
click here.
3. Added option, when printing a
FinishedForm, to omit totals.
4.3.84 (6/1/08):
Miscellaneous small improvements, including:
1. Much improved handling when wanting
to insert text (from past job or from a QuickEntry template) into a Callsheet or
JobRecord that already has text that may potentially be overwritten; and
2. A new method, in the dropdown
StreetList, to search of a numbered highway or similar feature. This
addresses a problem where, say, you're looking for a reference to Highway 101.
It could be in there as "STATE HIGHWAY 101," perhaps as "US HIGHWAY 101" or even
"UNITED STATES HWY 101." It's almost impossible to predict, and there are
still other possible configurations. This has made it sometimes difficult
to locate an entry for this kind of feature, even when it's actually in the data
somewhere.
Some time back we introduced a feature where, if a
street has not come up during the as-you-type search, you can fit F1 on your
keyboard to invoke a somewhat more exhaustive search (it looks for the target
string anywhere within any of the underlying entries, rather than looking
for a position-to-position match).
Now we have a new variation. If you hit Alt-F1
rather than merely F1, the system will figure you're searching for one of those
highway/route type of entries, and limit its findings accordingly. This
makes it very simple if, for example, you're looking for route/highway 19.
Invoke the above action, and the system will show you all entries where "19" is
part part of the name and where the remainder of the name suggest it's any
variation of text that suggests it's a highway/route type of feature. In
particular and especially, whereas the standard F1 search would have also shown
you references to 19th STREET, 19th AVENUE, etc., this new and modified search
will be more discerning.
4.3.83 (5/11/08):
Added ability in EmailedDispatchReceiver (EDR) to
auto-receive and auto-insert emailed dispatches as sent by Old Republic.
Update of ServiceDesk was needed to mate with that new ability (Old Republic is
added to the drop-down list of Types in the QuickEntry template).
Also added Haier and Danby to QuickEntry drop-downs, for use with
new release of SB-DispatchLink.
4.3.81 (4/24/08):
Improved the QOS report so as to exclude POS
items.
Improved the Restock to Trucks on Basis of Use
report so as to exclude items speculatively transferred.
4.3.80 (4/23/08):
Among other improvements, when you're in a Callsheet
typing in a telephone number, and refraining from including hyphens (because the
system is going to insert those for you), the system will now still succeed in
finding matches in the underlying CustomerDataBase. In other words, even
though your non-hyphenated string of numbers (as being entered) is not a true
match for properly-formatted telephone numbers in the past job history, the
system will find appropriate matches regardless.
Also, having repeatedly connected to clients' machines
and found they were typing customers' names improperly, we decided to police the
matter. Specifically, we've found many users enter names in the simple
first-name-space-then-last format (e.g., TOM JONES). This is wrong.
For any person's name (i.e., as opposed to a business), you should always use
last-name-comma-then-first format (e.g., JONES, TOM), so as to accommodate
future searching on the last name. Anyway, ServiceDesk now detects when a
person has used the inappropriate format, and offers to correct.
4.3.79 (4/22/08):
Miscellaneous tweaks -- including, most particularly,
discovered (and fixed the fact) that some time back I'd broken the feature
where, after linking to a JobRecord from a WipAlert Callsheet, the system notes
whether you've serviced the JobRecord, and if so appropriately puts the
Callsheet into MarkedForDeletion status (as broken, it was doing that
regardless).
4.3.78 (4/20/08):
Improved formatting for labels as printed to standard
Dymo (I finally purchased a Dymo, solely for the purpose of helping me do this).
In the FinishedForm context (Alt-F4), many have wanted
to save different versions of a ticket, though under the same Invoice/Job
Number. Now you can. In any FinishedForm's InvoiceNumber box
(top-right corner), just add a non-numeric character after the invoice
number, plus any other characters as may be wanted. You could, for
example, change "72688" to "72688A", or perhaps
"72688-Est" or "72688-02" (in the last example, the hyphen
serves as the needed non-numeric character). So long as you've retained the same base number,
and made sure the first character immediately following is non-numeric, the system will save your work as an independent
edit. Next time you go to load that form type with that particular job
number, the system will ask which of the edits (if any) you want load.
Added a ModelsHotList. This is very
similar to a PartsHotList feature that was added about 18 months ago (see
entry dated 9/25/06). The idea is, you can create a list of the particular
models that involve some matter of concern or interest. At various points
in ServiceDesk, when you're dealing with model numbers, ServiceDesk will check
that list, and if it finds a match, it will tell you so, and inform you of the
note you previously created in connection with the model. Creating the
ModelsHotList is virtually identical to what's done for a PartsHotList,
as follows:
1. Open a new document in Excel;
2. For each model number that you want
to call attention to, use a single line, with two columns. In the first
column, place the applicable model number. In the second, place a note
explaining what's special about that item (i.e., the text you want your
operators to see when that model number comes up).
3. Save the document in the required
location, with required name, and required type.
4. Specifically, in the bottom of
Excel's 'Save As' dialog form there's a box that says 'Save as Type'. Open
the drop-down there and select "Text (Tab delimitted)(*.txt)" as the type to
use.
5. Be sure you're saving the document
to the x:\sd\netdata folder (where 'x:' is whatever drive your server happens to
be); and
6. Be sure it's saved under the
name ModelsHotList.TXT.
7. Once the file has been created, you
can return and edit it (add, subtract, change, etc.) at any time wanted.
To see the response that occurs in ServiceDesk, open a
UIS that pertains to the model in question and click on it, or create a new UIS
with the model number. These and several similar actions will provide the
desired alert.
4/15/08:
Feeling anxious to help anyone obtain MapPoint who does
not have it, I did a quick Google on "mappoint software." Here are some
results that appear to offer great deals, at least if you can legitimately claim
an academic connection:
CostCaptain $69.95
Best Deal Software, $89.95
EverythingOutlet.com, $94.95
Otherwise, you can purchase for near retail at:
Amazon, $249.95 new, $149.99 used
I hope this helps.
4.3.77 (4/14/08):
Added two more operations, very closely related to the
new Routing-Optimization engine, as announced in the preceding entry
(i.e., below this one; if you haven't read that one yet, DO IT NOW!).
First, after reading the preceding entry you'll
see that under the original routing-optimization, it's up to you, as user, to
decide which job is first and which is last (the optimization engine attends to
the rest). We've now added an alternative optimization, with the following
clumsy name:
Optimize, With-Office-and/or-Tech's-Home-At
Begin-and/or-End
It's definitely clumsy, but conveys the idea. If
you know the tech is beginning at either his home or your office, and/or if you
know he's ending at either location, that info can be conveyed to the
optimization engine, and (using those as nodes), it can then decide
for you which jobs should be first and/or which last. This makes
routing optimization even more powerful.
To use this method, the command is Ctrl-Alt/Click
on any graphic/job representation within the route, or on the tech's name at the
top of his ListOfJobs. You'll see there's a brief dialog where the system
asks whether it's the office or tech's home that should be figured at each end
of the route.
As a second enhancement, we've added a
Show-Tech's-Route-In-MapPoint feature.
The idea is, if you're looking at a tech's route, and
wish to see what it looks like as plotted to actual roadways, do a simple
Ctrl-Alt/Click on any graphic/job representation within the route, or on the
tech's name at the top of his ListOfJobs. Very quickly, the system will
open your MapPoint application, with the route in question perfectly loaded.
If you wish, after the route is thus loaded to MapPoint,
you can easily take further actions, such as printing out DrivingInstructions,
or exporting to a PocketPC (so the tech can use his GPS-equipped PDA to guide
his navigation), etc.
As in the case of our new Routing-Optimization feature
in general, the commands for both new functions have been added to the
DispatchMap's contextual CheatSheet, so there is no need to memorize here.
4.3.76 (4/12/08):
------MORE BIG NEWS------MORE BIG NEWS------MORE
BIG NEWS-----
For a long, long time, people have asked if we
automatically route calls. What's meant, is will ServiceDesk
automatically figure out the most efficient sequence of jobs for a given tech?
The long-time answer has been: "No. However, we do
provide the ideal user-interface for employing human intelligence in the
tasks of: (1) deciding which techs get which jobs; and (2) optimizing the
sequence of jobs for each."
If you are a user who did not know, let me tell you:
there are tools in the DispatchMap that make these process very, very
easy, and (usually) ultra-efficient too. If you haven't learned about
them, it's time to do so.
Even so, there have been folks who wanted
machine-intelligence to do the sequencing work for them. Until now,
we've had no way to do it. The big new is, finally we do.
We are pleased to announce, ServiceDesk now offers the
power of a full-fledged .
This engine uses sophisticated AI (Artificial Intelligence), combined with a
huge database of underlying information. It accounts not only for the
layout of roads in your territory, but for traffic patterns as well. On
this basis, it will quickly place a tech's list of jobs into the unique sequence
that promises the smallest-possible driving time.
How did we do it?
The short answer is, we did not build the engine.
Microsoft did. It's part of their MapPoint application. We simply
created mechanisms in ServiceDesk that call on the Route-Optimization engine
in MapPoint.
What this means is, to use the new Routing-Optimization
engine in ServiceDesk, you must have MapPoint installed on the same
machine.
Assuming you do, to use the new feature is very easy.
First, see that the jobs you
presently anticipate a tech doing are assigned to him.
Second, decide which jobs you wish to have
as his first and last (that decision is not one the
optimization-engine makes for you). If you did not know, you can easily
decide, in the ServiceDesk DispatchMap, where you want any job to fit,
sequentially. If you're looking in the List area (i.e., under the tech's
name in his ListOfJobs), just drag-and-drop. If you're looking in the
graphic area, simply right-click on the job of interest. You'll see
a drop-down list. The idea is to click, within the list, at the new
position where you'd like the job moved to.
For example, if you were looking at a particular graphic
reference for a job and wanted to make it first, you'd just right-click on it,
then click in the resulting list just above what was previously the first job.
It's that easy. Same for making a job last, or repositioning in any other
sequential position.
Third, do a Shift/Ctrl-Click
on any graphic reference that belongs to the route you wish to optimize.
Or, as an optional method, do the same action on the tech's name at the top of
his ListOfJobs (if you forget the command, don't worry; it's been added to the
DispatchMap's contextual CheatSheet).
After the above action, you'll observe a brief pause,
after which you'll see the sequence of jobs changed, for minimum driving time.
If you look on the caption bar at top of the DispatchMap, you'll also see text
describing the true number of road miles encompassed in the route, plus
estimated driving time.
Please note, the sequence of jobs will be
optimized subject to the constraints of what you've specified as first and last
jobs. If you don't particularly like how it came out, try changing which
job is first (and/or which is last), then optimize again. Play around.
You're gonna find it's fun.
3/24/08:
------BIG NEWS------BIG NEWS------BIG
NEWS------BIG NEWS------
A long awaited product, , is
now available. We've been in "beta" mode with it for the past three
months. Now we're past that, and it's ready for all.
What is SD-Mobile, you ask?
Well, you know how the UPS guy has that nice electronic
clipboard? It tells him where to go, what do to, etc. Plus, as he
does his work, it keeps headquarter updated on what he's done.
In a nutshell, that's SD-Mobile.
Click here for
details.
4.3.75 (3/18/08):
New "CheckOnQuantities" Feature in
MasterPartsPlan.
Ever find yourself looking at a line-item in the MasterPartsPlan, and
wondering how many of the items you possess, and at what locations?
Always, you could (with a few keystrokes or mouse-clicks) navigate to the
InventoryControl form and make the determination there. However, there
is now a more direct, easier method. Just do a Ctrl-Right/Click on
the line-item in question. You'll see an instant display, detailing the
wanted info.
This release includes a long series of other
improvements, either too obvious as to need mentioning (such as, for example,
there are now calendar drop-downs when needing to select beginning and end dates
in the Reports form), or relatively minor. Please update, and
enjoy.
4.3.74 (3/11/08):
Improved Handling of Returned Parts in POS situation.
This was requested by Tanner (at Andy's Appliance in Lincoln, Nebraska).
The idea, when someone returns a part you've sold, you can use the POS system
and indicate a quantity of minus 1 (i.e., -1). That prompts the system to
add the item back into stock, rather than pulling it.
MEGA NEW METHOD/INTERFACE FOR POS OPERATIONS!!!!!
For any who do not know, POS stands for PointOfSale
(sometimes also known as Counter Sales). Recently, we took on Nebraska
Home Appliance out of Omaha. They are very serious about
across-the-counter parts sales. If I remember right, it's actually a
bigger part of their business than doing service. They let us know (and in
no uncertain terms) our existing POS system was just not good enough.
Among other things, to have to initiate each sale from a Callsheet was far too
cumbersome. They needed a constant POS interface -- one that would be
always up, and would involve letting a sales person initiate each ticket by
nothing more than typing in his two-letter name abbreviation -- no detour to
Callsheets -- not detour to JobRecords, etc.. and etc.
So now we have it!
There's too much to explain here. Instead, please
read this little, less-than-three-pages document.
4.3.73 (2/26/08):
Enhanced Feature on Printing Parts Labels.
Increasing numbers of people are using Dymo label printers for printing parts
labels. I'm told they work very well.
Dymo offers two sizes of labels: one approximates the
roughly 3.5 by 1" size we've commonly used. The other is much larger,
closer to 4 by 3".
Jeff Guinn (at Guinco in Fort Worth, Texas) had the
great idea of using the larger size label, and placing check boxes in the lower
two thirds in which the tech can indicate the final disposition on the part
(e.g., not installed and still good, not installed because found damaged in box,
not installed because incorrect part, installed but DOA, installed but used to
replace part still in warranty, return for core/dud fee, Used/Trash, etc.).
Until now, Jeff has been pre-printing his labels with
check boxes per the above, then (as a second step) printing the specific-to-part
info via standard mechanisms in ServiceDesk. He told us about it, and
explained that to send each item twice through the printer was a real hassle.
He wanted us to make ServiceDesk print the whole thing, kit and caboodle, with
one pass through.
So we did. Beginning with this version, you'll see
the list of options (when you go to print parts labels) has expanded.
Besides the fact that the options are now much more clear as to intent and
meaning, there are now two choices for printing to a Dymo printer. One is
for standard size printing, the other for "Jumbo." If you choose the
latter, you'll get that extra text, consisting of "What was the disposition of
this part?" checkboxes.
New Mode for Sorting Your MasterPartsPlan.
It's long been possible to sort your MasterPartsPlan via various schemes (by
part number, bin location, type of machine applicable, etc.). Now there's
a new option: Make.
New Screening Criteria for Automated Adjusting of
Prices in MasterPartsPlan. In ver. 4.3.71 we introduced automated
updating of prices in the MasterPartsPlan, including a feature that allows you
to screen the particular items updated via an option to mark certain items as
being immune. There's now a new option that allows you to screen on the
basis of the PreferredVendor as applicable to each item.
4.3.71 (2/18/08):
Between this entry and the preceding one, you'll see
what's probably the longest gap between announced updates as has ever occurred
in this Diary. However, I have been working frenetically, primarily
in SD-Mobile, which now has several users, and has grown to be rather robust and
powerful. Soon, we'll be ready to declare it's "ready for prime time."
In ServiceDesk, this latest release has some exciting
improvements.
Automated Updating of Prices in the MasterPartsPlan.
Until now, changing prices in the MasterPartsPlan was a wholly manual process.
Now, we've added a plethora of methods (certainly, one to suit any and every
fancy) via which you can update prices, or even create them de novo if so
desired. Simply click on the new 'Auto-Price' button that's
provided in the form (Ctrl-F10). There's a menu tree to lead you through
the options.
Option to Set MasterPartsPlan Line-Items as Immune
from Pricing Updates. A concern with auto-updating MasterPartsPlan
prices is that some items are essentially commodities, and typically these are
marked up many times more than others. If you were to be updating
the prices on most things based on, say, a markup scheme combined with recent
cost, you'd want leave those commodity items out of the process. There's
now an option in the MasterPartsPlan where you can check items that you want to
have so immune. It's a new, vertical grey band off to the right side,
within the Ctrl-F10 form). Just click there, next to any item that you
want to make immune. Click again to uncheck, if wanted.
New, 'DeferToPublishedPricing' Option in
Auto-Pricing System. Most servicer/dealers do not feel manufacturer's
suggested retail prices allow sufficient markup. However, for companies
that do a lot of across-the-counter parts sales, those may be the preferred
prices. Historically, the ServiceDesk auto-pricing system did not
recognize this difference. Now it does. There's a new option in the
MarginPlanner form (Shift-F10). It's labeled:
"Where possible (and
where a Markup Tier or MasterPartsPlan price is not explicitly indicated) defer
to Published Price."
What's meant by "Published Price," simply, is List price
as found in SmartParts (if we ever get data for other industries, we'll be
delighted to make it equally applicable).
Aside from that explanation, the option means just what
it says. If the option is appropriate for your situation, check it to
true.
New Guide to Auto-Pricing. With addition of
the new features just described, the ServiceDesk auto-pricing system can
accommodate virtually any need and preference. But just how it does that
(and in each situation), can be a little complex to describe. But you may
need to understand it, in order to achieve precisely the results you want.
For that reason, we've created a nice little guide. You can
click here to access it, or, from
any FinishedForm display in ServiceDesk (i.e., Generic, Custom or Narda), just
right-click in the per-item-price column of the parts listings.
New Line-Item-Deletion in the FinishedForms.
Recently I was connected to a user who decided she needed to remove a part
listing that was already inserted to her on-screen Narda. She had to click
into each box, and delete its text. I could see it was a pain, and it made
me realize she needed a better method. So now, following the same
convention as exists in many other ServiceDesk contexts, I've made it so a
simple right-click on any line-item, in the parts listings, will invite a
deletion of that entire line. (Actually, the right-click should be done
within the description box, as the right-click action has different
functions within the other parts columns.)
4.3.70 (1/16/08):
If you're doing Shop Jobs (see entry under Ver./Rel.
4.3.45) we added another special treatment for that situation.
Specifically, you can create a unique set of customized WipAlert GracePeriods --
for shop jobs, as opposed to ordinary ones.
To do so, simply create a new file with the name
GracePeriodsShop.TXT. Place it in the \sd\netdata folder on
your server. Equip it with 10 lines of text, each with an integer value
that stands for quantity of days grace, that you want applied to shop jobs, for
equivalent-position status categories in the JobsCurrent form. After
you've done this, re-start ServiceDesk (it only looks for such a file on
startup), go to the JobsCurrent form (F7), and float your mouse pointer over the
status buttons, and read the ToolTip to verify it reports on both standard grace
periods and on those applicable to shop jobs.
This new file uses the same internal format,
incidentally, as the one you've long been able to create for the purpose of
customizing grace periods as applicable to standard jobs. The name of that
file, historically, as been simply GracePeriods, with no extension.
Another small change at present is that that file's name has been changed to
GracePeriods.TXT (addition of the extension makes for easier creation
and editing). Don't worry. If you already have and are using such a
file, ServiceDesk will automatically change its name to the new one.
4.3.69 (1/11/08):
Wow! As I go to make this entry, I see that I've
not made one here since 12/19 of last year (plus it was three versions back in
ServiceDesk).
Well, the work in ServiceDesk was mostly incremental,
with one significant exception. For those of you using the
FaultCodesLookup feature (a sub-feature of SmartParts), I added
fault-codes lookups for Whirlpool Polara and Duet systems.
The really big news is that, for most of this period, I
worked like a dog to re-build (almost from scratch) our SD-Mobile
system. It's now available in beta mode, and any of you who wish to try
are welcome to do so. It's working pretty well right now,
though there are still wrinkles to work out and features to add. Just give
us a call if you want to try it.
4.3.66 (12/19/07):
Besides numerous tweaks here and there, added another
enhancement to billing statements. Now, the positioning of the
recipient's name and address has been changed (slightly) so that you can do a
simple fold of the statement, and place it directly into a standard window
envelope.
4.3.65 (12/16/07):
A MAJOR and AWESOME NEW TOOL:
This release has a really big item. It's a brand
new form. We're calling it the ShowAll form. The
simple idea is to gather almost all the disparate bits of information -- for
which you might have previously gone to a bunch of different search contexts in
ServiceDesk, into one simple page.
To display this new form, conduct any CstmrDbase search
in the same simple manner you always have. In other words, type a name,
address or telephone number in either a Callsheet or the F12 form. You'll
see that, to this point at least, things still work just as they always have.
Indeed, you can still left-click on any reference (just
as you always have) to see the underlying object to which it refers (typically a
JobRecord, but sometimes a ProblemCustomerAdvisory, and other times a SD-RevenueBuilder
account, if you're using that utility).
But if you want a big surprise, try a different
action.
Instead of left-clicking on the reference, do a
dual/both-button mouse-click (i.e., click on both mouse buttons;
it doesn't matter if both go down simultaneously, but neither should be
released until both are down).
Now you're gonna see our brand new ShowAll
form.
We're betting you're going to love it. As you'll
quickly see, it does indeed assemble a ton of different search-type references
into a single place. And, logically, you can click on any such reference
to instantly be shown the object to which it refers.
In this first mode, the ShowAll form is showing all of
various kinds of records (or, actually, references thereto) that pertain to the
set of JobRecords that match a particular target (as established via the
combination of your prior search and particular base-level reference that you
clicked on). If you wish, you can quickly display a second instance of the
ShowAll form that, rather than using a set of JobRecords as its matching basis,
uses a particular machine instead (i.e., it will show references to any and all
records that have any connection to a particular machine).
To make this switch, when you're looking in the
first-level ShowAll form, note whether it has any machines listed in the box for
that purpose. If so, you can do the same kind of dual/both-button
mouse-click that brought you to the first-level ShowAll form, and you'll
instantly see a second level that (as above-hinted) shows you references to all
matters that have any connection with that particular machine.
Please, do a lot of playing, and learn how this thing
works. You're certain to find it's extremely powerful.
MISCELLANEOUS IMPROVEMENTS:
As promised, the new ScreenForOverbooking feature
(as described in connection with Release 4.3.61, below) has been expanded to
cover all scheduling situations. More precisely (and to remind) when first
rolled-out it only warned against overbooking when juggling assignments within
the DispatchMap. Now it will do it's work when creating original
appointments via the Job/Sale sequence, or when re-scheduling from an existing
JobRecord.
To clarify, the ScreenForOverbooking feature is
tech-centered, designed to assure a particular tech is not overbooked. The
ZoneScheduler system, by contrast, is designed to allocate job capacity by
geographical area, particularly to coordinate such capacities with outside
scheduling entities such as ServiceBench, ServicePower, LG and your own
web-based On-Line Scheduling system.
I mention the above to explain another tweak, which is
that the ZoneScheduler will no longer require a password when overbooking (vis-a-vis
zone allocations) for the current calendar day. It was pointed out (by
Jeremy at ARH) that dynamics are much different in this situation, and password
requirement was more a hindrance than a help.
In the FinishedForm context, a revised the protocol for
auto-filling special-order parts so that it's no longer required for a part to
have been checked in, in order for it to be listed there.
Finally, for those of you who print parts labels, I
modified the code so that, if the part was special-ordered on a warranty job,
the system will refrain from placing any price info on the label.
Turn-Key WEB-HOSTING Now Available (12/12/07):
We've found many of your guys are anxious to use our new
CyberOffice features, but to not yet have your own website to use as a
foundation. We've now addressed that. Specifically, we can have you
up and running with your own website -- much pronto -- with but the slightest
work from you end, and minimal dollars too. Just call and ask Karie for
details.
New Name for Suite of On-Line Tools:
SD-CyberOffice
(12/9/07):
As we've expanded the set of functions and features
associated with what was originally just a system for on-line scheduling
system (though to say "just" is hardly fair, since no other system offers
fully-integrated real-time booking), the name SD-WebScheduler became
increasingly inadequate to describe what the full panoply of function.
For that reason, we've come up with a new term to replace the old, and a
subtitle too. We're now calling it SD-CyberOffice: Web-Scheduling on
Steroids. If you haven't checked it out yet,
DO IT NOW!
4.3.61 (11/26/07):
I truly haven't been on vacation for the last three
weeks. On the contrary, I've been buried deep in intense work. I
accomplished two very big things outside of ServiceDesk itself:
First, Advanced SD-WebScheduler is Now Ready!
This set of tools can -- literally -- reduce by more than half the time
telephone time spent with customers. Plus, your customers will love it
too. It's revolutionary, it's hot, it's big. To learn more, go to
our main web page, and click on "Web Scheduling."
Second, we finally rolled out with SP-DispatchLink,
which accomplishes the same dispatch automation, with ServicePower, that we've
previously had with ServiceBench and LG.
Within ServiceDesk, I've also been very busy, but mostly
it's been improving underlying structures (some big work there) and
miscellaneous fixes.
In terms of new features:
Added a brand new Screen for Overbooking feature,
designed to assure that each individual tech is not overloaded with too many
jobs. For a long time, we've had the ZoneScheduler system, which
seeks to assure that each of your geographical regions have appropriate
loads scheduled, but there's been nothing via which ServiceDesk keeps track of
individual technician capacities, or via which it compares those capacities to
what's actually scheduled for each tech. We have it now.
To begin using this new system, go to your Settings
form (Ctrl-F1), and click on any particular tech's name. In the Technician
Properties window, you'll see there's now a new box, labeled "Job Cpcty."
I've set it so that it defaults, for each tech, at 12 jobs (or, rather, 12
JobCount value). I know that's high for most, but I set it high,
deliberately, so that people who update without reading about this feature (and
consequently do not deliberately set values there) will less likely be put off
by a value that's falsely too low.
Anyway, please set appropriate values for each of your
techs. With those values set, ServiceDesk will watch, as you assign jobs
to your techs, to make sure none ends up being overbooked without at least a
warning being given the user.
Actually, at this stage, ServiceDesk will only be
watching when you assign (or reassign) jobs within the DispatchMap. I
figured we'd start with the screening process there, make sure we've worked out
any kinks, then add the screening to other processes, later on.
Also related to measuring (and comparing) capacities, I
made it so the ZoneScheduler (Shift-F5) will now tally JobCount values as
assigned to entries indicating technician absence. I further modified the
'Make Vacation Entries' function (in the ScheduleList form) so it
will now auto-input a JobCount value of 8 for each day of a technician's
absence.
In the A/R-Dunning form (Ctrl-F3), I improved the
system's handling of upper versus lower case when formatting text. I added
a box where you can indicate interest rate, and the system will now
automatically add interest/late charges (to any statement) on that basis.
And, if you wish to customize the little section of text that describes terms,
you may now do so by creating a little text file with the two lines of text
you'd like (i.e., in preference to those that otherwise print automatically).
Just save your file to the \sd\netdata folder on your server, under the
name 'TextForStatementTerms.TXT'. ServiceDesk will see it there,
read the text, and print that in lieu of its own text.
4.3.59 (10/30/07):
Added a feature that allows you to export your list of
zipcodes (together with city names, and so on) from the DispatchMap. It's
a new option under the general print command there (i.e., accessed via Alt-P).
If you happen to also be using the Miles-Determined S.Call-Rate feature, this
will include a rate for each zipcode that's applicable to its distance from your
office.
In close connection to the above, also added a feature
in the Callsheets. If you want a Miles-Determined S.Call-Rate there (and
as applicable to the customer's zipcode, just double-click on the same, and a
little message box will inform you.
Enhanced the record-by-record searches, as available in
the current JobRecords form (i.e., for name, addresss, telephone or P.O.
number). Now, if the system does not find the requested target, it offers
to carry-on the search in the archived JobRecords form.
4.3.58 (10/28/07):
Did a major overhaul of the system that rebuilds the
CstmrDbase Index set. There should now be zero interference with other
users as any particular computer engages in the rebuild effort. And, if
anything goes wrong during the process (which in itself should be less likely),
the old index set will still be left, doing its duty.
4.3.57 (10/22/07):
ZoneScheduler '.' For any who
do not know, the ZoneScheduler system allows you to divide your territory into
between 1 and 30 zones, and allocate JobCount values to each. Based on
zipcodes, ServiceDesk then keeps track of the total JobCount for appointments
scheduled within each zone, and interdicts if a call-taker attempts to schedule
above allocation. More importantly, the same setup is used to keep outside
entities informed as to your availability status within each zone.
Such entities include ServiceBench, LG, ServicePower and your own On-Line
Scheduling feature.
Until now there's been a little unwanted quirk in
zone-scheduling. Specifically, it could happen that, say, you've got Zone3
all booked up for a particular day, while right next to it sits Zone4 with 80
percent vacancy. It could also happen that, in point of fact, it's
relatively easy to send Zone4 techs over to work in Zone3 -- and, certainly,
you'd far rather do that than have them sit idle while simultaneously losing out
on work that could otherwise be scheduled for Zone4.
We now have the solution. It's called 'Flowing
Pipes.'
To understand how this device works, go to your
ZoneScheduler form (Shift-F5), and look at how the graphs are setup for each
zone (this assumes you've actually done a setup with multiple zones).
Now picture each graph/box as a water tank, and imagine you can create a little
pipe that allows water to flow from one tank into another -- not any tank into
any other, but just particular pipes (one-way ones at that) that allow
water (or, actually, JobCount values) to flow from just below the top of one
tank into a particular other tank.
That's the metaphor. The reality is you can make
as many 'pipes' as you want, each of which will allow JobCounts to be shifted
(for the purpose of tallying against maximum allocations) from one zone to
another. In every case, the pipe allows flow when the flow-from
zone is at or above maximum allocation, and when the flow-to zone still
has one or more vacancies.
In this connection, you'll see that the ZoneScheduler
form has a new checkbox, labeled "adjust view for flowing pipes."
This box will remain disabled until and unless you setup some pipes. Once
you do, you'll find that with it checked the graphs change per the
above-described scheme (i.e., to make vacancy if possible within any zones that
were fully booked and in respect to which you've made pipes that allow JobCounts
to flow into zones that still have space).
While implementation of Flowing Pipes is easy, we don't
want to take space here to describe it. Instead, please
click here for instructions.
Please note also, right now implementation of Flowing
Pipes occurs only within ServiceDesk itself. We have to release new
versions of each utility that uploads availability info to outside entities
(e.g., SB-DispatchLink, LG-DispatchLink, SP-DispatchLink and SD-WebScheduler)
that are revised to recognize your pipes. As of this date, none of those
will. We'll inform each of you who are subscribed to those other utilities
when such updates are available (i.e., don't look for the announcement here).
4.3.56 (10/16/07):
Enhanced AutoTimeFrameEstimator. If you did
not know, there's long been a feature where, if you began with all of a tech's
appointments set for whole-day windows, then worked out assignments and
sequencing, you can then have ServiceDesk automatically figure and insert
time-frames for each of the jobs (it's initiated, within the DispatchMap, by
doing a Ctrl-Click on a tech's name at top of his list of jobs).
We've improved this feature in two respects: (1) the system now remembers the
preferred parameters for each tech, so you don't have to re-type them each time;
and (2) it will now round off each time to the nearest whole hour.
If yours is an operation that starts with all-day
time-frames then narrows them down on the day preceding -- we
highly recommend this method. You'll find it saves a ton of effort.
4.3.55 (10/15/07):
Fine-tuned the recent work (described at top of previous
entry) as related to the QuickEntry Insertion function. Among other
things, added a universal QuickKey access to the QuickEntryTemplates form (it's
Shift-F1).
Historically, Alt-Q was the combo used for this purpose, but this would
only work from Callsheets or the CurrentJobRecords form. The new combo
works regardless of what form you're in.
Since we're now using Shift-F1 for universal
access to the QuickEntryTemplates form, that combo is no longer available for
initiating a search for text within current Callsheets (where it has, in fact,
long been used for the purpose). Karie pointed out that the universal
combo for initiating a search, within Windows, is Ctrl-F (as in 'F'ind),
and it would more intuitive to use that as the search initiator there. I
realized she was right, so that's now how you do it.
4.3.54 (10/12/07):
Enhanced-Call Ability for QuickEntry Insertions.
Historically, you could use an easy key-combo to insert any among the first nine
QuickEntry templates to a Callsheet (a year or so ago we made it so you could do
this within JobRecords as well). The key-combo is simply Alt-X (where X is
any number 1 through 9, as corresponding with the particular QuickEntry you want
to insert). Some folks have had a lot more than 9 QuickEntry templates
that they want insert via this shortcut (for those, they've had open the
QuickEntry template form, Alt-Q, and double-click on the item they wanted).
The problem has been that, programmatically, it's quite
a bit more difficult to capture multi-keystrokes as combined with an Alt (as
would be involved, for example, if you typed Alt-1,0 when seeking your tenth
QuickEntry template). It's more difficult, but not impossible, so we
finally made it happen. Now you can quick-key insert any of your
templates.
Also, formerly the number keys that you used (in
combination with Alt) had to be from the row of numbers at top of your keyboard
(i.e., keys on the numeric pad would not do it). Via an added bit of
programming (your computer actually doesn't see the two key sets in the same
way), that is also now changed -- giving you the option to use either
top-row keys or numeric keypad. So, if you want to insert the thirteenth
party from your QuickEntry templates, go ahead, hold down Alt, then type 1 and
then 3 on your numeric keypad. It should be perfect now.
Enhanced Screening for Parts in Stock. A
couple of years ago we added a check, when you're creating an internal parts
order, to see if the requesting tech has it on his truck. If so, the
system warns against ordering. It was not setup to warn if the part exists
elsewhere in inventory, though not on the applicable techs truck. It is
now. In fact, it will offer to give you a quick glance of the quantity
possessed in each of your inventory locations, to help you decide whether to
proceed with the order, or not.
4.3.52 (9/26/07):
Enhanced Export from SalesSummary Report.
There's long been an export feature that becomes available when, in the Report
form (F11) you run a SalesSummary report and display it on-screen. At that
point some buttons appear to the right, one of which was formerly labeled "Export
ZipCode-Based Tax File." This export was made, specifically, for
servicers who are forced to report sales tax obligations to multiple
jurisdictions. Based on having each sale listed with the applicable
zipcode, it allowed them to determine which portion of their sales (and
corresponding sales tax obligation) belonged to each geopolitical area.
Recently we had folks expressing further needs, and it
seemed that a mere expansion of this export was a good way to accommodate them.
Specifically, one client pays their techs commissions
based, in part, on the margin involved in parts sales. Since we
have no method internal to ServiceDesk for doing this, we've added the option to
add parts cost to the above-described export. That user can then
manipulate the resulting numbers (within Excel or similar utility) to externally
produce the reports that are needed.
Another client dispatches to their techs in such a
manner that the tech's are unaware of the ServiceDesk-assigned Invoice/Job
Number (instead they see each job via a third-party assigned PO Number).
This interfered with the tech's ability to verify proper payment of commissions
via the standard ServiceDesk Commissions Report. So, you'll find
applicable PO Number (at least where available) many also now (at your option)
be added to that export.
In accordance with these changes, you'll find the
caption on that button has also changed. It now reads: "Export with
Extended Data."
New Flexibility if using the Miles-Determined-SCall-Rate
Feature. For several years, there's been a
feature where, if wanted, ServiceDesk will calculate a formula-derived
ServiceCall amount based on the distance of the location from your office.
Basically, you save a little file (in the \sd\netdata folder on your
server, and under the name MileageRates) that contains three numbers
(each on its own line). These go into the formula for calculating any
particular ServiceCall amount, as follows: (1) quantity of miles that are
included in the base service call amount; (2) the actual base amount; and (3)
the amount for each added mile.
After having done this setup, if you want to see (for
any location) what the miles-determined ServiceCall rate should be for it, just
do an Item-Locate operation (i.e., right-click on the customer's
address). The DispatchMap then displays (among other things) the
formula-derived amount.
Historically, ServiceDesk has rounded that result to the
nearest whole dollar. Recently, we had a client who did not want it
rounded, and that's where the new flexibility comes in. If you prefer to
avoid such rounding, you may now add a fourth line to that little file.
Simply place the word "True" there. Think of it as the
RefrainFromRounding field. You're simply indicating that you want the
value, of that determinant, to be true.
4.3.51 (9/24/07):
New Bases for Filtering Display of Items in
PartsProcess form. One of the primary
attributes of the PartsProcess form (F8) is that it allows you, at any time, to
limit your review and work to just those items that fit within some particular
process stage (i.e., Needing Initial Inquiry or Order, Waiting for Response from
Supplier, etc.). Some time back, we enhanced this discrimination by
allowing you to further narrow the display (and work) to just those items
involving a particular vendor. Now we've gone a step further.
Specifically, there are now two more bases via which you
can narrow your review and work: by applicable Technician, and by applicable PO
Number.
In regard to the latter, to make it work, we had to
modify the system to make much more active use of PO Numbers than it did before.
Previously, there was an option (available in the contextual CheatSheet, click
in the colorful label area at top of the form) to make the system generate
blanket POs with each order. But the system did not attach the resulting
number to each included item, so there was little basis for using that number as
an internal reference back (we've generally used the individual-item reference
numbers instead). Anyway, with this revision the system will now in all
cases auto-generate a blanket PO with each order (i.e., no need to select the
option to make it happen), and will auto-record that reference with each
included item.
To understand how to use the new Limit-Display options,
just look at the explanatory note that appears at bottom of the F8 form when it
first displays.
4.3.50 (9/17/07):
Further Improvement on Show-Tiered-Pricing Feature in
SmartParts Lookup. Besides new features as previously described (see
entries under 4.3.48 and 4.3.47), this system will now also show MasterPartsPlan
price, where applicable.
Import to FinishedForm Without a JobRecord.
Until now, if you wanted text to auto-fill into the FinishedForm context
(Alt-F4), it had to come from a JobRecord. We had a request to make it
auto-fill based on text that's in a Callsheet, without simultaneous creation of
a JobRecord. You can do that now. From the desired Callsheet, click
on Job/Sale. In the little yellow form that results, pick Print
invoice, do not create job. You'll see at this point there is now an
option (not there previously) to choose an up-front style ticket, versus a
FinishedForm.
4.3.49 (9/12/07):
Added direct print capability for the
recently-enhanced QOS-Report (see first entry as pertaining to Version 4.3.48
release).
Index-Based Search Now Available on Email Addresses:
Many of you are now making intense use of customer email
addresses. As usage has increased, there has began to be a need for
instant, as-you-type searching on these fields, much as there has long been for
customer names, street addresses and telephone numbers.
The need has particularly been expressed in connection
with the situation where you receive an email from a customer, who does not
otherwise identify himself. Your only means of figuring out who it is is
via the email address.
That need has now been addressed. In any of the
contexts where you've been able to instantly search via name, street address or
telephone number (including as-you-type in a Callsheet, from F12, and so on),
you can now do searches on email addresses as well.
The one caveat is that the new search won't work until
your system has built an index for it. So after updating, either invoke a
MakeNewIndexes process immediately, or wait for it to happen overnight (with
expectation that you can use the new feature tomorrow morning).
4.3.48 (9/9/07):
Dramatic Improvements in QualityOfService Report:
There's long been a handy report available via the
key-sequence (mouse is optional) F11, P then Q (if you
watch the menu selections as you go, you'll see the logic). We just
completed a major overhaul/improvement in this report. If it's a report
you've been using, you'll be amazed at the difference. Besides the fact
that it now compiles much faster, and looks nicer, there is now
twice as much information in the report.
Most particularly, for each high-volume client (and with
comparisons to your company as a whole, to non-hvc jobs and all hvc-jobs-combined),
there are now figures for average quantity of trips per job, average
hours worked per job, and average days from start to completion.
This improvement was spurred by servicers needing to
analyze what it was requiring, in terms of such factors, to complete work for
specific clients. It's no secret that some clients require far more outlay
(in terms of these kinds of factors) than others. Even if they pay more on
average, their work may still not be profitable.
The improvements in this report now help you analyze that.
Enhanced Show on Tiered Pricing:
The recently-added ShowTieredPricing feature, as
available from the SmartParts Lookup (see entry under upload # 4.3.47) will now
show sell-for pricing, under each Tier, based both on SmartParts-indicated
dealer cost and on actual historical cost (assuming the system finds any actual
cost info in your Inventory-System data).
New Links to ShowQtyAndLocInInventory:
Now, from three added locations, if you're looking at a
part listing, you can do a simple Right-Click and ServiceDesk will instantly
show the quantity of that item possessed in each of your inventory locations.
The three locations are: (1) in a listing as shown from the SmartParts lookup
window (Alt-F10); (2) in a FinishedForm parts listing (which should be
particularly useful when performing PointOfSale operations); and (3) in the
PartsProcess form (just click on the applicable Part Number).
Enhanced Printout of Basic Schedule:
When you're in the DispatchMap and hit Alt-P for print
options, the first offered selection is for "An Abbreviated Synopsis of the
Days Schedule." Until now, that synopsis has lacked some of the
notational information that shows on-screen in the the TechsList area (including
the symbols that indicate whether the job was confirmed, dispatched to the tech,
etc., and tiny notations on the right indicating JobCount value, quantity of
prior visits, etc.). That notational info has now been added to this
printout.
File-Based Method for Ordering Parts Restock:
We've long had the option, when ordering S/O parts, to
place your order info in a file, which some parts distributors can directly
upload for hands-off, much-more-automated ordering. Just added a mechanism
to the Inventory system, for when ordering restock on the basis of items
deficient. The standard Select Printer dialog box will still come
up, but it now has an option on it to "Print to File."
4.3.47 (9/5/07):
Tiered Pricing will now show in SmartParts Lookup:
Sorry, non-appliance servicers; this one does not apply
to you (wish it did). If you're using SmartParts (Alt-F10 for the direct
lookup), for any part that's displayed in the right-hand column, you can now
click on it to see the sequence of prices that apply for each pricing tier as
setup in your MarginPlanner (Shift-F10).
ServiceDesk Updating is now Auto-Prompted:
Some four years ago, we made it so ServiceDesk would
update itself by connecting to this website, managing the download, and so on.
But still, it was left to you to initiate the process. No longer.
Beginning with this revision, ServiceDesk will monitor
this site, to see if an update is available, and prompt you to update in
suitable circumstances. We've designed this carefully, to optimize the
frequency and timing of updates to best suit the average user. Here are
some details:
1. The prompts will occur only at the
desk of the person who's listed first in the Settings form's List of
Station Names.
2. In normal circumstances, you'll not
get a prompt until a new Version-numbered release has been available for at
least three days. This is because (to put it candidly), we sometimes break
things. Serious breaks usually come to light within hours of release, and
are typically fixed (after we become aware) within minutes. Three days
allows plenty of time for the early adopters to discover any breaks, and for us
to have fixed them.
3. In the abnormal circumstance where,
as an early adopter you did an update shortly after release, and where we
learned of something that was seriously broken and immediately uploaded a fix,
this new system will appropriately inform you and urge an immediate update again
(this will happen within 10 minutes of the moment we upload the fix).
4. If you want to prompt your own
updates the same as before, exactly the same tools exist, without significant
change.
We think you'll like this new capability. Please
let us know if you perceive any need for further tweaking.
Other:
In virtually every update, there are numerous underlying
fixes of small faults and defects that were discovered during the period, minor
tweaks, and so on. Whether stated in each entry, or not, you should
understand that each update, at least typically, includes that kind of work.
4.3.46 (8/31/07):
SD-WorkDiary is Now Auto-Prompted:
When it comes to reading this WorkDiary, some of you
guys are great. Unfortunately, many are not, and Karie and I end up
spending a lot of our time re-explaining improvements to folks weeks and even
months after they were already carefully described here. A year or so ago, I
added a link in the About ServiceDesk form to make getting here easy, and
it seems that I'm constantly preaching the importance of regularly checking here. But even so, many do not.
To address that (and also, as an enhanced convenience
for the rest of you), ServiceDesk will now automatically open this document when
you upgrade to a new version. Hopefully, those many who've resisted will
at least look when this page is thrust in front of their face.
Hyperlink Tool in QuickEntryTemplates:
Many times we've had users express the desire to
maintain kind of a handbook as associated with each HighVolumeClient -- some
"sheet" where they can summarize details that need to be kept in mind when
working with the client. We just created a mechanism for it.
Specifically, there's a new box in the QuickEntryTemplate for Hyperlinks.
Suppose Whirlpool Corporation is one of your clients.
Make up a document that summarizes all the important details, suggestions,
rules, contact info (and similar matters) that you want to keep track of in its
connection. Save the document anywhere, and under any name you like.
Then, locate the resulting file via the Windows My Computer utility, and
drag it into our new box (or, if you saved it to your Desktop, just drag from
there).
You'll see that ServiceDesk instantly creates a
hyperlink in the box you dragged it to. Anytime you want, you can click on
the hyperlink, and ServiceDesk will instantly open the document for you.
Indeed, ServiceDesk will have created its own copy of the underlying file, so if
you want you can just delete the original.
Just as in the other ServiceDesk hyperlink-enabled
boxes, you can drag in links to as many outside objects as you wish -- pictures,
files, emails, etc. (at least as many as there is space for within the box).
You can even select text from an open document and drag it in. ServiceDesk
will automatically create a file containing the text, and the hyperlink to it.
As an example, besides your own little "handbook" as
associated with Whirlpool, perhaps you'll want to drag in a hyperlink to your
contract with them. The general idea is, it's very flexible, and you
should use it in whatever manner as suits your purpose.
Key to Symbols in DispatchMap:
The range of symbols in the DispatchMap that denote
varying situations (e.g., customer confirmed, dispatched to tech, tech arrived,
etc.) keeps growing. As it's grown, it's become increasingly easy to
forget what each means. To assist in this, we've now added a Legend Key.
To display it, first bring up your DispatchMap (F5), and on your keyboard hit
'K' (think 'Legend Key'). If you forget, this new command (along
with many others) is in the DispatchMap's 'CheatSheet' (accessed by
right-clicking in any empty space there).
4.3.45 (8/28/07):
New Method for Handling In-Shop Work:
Until now, ServiceDesk has not had a purpose-built
method for discriminating between In-Shop work and the more typical
Field-Service job. In fact, structurally it virtually assumed that all
jobs (at least all that included any kind of an appointment entry) were for
field-service. There was a resulting awkwardness, if you wanted to
schedule techs to do particular jobs within the shop. We've now redressed
that awkwardness.
Specifically, what you need do, when writing up an
In-Shop job, is place the text "SHOP JOB" in the LocationName box of the
Callsheet (or JobRecord, if it's already been made from a differently configured
Callsheet). When ServiceDesk sees that there, it will understand the
circumstance, and not pester you in circumstances where otherwise it might.
Most importantly, in the DispatchMap it will refrain from any effort to
graphically display appointments on such jobs, and will automatically configure
route-lines (if applicable) to go to the office, as is appropriate to the
circumstance.
BTW, the magic string of text (i.e., "SHOP JOB") can be
placed anywhere within the LocationName box. It can be on the left,
off on the far-right, wherever you want it.
4.3.44 (8/22/07):
Did a major overhaul of underlying methods for timing
events within ServiceDesk. This will result in a dramatically reduced CPU
load during all moments when execution needs to pause, for whatever reason.
I'm anxious to hear reports as to whether there's a noticeable difference in
user experience.
Overhauled and improved export of A/R data. Fixed
numerous small faults.
4.3.43 (8/18/07):
List Positions for Techs in DispatchMap Now User
Settable!
As you probably know, when we create your DispatchMap we
include within it a set of TechList positions. Internally (and though
unseen by you), these positions are sequentially numbered from Zero to X (X
being the total quantity of positions defined). It's always been the case
that, automatically (and without you having the slightest say-so) ServiceDesk
assigns the first tech in your roster to Position1, the second tech to
Position2, and so on. Usually that's fine, but occasionally people have
wanted greater control.
This has particularly been true when a tech that's high
in the list (i.e., low number) gets removed. Under the always-until-now
protocol, all the succeeding techs jump forward a notch, to replace the departed
tech's position. It was potentially disconcerting when you'd gotten used
to seeing certain tech's lists in particular positions, and
suddenly they all shifted.
For such reasons, we've now made it so that, for each
tech, you can explicitly indicate which of the numbered list positions you want
his list to appear in. And now every tech will stay where he's once
assigned, unless you purposely make changes.
To change a tech's position, go to the Settings form
(Ctrl-F1), click on his name, and to the right you'll see that the
Tech-Properties window has a new box (it's labeled "Map ListPos"). When
you first look, you'll see that all the techs have their pre-existing, standard
list-position assignments. Just click on the position you want to
move your selected tech to, and ServiceDesk will do the rest.
If you happen to move a tech to an already-occupied
position, you'll notice that any techs between the two points (i.e.,
position-being-moved-from and position-being-moved-to) will get shifted as
required. In such a situation there's simply no better way to accomplish
the requested move.
To assist you in the need to visualize where each tech's
list may appear, we've also added a feature to the DispatchMap itself. If
you hit the 'L' button on your keyboard while there (think 'L' for 'L'istPositions),
the DispatchMap will display all the available list positions, along with
the numbers that correspond with each (hit 'L' again, or Esc, to toggle out).
This new command has been added to the contextual CheatSheet there
(right-click in any empty space), so if you forget it, just use that as a
reminder.
Specification of 'Warranty Client' Now Separate From
'Tax Exempt'.
A very long time ago, we encountered our first
ServiceDesk clients who, having customers who were Tax Exempt, needed
to have ServiceDesk keep track of the fact and act accordingly. Not long
after that, we likewise encountered ServiceDesk clients who were doing OEM
warranty work, and needed to have ServiceDesk act appropriately in those
situations. As it happened, the OEM warranty clients were, in virtually
all instances, the same clients that were also tax exempt -- so the single
setting seemed to serve fine for both purposes.
We were very surprised, frankly, that that lasted so
long.
As was inevitable, finally (and just recently) a client
came along who had significant tax exempt clients who were not OEM warranty.
So, we've now made two separate checkboxes in the QuickEntry
template (Alt-Q from a Callsheet): one to explicitly indicate if the applicable
client is OEM Warranty, and another to indicate if Tax Exempt.
If you've been going fine with the old assumption,
there's no need to worry about re-setting anything. When ServiceDesk first
runs with this new revision, it will look to see if, on any QuickEntry template,
you had the old Tax Exempt box checked. If you did, it will automatically
check both OEM Warranty and Tax Exempt in the new form.
Fix for Longstanding Sales Entry Problem.
For several months, there have been spotty reports of
AccountsReceivable records sometimes failing to create -- when they should have
-- as part of the SalesEntry process. It's been a devil to nail down (we
could never seem to replicate it here), but finally (and with help from Josh at
Contract Installation Services), we got it. Shouldn't ever happen again,
and we apologize for any frustration this may have caused you.
4.3.42 (8/14/07):
Last Major Component Completed in the ServiceDesk
Auto-Pricing System!
This is a system that's come along piece by piece.
On October 29 last year, we introduced the
MarginPlanner (Shift-F10). It allows you to design a price-markup
curve according to your precise preference. We then began adding
operations (such as when checking in special order parts via the F8 form) where,
based on the curve as setup by you, the system would auto-calculate and insert a
retail price based on cost.
About three weeks ago (July 23), we added
TieredPricing -- a system that allows you (among other things) to design up
to six different markup curves, as applicable to clients residing on
differing preference levels.
Even after all this, there was still a major functional
area where the machinery had not been incorporated. That was
(emphasis on past-tense) PointOfSale operations (POS) in the FinishedForms
context (Alt-F4).
The one difficulty in this last area was the plethora of
situations, and the fact that each needs dealt with differently. To help
acquaint you with how the design manages these complications, we've provided
contextual help. If you load any of the three FinishedForm types (i.e.,
Generic, Custom or Narda), then float your mouse pointer over the top PartsPrice
box, you'll see a little ToolTip that tells you to right-click in any
PartsPrice box -- to view this help. You'll see, when you do so, that what
follows is a detailed but concise message describing all the important
particularities.
Among other things (and assuming you read carefully)
you'll see that after any auto-insertion of a part price, the system places a
new ToolTip in the PartsPrice box (float your mouse pointer over the box to see
the tip) that explains the markup basis that was used, and the underlying cost
on the part. This should make the whole system very simple and
transparent.
There is another new element, not mentioned in the
on-screen help, that we think you'll like very much. If it's a warranty
job, and if the system detects that it's also a warranty part (if special order, for
example, a warranty part should have been priced in the F8 form at zero), and if
it's other than the Narda form that's being used, the system will place the word
"Warranty" in the price box, rather than any actual number.
A single but less major component remains to be done, in
the auto-pricing system, and that's a feature that will allow you to instantly
update pricing in the MasterPartsPlan, based on latest experienced part
costs. We hope to get to that soon.
Direct Uploading of Claims to LG -- Now Even More
Ready! Just three entries back, we
announced you could now connect directly to LG for immediate claims transmission.
It was absolutely true. But we discovered a limitation. Turns out
that LG's new method of claims reception demands that you include, within your
claim, a previously assigned LG-JobNumber. This is no problem if you
received the job through LG's new automated DispatchSystem (with which we also
integrate, see 7/12/07 entry), but if you initiated the job on your own
(i.e., customer called, you took the job and went with it), there's no
likelihood that you'll already possess such a number.
For such reason, we've now modified the LG-DirectUpload
program code as follows:
Upon your request to transmit a claim, it looks to see
if you already possess an LG-assigned JobNumber. If so, it proceeds
normally. If not, it connects first for the purpose of submitting the job
and receiving back a number (which it dutifully plugs into your claim).
Then, it proceeds with the transmission normally. It all happens so
quickly you'll hardly realize any extra work is being undertaken, on your
behalf.
Moderate Improvements in ProblemCustomerAdvisory
(Alt-F11). Sometimes I go to tweak something of minor importance,
realizing it ought to be just a little better, though it's no big deal.
It's the kind of thing I'd never intend to spend a lot of time on (there are
bigger fish to fry), but I figure the effort will require but a few minutes --
then, to my horror, I discover it exhausting a half day or more. Such was
the case here. Regardless, opening the ProblemCustomerAdvisory from
multiple contexts, with intent to insert text for a new entry from the context
you're in, should now be much more consistent. To learn details, there's
new contextual help on this item too. It's accessed via a new help button
in the bottom-right corner of the form.
4.3.41 (8/7/07):
Minor enhancement in printout from JobsPerusal form
(Shift-F10). Now, the summary of each job will include a little notation
that lists the date of each visit and tech involved.
Minor enhancement in data file as created from
PartsProcess form (F8) for DirectData method of placing a parts order.
There are now two added fields: one for applicable make, and another for your
internal reference number.
4.3.40 (8/4/07):
Did a big overhaul in the bottom half of the Sales
Summary Report (available in the Reports form, F11). Previously, the
figures in that section were arranged and labeled in a manner that sometimes
produced confusion. Now it should be much easier to make sense of what's
presented. In addition, we're now explicitly tallying the portion of
"sales" that consists of parts credits, and explicitly deducting from the funds
received figure.
Though we were proud of our recently introduced "Safeguard
to Assure Parts as Used on a Job Get Included in Final Invoice and Billing"
feature (see 7/29/07 entry), we were quickly informed that, for some users (and
at least when requiring a password to bypass the warning in every instance), it
was proving more of a nuisance than a help. Thus, we've now added an
optional checkbox in the SalesEnter form (F9). This will default to 'On',
meaning that unless you uncheck it, the strict security (as recently created)
will still prevail. You have the option to uncheck it, however, in which
case the system will still inform -- if in fact you're entering a sale with a
PartsSold value that's less than cost of parts ordered and/or used from stock on
the job, but will simply be a mild message that informs you, and not a demand
for password if you want to proceed.
Found and fixed a flaw in the code that, in particular
situations, could result in one computer locking the current JobRecords file,
thereby preventing access to other users. Numerous other small fixes and
improvements.
4.3.39 (8/1/07):
DIRECT UPLOADING OF CLAIMS FOR LG!
Some five years ago, we were the first in the industry to introduce direct
claims transmission -- a technology we pioneered with ServiceBench.
If you're not aware, the traditional method of claims
transmission had been to first save your claim to a local file. Typically,
this was created using your service management software, but that's as far as
the latter took it. It was then up to you to somehow upload (or otherwise
transmit) the file to your warranty processing entity. With direct
claims transmission, there's no intermediate step. ServiceDesk connects
directly to the processing entity's server, and hands off the claim directly.
It's much superior.
At any rate, ServiceBench's prime competitor,
ServicePower/KPI, lagged a bit in creating the mechanisms on their end that
would allow us to similarly transmit claims directly to them, but they finally
completed the task a couple of years ago, and we soon offered the same
capability in their connection.
Until about a year ago, LG had been using ServiceBench
as its processing agency, which meant that through ServiceBench you could do
direct claims on your LG work. But it didn't last. LG decided to
separate from ServiceBench and handle all their processes in-house. It's
taken them the time since to build mechanisms to achieve automated dispatch
mechanisms such as they'd enjoyed with ServiceBench (see 7/12/07 entry), and now
the ability to accept direct claims. Of course, we bring you the ability
to use those mechanisms before anyone else. Update your ServiceDesk, do an
LG claim, and you'll see the new option.
By the way, LG has gone one better (as compared to
ServiceBench and ServicePower) in their own direct claims system. With the
others, your claim simply hands off to processor's system, and does so whether
there are defects in it, or not. You only find out after the fact if there
was a problem, either by logging into the processor's website, via email reply,
or otherwise. LG's system checks many elements of the claim prior to
accepting the handoff, and for any of several faults, immediately replies,
informing of the fault. This allows ServiceDesk to then tell you what the
fault is, thereby giving you the chance to fix it before LG ever actually gets
it. It's much better.
With this addition, we now offer the same essential
suite of capabilities, in connection with LG, as has long existed with
ServiceBench -- except LG's has some enhancements (such as just the one just
discussed, along with the drop-down boxes for DefectCode and RepairCode, as
discussed in the entry just below this one).
4.3.38 (7/29/07):
NEW DROPDOWN BOXES, for DefectCode and RepairCode, in
On-Screen NARDA. Until now, when filling in the on-screen Narda for a
warranty claim, it was up to you to know and type-in the DefectCode and
RepairCode, at least in any instance where these are required by the
manufacturer. Working in close conjunction with LG, we've now worked out a
mode of live connection whereby, when you're filling in an LG claim, ServiceDesk
makes a live connection to LG's server, determines the codes that are applicable
to the particular model involved, and auto-populates drop-down boxes from which
you can select the applicable codes. We suspect that any and all LG
servicers will find this is a wondrous tool. Just make sure LG is listed
in the Narda's 'Make' box, and you should see the buttons as needed for the
drop-downs.
On another note (and if you're interested), we now have
available a new Generic FinishedForm. It's the same as the old,
except doubles the number of parts boxes available. If you want it,
just email a request, and we'll email it back.
EIGHT NEW COLORS now available for your Techs!
Until now, there have been a total of 10 different colors that could be assigned
to your techs, for use (within the DispatchMap) in representing jobs as assigned
to each, his home location, and so on. For those servicers with more than
10 techs, the colors simply got re-used (meaning if you had 20 techs, each color
would be used twice, 30 techs meant three times, and so on). Those
companies that had more than 10 techs sometimes asked for more colors, but it
wasn't an easy deal. Besides significant programming effort, it's tough to
come up with added colors that contrast sufficiently against a white background,
and which contrast sufficiently against each other. But, we've done it
(there are now 18 colors total, besides the dark-red that you reserve for
Unassigned jobs). To reassign colors, click on any tech's name in the
Settings form (Ctrl-F1), then look in the 'Display Color' box to the right.
NEW SAFEGUARD to assure parts as used on a job get
included in the FINAL INVOICE and BILLING. We've always provided a lot
of security (by way of checks, cross-checks, and so on) for many of different
steps in operation -- the notion being that the computer should be watching, to
make sure you don't do anything wrong (or stupid) that costs you money.
One cross-check we've not had is, when you're entering the amounts in a
completed sale (i.e., in the F9 form), to make sure the amount as indicated for
parts sold is at least sufficient to cover the parts as actually used on
the job. That check has now been added. If the PartsSold amount is
below cost of parts used, the operator will get a nice warning -- and won't be
allowed to proceed with the entry (at least in such a state) absent entry of the
security system Master Password.
4.3.37 (7/23/07):
TIERED PRICING is now available!
Yahoo! This is one of those functions that, in more typical software,
might have been considered basic -- but in ServiceDesk (concentrating as we do
on the much more difficult problem or achieving superlative, base-level
operations flow) we neglected it for a long while. Well, that neglect is
past.
Now, if you check your MarginPlanner (Shift-F10), you'll
see you can design not just one, but six different price curves.
The first five of these are labeled "Tiers," with labels 1 through 5 (Tier
1 is the "default" tier, which ServiceDesk will apply in all instances
where there is no specification otherwise). The sixth (as indicated by its
label) is for auto-calculating prices when adding items to your MasterPartsPlan
(many people prefer a steeper markup curve when dealing with stocking parts).
The idea is, select the Tier of interest, then set its
variables as wanted to tailor its curve to your precise preference.
With the above done, the next task is to bring up the
QuickEntry template (Alt-Q from a Callsheet) as applicable to any client whose
parts you want to have priced at other than the Tier 1 level (since 'Tier 1' is
always applied, absent specification otherwise). In the template, you'll
see there is now a new space, where you can specify the Tier you want to have
applied to that client.
In fact, the system has been created to give you even
more
options, aside from merely specifying a Tier. If, instead of a Tier
other than 'Tier 1', you want to do a fixed percent discount below 'Tier 1'
pricing, that is also an option. It's also an option to setup a client for
a straight percent markup over cost (read notes in the box for details).
The idea is, we want you to have maximum flexibility.
As another enhancement in the MarginPlanner, it used
to be that its settings were local only (i.e,. particular to the computer where
done). Settings are now system-wide (i.e., setup at one computer, and it
takes effect everywhere) -- and, naturally, there is now password protection
before you're allowed to save.
In other news, finally worked out some
difficulties we'd been having with Dacor uploads, and we've now added Dacor to
the 'Translation Tips' function in the NARDA FinishedForm (Alt-F4).
If you're not familiar with 'Translation Tips', the idea is to provide a means
by which you can easily see how each field from the NARDA is translated into the
claim format of the particular processor you're interested in (i.e., whether
ServiceBench, ServicePower, LG, Dacor, Fisher Paykel, etc.). This can be
very useful if you're wondering in which particular box an item should be placed,
in order to get it, ultimately, to the right place in the manufacturer's final
claim form. You'll see a little
button labeled 'Translation Tips', just above the radio button where you
select "Narda," but only after Narda is selected. Click on it, and
follow the prompts.
4.3.36 (7/12/07):
Dispatch Automation is now available for LG!
If you're familiar with our long-available WebBasedDispatchEnabler (automates
the dispatching process with ServiceBench), this new tool is all-but identical
from the user end -- except that it works with LG rather than ServiceBench.
Specifically, it automatically keeps LG informed of your real-time availability
status, and whenever a dispatch is created for you, automatically downloads
all info and inserts it perfectly into a ServiceDesk Callsheet.
(Incidentally, we have a third utility that's ready to perform the same task
with ServicePower/KPI, and are just waiting for their final certification on
it). For more info on these utilities, give us a call, or email.
Added a "cloning" feature in the Inventory Control
system. This is particularly suited for initial inventory setup.
Suppose you've "populated" a particular truck with all its inventory (i.e.,
accurately told ServiceDesk how many of each item that truck possesses).
Now you have several other trucks that all have identical inventory, and you
don't want to have to manually enter quantities, again, for each of those.
The new cloning feature allows a shortcut. It's accessed from the F10
form: pick 'Adjust indicated quantities' then 'Clone from another'.
When printing a Generic FinishedForm, you may have
sometimes found there's more description of work performed than will fit in the
printout. Now, the system will note this condition, and reduce the size of
text (as needed) to assure that all the text fits.
4.3.32 (6/14/07):
When initiating an internal parts request from a
JobRecord (which is not the usual context, as that's more typically done via the
PostVisitReport), there's long been a potential frustration -- specifically, IF
the JobRecord happened to have multiple UISs attached. In such a
case, the system would simply assume you were ordering for the machine specified
in the first UIS. If
it was otherwise, you had to manually type-in applicable type, make, model and
serial descriptions. This was not a common occurrence, certainly, but it's
been addressed regardless. Now, when there are multiple UISs, the system
will ask which of them you're ordering a part for.
Created export of PartsProcess data. It's a new
button in the PartsReqest form (Alt-F8). We don't suspect a lot of people
will use this, but if you've wanted to access that data for any function that's
not available within ServiceDesk itself, this is your ticket.
Improved SD-Mail so that the system will no longer beep
you about pending items UNLESS one or more have not yet been looked at.
Also, when you have multiple items to view, they will now be sorted by date,
with newest first, working sequentially toward oldest.
Numerous other fixes and improvements.
4.3.29 (6/5/07):
Major enhancement in the WipAlert system (thanks to
prodding by Adam at Fred's Appliance). Until now, the underlying process
that creates WipAlerts followed a very simple procedure. It began at the
oldest JobRecord in the current file, looked to see if it was past-due for
attention, and created a WipAlert if so, then went to the next oldest, and so on
-- until making it through all the records in the file -- or reaching the
built-in limit for quantity of WipAlerts to be created at one time (whichever
came first). Adam pointed out this was deficient in that newer jobs
might be more stale for attention than older ones (i.e., more days past the
grace period since the most recent historical note) -- yet never be reached,
because older jobs (though less stale) filled the quota for allowable alerts.
It would be far more logical, he pointed out, to first show the items that were
most stale.
So, in result of a major overhaul that was just
completed, that's now what's done. It requires a lot more underlying work
by the system, because it has to go through all the records, count the days of
inactivity on each, then sort from greatest (that's greatest number of days past
grace period) to least, and (finally) create the WipAlerts according to such
sorting. But after all, what are computers for if not to perform such
grunt work?
As a further enhancement on this upgrade, I also now
have the system creating an underlying file that contains information about
all the jobs that are past due for attention. If, in fact, the number
of stale jobs surpasses the built-in limit for quantity of WipAlerts (i.e., you
get that final Callsheet that reads 'Whoa Pilgrim'), that same Callsheet will
have a hyperlink (on the bottom) to this new file. Just click on the
hyperlink and the new file will open, then you can peruse the entirety of your
neglected jobs.
Also made a minor (but long needed) improvement in links
to the ScheduleList from the DispatchMap (i.e., the Shift/Right-Click action on
a listing under a tech's name). For a long time, if it was a non-job
listing that was so clicked on (such as, for example, a tech Unvlbl type of
entry), the function was not operable. Now it is.
4.3.29 (6/5/07):
Another significant (and very valuable) use of the new
capacity for maintaining customer email addresses. There's now an option,
when checking in parts (if it's the last item being checked in on a particular
job) to auto-email the client, informing of the parts arrival, and asking them
to call office to schedule. Note this will only work if you've acquired an
email address for the customer, and have email setup to operate on the machine
in question.
4.3.26 (5/25/07):
In regard to the recent fix of the CapsLock frustration
(as experienced by a smattering of users), the good news is, my fix was
absolutely successful. There is no longer any unintended change in
CapsLock status. My new method (which directly plumbs the depths of
Windows, instead of relying on a Microsoft utility) holds the CapsLock
perfectly, without exception, exactly as per design. The bad news is, the
old, Microsoft-reliant method had a benign characteristic I'd not realized.
It had only controlled the CapsLock so far as ServiceDesk itself is concerned.
Thus, if as a user you tabbed to a different application, the CapsLock setting
as set per ServiceDesk did not affect the CapsLock setting in that other
application. My new method absolutely controls the CapsLock, which can
result in frustration if you're in a place in ServiceDesk that has CapsLock on,
then tab to another application where you do not expect it. Anyhow, I've
fixed it. ServiceDesk will now keep track of what the CapsLock status was
when you switched into it, and change back to that status when you switch back
out. This should, in short, make your usage maximally convenient.
Significantly enhanced the "Service History Report"
as printable from the UnitInfoForm. Besides the fact that the overall
layout is much improved, you can now choose to limit the description of
JobHistories to just the entries that resulted from PostVisitReports (in other
words, the printout will describe only work the technician did, and not other
actions pertaining to each job). The option comes up in the same form
where you select the printer that you wish the report to go to. You can
get to this report by going to the UnitInfoForm (Shift-F12), pick the UIS for
the machine of interest, click on 'Show All Linked Jobs', then 'Print
Summary'. A similar report is available, from the same form but
pertaining to all jobs as done for a given model (as opposed to on a particular
machine), by clicking on 'Find an Existing Entry', then Locate 'by
Model Number', then choosing a model and again selecting 'Print
Summary'.
Numerous other fixes and enhancements.
4.3.25 (5/21/07):
Since forever, there have been intermittent reports of
boxes on which the auto-CapsLock feature causes more frustration than
assistance. Specifically, users will be typing in a Callsheet, and for no
reason at all the CapsLock spontaneously releases, causing their continued
typing to be (unintentionally) in lower case. For those to whom this
happened, it was very frustrating. Repeatedly, I've tried to find any flaw
in my program code that would explain it, and always have come up empty.
Finally, I concluded it must be a defective OCX component as provided by
Microsoft. I've now replaced that component with one I programmed
directly, and it seems to have solved the problem.
4.3.24 (5/18/07):
When printing invoices from the DispatchMap, we've kept
having requests for different options. Some have wanted to use
Finished-Forms (any particular of the three types) in lieu of up-front type
tickets (but only if it's other than the first visit). Some have wanted to
refrain from printing any ticket if it's not the first visit. More
recently, some have wanted to use Finished-Forms in every instance. Most
recently, some have wanted to re-load preexisting edits to the FinishedForm, for
this purpose, rather than letting the system do a fresh import. Since our
old, simple-options method of setting preferences was no longer adequate for
specifying such a plethora of variations, we've added a new interface,
where any user can precisely specify any possible combination of options,
according to preference.
To access it, display the DispatchMap's "CheatSheet"
(right-click in any empty space on the map). In the third section from the
bottom, click on the item labeled 'Set parameters for Invoice Printing'.
You'll see the new interface, and can there set options according to preference.
4.3.23 (5/16/07):
First Automated Use of Customer Email Addresses:
If you did not know, since the customer email address
boxes were introduced, it's been a piece of cake to initiate an email to any
such addressee. Simply double-click on the desired email address.
Or, if you have multiple email addresses in a box, right-click if wanting to
address an email to all.
The real and big reason we wanted to add the email
boxes, however, was so we could introduce new and cool automated functions.
The first one is now here. We're calling it Emailed Confirmation
Requests.
To use this feature, just click on a tech's name at the
top of his list of jobs in the DispatchMap. You'll find, one item up from
the bottom of the resulting options list, there's a new option, labeled 'Email
a confirmation/reminder to each customer.' When you select that
option, ServiceDesk will do just as it says (emailing each of the customers in
the list under the tech's name) -- assuming, of course, that you've provided
appropriate email addresses (otherwise, it will inform you). It will also
add an an appropriate note to each applicable job's narrative history, and
append a new symbol to the appointment which denotes that a confirmation email
was sent.
This same option is available, by the way, for all your
appointments as pertain to a given day (i.e., not just those for a certain
tech), by using the general print Alt-P function in the DispatchMap (with
desired day displayed), then picking 'Invoke dispatch options, but for all
techs'.
Right now, you'll see, the email that's sent is asking
the customer to reply via email to confirm they'll be there for the appointment.
Soon, we want to offer instead a 'Click Here to Confirm' option.
That will automatically connect to our Web-Scheduling feature, and mark the item
as customer-confirmed without any further involvement on your part.
Other:
Since forever in the DispatchMap, there's been an
annoyance in that, if you dragged or layered some external object (such as the
window from another application) over it, it would erase whatever imagery the
object passed over. A simple click in the map would refresh its image, but
it was still annoying. This was a symptom I could have easily avoided via
a simple programming choice, but with a cost: you'd encounter slower "paint"
times. To me, it's most important that as you move around in the map, each
display should appear instantly. In programming as in most everything
else, there's no free lunch. So, faced with a choice between speed versus
having the Windows AutoRedraw property set to true, I chose speed (the
cost being that slight annoyance you may have encountered).
However, there's a happier ending (brought to us
courtesy of "Moore's Law"). The choice I made was several years ago, and
in the interim computer speeds have increased dramatically. Given that, we
just re-tested DispatchMap paint times, with the Windows AutoRedraw
property set to true. Eureka. Even with our slowest computer, paint
times are now perceptually instant. For such reason, the DispatchMap's
AutoRedraw property is now set as true, and that somewhat annoying symptom
will be gone.
If, by chance, you happen to have a computer so ancient
or slow that you now notice perceptible delays as your DispatchMap paints,
please let us know. Should there by any such need, we'll add a
user-settable option, where you can turn AutoRedraw back to off.
4.3.22 (5/14/07):
Added formatting to narrative JobHistories that will
make such entries as describe PVR activity more visually distinguishable from
the rest of the narrative. This formatting will be added only in regard to
newly-made PVRs (that's PostVisitReports). Narratives as already created
will be unaffected.
Numerous continuing fixes -- including, most notably,
found and fixed a problem that sometimes resulted in spurious AttentionNotes
being attached to archived JobRecords.
4.3.20 (5/8/07):
More miscellaneous, including fix of fault where
(sometimes) when checking parts in through the PartsProcess form, the system
erroneously concluded there were no more items to be checked in on a particular
job.
4.3.19 (5/8/07):
Miscellaneous fixes.
4.3.17 (4/26/07):
There have been a series of updates (as can be detected
via version number), which dealt with an equal series of minor, underlying
issues.
In this update there's a new feature. If you want
to send an email from Callsheets to confirm that you just made and appointment
with a customer (or for other reason), and you want ServiceDesk to automatically
insert some text into those emails, create a file in the
x:\sd\netdata folder on the server (where
'x:' is the server drive) called 'TextForCllshtSentEmail.txt'.
Place in the file the particular text you want. Now, from any callsheet in
ServiceDesk, hold down the Ctrl key while dbl-clicking (or right-clicking) in
the the email box. ServiceDesk will locate the text in that file, and
include it in the email that it then creates for you.
[PLEASE NOTE: This function has ben superseded by the
User-Defined-Template system introduced with Ver. 4.8.29 on 6/27/17]
4.3.13 (4/18/07):
Added a new feature that allows you to print the Generic
FinishedForm with a large watermark in the background labeled 'For Estimate
Only, Please Do Not Pay'. If you wish to take advantage of this, let
me know, as there's a bitmap I'll need to provide you.
Added ability in InventoryControl form, when reviewing
inventory via a List of Items, Showing Total Qty of Each, to right-click
on any item listing and then see a breakdown of quantities existing at each
location for that item.
Resolved a long-standing fault on Viking claims, in
regard to claiming for mileage. We'd worked with ServiceBench for some six
months trying to determine in what field (of their transmission format) they
needed the quantity of miles (they don't have any field that's actually
so-labeled). Finally got the answer today, and immediately revised the
export so that now, when you put quantity of miles in the box so-labeled of the
on-screen Narda, it will translate into the electronic transmission field where
ServiceBench needs it.
Fixed a few more glitches that came to the surface since
the last update.
4.3.12 (4/17/07):
Fixed a few further glitches that had come to the
surface in regard to the recent major overhaul.
More notably, did a major (and further) enhancement of
the Hyperlink system. Most importantly, in this regard, while
dreaming several nights ago I realized there was a serious problem in regard to
the present system. While it made ServiceDesk perfectly happy to
point to outside files and references, there remained a serious potential
problem. The addresses (technical term is filespec or url,
depending on circumstance) of such outside references might well change as time
goes by (i.e., as the user migrates from one computer system to another, makes
changes in the mapping of the underlying network, moves files to different
locations, etc.). Such changes are, in fact, likely, and could
leave hyperlinked references in ServiceDesk, essentially, orphaned.
To address the above, I've come up with an enhanced
scheme. Now, when you drag any link-capable object (i.e., files, emails,
etc.) into a ServiceDesk link-enabled box, instead of just making a
reference to the object as it exists in the world outside it's own files,
ServiceDesk will instead copy the object into its own file system (specifically,
into a new 'HLinks' subfolder), and make its reference accordingly. Thus,
because ServiceDesk files stay together, those references should never be
orphaned.
Another benefit with this new system is that the
hyperlinked references can be much shorter. In fact, when ServiceDesk
copies the referenced object into its own files, the reference that it creates
will be enclosed in brackets (with the word "SdLink" preceding the actual file
name). This makes the filename itself much more apparent (i.e., less
buried within a long path sequence), and thus more useful.
Remember, all you have to do is drag from a link-capable
object into a ServiceDesk link-enabled box. ServiceDesk then puts the
reference there (in fact, you can even do this with a string of text as
dragged from any text-edit location, such as from within Word or WordPad, for
example). Any time you want to display the object, just double-click on
the reference. Karie says this is "really cool," and mentions (as a
possible use), suppose you want to job-attach some snippet of text from a
manual. Just highlight and drag it into the job's history. It's that
easy.
BTW (and sorry to make it more complicated) but if you
want ServiceDesk to refrain from copying the object into its own file system,
just hold down your ctrl key as you click down and drag. If you do that,
it will make a standard reference to the external object. It's an
option, but in general we think you'll be better off using the more simple
method.
4.3.11 (4/14/07):
Cool new ability for making hyperlinks. Now you
can drag any file into a ServiceDesk link-enabled box. When you do,
ServiceDesk will instantly create a hyperlink to that object (in particular, at
the text location where you release your mouse). Bear in mind, almost
anything that can display on your desktop, in your My Computer utility, in
Windows Explorer, etc., is a file -- so this can work on pictures, text files,
programs -- a whole variety of things. Once you have the hyperlink, of
course, you can double-click on it at any time to instantly load the object
that's linked.
The boxes in ServiceDesk that are currently link-enabled
are JobHistories, StickyNotes, and both boxes in the MoreInfo form. If you
need to have any other boxes link-enabled, let us know.
4.3.10 (4/12/07) Now Available in General Release!!!!!!!!!!!!!
The 4.3-level major-overhaul/major-upgrade is now
available to everyone. Thanks are extended to our brave beta-testers
(ultimately there were four businesses that allowed themselves to be guinea
pigs). They discovered, coped with and helped us weed out a series of
glitches, but overall the problems were not severe. Chances are, as larger
masses update, other glitches will be found, but safety against any major
problems now seems reasonably robust (if you're particularly timid, just wait a
little while longer).
BTW, besides the major upgrade changes, two other
improvements have recently been made.
(1) The system will now add to an
archived-JobRecord's narrative history, to indicate when (and if) final payment
was received, or if (instead) any amount was written off as a bad debt (we're
now leaving space in the data structure to make this possible).
(2) A longstanding fault has been fixed in regard
to Fisher & Paykel claims, where formerly (and mysteriously) the parts-used
would fail to upload. For this we must thank, in significant part,
detective work as done by young Tim Merriam, of Appliance and Refrigeration
Hospital, in Portland.
4.3.0 (4/1/07 available now only in beta -- MAJOR SYSTEM
UPGRADE):
For the last 15 months, I'd been trying to set aside a
solid, uninterrupted week for intense re-programming work: mostly to overhaul
the Callsheets (and many related structures, such as JobRecords, QuickEntry
templates, etc., etc., etc.) to accommodate a third telephone space and email
addresses. Instead of just seven days, it proved to be a 16-day marathon.
But, I'm pleased to announce, the major work is done.
Indeed, I did much more than just add those fields.
Since I had to modify much of the program code that's involved in managing the
data, I took the occasion to dramatically improve and bolster much of the
behind-the-scenes machinery that makes ServiceDesk work. Some of the
appearance is improved as well.
The downside is, whenever so much re-work is done,
there's a significantly increased chance that unforeseen (and, until now,
undetected) faults could arise, and possibly wreak havoc in your operation.
That's why, initially, this new work is not being generally released.
What 'beta' means is that you're free to use it, if wanted, but please do
it with both eyes open, understanding the added risk involved. I don't
mean to overemphasize the risk. I doubt there will be any major
problems, but there are all but certain to be minor ones, and major ones are a
possibility. If you adopt at this point you're an early tester, a pioneer.
Another limitation is I've not yet revised the utilities
(specifically, WBDE, EDR and SD-WebScheduler) that interact with ServiceDesk, to
make them work with the new data structure. Thus, if you're using any such
utilities, you need to wait regardless.
Otherwise, if you're feeling intrepid and want to give
it a try, please call (800-353-4101), and I'll set you up. I want to limit
the early adopters to just three or four, and see how it goes for a couple of
days. As soon as all looks good, we'll open it wider.
BTW (and aside from many general improvements)
there's a new function in the PartsProcess form (F8). Now, if you're in
the box where you fill-in the part cost (i.e., as you're checking in a
shipment), you can increase the base from which markup is calculated by simply
hitting your keyboard's plus ('+') key. Or, if you want to apply a
straight markup percent to the cost (rather than using the internal markup
curve), just hit your keyboard's multiplier ('*') key. In either case,
a tiny box appears in which, with a keystroke, you can type the desired ratio.
4.2.52 (3/25/07):
Awesome new feature. It's now a single click
process, when needing assistance, to connect your computer to one at Rossware.
This allows a help person here to see your screen, or vice versa, and
dramatically aids the process of providing/receiving assistance. The new
feature is a new menu item (second one down) under 'File Functions' in the
ServiceDesk MainMenu.
4.2.51 (3/13/07):
Addressed a plethora of issues in the most recent three
updates, plus added two minor functions:
1. In the JobRecord or Callsheet's
ExtraNotes section, if you have an email address there and double-click on it,
ServiceDesk will initiate an email for you (of course, you need an installed
email program in Windows to make this work).
2. In the FinishedForm, made it so the
system will add a bracketed date (to parts item descriptions) to indicate when
(if at all) a part was previously installed). Actually, this is so if the
parts was a special order item. If it was a stocking part, the bracketed
notation will instead indicate "[Stock]".
4.2.48 (2/19/07):
Another drum roll please . . .
This one actually isn't in ServiceDesk per se, but it
sure relates. Are you ready?
The WebScheduler is now a
full-fledged reality!
Nope, that's not a misprint.
Quick and easy as can be, you can have customers
scheduling themselves on-line.
The airlines do it; why shouldn't we?
For a quick demo (at least as seen from a consumer's
perspective), click here.
To make this system work for you, requires just three
things:
1. We create
an account for you on our WebScheduler page;
2. You create
a hyperlink, on your webpage, to the WebScheduler page (it's configured so the
system knows the person who's clicking is your customer); and
3. You
install, run and keep running a little utility at your office called
SD-WebScheduler. For those of you using the WBDE (which automates
dispatches with ServiceBench), this utility accomplishes the same purpose,
except does it's work with your WebScheduler instead of ServiceBench.
(Specifically, it keeps your WebScheduler page informed of of your real-time
availability in each area, and grabs data each time a customer schedules,
placing it all neatly into a ServiceDesk Callsheet.)
Oh, actually, there's a fourth thing. That's a
willingness to pay us for the service at the rate of $1 per true scheduled
appointment (minimum $10/month).
With that easy setup, you'll be configured (and in just
a few minutes) so consumers can do a simple click from your website, see when
you're available to service in their area, pick the date they want, input
relevant info, and have themselves booked. Within moments of that
happening, you'll see all the relevant info pop into a ServiceDesk Callsheet.
What could be easier than that?
Call now to sign up.
In addition to the above, there were still more tweaks
and improvements in ServiceDesk -- including, most particularly, you can now
change the background color in ServiceDesk (it's a new option in the purple
section of the Settings form, Ctrl-F1). For some users, this is more than
cosmetic. Specifically, there are now a number of folks operating multiple
business from a single office, each with its own ServiceDesk install. The
colors are intended to help operators more easily distinguish between a
ServiceDesk window that's for, say "ABC Heating and Air," versus one that's for
"ABC Plumbing."
4.2.46 (2/12/07):
Numerous small fixes as connected to recent work.
Also, improved editing in ArchivedPartsProcess (Ctrl-F8). Now the system
will immediately display your edit results.
4.2.45 (2/10/07):
Added drop-down lists to each of the boxes in the
PartsProcess form (F8) where formerly you had to use the spacebar to toggle
between various options. Also upgraded the previously existing drop-list
(for Vendor) so that, as in other ServiceDesk contexts, you can select items by
cursoring into the list, then hitting Enter to select.
Changed the color, as used in the DispatchMap for the "ShowJobsNotReady"
feature. The color now will be a pale teal, so as to be more readily
distinguishable from any standard tech color.
Did extensive re-structuring into many areas of the
infrastructure governing ServiceDesk operations. Many areas have been
addressed for increased reliability, reduced incidence of annoyance, fewer
errors, and so on. Among other improvements, the as-you-type integration
with SmartParts data will be dramatically faster.
Repaired miscellaneous faults as discovered over last
couple of weeks, including a fault in the Inventory system for tallying parts
needed (this fault had only occurred where a user explicitly listed inventory
locations and specified multiple inventory Types).
4.2.43 (Just a Note):
Yes, it's true. I confess.
I took away the beloved 'Exit' button in the UnitInfo form.
Actually, I didn't truly remove
it. I actually replaced it with a new and different button (the new
one is for exporting UIS data, as described two entries back).
Truth is, back in my early days
of programming, as I designed new forms I typically placed an Exit button on
them, because it was conventional, and I was trying to put things in to make
them look important. As I gained more experience, however, I discovered
that a good percentage of people, when wanting to close forms, click on the
close button (the one labeled 'X') in the top-right corner. Another
significant percentage (particularly and especially in ServiceDesk) simply hits
'Esc' on their keyboard. Given these wholesome alternatives, I began to
realize there was really no salient purpose in a dedicated (and space-consuming)
'Exit' button.
Thus, any time since as I've
been adding new features to a form, and when I see that (a) I'm sort of
out of space for new buttons; and (b) there's a virtually useless 'Exit' button
just sittin' there, guess what happens? That's right, I commandere that
baby for a new purpose.
And so I say (and without real
apology), if you've become attached to any beloved 'Exit' button, GET OVER IT!
Actually, I don't mean to be
quite so unsympathetic. What I really want is for you to realize it would
have been more efficient all along to simply use the Esc key on your keyboard
instead, and to move to that usage. It's really faster, and involves
considerably less effort. Or, if you must do it via mouse, use the
standard windows 'Close' button.
I hope this helps.
Based on popular demand, I restored the
'Exit' button in the UIS form.
4.2.43 (2/2/07):
Worked on a couple of "focus" issues as connected with
Callsheets. "Focus" is a term used in Windows in reference to the
particular application, form and control that has the focus -- in
other words, the one that's activated, and where your cursor will be
blinking if the object of focus happens to be a text box.
One issue concerned the fact that when you clicked from
one Callsheet to another, the focus went to the top textbox of the new
Callsheet, regardless of which box you'd actually clicked on. At the
least, this could be annoying. It's now been addressed.
Another issue sometimes arose if you switched to another
application while ServiceDesk was simultaneously running. If other users
in the office made changes in the Callsheet page that you left active,
ServiceDesk would sometime re-grab the focus -- an event that could be highly
annoying if you were focused on work (and perhaps even actively typing) in that
other application. This was a devilish one to solve. Ironically,
this is something that Windows is not supposed to even permit to happen.
Regardless, it has been a not too uncommon event, and I still have not found a
way to prevent its occurrence when ServiceDesk is running in the background, and
NOT MINIMIZED. If you'll simply minimize it before switching to that other
app, however, I believe you'll find these "stealing focus" events are a thing of
the past.
Also added a feature in the Generic and Custom
FinishedForms. If you're printing either form after there have been one or
more prior visits on the job, the system will append the InvoiceNumber with a
notation such as "-02" (as an example, to indicate this printing is for the
second visit).
4.2.43 (2/2/07):
Recently we've heard from several servicers about
manufacturer recalls on certain models. These servicers have wanted a
means to quickly compile a list of all customers where they've serviced models
falling within a particular range or ranges. This is now available via our
just-added "UnitInfo-Export" feature. Go to your UnitInfo form
(Shift-F12), and there find a new button labeled 'Export'. Just
click on it, and follow the prompts. You can load the resulting output
into Excel or similar, and manipulate to your heart's content.
Enhanced the printout, from the InventoryControl form
(F10), when printing a list of items that need restocked to a particular
location. Now the printout will include an indication of storeroom bin
from which the items should be pulled, assuming you've provided such
information.
4.2.42 (2/1/07):
In another major power-enhancement for the DispatchMap,
added what we'll now call our "ShowJobsNotReady" feature.
This is to help you folks who schedule jobs before
you actually have the needed part in-hand.
As we all know, sometimes these parts do not arrive as
expected. As you're looking at your DispatchMap (planning out the tech's
routes, getting ready to dispatch the jobs, and so on), wouldn't it be nice to
know (and at-a-glance) which jobs are still waiting for parts that have not yet
arrived?
That just what this new feature does. In the
DispatchMap, strike your keyboard's 'W' key (think 'W' as in 'w'aiting
for parts). At that point ServiceDesk reads through your PartsProcess
file, seeing if there any items (for those jobs displayed) that were requested,
but still have not arrived. For any such job, it changes the display color
to bright red.
By the way, in connection with new features like this
(and like the ShowItemsNeedingScheduled feature described two entries
back) don't think you necessarily have to memorize what the key-command is based
solely on the description here. If you simply display the DispatchMap's "CheatSheet"
(right-click in any empty space for this purpose), you'll see we've added
references to these functions and commands there.
Added still another integration with SmartParts data
(and, again, we apologize to you non-appliance servicers that this is not
something you can use). This one is in the PartsProcess form. Now,
as you type a part number in its part number box (and assuming you have the
SmartParts data installed), there will be a drop-down matching what you've
typed.
Added a very cool and new "AtomicClockTimeSynch"
feature. This uses the same underlying facility as described in connection
with the last update (for verifying that no one has forward-dated the system
clock). Now we make increased use of knowing outside time. Checking
once per minute, if the system sees that your internal clock is more than 60
seconds off atomic time, it will offer to fix it (if you decline, it will leave
you un-pestered for another week). Or, if you click on FileFunctions in
the ServiceDesk MainMenu, you'll see there's a new option at the very bottom
(labeled 'Synchronize with Atomic Clock'). Click on it, and
ServiceDesk will perform the task immediately.
4.2.41 (1/30/07):
In the UnitInfo form, added integration with SmartParts
data (of interest only to appliance servicers, our apologies to everyone
else). Specifically, when typing in model numbers (and assuming you have
the SmartParts data installed), ServiceDesk will now present a drop-down showing
matching models. Thus (and typically after typing but a few characters),
you can select from the list for insertion of the full model text.
Added a major enhancement to the security of current
schedule data. Increasingly, we've had incidents where folks call in
reporting that all their appointments were suddenly lost.
Why did this happen?
It turns out it's because someone in the network had
forward-dated his or her computer (probably for gaming purposes). In
consequence, ServiceDesk notices that the ScheduleList is (apparently, though
not really) past-due for archiving, and prompts the user for permission to
perform the process. Unthinkingly, the user consents -- which is
disastrous, for with the computer being forward-dated, it appears to
ServiceDesk that all current appointments (though they truly are current)
are in fact in the past. Given this, ServiceDesk dutifully moves them to
the archive. At that point, other users in the network (who've actually
been working) suddenly see an empty DispatchMap. It's not a pretty
picture, and at the least involves some frustration to recover from.
I've wanted to protect against this for some time, but
it's not easy to come up with a strategy for a software that lives inside a
machine to detect that its clock is date-forwarded. However, I finally
developed the means. Assuming you have a live internet connection,
ServiceDesk will now check (regularly) with an outside time-server to verify
that the system on which it's operating is not date-forwarded. If it finds
it is, it will display messaging explaining so, and shut itself down.
If you wish to test this (it is kind of cool),
first update to this version or later, then forward your computer's system date
to tomorrow or later. You'll get the message immediately upon ServiceDesk
startup (or within a minute if you've forwarded the date while ServiceDesk was
simultaneously running). Consider this just one more element of
tranquility, courtesy of Rossware.
4.2.40 (1/28/07):
Drum roll please . . . Yes, it's another really
cool and totally new feature.
I guess we'll call this the "ShowItemsNeedingScheduled"
feature. The idea is as follows:
You know how sometimes you've got a tech whose schedule,
for a particular day, you need to fill up. You can look on the DispatchMap
and see where you're already sending him, and what you'd like to know is what
jobs might be in the same areas, that presently need rescheduling. If
there are any such jobs, obviously, they'd be prime candidates to adding to his
route. But how do you easily know which jobs, among all those that
presently need scheduling, happen to be in those areas?
Or, maybe you're sending a tech way out to the boonies.
As long as you're sending him out there, it would be nice if you've got any
other jobs, that are pending scheduling, out in the same direction.
Our new feature solves any such situation. To
invoke it, from the DispatchMap hit "J" on your keyboard (that's "J" for
"show me Jobs needing scheduled"). This will toggle ON the
ShowJobs feature (you can hit "J" again to toggle it off). What
ServiceDesk does then is to go through each of your current jobs (i.e., all
those in the F7 form). For all those that it finds in 'Working to
Schedule' status, it creates a locational display on your DispatchMap.
Thus, at a glance you can see the locations of all those jobs. A simple
click on any such reference will bring up the underlying JobRecord.
We're betting you guys are going to love this
feature.
A planned future enhancement (for you guys that get
dispatch requests from home warranty companies, and sometimes have them sitting
in Callsheets for significant periods pending first contact with the customer)
is to have the system also show references to these requests, as found in
Callsheets.
Overhauled Synopsis of Jobs, as printed from
DispatchMap. I'd had a few requests for inclusion of customer's first name
in this printout, plus one for horizontal lines between each item listed.
Also, there was a request to make it so any particular item would not be split
between multiple pages. All of that is now done.
For many folks there's been an issue where the telephone
numbers in past jobs (especially those converted from prior systems) lacked an
area code, and what's being inserted now includes an area code. The
difference has prevented the auto-CstmrDbase search from registering a match.
This has been an issue for those using a CallerID device, where the CallerID
number includes area code, and CstmrDbase data does not (i.e., no match with
CallerID-provided number). Sometimes the opposite happens as well (i.e,
number from past job includes area code, and user typing presently does not
include it). I've now added code that will cause ServiceDesk to search
both ways. Specifically, it will do it in either of two situations where
(on any telephone number CstmrDbase search) there is no initial match:
1. If the user has typed (or CallerID
has inserted) a full ten-digit number (i.e., with area code), and if that area
code is that same as the user's, the system will try again with the area code
removed; or
2. If the user has typed a seven-digit
number (i.e., no area code included), the will try again with the user's own
area code added.
In connection with Auto-Pricing in PartsProcess form
(i.e., as connected to new MarginPlanner), made it so when you move to the 'Sell
For' box, inserted text there is pre-selected, for easy editing if desired.
Somewhat similarly (and for enhanced ease in editing),
added a feature in the MasterPartsPlan form (Ctrl-F10) where, if you're in a
particular editing box and use the cursor keys to move up or down to the next
adjoining item, the system auto-select the entire text in the box upon loading
the next record.
Also in the MasterPartsPlan, when exporting to simple
text file (as typically used when wanting to format in Word for creation of a
parts-catalog for techs to keep in their clipboard), added option to limit
output to only items that are supposed to be stocked in a particular
location. The thinking is, if you list a lot of stuff in your
MasterPartsPlan that aren't generally stocked on a guy's truck, why give him a
list/catalog that includes those extra items?
Made the system more lenient in terms of how it
recognizes that a job belongs to a HighVolumeClient. Previously, you
had to have text in the CustomerName box that precisely matched text in the
equivalent box of the QuickEntry template belonging to the client in question.
Otherwise, ServiceDesk would fail to make a connection between the two.
Now, you may (in the alternative) simply place the clients HVC-Abbreviation into
the CustomerName box of the JobRecord. ServiceDesk will recognized the
connection on either basis.
Modified text in JobHistory as inserted when canceling
an appointment. Now the notation will describe the date and time of the
appointment that was cancelled.
For folks doing a significant amount of shop work, added
a potential convenience when using the Finished form as a POS tool. If
you've departmentalized your operation (per the provided ServiceDesk option) and
created a department called "Shop", and for any particular job that's assigned
to that department, when you're indicating items pulled from inventory in the
FinishedForm on that job, ServiceDesk will assume the inventory source was "OF"
(i.e., office storeroom).
Someone pointed that telephone extensions were not
displaying in the Archived-JobRecords form. Corrected.
Learned from Steve at Appliance Repair Hospital of an
unintended loophole around the ScreenForOverbooking feature. Turns out if
you simply changed an existing appointment (i.e., rather than creating a
new one), you'd bypass the intended warning. Now fixed.
For a long time it's frustrated the heck out of me
that, many times (it seemed like most the time) when I was at a show demonstrating the feature where SD
auto-fills a
tech's start and end times in the PostVisitReport (i.e., when you're using the real-time call-in method),
it failed. Yet, when I'd test it here, it worked every
time. I finally found (and fixed) the problem. Turns out the failure
occurred anytime there'd been a prior clock-in on the job as recorded in the JobHistory,
which had (improperly) not been removed (as often happened in a demo
environment).
4.2.39 (1/25/07):
Added a hyperlink to our new Chat Room. This is in
the 'About ServiceDesk' form. Also have performed numerous other small
improvements, and many small fixes.
4.2.37 (1/4/07):
Added option, when setting kind of form to use on other
than first visit invoice printing from DispatchMap, to print no invoice at all
in such instances.
Fixed numerous other small flaws as detected in last
couple of weeks.
4.2.34 (12/4/06):
Addressed some flaws in recently created ability to edit
archived PartsProcess items.
4.2.33 (12/3/06):
Developed ability to export data directly to
Microsoft Excel format. Also developed internal code calls that will
allow streamlined upgrading of all the pre-existing and old exports so that,
once it's accomplished, all will be able to export (according to user choice) to
any of three formats, Tab-delimited Ascii, Comma-Delimited Ascii, or Excel.
At this point, only a few of the old exports have been so upgraded
(specifically, a tech's route info from the DispatchMap, and the 'Direct Data
Transfer' method of creating a non-stock parts order). In the near future,
all exports should be.
Added a 'CopyFromPrior' feature to the
PartsProcess system. This is to address a longstanding complaint.
Suppose you're checking in a shipment of many parts, all under vendor Invoice#
123456789. In each line item involved, you have to (among other things)
fill in that invoice number. It's been kind of stupid that you had to do
that, and certainly contrary to ServiceDesk's normal pattern of making
everything maximally easy. Well, finally, it's been addressed. Now,
if you have items filled-in (with edit boxes displayed) on one process item, and
you want to have those saved in the same boxes for the next item you're moving
to, just make the movement while holding down your Ctrl key
(whether you use your mouse to click on the new item or your keyboard's cursor
keys to move up or down to it, shouldn't matter). As you'll see, text in
boxes that can sensibly be preserved (from one Process item to the next) will,
in fact, be preserved. If the new Process item already had text in a
particular box, on the other hand, it will not be overwritten, and for those
boxes where any particular Process-item is more likely to need unique info (such
as those involving price information, for example), this new function will have
no effect at all. Also, please note that these new 'saved-from-previous'
(sort-of auto-filled fields) will not save, in the new item to which they've
been transferred, unless you do other, manual edits within the new item. I
hope all that makes sense.
Added direct editing of archived PartsProcess
records (naturally, via Ctrl-F8 form). The editing is limited by the fact
you can't add more characters, since the stored data is in a compressed
state. Also, the set of tools available is limited compared to when
editing current PartsProcess records, but it's still a utility you may
appreciate from time to time.
Also added editing of Supplemental Parts data from the
InventoryControl form (F10). Formerly, that data could only be edited from
directly within the InventoryPlanner form (Ctrl-F10).
Added a new, optional field for when printing the
standard, up-front ticket (aka Invoice). A number of people have mentioned
their techs, when calling the office and wanting some added info on a job, wish
to talk to the particular call taker who wrote up the order. They've
wanted the name of the call taker (or at least initials) to be printed on the
ticket, so the tech knows directly who to ask for upon calling. That's now
available. You'll have to revise your .prg file to indicate where you want
the new field to print, font characteristics, etc. For that, you'll need
to use the SD-Tools utility -- in particular the new version that's included in
the present update, Ver 4.0.5. After you've done that (and assuming you've
also updated to this Version of ServiceDesk, the new field should print for you.
4.2.32 (11/30/06):
My apologies for providing little that's new over the
last couple of weeks. I've been swamped building packages for new clients
(a good thing), and other matters related to continuing service. Anyway,
this release has mainly a few fixes. (1) I'd previously broken the new
integration with SmartParts in the MasterParts plan; it's now fixed again.
(2) I'd previously added an addendum printout for ExtraNotes in the tech's
RouteSheet. Not everyone wanted that. Now it's an option to pick in
the SelectPrinter form. (3) Changed the 'Direct Data Transfer' method of
ordering parts so that the output is now in Tab-Delimited format. (4)
Miscellaneous fixes.
4.2.30 (11/15/06):
While sleeping last night (it's pitiful but true,
sometimes I do indeed dream about re-working processes in ServiceDesk) I had
another great idea for use of the new Zips-Location file (the one described in
my last, 11/5/06 entry, below). Besides using zips to create grid
coordinates, I realized we could also use them to verify relative
accuracy in grids otherwise created, and to warn against references that
are obviously bad. I was so excited by the possibility, I've already added
it to the program. Now, when you JobSale from a Callsheet, there's a new
check. If the system can't verify accuracy of your grid reference via your
StreetList, it next tries to do so via your Zips-Location file. If it
succeeds, the item goes into your schedule cleansed of the Grid-Ref-Suspect flag
that would otherwise exist (that is, it would otherwise exist if your reference
failed the standard StreetList-based verification). If, on the other hand,
this new check proves your grid reference is significantly outside a credible
region (as based on your Zips-Location file) it will give you a stern warning,
and opportunity to abort the process pending a fix of the reference. Of
course, this capability depends on you having the underlying new custom file
(see 11/5/06 entry, below).
Added a mechanism to more conveniently make ScheduleList
entries denoting when a technician will be absent for period of days (as when,
for example, going on vacation). There's a new button in the
ScheduleList form (F6) for the purpose. It's labeled 'make Vacation
entries'. Just click on it and follow the prompts.
4.2.29 (11/5/06):
BIG, BIG HELP WITH MISSING STREETS. For a
long time (since forever, really) it's been a nuisance when you have a customer
living on a street that doesn't appear in your drop-down StreetList.
Sometimes the street is actually there, and you're just not finding it. A
while back (see 3rd paragraph under entry explaining Ver. 4.1.107 release), I
added an F1-triggered find-target-string-anywhere-in-list feature, to
help with that. But when the street really and truly is not there,
you have to type the whole crummy thing, plus city name (and state and zip if
wanted). Most onerously, you have to come up with a grid coordinate.
Making this latter even worse, you may have operators who do a lousy job of
producing grid coordinates, with the result that jobs display on your
DispatchMap in a very wrong location, then get scheduled and dispatched in a
manner that requires a tech to drive many miles outside any sensible route.
That's really bad (though, to help with this, I also added a feature a while
back that causes unverified grid references to show on the DispatchMap with a
symbol indicating they are suspect).
Regardless, there is now a much nicer solution (I'm
calling it the ZipBasedInsert system). Based on a new custom
data file, ServiceDesk can insert full City Name and State, based on the
operator typing zip code alone. Much more importantly, it will also
insert a grid coordinate based on that single act. The simple
mechanics are, SD watches for any typing action in either of the two city-line
boxes of a Callsheet. As any such typing occurs, it looks to see if the
sole resulting text is a zip code. If so, it invokes the above-described
action. It's really cool. You just type a zip, and suddenly
everything is there. You can also invoke this action deliberately (i.e.,
without typing, and/or when there is other text besides a zip code in the box)
by hitting F1 on your keyboard (of course, your cursor must be in a city-line
box, with a zip there, when you do this).
A related new feature (that also takes advantage of the
new custom data file) is in the DispatchMap. Now, when you there hold down
the 'Z' button your keyboard (that's 'Z' for Zips), all the Zip Codes will
display in their correct location on your Map. It's looks awesome, and is
fun to play with -- pressing Z down, letting it up, pressing it down, etc..
Of course, there are some caveats. The first and
biggest is that you've got to have that new data file to make it work.
Beginning now, all new packages will ship with this new file included (in other
words, it's now part of the standard roster of custom files). However, if
your ServiceDesk was built and shipped prior to this date, the file will need to
be separately built and added for you. If you purchased (or are
purchasing) ServiceDesk at the full current price, I'll build and supply this
new file to you free-of-charge (though you do need to ask). Otherwise,
I'll need to charge you for it, because it's a significant investment in labor
to create, it's done specifically for your unique territory, and it's not part
of what you originally purchased.
Another caveat is that the grid coordinates as inserted
via this new system are NativeGrid type only (i.e., they will not be
references to page and grid in your underlying MapBook, if any). And these
references will typically not be as precise as those created via the drop-down
StreetList (or as result if doing a careful manual lookup in the index of an
underlying MapBook, then typing in). In each instance, the coordinates
will place the job's graphic reference at the weighted center of a
zip-code area. At worst, the resulting display location will at least be
in the same approximate area as the genuine location. At best (assuming
either serendipity or a zip code that consumes a small space compared to your
DispatchMap scaling), it may in fact be precise.
Bottom line is, if you've had frustration with missing
streets, this is the ticket to fix it. Call or email if you'd like me to
build the new file for you. I'm going to make a beginning price of $249
for the build, though I reserve the right to make it more for anyone who's got
an exceptionally complex setup.
4.2.28 (10/31/06):
In another significant development, there is new
integration with SmartParts data in two added venues: in the MasterPartsPlan
form (Ctrl-F10) and in the PartsRequest form (Alt-F8). In both places (and
assuming you have SmartParts data installed), you'll find that as you begin
typing a part number in the appropriate box, there's a sudden drop-down list
showing matches from SmartParts' broad data set. When you see the item
wanted, use your cursor or mouse to select it, and you'll get an instant
insertion of appropriate text (including appropriate price markup per the new
MarginPlanner, when in the the MasterPartsPlan). Very cool. BTW (and
if you did not know) we've had operational integration with SmartParts in the
PointOfSale context for long time, so with these added developments, there are
now three operations where that integration potentially occurs.
4.2.27 (10/29/06):
Hurrah! Hurray! Hallelujah (and so on)!
For a long time, I've received occasional requests for automated pricing
-- a system that will apply a user-settable formula to automatically apply
markup from cost on parts to create a retail price for you. This would
likely have been a feature long ago, except as a management philosophy in my own
business I'd deemed it better to do markups on an ad hoc basis, taking all
relevant factors into consideration, including subjective ones (e.g., if a part
comes in way cheap compared to what you'd guess, you can safely mark it up much
more than if it comes in way high). However, that's not everyone's
philosophy, and is only practical, regardless, if you have an owner/manager who
does not mind being personally involved in the task. Most companies, I've
found, want something more automated (and formulaic) for the purpose. So
finally it's here.
There's a new form in ServiceDesk called the
MarginPlanner (access it via Shift-F10). I want to brag about it a
little.
Any pricing system that's half intelligent needs to
account for the fact that, generally, you want to have a higher percentage
markup on items where cost is tiny as compared to those where it's great.
Most systems accomplish this with clumsy brackets or bands where you specify,
say, anything with a cost between $.01 and $5 will have X percentage markup,
while between $5.01 and $20 it will have Y percentage, between $20 and $100 Z
percentage, and so on. This makes a stepped (or jagged) system, and to me
is very clumsy. I suppose that's another reason I've been slow in getting
to it (I don't like clumsy). I finally did it, however, because finally I
figured out something better.
Specifically, upon examining the new MarginPlanner,
you'll see I've created a very simple and pretty little formula -- one with two
user settable variables via which you can precisely tailor a continuously smooth
markup curve, one that algorithmically applies across the entire range of costs,
and can be made to exactly match your preference at every level. It
includes a bar graph that instantly shows the effect (across a range of sample
costs) for any combination of settings. I think you'll find it's elegant,
even cool.
Though additional developments remain (find details in
the form itself), this new system is operational now. I think you'll love
it.
In another significant improvement, I added a system to
explicitly check-off when special-order parts have been installed. This is
to help cope with the situation where a tech's already been back on a return
visit, installed some ordered parts, then orders more, and later either he or a
different tech has a hard time figuring which parts have already been installed
and which not (especially, for example, on examining the PartsPickList).
It also helps if a non-tech employee is pulling parts to put in a tech's
tote, and needs to be able to easily determine which items should go on the tote
versus which one's were installed previously. This new system
invokes a new window in the PVR Form Type II. If special-order parts have
previously been checked in on a job, the PVR form will list them, with the request
that the operator check-off any that have been installed. In consequence of
the check-off, ServiceDesk will change the BinLoc field on the underlying item to
the tech's initials, hyphen, and day/month date reference (i.e., like
"GR-10/29"). When you see this, you realize it signifies that the part was
installed by "GR" on the indicated date. One thing to note, there will be
a transition period during which many part items will not appear in the list.
These will be items that were already archived prior to this change, and the
underlying archived record was not saved in a manner that allowed space for
later addition of the new reference. However, all items that were not yet
archived when you perform this update should appear so long as you check them
off as having been received.
4.2.25 (10/22/06):
Added check for items in new PartsHotList to any action
that creates a match in the PartsProcess form.
Miscellaneous other fixes.
4.2.24 (10/1/06):
Mostly just added some finesse on the latest
improvements.
4.2.23 (9/25/06):
As a further improvement in the PartsProcess system
(i.e., for managing special-order parts via the F8 form), you can now limit the
items displayed to those applicable to a particular vendor. This should
dramatically ease the task of adding information as is returned by a vendor
after your initial order or inquiry, and of checking in actual parts when they
arrive. You'll likely find other great uses as well. To use this new
feature, simply pay attention down toward the bottom of the initial menu page
(which first shows after hitting F8). There's a note there that tells you
what to do.
In conjunction with the above, also created a drop-down
vendor list as attached to the 'Vendor' box in the PartsProcess form.
Using the list, you can simply click on the abbreviation for the vendor of
interest, rather than needing to type it. (Note that the contents of this
ListBox come from your work in the F10 form -- particularly, when you're
checking in a stock shipment and the system asks you to indicate the vendor; if
you wish to add vendors to the list, go there and pretend to receive a shipment,
add as many vendors as you wish, then just back out before claiming to check any
actual items in.)
As a feature connected to both the PartsProcess and
InventoryControl systems, added ability to use a PartsHotList.
Suppose there are some part numbers that you need to have flagged as requiring
return to the manufacturer (i.e., if you're to receive warranty credit).
Or, there are ones you want to flag as requiring a core return. Or you may
want to flag some indicating the tech gets a bonus every time he uses one.
Regardless, if there are any quantity part numbers to which you want to call
such particular kinds of attention, it's easy to setup. Follow these
steps:
1. Open a new document in Excel;
2. For each part number that you want
to call attention to, use a single line, with two columns. In the first
column, place the applicable part number. In the second, place a note
explaining what's special about that item (i.e., the text you want your
operators to see when that part number comes up).
3. Save the document in the required
location, with required name, and required type.
4. Specifically, in the bottom of
Excel's 'Save As' dialog form there's a box that says 'Save as Type'. Open
the drop-down there and select "Text (Tab delimitted)(*.txt)" as the type to
use.
5. Be sure you're saving the document
to the x:\sd\netdata folder (where 'x:' is whatever drive your server happens to
be); and
6. Be sure it's saved under the
name PartsHotList.TXT.
7. Once the file has been created, you
can return and edit it (add, subtract, change, etc.) at any time wanted.
Beginning with this revision, ServiceDesk is designed to
look for that file whenever: (a) a special-order parts request is created; or
(b) it's indicated that an inventory item was used from stock. If it finds
the file, it opens and reads it, looking to see if the presently involved part
number can be found in the list. If it is found, the system will display a
message informing the user it's "Hot-List" item, and showing the message that
you've placed in the file.
Added a File-Export feature to the JobsPerusal form
(Shift-F7). To use it, click on that form's 'Print' button, then in the
'Open Printers' dialog box check the item labeled 'Print to File', then follow
the prompts. This export will allow you to list (via manipulation in Excel
or similar environment) each of the jobs by sequence of date-since-last-history
note, and to analyze on that basis.
4.2.22 (9/24/06):
In the Inventory Control system, there has long been a
slight fault in the facility that assists you in ordering restock on the
basis of items that have fallen below minimum quantities (the sequence to reach
that interface is F10, 'O', and 'D'). In calculating
whether any particular part item had fallen below minimums, the system did two
simple tallies: (1) of the total quantity that was needed system-wide
(i.e., adding up the minimums that are supposed to exist in each location); and
(2) of the total quantity found system-wide (i.e., adding quantities at
every location). It then compared the two figures; if the total found was
less than total needed, it would present the item as one that needed placed in a
restock order. If not, it refrained. Problem was, suppose you have
two trucks and an office storeroom. Each is supposed to maintain minimum
stock of one widget a piece. The office storeroom has 0 and Truck1 has 0,
but Truck2 has 5. In this circumstance, since the total counted (of 5)
surpasses the total need (of 3), the system would refrain from including the
item in the list of restock/order needs. So there was no prompting to
order the restock as needed for the two deficient locations (essentially, the
system expected you to pull the overstock from Truck2, in order to satisfy the
other locations). Anyway, that's now been addressed, as you'll see if the
circumstance arises.
In conjunction with the above improvement and process
(i.e., ordering restock), it occurred to me that if the system tells you that
for a particular line item (such as widgets, for example) you possess 5 as
compared to only 3 total needed (and yet still are deficient in some locations),
you might form a quick curiosity as to where the surplus is being horded.
Thus, I provided a simple right-click option, on the line of interest, which
will cause a second instance of the Inventory form to display, showing you how
that particular item is distributed throughout your system.
In this connection, you might notice there's another new
capability. Traditionally, ServiceDesk allows you to have open only a
single instance of any particular form at a given time. In the F10
Inventory form, however, I've found that very often I'd like to do some other
lookup, without exiting the particular operation/view that I'm in. For
that reason, you can now load up to three separate instances of that form.
If you're looking at one instance and want another, just hit F10 again.
A year or so ago we added a feature that warns, when a
part is being requested for special order during a PostVisitReport, if it's an
item that the tech already possesses on his truck. That kind of warning
has now been expanded into a new operation. Specifically, when in the F8
form and marking an item for inclusion in an inquiry/order request (i.e., doing
a Ctrl/Right-Click on any info band, while in that mode), the system similarly
checks for stock, and will inform you if it's an item that's both in-stock and
on which a sufficient quantity is possessed to fill the need.
Also in connection with the PartsProcess system (i.e.,
managing special-order parts), added a very handy
single-button-Show-Parts-Ordered feature. Quite simply, if you're
looking at a JobRecord (F7 form) and want to see each PartsProcess item
connected to it, either right-click on the form's 'orDer parts'
button (this is as opposed to a standard left-click, which will in fact invoke
the process by which you create an order request), or strike Ctrl-D on your
keyboard (as opposed to Alt-D, which will likewise invoke the button's standard
function). If you forget these methods, don't worry. If you simply
float your mouse pointer over the button in question, a ToolTip will appear to
remind you. (This is similar, incidentally, to the manner in which we've
created an extended function for the same form's 'add AttnNote'
button; by floating your mouse pointer over that button, a ToolTip will appear
that explains its altered function.)
In the Security/Password form (Shift-F11), I thought I'd
had the interface (for setting subsidiary passwords and their permissions)
working just fine when I created this system some two years ago. It came
to my attention, however, that in some situations both the subsidiary passwords
and the permissions attached to them failed to save properly (results could be
screwy). It turns out my program code did not properly keep track of
changed record positions when a user re-sequenced the user list by clicking at
the top of any column. That is now addressed, and you should get perfect
results -- whether you re-sequence the list or not.
In the TechWindow mode feature (accessed via Alt-W),
made it so you can provide each technician with a unique log-on password that is
uniquely required by his own log-in. Using this feature, you can make it
so each tech is capable of logging in only under his ID (and therefore has
access to only his stuff, and can't pretend to be someone else). To
implement this feature, go to the Security/Password form (Shift-F11) and under
'Users' setup an account for each tech whose log-on you wish to protect.
Provide a unique password, obviously, and in the second column, type the tech's
full name precisely as it's listed in the Settings form (Ctrl-F11). What
now happens, operationally, is that when anyone attempts to log-in under a
particular tech's initials in TechWindow mode, the system looks in the 'Users'
section of your password setup to see if there's one provided for the tech in
question (again, using his full name). If so, it figures the log-in for
that tech is password protected, and demands the password that corresponds
(although the MasterPassword will also suffice).
Due to popular demand, made it so invoice printout will
include name of technician in circumstances where formerly it would not (e.g., a
new printout of the ticket as initiated from the JobRecord). For this
purpose (i.e., to determine which technician to indicate), the system reads in
the JobHistory to determine which tech most recently had any involvement with
the job).
4.2.19 (9/10/06):
In the UnitInfo form (Shift-F12), when doing a search
via serial number, the system will now display not only serial numbers in the
drop-down list, but type and make as well.
In the FundsJournal, we previously combined parts
credits and electronic funds transfers (EFTs) as though they were one kind of
money. Now the two are separated. Please be sure, if it's an EFT,
you use the new category. Also added note when opting to export accounting
info to QuickBooks that explains issues connected with handling parts credits.
Numerous fixes on small issues.
4.2.17 (8/30/06):
Based on lessons learned and new info provided by LG,
honed the LG warranty claim export feature. Expectation is that now the
exports should work very well.
Added feature that, when re-scheduling any existing job,
checks to see if other jobs exist for the same address. If so, the user
alerts user to the fact that other jobs should be considered when scheduling the
subject one.
4.2.16 (8/27/06):
Added export for new LG claims format. There's
been no real-world testing of this export yet, so there may still be
imperfections to work out. Please let me know what you encounter.
Added exported report of sold-serialized inventory.
This update also includes a wide array of small fixes
and tweaks, each too minor (or particular to a particular issue as addressed by
some individual) to warrant specific discussion here, but really, in spite of
the long lapse since the last announced update I've not been sitting on my duff.
4.2.15 (7/23/06):
Added new method for placing orders for non-stocking
parts. Now you can use a direct data method. For any supplier that
will take an order directly into their system via a simple parts file or text
(in the format of PartNumber:Qty, one line per request), ServiceDesk will now
accommodate you. Simply designate items for inclusion in the same manner
as if you were doing a fax or email request, then select the new option, and
follow the prompts.
For those using the ZoneScheduler system, added
comprehensive protection against overbooking JOBS absent use of password.
You can set the system to require a password for booking above the 'Full' level
(85% of total allocation) or at the Max level (equals total allocation).
To do that setting, go to the ZoneScheduler form (Shift-F5) and notice that
'Maximum Load' line label is in read. This means that's the
higher-than-this-requires-a-password threshold. To change the threshold to
'Full Load' (should that be desired), click on that label. It will then
toggle to red (at least after you supply the required password), indicating it's
now the threshold.
Overhauled system that checks for duplicate JobRecords
upon engaging in Job/Sale action. Depending on your system, the old method
could potentially create a significant wait for the Job/Sale form to display.
The new method should eliminate that.
You might notice that, since last entry here, we've
jumped from 4.2.9 to 4.2.15 (and almost a month has gone by). There's been
a ton of work in the underlying structure, making it more robust, smooth,
reliable and error free. Most of the work did not involve such notable
particulars as to warrant specific description here.
4.2.9 (6/25/06):
Added a new option in the 'Create Job/Sale' form.
You'll see there's now a new box there, where you can directly specify the
JobCount value (previously you had to go edit the appointment entry, after
creating the job). Also made it so the JobCount value (assuming it's other
than 1) will print in the tech's RouteSheet.
Added optional password protections for changing amounts
in the FundsJournal and for emailing job histories (these are defaulted as
password not required' to change you must go to the Security form (Shift-F11)
and specify that a password is required for the operations).
Numerous other fixes and small improvements.
4.2.8 (6/20/06):
For a very long time, the sharing protocol in the
ScheduleList form (F6) has been slightly primitive. If you went there and
clicked on an item to edit it, and in the meantime someone else made any change
in ScheduleList file, your edits would be disallowed. In a busy office,
this could be frustrating. This revision has a major upgrade on the
underlying protocols which should make any such frustrations an extreme rarity.
Basically, you should not get kicked out of you own edits unless someone else
beat you to a change of that very same record.
4.2.6 (6/17/06):
Did further work on sharing protocols for PartsProcess
system (i.e., so that when multiple users are simultaneously working in F8, each
user sees and reacts well, in real-time, to changes as made by the other).
Miscellaneous other improvements.
4.2.4 (6/11/06):
Added a major new system to assist users who've failed
to properly setup one or more of the major automation systems in ServiceDesk --
in particular the WipAlert, Auto-Archive and SD-Backup
systems. Repeatedly, we've found users (particular newer ones)
encountering frustration because they'd not implemented one or more of those
systems. This new system of 'Automation-Checks' will monitor use
and detect when users should have implemented such systems, but have not.
When such a condition is detected, it will effectively guide the user toward
understanding and implementation of the relevant system.
Added new sort sequence option in MasterPartsPlan (i.e.,
as accessed via the Ctrl-F10 form). If you did not know, these sort
options are kind of hidden there; to access them do a right-click on the button
labeled 'Do Sort/Index'. One client in particular thought it would
be much easier (at least for inventory-taking purposes) to have items listed in
sequence of bin/shelf location, so that is now an option.
Added sharing protocols to enhance simultaneous use (by
multiple users) of the PartsProcess system (F8 form). Previously, if both
you and another user were in the form at the same time, you wouldn't be aware of
any changes they'd made unless you did something specific to trigger a re-load
of data. Now, without any action on your part, your display will update
within a second to any changes as made by another user there.
Improved message-reaction to various system faults,
including network failures, printer errors, and so on. Now the messages
will much more informatively guide you toward a productive solution.
4.2.3 (6/8/06):
Discovered that recently, in some network situations,
ServiceDesk had been running sluggishly. This was because of a
three-time-per-second file check that I'd programmed in several revisions back,
and in some networks each check consumed most of that 1/3 second, resulting in
slow operation. Since poor performance is positively unacceptable
in the ServiceDesk world, I developed a new method of accomplishing the file
check, which (at least so near as I can tell upon present testing), happens
speedily in all situations. Hence, if your ServiceDesk was recently acting
in a generally sluggish manner, you should find it's much more speedy now.
4.2.2 (6/7/06):
The upgrade to Version 4.2 is now in general release
(i.e., it's no longer beta), and so is available for everyone.
Also fulfilled particular requests for new features, as
follows:
(1) In the PartsProcess form (F8), you can now do
a 'Select All' when wanting to mark items for inclusion in a fax/email
request. Simply use the standard Windows command that's applicable for
that purpose, which is Ctrl-A. You can then individually de-select
items, if wanted, via the standard Ctrl-Right/Click action.
(2) Also in the PartsProcess form (F8), you can
now generate a faxed-or-emailed 'Status Inquiry' for items already
ordered. To do so, select the 'On Order, Awaiting Arrival' category
of display (or 'Items Past-Due'), and mark desired items for inclusion
just as you would for an original fax/email request (i.e., do a Ctrl-Right/Click
on each item you want to include). When all items are marked that you wish
to include, hit Enter or Alt-P on your keyboard, and follow the prompts (great
idea, Jennifer from Andersson).
(3) For any folks who are quoting varying service
call amounts (depending on locale, customer, kind of machine being serviced,
etc.), and want to automatically print on the ticket the amount that was quoted,
there is now accommodation for that. When you do the Job/Sale process from
a Callsheet and the little yellow 'Create Job/Sale' form appears, a simple press
of the Ctrl button on your keyboard will cause a new box to display in
that form. There's provision in that box to type the amount you've quoted
the customer. It will then print on your ticket -- at least assuming
you've setup the appropriate field in your InvoicePrinterInstruction file
(instructions on this in the very first section of the manual's appendix).
You'll notice, incidentally, that next to the box where you can type the quoted
amount, there's a presently inactive button labeled 'Pull from Formula'.
The idea is we'll be creating a basis by which you can make a simple table that
includes a base rate with add-on amounts for particular brands or kinds of
machine, zip codes, etc. The system will then be able to reference this
table to figure the service call amount, for you, on its basis. We just
haven't done this yet. The button is there for that future enhancement.
4.2.0 (6/4/06, initially in beta-only):
Look at this.
It's our first version-level upgrade in more than
a year and a half (we've been in the 4.1 series since 10/04). If you did
not know, we never change the first two elements of the VersionNumber unless
there's a structural change in one or more of the underlying data files.
That's what we've just done.
Specifically, we've changed the structure of the
CstmrDbase Index system so as to accommodate better information in the
as-you-type display listings (e.g., off to the side in a Callsheet, or above
where you're typing in the F12 form). Instead of showing name, address and
telephone number, the display listings will now show name, address, job-date and
kind of machine serviced. This has been requested by many, and should make
the listings much more informative.
As a related enhancement, the system now indexes all
relevant telephone numbers -- so you can effectively search on any
telephone number, even if it's not the first one from a party listing
(previously it was only the first that would come up in a search).
And, as one further matter, if you use our contract
service management program (SD-RevenueBuilder), the CstmrDbase listings now
include references to any matching accounts within that system (along with
immediate links to such accounts, via the same simple click action that opens
matching JobRecords within ServiceDesk).
If you want to try it in beta,
click here.
4.1.142 (5/22/06):
While most folks loved 'em, there were a few who didn't
like the new vector lines in the DispatchMap. For those who prefer
the old way, we've added an option in the Settings form (in the green, local
section) to go pack to the old plain lines.
4.1.140 (5/21/06):
Significant upgrade to the DispatchMap.
Route-Lines (those lines between each of a tech's jobs) are now more than mere
lines. Now each line is a series of chevrons, showing the
sequence of jobs from one to the next.
4.1.140 (5/21/06):
Made several major improvements for those making
warranty claims via the on-screen NARDA.
First, there is now contextual data to help you
understand and predict which particular NARDA text gets translated into which
particular transmission field for ServiceBench, KPI, or other processor.
This is particularly germane if there's some item that's not getting through
toas wanted, and you're trying to figure out which NARDA box it needs to be in,
to achieve ultimate success. If you talk to the processing entity (i.e.,
ServiceBench, KPI, or other processor) and learn from them which of their
transmission fields the item needs to go in, the new Translation-ToolTips
in ServiceDesk will tell which precise NARDA box it has to be, in order to get
there. To use this new tool, look for a tiny push button that appears,
after you select NARDA as the desired form type, just above the Narda
radio-option (i.e., in the bottom-left corner of FinishedForm environment,
accessed by pressing Alt-F4). Click on the button and follow the prompts.
Also added two new claims formats. First,
added a special Sears-claim format to the ServiceBench lineup. And (as a
wholly independent processor) added claims exporting for the Fisher & Paykel
format.
By the way, each of the particulars in the various
FinishedForms (i.e., Generic, Custom and Narda) have been improved. If
you've not done so recently, I suggest you update your FinishedForms (it's a
separate update from the one that's done quasi-automatically by ServiceDesk).
It's a standard download item on our our downloads page, which you can navigate
to normally, or use this link.
4.1.138 (5/14/06):
Big improvement for those few servicers with lots, and
lots of techs (you know who you are). Previously, if wanting to invoke any
of the litany of methods for printing/transmitting/emailing a tech's list of
jobs (or printing a tech's route sheet or printing his PartsPickList), the
procedure involved invoking the action once for each tech (by clicking on his
name at the top of his list of jobs in the DispatchMap, then selecting the
desired option). If you had a lot of techs, this could be tedious.
Now, you can do a blanket request for all techs in your lineup. To invoke
this new option, just go to the DispatchMap and press Alt-P on your clipboard
(this has long been the command to invoke pre-existing print options for your
job roster as a whole). Now, there's a new option that comes up, labeled:
"for every tech (but
w/o requesting for each individually), invoke one of the options as arise when
clicking on his name at the top of his list."
I know, it's a long description, but it gets the point
across. Click on it, and you will indeed get the predicted options.
Pick your option, and sure enough, the system will run it for each and every
tech in your lineup. If you've got several techs, it should save you a lot
of effort.
Did further work seeking to eliminate the infamous
"Permission Denied" faults as have sometimes been arising. For the first
time, I was able to replicate a circumstance where the fault arose and should
not have. I suspect a similar dynamic is what has been causing trouble out
there, and having replicated, I was able to create a very effective work-around.
I suspect ya'll may find the frequency of this annoyance is now dramatically
reduced.
4.1.137 (5/10/06):
Improved printed Job Synopsis (option 'S' when clicking
on tech's name at the top of his list of jobs in the DispatchMap) with option
(new checkbox in SelectPrinter dialog box) that will cause system to include UIS
info (model, serial, purchase date and selling dealer) in synopsis of each job.
For each of the many job-list and route-list printouts
emails as available from the DispatchMap, modified code so that, where
previously the system would print solely the time or time-frame of the
appointment, now it adds any small notes as the user may have placed into the
text immediately after.
Made TechWindow mode expand to full screen, to more
fully exclude techs from other areas in computer. With more computers
being setup these days with resolutions higher than XGA, this was needed.
In the AccountsReceivable form, made it so when you're
doing edits there, the system automatically recognizes (and responds
appropriately) if the client is tax-exempt.
Addressed a few "small wrinkles" as connected to recent
overhaul of CstmrDbase management system. As an example, realized that for
unusual situation where a user operates from install on a network drive, it was
possible for the system to attempt a copy from a drive to itself. This and
other small matters corrected.
4.1.134 (4/22/06):
So much for major overhauls.
Yep, that's what I said I'd done last update -- of the system that works to keep
each station equipped with up-to-date Index sets for the CstmrDbase. Well,
it wasn't a major enough overhaul. Now I've done one that really
is major -- I mean truly, mega-major. Aside from any small wrinkles
that may be revealed via real-world operation, the new design promises to be
dramatically more trouble-free (in the first place), and infinitely more
efficient in accomplishing a solution when one is needed. I'd describe the
improvements, but you'll recognize them as they are encountered.
4.1.132 (4/17/06):
Completed major overhaul of system that works to
keep each station equipped with up-to-date Index sets for the CstmrDbase.
The previous level of efficiency, in regard to those operations, had left too
many people experiencing too much frustration too much of the time. The
system now encompasses substantial improvements in several areas, including:
1. Found and fixed a flaw in the
indexing itself. It turns out if you had a customer with a two- or
three-character name, and if that name precisely matched the abbreviation for
one of your HighVolumeClients, that customer's name, address and telephone
number did not (until this upgrade) get indexed.
2. Fixed a flaw (as only created in
the last release) where stations no longer volunteered to update themselves to a
new index as present on the server.
3. Dramatically overhauled mechanisms
that manage the "Suspending operations while another computer updates . . ."
function. Previously, in a larger office these interruptions could be
sufficiently frequent as to be bothersome. Now they should be considerably
less frequent, because the system more intelligently distinguishes between where
only a particular computer needs to suspend, versus all of them. Above and
beyond that, each computer that needs to suspend will react more promptly and
reliably -- making associated operations more reliable as well.
4. In a somewhat related action, made
it so if the server itself is having its ServiceDesk install updated, any
stations that are running off the program file as installed on the server will
automatically terminate -- thereby leaving that program file free to be copied
over with the newly unzipped one. However, don't expect that to happen
with this update. This one has to be in place first -- so that this can
happen in the future, with subsequent updates.
Also overhauled much of the program code that's involved
in managing the ScheduleList (aka DispatchMap data). For some time,
there's been a rare circumstance where ScheduleList data would suddenly be
corrupted (thank goodness for automatic backups). In the past week, the
problem became chronic for a particular user. It appears the fault (as it
eventually proved to be in some other contexts) has been in Windows failing to
properly execute a simple FileCopy command. As we've done in other
contexts, we've now made it so that after ServiceDesk requests a FileCopy of
ScheduleList data, it then double-checks to make sure Windows did it properly.
4.1.131 (4/10/06):
Using Higher Screen Resolutions: We've found that
increasing numbers of people are now using screen resolutions higher than 1024
by 768 (higher resolutions essentially give you a larger desktop, though
everything on-screen appears smaller). With any res-setting higher than
that 1024 by 768 standard (aka XGA), ServiceDesk does not fill the entire screen
(in other words, its dimensions remain at 1024 by 768 pixels). We
realized, for those using higher res-settings, and when in ServiceDesk forms
where it would really be beneficial to see more at once, we ought to make the
system automatically take advantage of the larger space. We've now made it
so in two contexts:
1. When you go to the FinishedForm
(Alt-F4), ServiceDesk will expand vertically to take advantage of whatever added
vertical height may be available on-screen. With a sufficiently vertical
height, you can see the entire FinishedForm without need to scroll up or down.
2. When you go to the DispatchMap
(F5), ServiceDesk will expand vertically and horizontally to fill the entire
screen. This allows you to see a larger overview of your territory in a
single screen view, and reduces the need for panning up and down, left of right.
Any reasonably modern system is capable of resolutions
significantly higher than 1024 by 768. If your monitor is reasonably large
and you're not yet using a higher res-setting, you may want to try one.
Improved Client-Type/Revenue Comparisons:
Enhanced the Quality of Service report (F11, Performance Analysis) by
adding comparison breakdowns which now show figures for All, Non-HVCs, All-HVCs,
and then (as was there previously) each HVC individually (HVC = HighVolumeClient).
4.1.130 (4/6/06):
Added ability to email special-order parts
requests. To use this new ability, use the very same procedure as has
historically been used, in the F8 PartsProcess form, to mark items for a fax
request (i.e., Ctrl-Right/Click to mark each item that you want to include in a
particular request, and when done marking hit Enter on your keyboard, then
follow the prompts. You'll now find that at this point there are new email
options, from which you may select.
We're getting ready to add several new fields to the
Callsheets, including space for a third telephone number and email address.
In this release, you'll some re-organization that's been done as prep work for
those new fields. Specifically, to make room for a third phone number (to
be placed between the two existing ones), we've moved the formerly
invisible telephone comment fields from that in-between space into a little
corner of each telephone number box. We also made the fields now
semi-visible -- and of course made them much smaller, so they'll fit within the
tiny corner space. Check it out. We think you'll like it --
especially because there's now room for a third telephone number, to be coming
out soon.
Made miscellaneous small improvements and corrections,
including repair to recently upgraded ability of system to warn if re-using the
same P.O. Number as had already been used. It turned that in some
situations the system was returning false positives. That's now been
fixed.
4.1.129 (3/23/06):
Added ability to email invoice IMAGES to technician.
This is so the tech, from his remote locale, can then print actual images
without having to otherwise be connected to the home office. Lots of
people asked for this, and finally we have it.
Overhauled Inventory form's display of parts as
applicable to particular inventory location (usually trucks) to display only
items that either should be on truck or which system reckons actually are on
truck. In other words, the system now excludes display of items that
neither are on the truck nor should be on the truck.
Also made numerous small improvements and corrections,
particularly as connected with other recently added features.
4.1.124 (3/11/06):
In connection with new hyperlink capability, users were
quick to point out a couple of things I'd not considered.
First, the hyperlink process did not work if the
intended hyperlink text had spaces in it (as in "c:/documents and
settings/Picture of Jones Kitchen.jpg") The reason is, by default,
Windows selects only the particular "word" you double-click on, and it's this
selection the system was interpreting as the hyperlink text. To get around
this problem, you may now simply enclose your target (if in fact it does
include spaces) in square brackets (as in "[c:/documents and settings/Picture
of Jones Kitchen.jpg]").
Second, I'd neglected to consider that AttentionNotes
(the particular "sticky notes" as involved with current JobRecords) are
generally deleted during the archive process (i.e., when a particular record is
completed and moved to archive). If you're putting hyperlinks in such
notes, obviously, you don't want them deleted as part of that process.
I've now revised the code so that, in fact, any "sticky note" in a current
JobRecord that includes a hyperlink will be preserved during the archive
process, and converted to an archived JobRecord "sticky note."
In connection with the new direct transmission of claims
to Key Prestige, discovered that while everything on our end had in fact been
perfected, for any particular servicer there are some details of setup that must
be done on the Key Prestige end. If those details are not done first, you
can still transmit just fine, but your claims will sit in unprocessed limbo
(would have been nice if KPI told us that). We have now added code so
that, when you go to transmit via this new method, the system will inform you of
the need for this setup work, and tell you who to contact at Key Prestige for
the purpose (it's Wendell Vicente at 800-377-3678 ext 3061; ask him to create a
"library" as needed for direct reception of ftp'd claims).
4.1.123 (3/3/06):
"Doo duh duh Dooo duh Doooo." Yes, that's
the sound of trumpets!
Earlier I said we'd quickly expand the utility of our
new hyperlink capability. We've now created the first such
direct-operation enhancement. Now, in any JobRecord ExtraNotes or
AfterNotes box, you can place a full-path reference to any Windows
recognized document, program or other file. Just double-click on that
reference, and ServiceDesk will immediately open the underlying object. In
other words, suppose you worked up a detailed job quotation for some client in
Word, Excel, or other context. Or suppose you took pictures of damage in a
kitchen. Suppose you want to have ready access to any such kind of
picture or files, from a JobRecord, in ServiceDesk. No problem, just place
text that describes the full path to any such item (e.g., "c:\My Documents\PictureOfJonesKitchen.jpg")
If thereafter you're in the JobRecord and want to go to any such linked item,
just double-click on its reference. Instantly, you'll be there.
Using the above, you can have as many instant links as
wanted to any external program, document, music file, even websites (anything
Windows will run). Very cool, but there's still more.
Many have wanted some method to link jobs together in
ServiceDesk. Especially if you're doing multiple warranty jobs for the
same client at one time (each of which need to be on separate tickets), it would
be nice to have a method by which you could link each such JobRecord together --
so that you'd know, for example, not to schedule one without scheduling the
others so linked.
Using the above-described hyperlink mechanism, you can
now also do that. Essentially, you simply must place a hyperlink on each
such job to its counterpart (or counterparts). For internal-to-ServiceDesk
hyperlinks (i.e., those from one JobRecord to another) we're using the simple
convention of this format (as would be appropriate if linking to a JobRecord
with invoice number 37610):
"SdJob.37610"
In other words, just make a little text string, using
the word "SdJob" followed by a dot (".") then the InvoiceNumber of the
JobRecord you're linking too. Once that's there, you can double-click on
it whenever wanted, and instantly ServiceDesk will display the indicated
JobRecord.
Of course, if you're linking two jobs together (let's
call these "JobLinks"), it's
likely you'll want these to be reciprocal (i.e., with a link on each, referring to its opposite). That's
actually two links. If you had to
create both manually, it would be annoying -- so we've added a feature to
automate such cross-linking. While we'd liked to have added a new
button to the two JobRecord forms (i.e., current and archived) for
this purpose, there's no readily vacant space. Instead, we're making
another button do double-duty. If you float your mouse pointer over the
'Add AttnNote' button in the F7 form (or corresponding 'Add AfterNote'
button in the Archived-JobRecords form), you'll see a ToolTip come up
that tells you to access this feature via either mouse or keyboard action
(essentially, either right-click on the button or hit Ctrl-E on your keyboard).
You'll see it's very obvious from there.
Also, in connection with this work, we made the two
kinds of "sticky notes" automatically reduce their width when less than standard
width is needed to display included text. This allows them to obscure less
of the text behind them.
Though we've not done it yet, we'll soon add a feature
that automatically offers to create these links when you're creating a
new job and the system detects it's for the same location as a job already
pending.
Unrelated to the above, we also significantly enhanced
the behind-the-scenes utility that warns if you're about to create a new
JobRecord using a P.O. Number (or other job-identifying code as provided by
client) that's already in-use. Previously, the system only did this check
when actually creating a JobRecord, and it was limited in how far into past
history it would search. Now it searches ten times further and faster into
past history. More importantly, it does not wait until creating a
JobRecord to perform this check. It performs it immediately after the
job-identifying number (as provided by client) has been entered into a
Callsheet.
And we overhauled PartsLabel-printing as connected to
full label sheets (i.e., Avery 5261 type forms with 20 labels per letter-size
sheet). Now the system is perfectly accurate, and it will print both
columns on the page, so there's no longer a need to rotate a page around and
feed it back through for printing in the second column.
Finally (and not least significantly), dramatically
overhauled the applicable program code, as used in the JobsPerusal form
(Shift-F7), to determine which tech was last involved with a job.
Formerly, the program code would simply look to see which tech was last
dispatched on a job, and would ignore entries such as if the job had been
assigned to a tech (though not yet actually dispatched) upon scheduling, and
would ignore entries regarding actual work done even if they were more recent
than entries regarding dispatch events. Now the system looks for all such
categories of tech involvement, and will associate with a job whichever tech has
the most recent involvement of any kind.
In connection with this same work, also added an 'All
status' category in the JobsPerusal form. This will allow you to
quickly review all jobs as applicable to a particular tech.
4.1.122 (2/28/06):
Found and addressed a problem as connected to the new
direct-FTP upload to KeyPrestige (i.e., the one that ends all need to manually
upload claims to them). While our end of the system was in fact working
perfectly, it turned out that a quirk in the IBM AS400 server at KeyPrestige was
causing uploaded files to be scrambled there. To address this, we had to
create a whole new upload mechanism that now hands off the files in the
particularly specialized manner as needed.
4.1.120 (2/28/06):
In the FinishedForms claim system, added facility
to warn if description of service performed exceeds the 80-character limit as
allowed in the ServiceBench claims format (or 100-character limit as allowed by
Key Prestige, or 250-character limit as allowed by Dacor). Also, in the
caption label above the service performed box, added text to inform how many
characters are in your description at any point in time.
Also in the FinishedForms claim system, added
capacity to direct FTP transmit claims files. This is an option that
should be superior to the traditional method. Much like the ServiceBench
Web-Direct method, you can now immediately transfer each claim, and without
having to manually do a separate file upload.
Added a feature that checks, when doing a
QuickEntry insertion, to see if the applicable QuickEntryTemplate includes a
space as setup for a P.O. Type Number (i.e., a space toward the right end of the
CustomerName line that is preceded by a pound "#" sign). If
such is found, the system will now automatically place the user's cursor into
the space where the P.O. Type Number should be typed. (Please note we
refer to this as a "P.O. Type Number"
because some service vendors call their job-identifying numbers
ServiceWorkOrders, or SWOs, others use the term "C.U. Number" and so on.)
This makes it so the user can simply begin typing that number, immediately after
the QuickEntry insertion.
Making the first significant use of the new
hyperlink ability, added links in About ServiceDesk form to go to the
ServiceDesk WorkDiary (for reviewing recently added features), and for going to
the ServiceDesk downloads page.
4.1.119 (2/24/06):
For Wage Reports and Commissions Reports (F11
form), added option to print entire set for all hourly employees with single
request, and entire set for all commissioned employees with a single request.
To invoke this option, select the kind of report you want, specify the Printer
as the output location, and indicate the date range (i.e., just as you normally
would). At that point you'll see instructions just below the box where
you'd normally the initials of the person on whom you wish to report.
Those instructions tell you that if wanting to print reports on 'All', you
should simply double-click in that same box.
For some time we've been wanting to offer
hyperlink capabilities, particular so if you have electronic documents that are
associated with a particular job or customer, you can add hyperlinks to a
JobRecord which will instantly transport you to those other documents.
Since the programming environment that we program ServiceDesk within (VB6) lacks
inherent hyperlink capability, we've some difficulty in developing this
capability. We've finally broken through the barrier, however, and expect
to soon offer hyperlinks in a variety of contexts. The first example as
now operational is in the 'About ServiceDesk' form (first option under 'File
Functions'). It's a simple hyperlink to this website.
Churned through about 30 error message as had been
email-forwarded in last couple of weeks. I'm making a determined effort to
react to all of these as thoroughly as possible -- with the goal of making
ServiceDesk operation increasingly rock-solid.
4.1.118 (2/7/06):
Added a new set of info boxes in the UnitInfo
form, particularly as needed for HVAC companies (e.g., fuel type, flow
direction, unit location, and qty of units on premises). The UIS form will
not normally be expanded to display these (there's a little button to click on
for such expansion), and the lists that go into each box must be populated
separately by loading the file UnitInfo.mdb into Access and populating manually
there. For those of you not in the HVAC business, there's likely no need
even to concern yourself with this.
4.1.117 (2/5/06):
Added a new informational item in the DispatchMap.
It takes one of two forms.
First, a number of folks had wanted some visual
indication, when viewing the DispatchMap, as to whether the grid reference
(creating the particular location where the job is displayed) had been manually
created by an operator (e.g., as when there was no reference to the street in
the drop-down list), and was therefore potentially suspect. That visual
reference is now provided by virtue of a pound symbol (as in "#") as appended in
the bottom right-corner of each applicable graphic reference, and in superscript
form at the end of each list reference.
Second, some other folks (Dave at All American, in
particular) wanted some visual indication, when viewing the DispatchMap, of how
many previous visits there'd been on any particular job. That visual
indication is now provided via a small number symbol, in the same position as
described above for the Grid-Ref-Is-Suspect symbol. Presumably, if it's
not the first visit, questions about accuracy in the grid reference will have
already been resolved, so we should be safe in using the same position for
either indication.
Incidentally, once you have confirmed that a grid
reference/display location is in fact legitimate, you can toggle off the
Grid-Ref-Is-Suspect indicator by doing an Alt/Right-click on the graphic
reference (this is also in the contextual cheat sheet, so you don't have to
worry about memorizing the command here).
Please bear in mind that these new information
items will function only for appointments that are created after your update to
this release or later one. Appointments as made in preceding versions will
not contain the added info for display.
4.1.116 (2/2/06):
Added a whole slew of new optional password
protections, as requested by various users over the last few months. To
view the new options, go to your Security form (Shift-F11), view Actions,
click on the ID tab at the top of the left hand column, and scroll to the
bottom to view the last 9 items. Those are all new.
Added optional EDA account withdrawal to refund
process in Funds form (Ctrl-F9).
Responded to miscellaneous error messages as
recently received.
4.1.115 (1/30/06):
Major upgrade of Callsheet search feature
(accessed via Shift-F1). Now the system will search anywhere within any
field for whatever snippet of text you enter as a search target, and the system
otherwise performs better in a multitude of ways. One example: if you have
any segment of text selected (i.e., highlighted) prior to hitting Shift-F1, the
system will offer that to you as the search target -- sparing you any need to
type it. Also, when the system locates a match, it will highlight the
matching text where it's found. The system begins its search at your
present Callsheet location, searches toward the first Callsheet, then resumes at
the last Callsheet (i.e., completes a whole revolution) back to your beginning
point.
Corrected a lot more minor bugs.
4.1.112 (1/19/06):
Upgraded output for Maytag claims to their new
'06' format. This should result improved accuracy of transmission.
Please note, if on uploading claims at the Maytag website you've been checking
the box indicating that you were using the older '05' format, you should no
longer check that box.
Added a feature in the PartsProcess form (F8) to
help you more effectively deal with the situation where you've ordered a
quantity greater than one for a single part, yet fewer than the ordered quantity
arrived (e.g., you order 10 tub screws, and only 3 arrive). Always, you
could change the quantity in your original request to what was actually
received, then create a new request for the remainder. Now you don't have
to do that (at least not on your own). Instead, in the original request do
a right-click in the 'Date Received' text box. The system will then query
regarding the actual quantity received, adjust the original request to that
quantity for you, and automatically make a new request for the remainder.
Added some diagnostics to assist in determining
why current SmartParts files are not being found, if you are using that feature
and have any trouble in such regard.
Added second telephone number to Synopsis of Jobs
as printed from the DispatchMap.
Addressed numerous bugs, particularly a collection
as introduced by recent overhaul of behind-the-scenes function as connected to
JobRecords.
4.1.111 (1/18/06):
When doing backdated SalesEntries, the system will
now note the fact of backdating in the corresponding history notes as added to
each JobRecord.
In the last several months I've received isolated
reports of particular JobRecords having gone missing. That's a horrible
thing! In response, I've repeatedly scoured the applicable program code,
seeking to find any place that something might go awry in such manner as to
cause so unacceptable an event. While I did not in any case find a
"smoking gun," I've repeatedly "tweaked" the code, hoping to make it more
reliable against any such event. Apparently this was to no avail, for I've
recently received reports of it happening again. In response, this release
contains my most ambitious work yet in the effort to finally kill that bug,
wherever it lurks. I have "thoroughly fumigated the house," as it were,
with a ton of insecticide. The bug better be dead. If evidence again
arises that it is yet alive, you'll hear a mighty and bloody scream coming from
Shelton. Quite simply, I never want the product of my work to cause such
frustration for my clients. You deserve better.
4.1.110 (1/12/06):
Did a whole lot of fixes of various little
problems that had existed here and there (too numerous to enumerate). In
terms of new features, added a new set of checkboxes to the Generic and Custom
FinishedForms -- in which you can specify on individual line-item-listings
whether they are taxable or not.
4.1.109 (1/3/06):
Enhanced system reaction to loss of connection to
network fileserver. If the connection is even momentarily lost, the system
will signify this fact by having the mousepointer change to a network symbol.
That symbol will persist until either the effort to connect times out, or the
network connection is restored. As long as we were involved in signifying
underlying actions via changes in the mousepointer, we also made it so the
mousepointer will change momentarily to a binocular symbol while looking within
the network for a more up-to-date version of itself, and to a ruler symbol while
loading the DispatchMap file.
Augmented the just-added supplementary lookup of
Streets by making it look into the AddStreetsFile, in addition to the normal
Streets file.
Responded to numerous error message as received in
recent days.
4.1.107 (1/2/06):
Added 'Pattern Matching' to all ServiceDesk,
record-by-record type searches. What this refers to is the fact you can
use "wildcard" characters in formatting your search target. Say, for
example, you want to search for the name 'Humphries', but you can't remember
whether it was just that, or perhaps it was 'McHumphries'. If your specify
a search target of '*HUMPHRIES' (where the asterisk symbol stands in for
any number of unknown characters) the system will find it either way.
ServiceDesk will now use the standard Windows conventions in regard to these
wildcard characters. Those conventions are '*' for any set of
characters, '?' for any single character, and '#' for any single
numeric digit.
Revised search functions in the ArchivedJobRecords
form (Ctrl-F7) so that now the Name, Address and Telephone number searches there
go record-by-record, instead of being based on the CstmrDbaseIndex set, as they
had until now. This will permit you a broader search (i.e., using
wildcards and such) that's not available with the various as-you-type kind of
searches. Also, this search will turn up matches even if there's a fault
in the index set that other searches are based on.
Added a supplementary search feature in your
StreetList drop-down box. Prior to now, you sometimes had to work a little
hard (and possibly be imaginative) to find some streets within your StreetList,
because of different ways they might be found there. A given street might
or might not have a directional prefix, for example (i.e., such as N, S, E or
W). If you typed the name in one way, but in fact it was in there the
other way, you'd not see it pop up in the drop-down list. We decided to
take away the burden of forcing you to try lots of different variations.
Now, if you've typed in as much of the StreetName as desired and still don't see
it in the drop-down list, just hit F1 on your keyboard. This causes the
system to conduct an auxiliary search within your StreetList (this is a
record-by-record search, so may take a few moments), to see if what you've typed
can be found under any other reasonable variation. The background color of
the drop-list changes to show it's this kind of display it's providing.
Just change your text (i.e., add or delete a character) to resume the normal,
as-you-type kind of search.
Added a Both-Parties-Insertion feature when in a
Callsheet and wanting to insert both parties based on a previous job (rather
than just one). The action is to do an Alt/Rt-Click on the reference to
the Job that you want to do the insertion from.
4.1.105 (12/15/05):
Added a 'create Duplicate Callsheet'
feature. If you've placed one or both party's name, address and
telephone-number sets into one Callsheet, and want another Callsheet with the
same name/address-and-TelNumber sets, just hit Ctrl-D in the first Callsheet.
If you forget this command, it's now included in the ContextualCommandSummary ,
so just check there (i.e., right-click on the label area that's just to the
right of the name-and-address boxes).
Added a 'what display-category is this?'
feature to the PartsProcess form. Sometimes it's confusing for people to
determine, based on which boxes have been filled-in and in what manner, what
display/selection category a particular record will be destined to show within.
Now, you can do a shift-ctrl/click on any line item, and the system will tell
you the display category it belongs in. Again, this item too is in that
context's ContextualCommandSummary, so if you forget the command, just go to
that summary (i.e., right-click in the label area that displays above the
operative bands of text).
Miscellaneous improvements in operations,
including fact that PartsPickList will now search deeper into PartsProcess files
when needed, and SalesEnter program will search deeper into FundsJournal, as
needed, to match funds received in a possibly distant past with a sale as
presently entered.
4.1.104 (12/13/05):
Two augmentations of last added
Speculative-Transfer-of-Parts feature. First, we made it so such parts
will be included in the printed PartsPickList as applicable to any appointment
as involving the job in question. Second, we made sure that when a part is
indicated as used on a particular job, it's the spec'd part that will be pulled,
in preference to any other instance of the same part as may exist at the
indicated location.
4.1.103 (12/12/05):
This is a cool one. If in your operation you
like to speculatively move parts onto a truck in anticipation of probable use
for a particular job (i.e., pre-diagnosing the problem), chances are you'd like
to keep track of the fact you've done this in each instance, and make sure the
parts get back onto the shelf in your office storeroom if it turns out they were
not used on that job. We now have provision to accommodate this.
Specifically, if you look in the CurrentJobRecords
form (F7), you'll see there's a new button there, labeled "Antcptry Prts Trnsfr."
In case it's not obvious, this is an abbreviation for "Anticipatory Parts
Transfer." If you click on the button and follow the prompts, you'll find
it's very easy to transfer any parts, as wanted, to a particular tech's truck in
anticipation of possible need for the particular job as was displayed when you
clicked on this button.
When you've done this, ServiceDesk then works
behind the scenes to keep track of the fact that any such parts are on the
tech's truck for the particular of being used on such a specific job. This
will be borne out to you in two contexts:
1. When you're doing a
PostVisitReport on which it's indicated the job is complete, if you're not
already indicated that any particular parts as speculatively transferred for the
job were in fact used, the system will inform you, and invite you either to go
back and indicate such usage, or be sure the parts are retrieved from the
technician and properly returned to office stock.
2. As a secondary fallback,
there's now a new report you can do in the InventoryControl form (F10).
This report will print a sheet for each service location, listing on each any
parts that were speculatively transferred to it, which have not been reported as
either used or moved back into main inventory. The thinking is, you can
run such a report periodically to make sure you're getting back into main
inventory all the items that you should. To access this new report, go to
F10, select "Transfer Items", then "Return Items," then "Find Items
Speculatively Placed."
4.1.102 (12/6/05):
Miscellaneous fixes and improvements.
4.1.101 (12/5/05):
Added direct-printing to Tech'sRevenueReport and
addressed a few bugs as associated with recent improvements
4.1.100 (12/1/05):
The previously-described beta-improvements are now
available (in this build) via standard update. Also, we've made these
improvements:
The MakeMailList-1 feature is improved to allow
much tighter user specification as to the range of jobs that will be included in
the output file.
When you do statement or dunning letters now from
the Ctrl-F3 form, the event will be logged in the Notes section of each
applicable A/R record.
There is now a check in the system to make sure no
more than a single computer in the network has the Auto-Archive feature turned
on, and to warn if so.
We've now hidden the 'Archive' button in the
CurrentJobRecords form (too many people were using it inappropriately), and
replaced it with a new button (labelled 'Spec Transfer'). Though not yet
functional, this is in preparation for a feature that will allow you to
speculatively transfer stock to a truck in anticipation of probable
use on a job, and conveniently manage its actual use or return to office stock
thereafter, depending on circumstances.
4.1.99 (11/29/05):
MORE BIG NEWS: From time to time I make an entry
here describing an improvement that's not only major, but that also finally
addresses what has been a longstanding (and to some extent embarrassing )
weakness in the system. For the longest time, the system for entering a
fund that's received in payment against multiple receivables, and applying it
toward those receivables, has been very much less than ideal -- at least if the
check (or other money) that you've received applies toward a very large
number of items (such as, say, 50 to 500). There were a number
of factors making that system less than ideal. All have now been
addressed. In particular, if you now realize in mid-course that you made a
mistake in an earlier entry, it's easy to delete that earlier entry in
mid-course, and re-enter it. You can also now make Sales Amount
Adjustments in on-the-fly. And the readout of entries scrolls along, so no
matter how many items you're entering, they all remain readable and accessible.
Also, we've eliminated the request for user approval in regard to applicable
Paycode 3 SalesJournal entries, and this streamlines the entry process.
In regard to the previous big news about
direct-print statements, there were scattered reports of a printing flaw as
evidently associated with some particular printer drivers. It was
difficult for me to address here, because none of my printer drivers would to
it. But thankfully (and inexplicably), one suddenly started producing
precisely the symptom that was reported. Thus, I was able to work directly
until finding a work-around for it (the problem was in fact in the interface
between Windows and the particular printer drivers involved, but that doesn't
mean it's impossible to provide a workaround from my end.).
Since the changes in the "Receive payment on A/R"
function introduce a slightly greater than normal risk of difficulty from
unintended consequences, the present release is remaining beta for
the time-being. That means you can't do a from-within-ServiceDesk update
to it. If you want to try it, go to
this item on the
downloads page, and do a manual update.
4.1.94 (10/30/05):
My apologies to those who've been waiting and
waiting for particular new features -- if yours are among those that have not
yet appeared. I've been running like a chicken with its head cut off,
trying to take care of a huge variety of things, including fixes of
miscellaneous issues within ServiceDesk itself. The last few updates
(i.e., since Ver 4.1.91) deal primarily with such matters, and not new features
per se.
4.1.91 (10/9/05):
BIG NEWS: For all the many who've longed for
the ability to print Statements directly from within ServiceDesk
(i.e., instead of using ServiceDesk simply to create the underlying data, then
having separately merge it via a program like Word, in order to create the final
documents) -- yipee, yahoo, hurrah -- after all this time I've finally
done it. And they're very nice statements, too. They're available as
a new option in the AR-Dunning form (Ctrl-F3). I've also done a major
overhaul of the form itself, improving the interface and functionality in a
variety of ways. Please check it out.
Also added new teeth to the PVR-Enforcer.
This is a behind-the-scenes system that watches, when a technician wants to
print his tickets, to see if the tech is past-due on PVRs (PostVisitReports).
If so (and as a means of encouraging him to do the PVRs), it refuses to print
the tickets. Now, we made it even more ornery, for if the tech is severely
behind it will refuse to print anything for him -- except the list of items he
needs to do PVRs on.
4.1.89 (10/2/05):
Improved performance of PartsPickList. Until
now, there's been a potential fault in that if it was a very long time ago when
you checked in a part, it might not show up in the PartsPickList. The
reason is because, to avoid excessive lag times, the program code that looks for
PartsProcess items in the PartsProcessArchive limited its search depth to the
most recent 3,000 records. Thus, if a relevant item was more than 3,000
records deep, it wouldn't be found. We've now addressed that (while still
avoiding excessive lag times) by having the system also read in the JobRecord's
history narrative. It looks there for the first/oldest text regarding the
checking in of any part -- then searches deep enough in the
PartsProcessArchive to be sure it's found that item. If it still hasn't
found it, it provides a note telling you so.
Found and fixed fault wherein, for archived
PartsProcess records that had no HoldLocation, the system erroneously displayed
whatever HoldLocation had been found in the last-loaded record that did have a
HoldLocation.
Noticed that FirstPage/LastPage commands had never
been setup to work in the PartsProcess forms (i.e., current and archived),
corrected.
Since we added the potential to split A/R records,
we found a small unintended consequence in that, now an A/R record can be
created solely with a HighVolumeClient's abbreviation in the name position
(i.e., instead of the old format where it was always that abbreviation followed
by a hyphen then consumer's name, as in "AHS-Jones"). In the DunningList
form (Ctrl-F3), the underlying program code had not been modified to find
records in the new format. That modification has now been made.
In the ApplicationsJournal, made PreAndPartPay
entries editable. If you don't know what I'm referencing here, don't
worry. This is a behind-the-scenes journal that very few people ever find
the need to worry about.
4.1.88 (9/18/05):
Enhanced Commission Report in two ways. First, you can specify
fixed amounts to be paid to techs in conjunction with each sale amount (i.e.,
regardless of the amount involved in that component of sale, the tech's
commission is a fixed amount rather than a percentage). To use this
feature, go to the EarningsRate form, and in the same boxes where you'd normally
place a decimal fraction for percentage of commission, place a dollar value
instead. Second, the formatting of the printout has been
substantially overhauled for improved legibility and convenience.
Significantly enhanced a half-hidden feature that we call the "PVR-Enforcer."
This device attempts to cajole recalcitrant techs into making their past-due
PostVisitReports by refusing to print their tickets for them, until and unless
they do. The system will now uses a much improved method for creating the
list of past-due items, offers to print a list for the tech's use, and if the
tech uses a password to bypass the enforcer-block will email the boss (assuming
he's the top office person listed within the Settings form) informing of the
action.
Enhanced the system's reaction when an accross-the-network Server drive
becomes unavailable, and a user erroneously attempts to re-set the Server as C:.
There is now a very rigorous system in place to warn the unwary user this is
very, very likely not the correct course.
4.1.87 (9/7/05):
Added option that allows you to make it so if a tech is reviewing his jobs
via TechWindowMode, he will not be able to easily compare his workload with that
of other techs. This is a an option that, if wanted, you must turn-on from
within the Settings form.
Added a system check, when you're exporting accounting info to QuickBooks,
that compares the period currently being exported to the period last exported.
If there's either a gap or overlap, the system warns you.
4.1.86 (8/30/05):
You might notice we've had 8 revisions since the last entry. These have
mostly been fixes of small matters, with some minor new features and tweaks --
all of such nature as to hardly bear comment here. With this revision,
however, there are a couple of improvements worthy of comment. First,
there's no an option to add each job's address to the the printed RouteSheet.
Second, we've enhanced legibility in the Abbreviated-format faxed SpecialOrder
PartsRequest printout.
4.1.78 (/7/27/05):
No new features; simply corrected a few flaws in earlier work, and now taking
the last few improvements out of beta and placing into general release.
By the way, while for the past two-plus years we've been suffering, here at
Rossware, with an internet connection that was much slower than most of you
enjoy (ISDN at 128 kbps), we finally got the upgrade we've long been seeking.
Now, we're betting not one of you has a speed anywhere near ours. Our new
connection is OC20 (based on a direct optical fiber connection), which gives us
speed potential up to one million kbps (aka 1 gbps). That's a big
increase. It should increase our flexibility, and help us serve you
better.
4.1.75 (7/27/05 -- Still maintaining Beta State):
Added capability to pay techs varying commission rates depending on whether
it's a warranty job, or not. Go to the EarningsRates form
(Shift-F2) and you'll boxes to fill in the alternative pay rates.
Added a new A/R-Aging report. The previous report tallied for all
receivables, and simply separated HighVolumeClient receivables, as a whole, from
others. The new report is exclusively for tallying and aging receivables
for each particular HighVolumeClient. Access it from the Reports
form (F11), sub-option 'AccountsReceivable'.
Major embarrassment. When first creating the special-order
PartsProcess system several years ago, I naively did not suppose anyone
would typically order more than nine items of a single part, for
special-order purposes, at one time. Thus (and since I'm always anxious to
conserve data space), I allotted a single character for item quantity in that
context. But, lo and behold, it turned out sometimes some people do
special-order more than nine of a single item at one time. Back in
November of '02 I addressed the situation, and re-structured the underlying data
to accommodate larger quantity amounts, and changed all the associated program
code to make it work. However, for particular technical reasons I had to
allow a transition period of a month or two before activating the change.
Guess what? I forgot to ever activate it. I even forgot I'd made the
change at all. In the interim since, there've been numerous instances of
people complaining about the nine-quantity limit, and in each instance I've
indicated I'd fix it right away, except it requires some underlying structural
changes of the kind I can only make with major version changes -- not realizing
(on every such occasion) I already made those changes -- way back in '02.
How humiliating! Anyway, on again encountering that complaint today, I
looked at the underlying code to see if there was anyway I could fix it without
that major structural change, and discovered what's described above.
Needless to say, the more-than-nine-quantity-limit has now been activated.
Another embarrassment. In the last year or so, I've had a very few
clients complain of Appointments being made, but not always taking (i.e.,
they don't appear thereafter in the ScheduleList or DispatchMap). I've
looked, studied, examined, searched and scrounged trying to find a place where
the program code could foul up, to result in this symptom. Each time I
came up short, until today. Once I discovered the erroneous logic that was
embedded in a few lines of code, it was (of course) obvious. What an idiot
I was -- not to realize the flaw when initially writing it that way, or to see
it when studying the matter so many times. Well, at least finally I did.
Again needless to say, that problem is fixed.
Since we are still, again, in beta-mode right now (if you're wondering, I do
this whenever I'm concerned about a greater than normal risk I may have broken
something new, and so I don't want anyone to expose themselves to that without
full knowledge), if you want the latest at this point you can't do the
automatic-from-within-SD mode of update. Instead, go to
http:www.rossware.net/downloads)
and, at the very bottom of the page, click on the item labeled 'ServiceDesk Beta
Ver 4.1.74'.
4.1.74 (7/24/05 -- Beta Release):
Added capability to record jobs to SalesJournal without simultaneously
closing them out. Another way to say this, you can now do interim
Sales Entries. This is useful, in particular, if you pay by commission and
want to pay a tech who started the job (by recording to the SalesJournal for his
work), then later pay a different for finishing it (by recording to the
SalesJournal for his portion of the work).
Added a 'Hold Location' box to the PartsProcess system, and revised the label
printout for much better format as associated with SpecialOrder parts. The
Hold Location is for keeping track of where a part is kept, after having been
ordered in, prior to being given to the tech for use on the job.
Since this is a beta-release, the standard, automated-within-ServiceDesk
update will not work. Instead, go to the ServiceDesk downloads page (http:www.rossware.net/downloads)
and, at the very bottom, click on the item labeled 'ServiceDesk Beta Ver
4.1.74'.
4.1.73 (7/24/05):
Added auto-formatting for telephone numbers within Callsheets. This is
something I resisted doing for a long-time, since I wanted to leave the user
free to use these boxes for other purposes if they wanted to. Plus, I
personally find it distracting when the system formats as I type, as it
interferes with editing my own typos, etc. However, thanks for input from
Jim at Stafford Appliance, I thought of a scheme that would allow the present
flexibility, and auto-format as well. Now, when you move the Windows focus
out of one of these boxes, the system does a quick, behind-the-scenes check.
If it finds seven or ten numeric characters, it will automatically change (if
needed) to the correct format for you. If it finds no numeric characters,
it assumes you're not presently using the box for a telephone number at all.
However, if it finds a quantity of numeric characters other than seven or ten,
it warns you there is not a valid telephone number, and suggests you
correct.
4.1.72 (7/18/05):
Added feature to MasterPartsPlan form (F10) that allows you to sort the main
listing via PartNumbers in preference to sorting via Type, Description and Make.
To set for this alternative sorting hiearchy, right-click on the 'Sort/Index'
button as there found. Also, noticed while there that the Top and Bottom
quick-keys (Ctrl-Home to instantly go to top of display, Ctrl-End to instantly
go to bottom) for that context had never been setup, and did this as well.
4.1.71 (7/15/05):
For those using a Registry-Based LocalFilesPath, we put a cap on the number
of post-setting messages that remind, on bootup, of the special setup
circumstances.
Added ability to print or save-to-file entire list of pending appointments
(it'd done via new button in ScheduleList form, F6). Previously, you could
print or save to file appointments for any particular day (via various options
in the DispatchMap, F5), but not for all pending days. Now you can.
Fixed a few miscellaneous bugs.
4.1.70 (7/6/05):
Added ability to create multiple, non-truck type inventory locations.
What was formerly the 'Trucks' form (accessed from within the MasterPartsPlan
form (Ctrl-F10) is now called the 'Inventory Locations' form. You can now
specify different inventory locations, whether involving a truck or otherwise,
from there.
Enhanced desk-selection from a Callsheet. Now full names will appear in
the selection list. Also, you can now use the keyboard-only to make your
selection (Alt-S, then cursor down to the name you want, then hit 'Enter'),
instead of needing to use the mouse. Actually, you always could use
keyboard only if the other desk that you wanted to switch to was first in the
list. Now you can regardless of whether the other desk is in the list.
Updated Dacor warranty export to fit recent expansion in Dacor's autho field.
Switched AssignedTech printout on invoice to show first-name and last-name
abbreviation (instead of vice versa). Some users had been concerned lest
customers, noting tech's last name, call him at home without invitation.
4.1.67 (7/6/05):
Added new screen-criteria in JobsPerusal form (Shift-F7). Now you can
also screen jobs via a selected HighVolumeClient. This is so, if you
you're interested in seeing all jobs as currently pending for any such client,
it's easy to review on that basis.
Also included numerous small fixes. .
4.1.66 (6/30/05):
Added print feature to Funds form. Now, after displaying for any
selected category, a new button appears with a 'Print' label. Click on the
button and you can print a summary, for any date range desired, under the
selected display criteria.
Expanded quantity of zones that can be used from 24 to 30.
Fixed miscellaneous little bugs that had been reported in last week.
4.1.65 (6/16/05):
When inserting a former customer's name and address set from a past job to a
Callsheet (via the CstmrDbase system), the system has long noted if a UIS was
attached to the previous job, and if so offered to transfer the same attachment
in the Callsheet. However, if multiple UISs were attached to the past job,
it did not note that multiplicity, nor query the user as to which of the
multiple items he or she might which to have attached to the Callsheet.
Now the system does.
When creating an appointment via ItemLocate feature from existing JobRecord
or via ZoneScheduler from existing JobRecord, the system will now note if
there's already an appointment pending for that job, and if so ask if the user
wants to change the existing appointment, as opposed to creating a new one.
This was important because some users unwittingly found themselves inadvertently
creating new appointments via these processes (before the improvement), when
what they intended was to change an existing appointment.
Made some improvements in SD-Backups. Among other things, it will now
warn you if you try to start the program when there's already another instance
of it running on the same machine.
Added progress bar to creation of ZipCode-based Tax File in Reports form.
Fixed flaw created with last upgrade whereby, during auto-archive process, an
error was created in the frmSalesView.DisplayPage procedure.
4.1.64 (6/14/05):
In the Reports form's Dept-by-Dept summary (applicable only if you
departmentalize, designed generally for Mr. Appliance franchisees to make
reports they need for home office), added columns for totaled materials and
totaled labor.
In regard to making SalesEntries, until now there has always been a
requirement that they must go in with a proper date-sequence (i.e., you're not
permitted to create an entry with a date of 6/10/05 after making an entry with
date of 6/11/05). The requirement was important, because when you make
date-range reports the system relies on the entries being in proper
date-sequence as part of its effort to determine which records to include in any
tally. However, some users found themselves wanting to make entries for
sales that were actually for earlier dates (and they wanted them recorded under
those dates), even after they'd recorded entries for later dates. We've
now added a re-sort feature to the SalesJournal that will properly re-sequence
entries there, even if entered out-of-proper-date-sequence by the user.
You can invoke it manually by clicking on the appropriately labeled button in
the SalesView form (F4), or just let the overnight AutoArchive process take care
of it for you.
Overhauled the Model # and Serial # search features in the UnitInfo form.
They are now much faster, and will no longer get tripped up when you have more
than 32,768 records there. Also, on model number search, when a selecting
a particular model there is now an added list of applicable serial numbers, so
you can link directly to any underlying UIS. Also, you can now do
single-key quick-access to the basic function buttons there.
4.1.63 (6/12/05):
At request of Cindy at After Hours (great idea Cindy) added a listing of
parts needed to the 'single large Email' method of dispatching from the
DispatchMap (i.e., in the list of options that comes up when you click on a
tech's name at the top of his list of jobs). It's the same text as would
print in the 'pick-list of Parts' option, but added to the email, and in email
format. This should make that method of emailing dispatches considerably
more constructive.
Added option to disable auto-CapsLock feature. It's a new local setting
in the Settings form.
Learned from Larry (at Larry's Service) of particular circumstances in which
system was still failing to capture job completion dates for insertion to the
FinishedForms. Corrected.
Also at Larry's request, created ability to pull parts in POS context from
other than office stock.
At request of Appliance and Refrigeration Hospital, expanded number of
potential zones (as involved in ZonePlanner system) from 12 to 24.
4.1.62 (6/2/05):
Completed remaining element in split-billing system: specifically,
when
subsequently applying payments as received against A/Rs (via the Ctrl-F9 Funds
form), the system will now note when multiple receivable items are open under a
single invoice number, and if so query as to which particular one the payment
should be applied toward.
Added Dial-9-First option to auto-dialer.
Responded to miscellaneous error messages as forwarded via auto-email system.
4.1.60 (5/26/05):
Without advance announcement, we discovered that AHS completely re-worked the
format of their emailed dispatches. This severely threw off the program
code that parses the text from those emails for the purpose of plugging it
automatically into Callsheets (whether from within ServiceDesk itself of from
the EmailedDispatchEnabler). We re-wrote the parsing code today, to work
with the new format. This release of ServiceDesk has that re-worked code.
We've not yet re-done the EmailedDispatchEnabler with the re-worked code.
Hope to do so tomorrow.
Also fixed small problem that still persisted in regard to brackets on the
grid reference as connected to jobs being inserted from the past.
4.1.59 (5/23/05):
For some number of years there's been an occasional fault the
InventoryControl system that I could never replicate or figure out. I just
knew from reports that sometimes it happened, specifically in connection with
changing the controlling part number in the MasterPartsPlan, or removing a
listing there entirely. Whenever this is done, the system needs to change
the listing for any actual items in inventory. The code was there to make
it happen, but sometimes (I learned from users) it did not. Upon
investigating another symptom (too many listings under a particular part number,
and under varying descriptions), I discovered an underlying flaw in the program
code that manages the change operation just described, that could cause both
problems under particular circumstances. That is now corrected.
Also corrected fault in new procedure that checks for improved page/grid
coordinate upon inserting customer's data set from previous job. Under
some circumstances that check had been erroneously offering an supposedly
improved coordinate, and erroneously with double surrounding brackets.
That is now corrected.
4.1.58 (5/22/05):
Major overhaul of program code that manages printing of parts labels.
As Windows has modernized over the years, it's grown decreasingly compatible
with older, dot-matrix printer technologies. To compensate for this fact,
the parts-label printing system now offers several optional methods for printing
to such printers in a continuous form, tractor-feed kind of situation. No
matter what your printer situation, we expect that at least one of these methods
will work for you.
Made it so you can now create UnitInfoSheets from an archived JobRecord.
Added checks, upon transmitting claims, to make sure there's a model and
serial number, and to warn if not.
4.1.57 (5/14/05):
This is a big one. We added split billing. What is split billing,
you ask? It's a built-in method for creating multiple A/R records (i.e.,
receivables) as associated with a single sale. This is to accommodate the
situation where, perhaps, you're billing the consumer for one portion of
the job, the manufacturer for another portion (i.e., some element of labor as
covered under warranty, a parts supplier for another portion (i.e., for parts
covered under warranty), and perhaps a home warranty company for still another
portion (i.e., for some element covered by their policy, though not covered by
the consumer's deductible or manufacturer's warranty). Formerly, no matter
how many parties you were looking toward for satisfaction of all amounts as
involved in the sale, it would typically be handled regardless via a single A/R
record. In practice, it usually did not badly, except for the fact that no
matter who truly owed, it would still show under the name of a single payer
(which might not be the one who still owed). Well, now we've fixed it.
When you're entering a completed but billed sale (i.e., a Paycode 2) via the
SalesEnter form and it then takes you to the AR-Input form to create the
associated receivable, you'll see there's now a new button on the form labeled "Split
Among Multiple A/Rs." First put in info as applicable to the first A/R
you want to create, then click on that button and follow the prompts.
Basically, you'll be creating one A/R (i.e., Accounts Receivable record) after
another, until satisfying the full amount as involved in the sale.
4.1.56 (5/10/05):
Added improved color indications on PercentOfAllocationUsed PieChart in
DispatchMap.
For PartsProcess faxed-order printouts (abbreviated format), improved left
margin and added transmission of notes from underlying request.
Further overhauled file-sharing protocols as associated with inventory system
so as to avoid or minimize conflict between multiple users.
4.1.55 (5/8/05):
Improved recent addition that allowed check in current StreetList for
addition or improvement of page/grid reference upon inserting, to a Callsheet, a
customer's data set as found from a past job. Discovered our initial
effort had failed to account for the underlying BlockList, which can alter the
assigned grid reference depending on the address number that goes with a
particular street name and zip. For this reason, users could be prompted
to change the page/grid reference inappropriately, and novel additions might be
less than optimum. Corrected.
For auto-filling of special-ordered parts in the FinishedForm, made it so if
you're in one of the warranty-claim type forms (i.e., Narda or Ceasa), and if
the underlying request lacks a price in the 'Sold' box yet has a price in the
'Cost' box, system will pull from the 'Cost' box.
For tech route sheets, added notation (consisting of asterisk next to invoice
number) to provide tech with indication, in regard to each appointment, as to
whether an office person had confirmed that appointment with the customer.
When changing an appointment, made it so added notation in historical
narrative will indicate the tech assigned, if applicable.
4.1.53 (4/26/05):
Added check when inserting customer name, address and telephone set into a
new Callsheet from the database. It looks to see if the set that's
inserted from has a page/grid reference, and whether (if so), it matches current
expectations. If none is found, the system simply adds the insertion of
one for you. If one is found, it asks if you want to replace with what it
currently finds as being correct.
4.1.52 (4/24/05):
For the ZoneScheduler, made it so that besides tallying appointments from the
ScheduleList, it also tallies those that are sitting in Callsheets, which have
not yet made it to the Job/Sale process. This has long been done in the
WBDE, but was not previously done within the ZoneScheduler itself.
Made some improvements in the 'Overview' mode of DispatchMap (i.e., the view
you get when holding down your spacebar). Unassigned jobs no longer have
route-lines drawn between, and now TechHome positions will display there.
Made it so when checking off in DispatchMap that an appointment was confirmed
with the customer, it adds a notation to the historical narrative reflecting the
fact.
Added new Security/Action item (i.e., potentially password-protected action),
to terminate ServiceDesk from the TechWindow mode.
4.1.49 (4/17/05):
For CallerID-capture system, made it so host-computer (as unit actually
connected to CallerID device) can share Caller info with other computers in
network. Further refinements in new security system. Overhauled file
sharing in inventory system (had had some reports of conflict, believe any
difficulties should now be resolved).
4.1.46 (4/13/05):
Made some refinements on new security system, including fix for initial flaw
that in some instances kept individual permissions from saving correctly.
Also added a couple of new context areas (i.e., operations that may optional be
set for password connection) as connected with editing the main text in
JobRecords or editing previous history.
4.1.45 (4/11/05):
Hallelujah! A new SD-Security system. Many users have been
pleading for this for a long time, and it's done: an enhanced security system
that allows you to specify any number of separate passwords, keep track of to
whom each is given, and specify precise permissions (i.e., which particular
operations each password will "unlock") for each. The old password system
works just like it always has (except we're now calling that main and old
password the "MasterPassword"). If previously you'd given this password
out to others to whom you'd prefer to grant more limited access, we suggest
changing that password to something new, that only you will know (click on 'File
Functions', then 'About ServiceDesk', and click on the button indicated for
setting the MasterPassword). To set specific user passwords, you'll use
the new SD-Security form, accessible either under 'File Functions' or by
pressing Shift-F11. As you'll note, you must use the MasterPassword to
access this form. Its operation from there on is, we believe,
self-explanatory. If any questions, please let us know.
4.1.44 (4/5/05):
Improved method for capturing true completion date on inserting data to
Finished Forms.
Added a substantial auto-correlation (in terms of added contextual notes) to
various A/R and Funds control operations. Specifically, if an A/R account
is written off as a bad debt, system will now automatically add an AfterNote to
the corresponding JobRecord, describing the write-off. A similar note will
be added if a refund is made. Also, when amounts are applied (from the
intended Funds form operation) toward any A/R record, the system will auto-add a
note in that record's Notes section detailing the application.
Added feature to SalesEnter process that permits temporary alteration of
entered recording date. This is appropriate, for example, if your techs
completed jobs at the end of March, but it's the first, second or third of April
by the time you get around to recording the completed sale -- and yet, to keep
your accounting straight, you want to recorded date to be in the same month the
work was done. Previously, as a solution to this problem, we'd suggest
users momentarily backdate their computer while making such Sales entries, which
was obviously an inelegant solution. Now there's a button in the F9
SalesEnter form for changing the date that will be recorded for entries made.
Added provisions that facilitates (for those few servicers who use such a
system) servicer setup where each technician purchases and manages his own
parts, and where warranty claims need to include distributor account numbers
(since each tech purchases on his own account) as unique to each such tech.
There are a couple of steps required to make this work. If interested in
using this capability, please consult us directly.
Improved 'Adjust Indicated Quantities' function in Inventory Control Form
(F10) so, when needing to remove items to make indicated stock square with
actual count, the system preferentially removes entries that lack a purchase
invoice number, as opposed to those that possess such data.
Added QuickLink to JobRecord from A/R form (F3). Also, added tooltips
in locations where, for some time, you've been able to auto-insert a time/date
stamp. Specifically, if you're adding notes to the Notes section of an A/R
record, or AttnNotes to a current JobRecord, or AfterNotes to an archived
JobRecord, you might want a time/date/operator notation to indicate when the
note was inserted and by whom (much as is done for you without request in a
number of other contexts). To have this done for you in these particular
contexts (where it's not otherwise automatic), hit Shift/F1 on your keyboard
while the cursor is positioned in any such box. To remind yourself of that
command, just float the mousepointer over any such box and a tooltip will
display to remind you of the needed action.
4.1.42 (3/13/05):
Significant upgrades to electronic claims system.
The system will now record, to the on-screen NARDA, file-making as well as
direct-transmission events, and will record a notation to the underlying
JobHistory for either.
Also, we'll now be transmitting a new field to ServiceBench which identifies
the DispatchID of the item being claimed upon. This is so they can check
off the dispatch, within their system, as having been fully processed and
claimed upon (something that previously was not occurring, owing to shortfalls
on their end). Even so, though we'll now be transmitting this
information, ServiceBench does not quite yet have the machinery in place to use
it. Thus, until they get their end completed, you'll continue to
experience the same symptoms as before (at least our end is done).
As a final improvement, we've upgraded the interface that's involved when you
load a job into the FinishedForm where there were already one or more
FinishedForms that had been saved with prior edits. Previously, in the
effort to inform you and offer the option to re-load previous edits, the system
essentially forced you to choose your intended form type twice -- which was
slightly annoying. You'll find the new interface is better. Also,
you should notice that where pre-existing edits in any form-type already exist,
the radio-button that corresponds with that form-type will show with bold-text,
indicating on its face and before any load-effort that such pre-existing edits
exist for that form-type, and are available to load if wanted.
4.1.32 (2/15/05):
Did a couple of little fixes as associated with recent work. In regard
to importing parts-ordered info the FinishedForm, discovered that while the new
intelligent search did a better job of search deep into historical data,
it needed to open a somewhat larger window at such depth. Fixed.
Also found found that recent work in DispatchMap resulted in occasional loop
when attempted to drag/drop reassign a job that was already marked as dispatched
to original tech. Fixed.
4.1.31 (2/13/05):
Worked over the WagesReport to make it optional whether to use the California
rule, or not, when calculating an employee's overtime. In California (and
perhaps a few other states, so far as we know), overtime is calculated not only
as any hours exceeding 40 in a particular week, but also as any exceeding 8 in a
particular day. Under Federal Rules (which at least most other
states follow), it only has to be calculated as the former, not as the latter.
You now have the option, when making a WagesReport, as to whether to go one way
or the other.
Modified system so that now all users can assign a variable JobCount
value to each appointment (previously, this was available only to those using
the ZoneScheduler system). In the ScheduleList form (F6) there's a
new last column (at least it's new for those who've not been using the
ZoneScheduler). In this column the system will automatically place a
default JobCount value of 1. If you expect a job will take twice as
long as normal, you can change its value to 2, or if three times to 3, etc.
You can also set as 0 if circumstances make that appropriate. These
figures will be reflected with JobCount totals in the DispatchMap.
Improved auto-fill-in feature for FinishedForm in regard to parts special
ordered and parts used from stock. Formerly, the system would search back
a maximum of 1000 records in each context (the search was limited to preserve
fast response). If you were loading an older JobRecord into the form, this
may have not been far enough back of a seach to capture items used or ordered.
Now the system uses intelligent algorithms to gauge the search distance back
according to circumstances, resulting in both fast response time in normal
instances, plus still accomplishing a thorough search when jobs are old.
Also in the FinishedForm context, added a final element of POS integration
that I'd formerly forgotten. This has to do with automatically creating a
PartOrder/Request in conjunction with using the FinishedForm/POS.
Now that will in fact happen for you, automatically. The simple key to
make it work: as you fill-in a parts line in a FinishedForm, if its for an item
that you want to create an order for, place a double asterisk (i.e., '**') in
either the PartNumber or PartDescription box. That signifies to
ServiceDesk that you're wanting to order any such part. When you then go
to print the item (or if you hit Alt-O, for 'Order'), the system will
flag items so marked, and asked for your confirmation that internal PartsOrder/Requests
should be created in their connection. For a reminder of this method (and
a slightly related one), try floating your mouse pointer over the top PartNumber
and top PartDescription box in any FinishedForm. ToolTips will appear that
provide a contextual reminder of these capabilities.
Overhauled section of program that checks display properties on startup to
make sure they're adequate for full display. Since introduction of Windows
XP with its taller caption bars, many users have unwittingly been using the
system with the bottoms of the lower two Callsheets cutoff. The system
will now catch this condition, and coach XP users through to a solution.
Significantly upgraded portions of software that manage the new CallerID
feature. Created the interface as needed so a hardware-connected computer
can share CallerID info with other computers in the network, but didn't quite
find time, yet, to finish the rest of that project.
Created option to force update of local CstmrDbase indexes even when not
otherwise prompted. Made option when printing parts labels to use
old-fashioned dot-matrix tractor feed.
4.1.28 (1/25/05):
Added two new terrific features:
First, we now have Caller-ID functionality. If you hookup a device to
your network that provides Caller-ID info, ServiceDesk will display, within a
Callsheet, the incoming caller's name and telephone number. Click on
either or both for instant insertion and CstmrDbase search.
Second, we've now added the remainder of integration-functionality for
PointOfSale applications. A few months ago, we'd created auto-fill-in
features for FinishedForms, as integrated with either SmartParts, internal
Inventory System, or Serialized Dealer Inventory. The remaining deficiency
was that, after such fill-in, the system did not automatically pull sold items
from inventory. That is now fully addressed. You can sell, invoice,
insert, and pull from inventory either stock parts or serialized inventory, all
in a single step! Hurray. It's been a while in coming, but we
finally got there on this. We also improved the mechanism to indicate,
when doing a PointOfSale action from a Callsheet, that such is your purpose (go
ahead and try the old method, the system will instruct you in the new method to
use instead).
When in the FinishedForm, if you insert to a line-item from either stocking
parts inventory or from serialized dealer inventory, the system keeps track of
the insertion. When you then print the ticket, it asks if you want those
inserted items simultaneously marked as having been used from inventory.
With your consent, of course, it does so. You may also trigger the query
(i.e., in the alternative to having it come up automatically when you go to
print) by hitting Alt-I on your keyboard (think 'I' as in Inventory).
4.1.21 (1/11/05 -- Beta-Release Only):
Major overhaul in the Settings (Ctrl-F1) form as connected to ability to
specify particular properties as associated with each tech. Now, if you
click on a tech's name in the List of Technicians, a box appears to the right,
where you can set several properties. Some of these envision future
capabilities, some old, and some are newly functional.
In regard to newly functional properties, the most exciting is you can place
in the DispatchMap grid coordinates for each tech's home location. In
result, the system will display a cute little house symbol at that location on
the Dispatch, in the applicable tech's color, and with his initials inside.
A related and new capability is you can deliberately specify each tech's display
color, instead of simply accepting the default as assigned by ServiceDesk.
It's also easier to change the sequence of technicians (if having questions on
this, please call).
To set any tech's display position, first get coordinates for that position
from the DispatchMap (as for other other operations, if you simply left-click at
a location, ServiceDesk puts that position's coordinates into your Windows
clipboard). Then go to the Settings form (Ctrl-F1), click on the tech's
name (from the List of Technicians), and in the box that appears to the right,
click in the text area labeled 'Display Pos'. At that point you can either
manually type-in the display coordinate position (fractions are okay, if
wanted), or hit Ctrl-V to insert from the Windows clipboard. You should
then click on Save Net-Wide Values, and the job is done.
Also in regard to the DispatchMap, we made it so the little pie-chart
percent-of-allocation-used box can be moved to wherever you want it.
Also, upgraded SD-Backup Utility in two respects. (1) Upon minimizing,
it now goes into your taskbar's system tray, rather than onto the taskbar
itself. (2) You can now designate a drive other than the drive it's
running from as the backup location.
4.1.18 (12/22/04):
Discovered we'd created a flaw with last update that prevented certain edits
in the AccountsReceivable form (Ff3) from saving; corrected.
Also added a wholesale-checkoff method to the A/R form.
4.1.16 (12/12/04):
Made it so the two versions of the PartsProcess form (Current and
Archived, F8 and Ctrl-F8) can simultaneously be loaded and used. So now,
you can maintain a search/work position in one, toggle to the other for some
research there, and return to where you left off in the first. The
capability was not there previously because we actually use the same form
for both display modes, and it did not occur to this unimaginative programmer,
until recently, that he could write code to simply create another instance
of the same form, but in opposite mode.
Worked on Finished-Form NARDA to make it more perfectly work with LG brand
claims. In this regard, we've improved the labeling for some of the boxes
in the on-screen NARDA. Since this last part is not part of the program
itself, it requires a separate download if you want the improvement (which we
highly recommend). In fact, over time we've made improvements to some of
the other Finished-Form setups, so if you've not recently done those as a
separate download update, you should do so. You can go to the downloads
page manually, or just follow this
link.
Expanded on just-added feature that allows you to directly email a job report
to any designated recipient. Specifically, there are four improvements:
(1) You can now access the feature for archived JobRecords as well as for
current ones. (2) You can now also access the feature from the F12,
CstmrDbase display context. (3) In the QuickEntries template for any
HighVolume client, there is now a place for you to designate their email
address. If you've done so for any client, and you're emailing a JobReport
for a job that pertains to that client, the system will find that email address
and insert it for you. (4) The report now includes the full history rather
than just excerpted section from it.
Added feature in Archived-JobRecords form (Ctrl-F7) that allows searching
within the text of job histories. This was needed by a client for whom
we'd converted Swiftlink data. The old Swiftlink numbers were placed into
the converted JobHistories, and sometimes they needed to look those old jobs via
those old invoice numbers. You may find the feature useful for your own
separate purposes.
In the InventoryControl form (F10), enhanced the feature that allows
contextual display of the Supplemental-Info sheet from the MasterPartsPlan
(generally, just click on a displayed item for this purpose). Now the
Supplemental display will also show retail and discount pricing, plus minimum
storeroom and standard truck quantities.
In the SalesSummary Report (F11), added a line item that indicates total
materials and total labor subject to tax exempt status.
In AccountsReceivable form (F3), created a new export feature that will let
you place all the accounts receivable data into a spreadsheet, if you're wanting
to do any manipulation of a type that's not already available within
ServiceDesk.
4.1.15 (12/1/04):
Added a feature (under 'Print Options' from the F7 CurrentJobs form) that
allows you to email details about a job to any email recipient. This handy
if, say, a home warranty company client wants a report on the status of a job.
Just go to the JobRecord, select the option, and zip the email right off.
Added some overhauling to the FinishedForm NARDA to perfect claims setup for
Asko.
4.1.13 (11/15/04):
Added feature, if you have techs remotely printing their own invoices from
the DispatchMap, that checks to see if they're more than two weekdays behind in
making their PostVisitReports. If so, if chides them, and refuses to print
current tickets until they report on such past jobs. The idea is this
gives them a big incentive to get those past due reports completed, because
otherwise they lose the convenience of having their tickets printed, and have to
write them by hand.
4.1.11 (11/8/04):
Addressed problem where some system continued to display message that
expressed uncertainty regarding whether 4.0-to-4.1 conversion had been
performed. Responded to some email-forwarded error messages.
4.1.10 (11/3/04):
In the PostVisitReport-Type 2 form, made it more intuitive to select
the parts-ordering, inventory-use and funds-received actions via mouse.
Formerly, you had to right-click in any of those three applicable boxes to
invoke the function (or hit Enter on your keyboard with the mouse focus there).
It was more intuitive to simply left-click with your mouse, but this produced a
message telling you to right-click instead. Now we've made the left-click
work as intuition suggests. Also added in check for when inventory is
indicated as being used and item is designated as 'SU' type, to warn user to
indicate use only when such a bulk-type item is exhausted. And corrected
defect where, if FundsForm or PartsRequest forms were already visible but hidden
behind other forms, they'd fail to come to the front when their functions were
selected from this context.
In the TechWindow mode, made it so technicians can print their own set
of invoices from within the DispatchMap (previously, technicians accessing via
that mode had been locked out of all within-map operations except simple
viewing).
Miscellaneous other improvements, and responded to email-forwarded error
messages as received in last week.
4.1.8 (10/19/04):
In the ArchivedPartsProcessForm (Ctrl-F8), added a Usages
Report. This goes through a specified quantity of past part orders and
provides a sorted tabulation showing the frequency with which you ordered each
of any part number.
For those using the SmartParts utility from within ServiceDesk (this
concerns appliance servicers only), made it so ServiceDesk itself will
manage the update for you (i.e., the same as from within stand-alone
SmartParts). Just click on the little CD symbol from within the
SmartParts interface (Alt-F10), and follow the prompts.
In the FinishedForms, revised the Generic so that boxes that are totaled for
you are disabled and greyed, thus preventing an unintended tab-stop at such
locations when you use tab to move from one intended box to the next.
Please note this improvement is based on updating of files separate from
ServiceDesk itself, and the standard, automated update will not bring you the
improvement. You must manually download this from the ServiceDesk
downloads page, or just click here.
Learned from Kathy at Allied that in some instance a name or part number
search failed to yield results in the PartsProcess form. Corrected.
4.1.7 (10/14/04):
In the InventoryForm, Review Existing Inventory, Tabulate Values
function, made a true breakdown-type report. Now shows quantity and value
total on each truck, averages days in inventory, etc.
Miscellaneous small fixes for a variety of minor matters brought to our
attention in the last many days.
4.1.4 (10/10/04):
Please note this is a version-level upgrade. Its immediate
version predecessors were released only in beta version. There's been
enough usage now, by those courageous enough to use the beta version, we feel
confident for a general release. If you do not know, we reserve
version-level upgrades for changes that involve one or more underlying data
files being re-structured. This means ServiceDesk must note the new
structure after you've updated, and convert the applicable files into the new
structure. You'll see this when you first make the transition. To
understand the substantial changes this re-structuring made possible, please
read notes as connected to release 4.1.1 (the notes in this section relate to
improvements made since then).
In regard to the new StickyNotes option, made it so they'll optionally print
from any Job/Description report. Also made it so you can auto-insert a
desk and date/time stamp into them (just press Shift-F1 when the cursor is
within any such note). The same auto-insert feature also now works in the
new Notes section of the AccountsReceivable records.
Created new method in InventoryForm to tally items needed for restock and to
create a restock orders. It's useful for anyone who has not yet fully
setup the MasterPartsPlan. Rather than comparing actual stock to specified
minimum stock, this method simply looks at what was recently used (during any
interval as specified by user) and generates restock printouts on that basis.
To use this method, go to the F10 form, select the 'Order stock
replenishment" option, then the 'items Recently used' sub-option.
Increased quantity of lines displayed in the InventoryForm from 22 to 30.
This was needed by some larger servicers who employ more than 22 technicians.
Responded to reports of very rare circumstance where the history from one
JobRecord can write over that in another. Since the problem is rare, it's
hard to know the cause for sure, but I most carefully review applicable program
code and think the problem is likely fixed.
4.1.0 (released as beta only):
Added AttentionNotes to Current-JobRecords and AfterNotes
to Archived-JobRecords. These should be very handy tools. Please try
them out.
More than doubled the amount of space as available within the History
section of Current-JobRecords. Also, altered the compacted file structure
within Archived-JobRecords so now you can add up to 15 characters without need
to delete others first.
Added a Notes section to AccountsReceivable records.
Finally got the telephone number extension fields (that have existed in
Callsheets for some time) added into equivalent spaces in the JobRecord format
as well (also increased size from 4-character to 5-character max).
Changed the nomenclature for the intra-office mail system within ServiceDesk.
We had referred to this system as E-Mail, which occasionally resulted confusion
between if (i.e., the mail system within ServiceDesk) and normal, outside
internet-based email. To eliminate that confusion, ServiceDesk's internal,
intra-office mail system is now called SD-Mail.
4.0.148 (9/15/04):
As a means to help y'all increase first-time completions, we added a check
for when special-order parts requests are created via the PostVisitReport-Type2
process. Now the system checks, prior to recording any such request, to
see if it's a part the technician already has on his truck. If so, the
operator is prompted to tell the tech to use the part already his truck, and
thus avoid a second visit. If the operator insists on creating the new
special-order request regardless, an SD-Mail is automatically sent to the boss,
telling him of the event.
Based on multiple requests, modified the allowable Appointment-Denotation
syntax so that now you can use 'AM' or 'PM' to indicate the time-slot that's
applicable to a scheduled job. Formerly, you could have the intended
time-slot stated as a simple time (e.g.., '9:45') or any kind of
time-range (e.g., '9:45-1') or you could use the exclamation mark to
indicate an all-day appointment (i.e., '!'). If you wanted to use a
simple 'AM' or 'PM', however, the system would not accept it.
Now it will.
For any of you folk who print invoices from the DispatchMap just before
giving a stack to the assigned tech, worked over the underlying machinery that
prints the tech's name into the ticket. Now, it should be there
consistently.
Informed by Brenda at Caesar's of a problem when trying to apply a check
received in payment on accounts receivable toward receivable that (owing to
prior input mistakes by user) did not exist. Corrected.
4.0.147 (9/2/04):
Modified the Inventory form to allow it to work with a MasterPartsPlan
containing an unlimited number of entries (it previously maxed out at 1800
entries).
Modified system that checks for outstanding A/R records upon inserting a
customer's data set into a Callsheet so that it will refrain from this practice
if the insertion is for a HighVolumeClient.
Modified ArchiveJobRecords form so now it can provide direct access to up to
12 different UIS attachments (as contrasted to the five previous limit).
Corrected small anomaly in FinishedForm tab-sequence that had developed in
consequence of recent integration upgrade.
4.0.146 (8/22/04):
Two rather major things were done with this release:
First, we finally created the first stage of integrations from the
Finished-Form 'POS' (PointOfSale) context to three different data sources.
Specifically, when the FinishedForm is being used for an over-the-counter sale,
it made sense that as you entered the parts-listing boxes, when you went to type
a part number the system should consult either your MasterPartsPlan or
SmartParts data and present a drop-down, as-you-type kind of list to help you
input the line item (i.e., full part number, description and price). It's
only because our emphasis has been on managing service, and not sales, that this
has not already existed. Similarly, for those client who are also dealers
and who've been using our serialized inventory module (aka 'SD-Dealer'), it made
sense that if they were using the Finished-Form 'POS' feature to create an
invoice for appliance sales, input to the item-listings should be integrated
with being able to select the machine(s) being sold from the SD-Dealer utility.
Drum roll please . . . Now we have the first stage of all three integrations.
Specifically, you can input to the Finished-Form from any of those three
contexts. The methodology should be self-explanatory when you begin typing
into the form as previously (if not, give me a call and I'll explain).
We're calling this the "First Stage" because at this point I've only created
integrations to allow input of text into the FinishedForm from any of those
contexts. Right now, it doesn't go further. For example, if you end
up listing parts items from stock, it doesn't yet simultaneously pull the items
from stock. Or, if you've indicated items being ordered, it doesn't yet
simultaneously create the order. That should be coming soon.
Second, we perfected the QuickBooks export of basic accounting data.
Run a SalesReport, display it to the Monitor, and there's button to create the
export. The basic feature was created some while back, but we didn't
actually have copy of QuickBooks to test the export with. A nice client
kindly provided one, and we worked out the kinks, so now it works perfectly.
Besides those two milestones, we also accomplished a long-requested secondary
enhancement to PostVisitReport-Type 2 (fill-in-the-blanks method). Some time back we
made it possible to indicate parts used from stock there, even when there was as
yet no anchor listing for the item within the MasterPartsPlan. As soon as
we did this, people started asking us to further enhance it so that, when
indicating a part used from stock, you'd have the further opportunity -- then
and there -- to add an anchor listing to the MasterPartsPlan ("on-the-fly," if
you will). We've now added that option.
4.0.145 (8/19/04):
Small enhancement in F12-based CustomerDbase search. A
longstanding feature of the search here is that there is no need to specify
whether searching via name, address or telephone number. You can just
start typing any of the three, and the system searches on all three. At
least, for most searches that has always appeared to be the case. In
reality, as you typed the system first searched within the names index. If
no matches were found, it then searched within the address index. If no
matches were found there, it then searched within the telephone number index.
From the user's perspective, this was generally seamless, and to all intents and
purposes it appeared as though the system searched in all field simultaneously.
However, we discovered and addressed one weakness. If you typed the first
characters of a target telephone number, and happened to also have addresses
that matched those those characters, the system would show only the matching
addresses, and not the matching telephone numbers too. You had to type
more of the telephone number (until there were no address matches) before the
telephone number matches would display. Now it will display both kinds of
matches simultaneously.
Also connected with the CstmrDbase search system, there's a very handy
feature that few people seem to discover and use. It's that if you have a
current JobRecord displayed (F7 form), and find yourself wondering about past
jobs for the same person, address or telephone number as you're looking at,
there's no need to to to F12 or a Callsheet and there type such a target
for the purpose of searching on it. Instead, just hit F1 on your keyboard
and the system will instantly do a search then and there, from the current
JobRecord, and display the results to the side. If your cursor happens to
be in a particular Name, Address or TelephoneNumber box, the system will search
on that particular target. Otherwise, it will search on the customer name.
Anyway, as testament to the fact few people have discovered and are using this
handy feature, we just discovered we'd semi-broken it (it still worked, but not
quite like it should) via other improvement work about three months ago, and no
one brought it to our attention. Anyway, it's now back to perfection.
Beth at A1 helped us find another instance where the system failed to
internally adjust for certain user-activated accounting adjustments as concerns
tracking net changes in part-pays against accounts receivable. This one
occurred if the user changed the total due on an A/R to equal the amount already
received, then consented when the system offered to make appropriate resulting
entries in the SalesJournal. The system did not make one needed
corresponding entry in the Pre-and-Part-Pays Journal, which resulted in the
Net-Changes figure (as included in the SalesReport) being off by such an amount.
Informed by users of discrepancies as occurred in particular situations in
connection with two obscure reports. Corrected.
4.0.143 (8/3/04):
Repaired fault in FinishedForm where system found more parts than spaces to
list them in within form. The system claimed the excess was copied for
user's convenience into Windows clipboard, but in fact it was not. Now it
works as advertised.
Repaired fault with SupplementalInfo section of MasterPartsPlan where
sometimes, under particular circumstances, info there was lost.
Miscellaneous other fixes
4.0.141 (7/25/04):
Added a new option when printing a fax request for special order parts in the
PartsProcess form. Now, when you designate items for a fax request then go
to print it, the 'Open Printer Dialog' form has a new option, labeled 'Print
in Abbreviated Format'. If you check the option, the system will print
your request in an abbreviated format that fits many more requests into a single
page (about 25 request items per page versus 8 per page in the standard format).
The old format will remain best if you have the suppliers doing lookup for you.
You'll probably find the new abbreviated format preferable if you've already
done your own lookup.
In the FundsForm, 'Receive Payment on AccountsReceivable' procedure, a
few weeks ago wherein I'd made it so the offer to pull credit from an EDA for
the purpose of satisfying the full balance due would not arise unless the amount
received was already reasonably close to the amount due. This stymied a
user when she wanted to pull from the EDA when the amount received wasn't close
to the balance due. For such reason, I added a new option that allows a
user on her own accord (i.e., without prompting) to initiate withdrawal from an
EDA (just enter the amount applied with a 'Shift-Enter' rather than simple
'Enter' action). The prompt as offered by the system will still arise only
if the amount received is already reasonably close (within $10 or ten percent)
to the balance due.
Small nomenclature change: The "PostVisitReport" is now called the "PostVisitReport."
Experienced users will probably not notice the change, but we think that for new
users the new term will more immediately convey the notion of what the
PostVisitReport is all about.
Overhauled the section of the PostVisitReport Type-1 that's involved in
creating Special-Order Parts-Requests. Other venues for creating such
requests had previously been revised so that a request for multiple items would
simply show the multiple quantity on a single request, rather than creating a
separate requests for each item in the multiple. There were reasons we'd
originally designed it oppositely, but users tended to find the burdens of such
an opposite design outweighing the benefits, so we changed it to make a single
request for multiple items in all venues except that older PostVisitReport.
Now it's changed there too.
4.0.140 (7/23/04):
Overhauled section of program code that tests SalesEntries for appropriate
balance and responds with various messages depending on any discrepancies as may
be found. The responding messages will now be more accurate, informative,
and particular to the situation.
Repaired miscellaneous little problems as reported by clients in last few
days.
4.0.139 (7/14/04):
Augmented procedure when deleting a MasterPartsPlan listing and there are
still items, as connected to that listing, in actual inventory. Now the
system offers to simultaneously removed the inventory listing so such items
don't end up as orphans.
Received new reports of one JobRecord's history overwriting another.
We've had scattered reports of this, as an extremely rare occurrence, for some
time, and I've worked like the dickens to find and correct the cause. I
think I finally nailed it (time will tell).
Discovered that I'd recently broken a portion of the general error-message
presenting routine so that it did not present the complete expected message;
corrected.
Learned from Beth at A-1 of a fault that had probably existed for a long time
in the FinishedForm context. When tech start and end times import to a
FinishedForm (in particular the NARDA), the total time is auto-tallied in
hours-and-minutes format. On the other hand, if you manually edited
either start or end times, the system would re-tally the elapsed time in simple
minutes format. On some occasions this was a problem, for the simple
minutes format was not properly translated when transmitting electronic claims.
Corrected. Now, even on manual editing, the elapsed time is tallied in
hours-and-minutes format.
Received a couple of complaints that, when minimized and working in another
application, ServiceDesk would annoyingly grab the focus and appear in front of
the other application one was working in. I've worked on, and hope I've
corrected the problem. This is another one in which time will tell.
4.0.138 (7/9/04):
Augmented Commission Report so now it includes listing of items written-off
as bad debts, and provides a summary figure showing commission amounts as
applicable thereto. This was needed by a client whose commissions policy
was that tech's got paid only if the company was paid, but they nevertheless
assumed they would be paid and therefore paid commissions when jobs were merely
billed, with the intent to charge back on any items that were not ultimately
paid. The new information in the Commissions Report now allows them to do
this.
In regard to last revision's addition of auto-PO-Number creation for faxed
parts requests in the SpecialOrder context, learned that some users preferred
not to have these, so added option (in the contextual command summary of the F8
form) to turn the feature on or off.
Miscellaneous small fixes as requested by particular clients in last little
while.
4.0.137 (7/7/04):
Added auto-PO-Number creation to PartsProcess system, and enlarged font-size
for item reference numbers, and made it so items marked for deletion will not be
included in standard display.
In InventoryControl form, altered printout-listing of parts at any particular
location so that it only includes items that are supposed to be at that location
(i.e., if location is set for minimum quantity of zero, then the listing is not
included in the printout for that location). Also improved printout to
leave space at top and bottom of each page.
Corrected new RouteSheet printout so it shows the applicable date even if not
the same as current date.
Small overhaul of Callsheet-Search feature (Shift-F1). Now the
request-box auto-fills, allowing edit if wanting to change target.
4.0.136 (7/5/04):
Added password protection when applying a funds received to A/R and making up
deficiency with draw from EDA Account.
Added internal multi-effort work when archiving ScheduleList and and system
find another computer has files locked.
Increased depth of search in PartsProcessArchive when doing PartsPickList
(from 1000 to 3000 records).
4.0.134 (6/27/04):
Increased potential number of specialized trucks, in Inventory Control
system, from three to six.
4.0.133 (6/20/04):
Improved warnings/reaction in FundsForm when user goes to close form without
first saving an entry that's been created.
Made it so CommissionsReport sorts the listing of tech's jobs in
InvoiceNumber sequence.
4.0.131 (6/15/04):
Added direct printout of tech's route sheet from DispatchMap. Many had
requested this. We'd resisted doing it directly based on the theory each
company that used such sheets had its own preferred format, so we thought it
better to export the data for each company to format in its individual route
sheets according to preference. But more and more people indicated they'd
prefer the ease of doing the whole thing internally, even if the result was not
precisely to their individual preference. So, the option has now been
added to the many others available when you click on a technician's name at the
top of the list of his jobs in the DispatchMap.
Based on request from Fuller's Appliance, made it so if you're creating a
JobRecord on a warranty job, the DateWritten variable in the JobRecord assumes
the same date that the Callsheet was created, rather than the date that the
JobRecord itself was created. We learned from Fuller's sometimes this was
important, as they'd receive the original call just barely within the warranty
period, but not create the JobRecord until later, after the warranty period had
expired.
Also based on a request from Fullers, made an accommodation in the WipAlert
system for in-stock repairs. Now the system will look in the CustomerName
line of each JobRecord (as it assesses whether to create a WipAlert). If
it sees the word "STOCK" there, it will double the normal grace period for the
status category the JobRecord is in.
Revised method of counting invoice quantity in SalesReport so that mere
adjusting entries or -0- sale entries are not included. This results in
more realistic reporting of average tickets, etc.
Corrected flaw in SalesJournal form (F4) that, when using the editing
feature, in some instances resulted in the amounts as filled-in to the editing
boxes being one-penny different from what appeared in the main display.
Responded to miscellaneous error messages, as email forwarded in the last
week.
4.0.128 (6/7/04):
Per suggestion from Dan at Alegria added Web-Based method to list of optional
methods (to specify how item was ordered) in PartsProcess form.
Added info section to the 'About ServiceDesk' form that informs when
Auto-Archive was last performed and at whose desk.
Responded to miscellaneous error messages as email forwarded during last
week.
4.0.127 (6/5/04):
Recently had reports from a single, large user regarding one and sometimes
more appointments spontaneously changing. It was very weird, and
unprecedented. I examined all the applicable program code, trying to
imagine a scenario of various interacting procedures (with many users
simultaneously in the system) that might result in the symptom encountered.
Ultimately, I managed to imagine a circumstance where two procedures operating
simultaneously might in fact produce the symptom. Protections are now
written in to address it.
Allied Appliance encountered a situation where the system locked up when
attempting to locate a JobRecord for the PostVisitReport. Found and
corrected a flaw that, depending on a specific particularity in the underlying
data, could allow this to happen.
4.0.126 (6/4/04):
Fixed fault I'd recently created in the Auto-Archive facility (sorry, I was
making an upgrade and instead broke a feature that had long worked).
Anyway, it's fixed again.
Fixed a fault I'd momentarily introduced as connected with creating a
non-job-connected ScheduleList entry (an inappropriate message resulted).
Also, learned of and fixed still another fault as connected to my weeks-ago
overhaul in the JobsCurrent form, wherein auto-dialing of a Location-Section
telephone number inappropriately loaded the Customer-Section number instead.
4.0.126 (6/2/04):
For those of you who work in different tax jurisdictions (and therefore have
to collect tax at different rates for each, and keep track of your separate
sales in each, etc.), we've long felt a little guilty over the fact we did not
provide you with a really elegant method for separately tracking your sales to
each such jurisdiction. Many of you created solutions for yourselves,
within the system. Some people used the departmentalization feature to
solve this problem, for example. It wasn't bad, but wasn't the best
either, especially if you had a lot of jurisdictions, or if you wanted to use
the departmentalization feature for other purposes. Now we've got
something better (it's still not the very best, but it is much better).
Now, when you run a SalesReport from the F11 form, you'll see a new button
appear. It's labeled 'Created ZipCode-based Tax File.' Click
on it, and the system will create a file (for the same period as already
specified for your main report). This will be a spreadsheet-type file, and
will list each of the involved sales (Paycodes 1 and 2), with the applicable
zip code. All you have to do is load the file into Excel or a similar
environment, and there you can use the zip codes to prepare the needed reports
for each of your jurisdictions. We've had requests to build a matrix
within ServiceDesk where you can specify your tax rates for each zip code, and
do the reports directly from there. Eventually, we intend to make that
happen, but in the meantime, this method will certainly provide all the
information you should need for full and proper accounting.
Fixed a fault I'd momentarily introduced as connected with creating a
non-job-connected ScheduleList entry (an inappropriate message resulted).
Also, learned of and fixed still another fault as connected to my weeks-ago
overhaul in the JobsCurrent form, wherein auto-dialing of a Location-Section
telephone number inappropriately loaded the Customer-Section number instead.
4.0.124 (5/28/04):
Overhauled dialog in the FundsForm for checking in payments on
AccountsReceivable. Previously, the system asked a 'Yes' or 'No' question
in regard to whether the applicable BalanceDue, on an identified a/r, was the
same amount as received on it. That was efficient enough if typically
payments as received equaled the BalanceDue, but for warranty servicers this is
often not the case, as they frequently have occasion to check in a parts credit
while labor is still pending, or vice versa. We've now taken away the
'Yes/No' question, and instead have the dialog go straight to querying the
amount paid, but with the BalanceDue pre-typed for you. Thus, if it's the
correct amount, you simply hit Enter. Otherwise, simply type the applied
amount (automatically replacing what was pre-typed for you). Overall, for
any company that often checks in payment for other than the BalanceDue, this
should speed the sequence substantially.
Historically, in the InventoryControl system (F10), when receiving items into
stock (as purchased from a supplier), the system has assumed that
received items are first placed into the office storeroom. After thus
being first positioned there (at least so far as the system was concerned),
items could then be disbursed to any of the trucks. Somewhat recently, we
added an option that would allow newly-received items to bypass this
office-storeroom-first assumption, and go directly to a truck. But the
user had to remember to click on a separate little button, outside the normal
sequence, to achieve this end. Now we've changed that. Selecting the
destination of newly-received parts is now part of the standard dialog sequence.
Discovered a weakness that, on very rare occasion (at least normally), made
it possible for the added historical notation, that should be added to a
JobRecord as part of the PostVisitReport, failing to successfully record.
For some reason we still don't quite comprehend, a particular user suddenly
started encountering this symptom nine times out of 10 -- which exposed the same
weakness that, we're guessing, affected other users perhaps one time out of
10,000. At any rate, the weakness is fixed.
Found and corrected a just-introduced error in the InventoryControl form,
when Transferring To/From Trucks and using the 'Review Needs' method.
4.0.123 (5/26/04):
Added significant sharing protections to PartsProcess functions. Found,
specifically, that with several multiple users were simultaneously completing
real-time PostVisitReports, a former lapse in sharing protection resulted in
occasional failure of PartsRequest records to properly record.
4.0.122 (5/25/04):
Found that when re-assigning jobs via the drag-and-drop method in the
DispatchMap, the mechanism that was supposed to warn if attempting to reassign a
job that was already dispatched did not always function correctly; overhauled
and corrected.
Did a lot of overhauling in procedures that open and close the JobRecord and
ScheduleList files, attempting to make those processes more secure against files
being left open and interfering with access from other stations, or being closed
in the middle of a procedure and interfering with its proper completion.
Learned of and corrected a defect that prevented the servicer's distributor
account number from auto-inserting to NARDA as connected with special-order
parts.
Learned of and corrected a defect that prevented archived PartsProcess items
from inserting correctly to the PartsPickList.
In the new Auto-Time-Frame-Estimator feature, made it so you can re-do the
process after you've already done it to a tech's roster (previously the system
prevented re-dos).
Found and corrected a defect in the new boxes, for NARDA and GENERIC
Finishedforms, that show payments received and balance due. In some
circumstances the system failed to correctly calculate the balance due.
Responded to miscellaneous error messages as email forwarded in last several
days.
4.0.120 (5/20/04):
A little more finessing on the most recent work, plus learned that in some
instances, in the FinishedForm, the system was filling in the date of the last
PostVisitReport as the job's completion date, even if the date of the tech's
last visit was earlier; corrected.
4.0.119 (5/19/04):
Just a little finessing on the most recent work.
4.0.118 (5/18/04):
Per request from Steve Merriam, made a change in the PartsPickList as printed
from the DispatchMap. Now the list will include any text from the Notes
section of the PartsProcess field. The general idea is these notes might
be used to indicate the place particular part items, probably bulky items, were
placed pending the tech's pickup of them. With such notes placed into the
PartsPickList, the tech will know exactly where to grab the part.
Also per request from Steve Merriam, made a change in the response when, in
the PartsProcess system, you check in the last parts as ordered on a particular
job. Formerly, the system simply offered to change the JobRecord into
'Working to Schedule' status. Now the system checks to see if perhaps an
appointment is already scheduled and pending. If so, that's the status it
goes with.
Per request from Mitch Romero, made a change to the UnitInfo system.
Formerly, the ModelNumber was a required field. This was a problem when
users wanted to create a UIS for the sake of inputting a purchase date, but
prior to having model and serial. Now the model is not required, and of
course you can press F1 for a temporary but fake serial number.
Per request from Adam at Fred's appliance, made it so listings of parts as
imported into FinishedForm mirror the sequence in which requests were created.
Responded to miscellaneous error messages as recently email forwarded.
4.0.117 (5/17/04):
Found a flaw in recent work on Auto-Archive system that could produce an
error once every two minutes if you'd not previously used the feature;
corrected.
Found that the recent addition of ability to check inventory items from a
supplier directly to a specified truck, while working perfectly so far as
tracking inventory is concerned, failed to note the changed destination in the
IJrnl; corrected.
4.0.116 (5/16/04):
As connected with the recent creation of a within-ServiceDesk backup utility
(for creating, viewing and restoring user-directed backups), found there was an
unhandled error if you selected a drive with removable media that had no media
present (such as a CD drive with no CD in it); corrected. Also did a
general upgrading of the utility, making it remember previous backup location,
guide user toward CD burning, etc.
Overhauled Auto-Archive system to deal with a couple of issues. (1) if
a station as setup for doing Auto-Archives is not left with ServiceDesk running
overnight (to accomplish the task), the system will alert the user within a
minute of the next turn-on to the fact the process did not run overnight, and
offer to do it presently. (2) Based on how the system keeps track of
whether the Auto-Archive has been completed for any particular day, there was a
possibility that if someone advance-dated their computer, and the Auto-Archive
process ran with that advance date, it would log the process as having been
completed through that date, and so (assuming in the interim the user
re-set his computer to the correct date) the process wouldn't call itself again
until the advanced date was reached. Now the system will detect such an
anomaly and avoid being tripped up by it.
In the Generic FinishedForm, replaced the TypeOfPayment box with a new box
that will show a listing of actual money items received, and calculate the
balance for you. Also made it so this box will auto-update if, from the
FinishedForm, you enter items of money received.
Added another small enhancement to the Inventory form. We've long had a
feature there that allows you to directly enter usage of a part. This is
not the normal way you'd enter such usage, because typically it's done
via a PostVisitReport. However, the facility was there for the odd
occasion when needed. The one deficiency (someone pointed out) was there
was no provision, when entering usage via that context, for the system to
capture info about which job the part was used on (as potentially needed,
for example, for later insertion into a FinishedForm). That's now been
addressed.
Received suggestion from Mitch Romero that, even if you are working with
different tax rates and so have the feature turned on that accounts for that
(and therefore does not normally figure the tax for you), when you in the
FinishedForm in a PointOfSale kind of context, the system might as well assume
your local rate (with the assumption you're selling across the counter, so that
local rate applies). Thus, I modified the Settings form to allow you to
specify your local tax rates while simultaneously specifying that you have
different rates in different jurisdictions. If the client is not
designated as tax-free, the system will now calculate a tax amount for you in
the FinishedForm. I've not presently made it so it desists from doing so
there when in non-PointOfSale operations (and non-tax-exempt), but if that's
preferred it's an easy change.
Made the Miscellaneous-Print and other general commands functional from
within the MoreInfo form.
Found and corrected a fault where one of the housekeeping timers could be
shut-off when ServiceDesk ran on a weekend, and not turned back on again during
the week, unless ServiceDesk was re-started; corrected.
Had received two reports of Supplemental-Info items, as connected with
MasterPartsPlan listings, getting out of sequence with the master listings.
On careful investigation, discovered there was a fault in the procedure
governing the deletion-of-listing function that resulted in this failure;
corrected.
Learned from Shelton's service that with certain error sequence when copying
CstmrDbase files from another computer, the station could get stuck with the
pink narrate box displayed; corrected.
Learned from a couple of sources that I'd introduced a fault in the
FinishedForm that caused it to no longer correctly recognize when a client was
tax exempt; corrected.
Discovered and corrected a vulnerability that, on saving an edit to a UIS
that was already JobRecord connected, allowed a user to create a second or third
connection to the same item.
Responded to miscellaneous error messages as email-forwarded during last
week.
4.0.115 (5/11/04):
Created a new backup utility. Previously, there was no directed form of
backup from within ServiceDesk itself. We had the SD-Backup utility, of
course, which is terrific for automated and regular backing up on a station in
the network, but nothing the directed a target-specified backup from within the
program itself, as wanted for example for copying to a Zip disk or writable CD
for taking backups off site. Nor was there any programmatic provision for
copying backed up files back into the main data space. To be sure, either
operation could easily be done from within Windows Explorer, but we found that
no matter how easy such tasks are from there, some folks wanted programmatic
solutions. Those have now been provided, and incorporated with the
already-existing ViewBackups facility, as accessed either from 'File Functions'
in the MainMenu, or by pressing Alt-F1. So now, there's a complete
within-the-system utility for managing targeted, backup functions. You can
direct the creating of a backup, viewing of backup data, and copying of backup
data into the main data space, all from the same convenient context.
Added option in InventoryControl form for checking in a shipment directly to
a particular truck. Previously, when checking in a shipment of stocking
parts the system assumed the parts first went to the office storeroom.
Now, if wanted, you can specify they're going directly to a particular truck.
You have to click on a button for the purpose that appears simultaneous with the
point when you're asked to specify the supplier from whom the shipment was
received.
4.0.114 (5/4/04):
In revision 4.0.104 we added an Alt-S command in the FinishedForms
context as a method to invoke the link to the SalesEnter process without waiting
to print or transmit the item. It was brought to my attention this
wouldn't work unless you already had the type-of-form set for automated-linking.
Corrected.
Learned of and corrected a couple of glitches as connected to the newly added
fact that tax exempt status is now recognized internally within the SalesEntry
process. One was that, for that context, any HighVolume client was
mistakenly getting classified as tax exempt. The other was that if you had
a sale to such a client that was only partially tax exempt (such as if part was
covered by warranty and part paid by the customer), the SalesEntry reaction to
the situation was not one of gracefully allowing recognition of that dynamic.
Learned of and corrected a small shortcoming in the recently re-engineered
ScheduleSort process. Non-time specified appointments, when added, did not
get sorted at all (i.e., even moved to the bottom of the sequence of
appointments pertaining to the same day, as viewed from within the ScheduleList
(F6) form. While there was really no operational consequence, we addressed
the matter anyway, making the result ultimately more elegant.
4.0.112 (5/3/04):
Learned from a couple of clients of a fault in the
PostVisitReport-Type2.
This occurred f you were making a report and there was no appointment found.
Corrected.
4.0.111 (5/2/04):
Added a very cool new feature in the DispatchMap, for anyone who's also using
the ZoneAllocation system. If you're so setup, you'll now see a new item
displayed in the top-right corner of the DispatchMap. It's a little
Percent-Of-Allocation-Used Pie Chart. It helps operators know, at a
glance, how tightly scheduled any given day is, without having to look at actual
assignments under each tech's name. It's particularly useful for companies
that leave jobs unassigned until the last minute -- such as All-Household, who
requested this feature. To make it work, you simply need to setup
allocations (i.e., how many jobs you can handle), if you haven't already, in the
ZonePlanner section of the ZoneScheduler utility (press
Shift-F5
then click on the ShowPlanner button). With that done, you'll see
that new item in the top-right corner of the DispatchMap. It disappears
automatically on any panning action (i.e., moving to a different display
location), but will reappear the instant you display for a different day, or if
you just hit the letter 'A' (for "Allocations") on your keyboard. Check it
out.
Another new DispatchMap feature, called the Auto-TimeFrame-Estimator,
is for use by any operation that, on initially scheduling customers, leaves the
appointment open to all-day (i.e., designating the appointment with an
exclamation mark). Many such operations do this initially, then each
evening prior to a particular scheduled day, they route the jobs on the
DispatchMap as efficiently as possible (having complete freedom, because all
jobs can be place in any point of the day). At this point, obviously, with
the jobs thus sequenced, it's possible to narrow down the expected time-frame
and let the customer know. Hadco requested a method to automate
this estimating process (even to the point of automatically inserting estimated
times for you). We've now created the machinery to do so. To access
it, enter the DispatchMap (F5), and do a Ctrl-Click on the name of any tech
above his list of jobs. You can just follow the prompts from there.
Added still another cool new feature, this one connected to scheduling.
Hopefully, you're familiar with how you can create 'Unvlbl', 'Unvlbl
Until' and Unvlbl After' type entries in the ScheduleList
to indicate times when a particular tech is not available to perform jobs.
These entries then appear in the DispatchMap (in the list area under the
applicable tech's name), to make such important information contextually
available there. We heard from Toni at Guinnco, however, that sometimes
people in her office failed to notice the entries, and went ahead and scheduled
a bunch of jobs for a tech, even though the entry was there saying they should
not. Toni asked for a mechanism that would automatically watch as an
appointment is being created, and warn of such a conflict. That's now been
added. We'll call it the WarnIfTechIsNotAvailable Alarm.
A few revisions back we added the ability to specify that particular clients
are tax exempt. This is done through the QuickEntry template as pertains
to any such client, and the status is reflected in operations within the
FinishedForm context. If the underlying client is not set as tax exempt,
the system automatically add tax there for you. Otherwise, it won't.
All that was good, but a couple of users pointed out the status should also have
effect in the SalesEntry form (F9), so that if you're entering a sale to a
tax-exempt client, the system won't expect the addition of tax there.
We've now added that piece of additional intelligence.
In the FinishedForm context, the option to link (for any particular form-type
option) directly to the SalesEntry process has previously been a net-wide
setting. On the basis of a request from Freds, we've now made it a local
setting (this allows different stations in your system to set the option
differently). On transition, the former net-wide setting will
automatically transfer to each local station.
In response to continued reports of trouble maintaining an intended sequence
of jobs in the ScheduleList, I totally overhauled and upgraded the system.
The difficulty resulted only in the particular situation where a user mixed a
high volume of time-specified jobs (i.e., '3 MON 9-12', or something of the
sort) with non-time-specified jobs (i.e., '3 MON !'). It was a tough to
engineer a system that would perfectly sort the time-specified jobs, while
maintaining their sequential relationships as much as possible with the
non-time-specified jobs. If you read notes from the preceding few weeks,
you'll see I tried some bandaid approaches, all of which proved inadequate.
I have high confidence the present approach will be flawless.
Made improvements on the basis of miscellaneous error message as email-forwarded during last week.
4.0.110 (4/27/04):
Further work in Schedule-Sort procedure in effort to make all-day
appointments remain in same position relative to time-set appointments.
Made it so status setting of JobRecord that results from a PointOfSale
operation more sensibly goes into 'Other' status, rather than 'WorkingToSchedule'
status as it had done.
4.0.109 (4/26/04):
Corrected flaw in Time-Clock feature that, in some circumstances, caused the
greeting to display the wrong date.
Overhauled program code that manages display of items when searching for
parts used on basis of TechName or PartNumber. Previously, as you paged up
and down among multiple pages of search results, the experience was not always
intuitive. Now it's much better.
Responded to miscellaneous error messages as had been received in last week.
4.0.108 (4/22/04):
Recently we received reports of JobRecords having gone into 'Completed'
status when they should not have done so, and we received one report of a
JobRecord erroneously disappearing from the system (some reports were from
clients using pre-.104 versions, so we know there was no connection to that
recent work). In response, we did a major overhaul of program code as
involved with loading and saving JobRecords, tightening the overall fabric
considerably.
In the same connection, we added password protection in the JobRecord for
where a user tries to manually switch a JobRecord into 'Completed' status.
Learned of and corrected another fault stemming from the .104 addition of
QuickEntry insertions to the JobRecord. This one resulted in failure of
telephone numbers to be included in the FlipFlop operation as initiated from a
JobRecord.
4.0.107 (4/20/04):
Repaired a fault stemming from the revision .105 fix. This one produced
an error when saving a UIS in conjunction with a PostVisitReport Type2.
4.0.106 (4/19/04):
Repaired a fault that resulted in Customer TelephoneNumber fields
overwriting in the place of Location TelephoneNumber fields in a
JobRecord, when the JobRecord was edited from the F7 form. This was in
consequence of a flaw as accidentally introduced while making the QuickEntry
insertion process work in the JobRecords in addition to (as it always had
function) in Callsheets.
4.0.105 (4/19/04):
Repaired a fault in the PostVisitReport Type2.
4.0.104 (4/18/04):
In response to long and repeated demand, finally added ability to insert
QuickEntry templates directly to JobRecords (useful for when you first write a
job as COD, only to learn later it should be billed to some high-volume client).
Added check when creating a job or appointment which verifies you've not
indicated a date that's already in the past, and warns if such is the case.
Corrected small defect that, in JobsPerusal form, allowed jumps of more than
one page at a time when using the PgUp and PgDn keys to move among
selected-category jobs.
Added ability when creating a AccountsReceivable DunningList to custom
specify the threshold (in terms of date the receivable was created) for
inclusion in the proposed list. To use this ability, first display the
DunningList form (Ctrl-F3), then hold down the Ctrl key on your keyboard.
With this key held down, you'll see that a new button appears on the form.
You can click on this button to initiate list creation in a mode that allows the
new, custom-specified variability.
Since about a year ago, when we added the ability to link directly to making
a SalesJournal entry from the FinishedForm, we've found the ability has been
increasingly used. Some people have even used it as the preferred means of
creating a SalesEntry, even if they did not otherwise need to Print or
Transmit a claim from the FinishedForm. Since the Print and
Transmit functions are the methods that have existed to invoke this link,
these people had to pretend they were doing one or the other to use the
facility, even if they intended to use just the link feature, and not the
ultimate function. Some of these people requested a direct link command,
without having to pretend to do the other. We've now added that.
Since there's not much extra room on the form, we did not want to add another
button for the purpose. Instead, if you want to do the direct link, just
press Alt-S (as in SalesEnter).
4.0.103 (4/17/04):
Added ability to export file containing data regarding jobs written in a
specified period, as required by Whirlpool for certain servicers.
Eliminated annoying message that sometimes occurred on producing SalesReport
indicating need for revision in order to avoid excessive pause.
Overhauled code as involved when sorting added streets into your main
StreetList. System will now annoy less when there are multiple streets
under the same name, but applicable to different cities.
Learned from Heather at J&M there was a reduced value in schedule printouts
where added text (after the appointment time or time-frame) was not included;
revised code so such added text is now included in such printouts.
Responded to miscellaneous error messages as email-forwarded during last week
4.0.102 (4/13/04):
Corrected longstanding fault in ZoneScheduler form that allowed occasional
occurrence of an error 340.
Corrected another minor-annoyance as introduced in revision 100. On
quick-linking to a JobRecord from the DispatchMap, if the JobRecord form was
already displayed, it wouldn't come to the front and thereby show itself.
Made it so when indicating stock used from
PostVisitReport Type II, and
entering parts used from stock though not yet in MasterPlan, when selecting the
the distributor you can type the first character or two from the distributor
abbreviation rather than having to select directly from list.
In connection with still other work in revision 100, learned that in some
situations (mainly, when all jobs are scheduled for anytime via an exclamation
mark, the system might re-sequence differently than already manually sequenced.
Significantly overhauled the underlying code. It's difficult to
programmatically achieve auto-sorting of time-frame scheduled jobs based on
time-value, while avoiding any re-shuffling of jobs that are scheduled for
anytime. I think, however, we have the objective finally mastered.
4.0.101 (4/12/04):
Corrected a minor-annoyance fault as introduced with the last revision's
addition of color on the MoreInfo button to signify contents there. In
certain circumstances, the button would improperly turn white. That's now
corrected.
Corrected significant-annoyance fault as introduced with the last revisions
addition of a Receipts-To-Date box in the FinishedForm NARDA. If you did
the main update but did not update to the new FinishedForms (required manual
downloading from the website), you'd get an error on loading a JobRecord into
the form. Corrected.
When making electronic claims to Maytag and using a pre-existing file, the
system will now indicate the last-previous revision date of the file as you
choose to open it.
Responded to miscellaneous error messages as email-forwarded in last week
4.0.100 (4/11/04):
Per multiple requests (in particular and most recently from Lee at A&L) added
a box to the NARDA FinishedForm that details moneys received to date and
auto-calculates the balance. You'll have to download the current
FinishedForms to make this new capability function (it's not part of the
standard, automated download). Once we're certain this is working
appropriately (and on the basis of your requests), we'll add a similar box to
the other FinishedForms. Don't hesitate to let us know if and when you're
anxious for the latter.
Per request from Fred's Appliance, added a feature that, if you're using the
Immediate-Call-In method for PostVisitReports, checks on completing a report to
see if the tech is setup for hourly pay. If so, it checks to see if the
job being reported upon is his last job of the day. If so, it
auto-volunteers to clock-him out under the Time-Clock system.
Corrected fact that All-day/Anytime appointments (designated with a simple
exclamation mark for the time-frame) did not maintain a particularly-set
non-middle-of-the-day position, during auto-sorting of the ScheduleList, as
compared to time-frame provided jobs. Previously they had resisted this
re-positioning, but I made a change that took that resistance away. I've
now restored it, and can't remember why I ever removed it. If for any
reason you need it put back the way I've had in the interim, please let me know.
In regard to PostVisitReports, when indicating parts as used from stock but
not yet included in the MasterPlan, improved selection of distributor interface.
Now the list is alphabetized, and the Esc key works as expected.
Improved underlying mechanisms that auto-link to a connected JobRecord (e.g.,
from the DispatchMap). A long while past there was a problem in this
function if you created JobRecords with out-of-sequence invoice numbers.
We added a behind-the-scenes index system to make it so items would still be
found, even if out-of-sequence numbers were in the system, but this depends on
having an up-date-date and accurate CstmrDbase index set. If users allowed
that to slip, plus had out-of-sequence invoice numbers in their JobRecord set,
there was still a problem. We've now added further code to make it so even
in that instance the system can succeed in finding an item.
Added code to deal automatically with what been a problem if you were
inserting a very long street name to a Callsheet, or a moderately long street
name combined with a long address number and/or long coordinate reference.
The long string of characters could exceed the 38 character positions allowed in
the address line of a Callsheet, resulting in some of the grid reference being
left off. Now the underlying insertion code will check for this, and
remove as much of the street name as needed to make sure the full grid reference
still fits in the line.
Per suggestion from Jeff at Priority, made it so when there's any text in the
MoreInfo box from a Callsheet, the MoreInfo button changes to a pink color to
indicate the fact.
4.0.99 (4/7/04):
Thanks to Heidi at Priority, I learned of a deficiency in the Inventory
Control and Maintenance form (F10). If you'd used the somewhat newly
available method for entering parts as used from stock even though not yet in
MasterList, it was impossible to search for those parts as used via the search
facility in that form. That's now amended. Per request from Kasia at
Priority, I added the applicable Tech as a field to the DunningList as exported
for statements/dunning letters.
Rec'd another request to eliminate forced-requirement that address be
included when creating A/R records in connection with high-volume clients.
Went to make the change and found I'd already done it, but failed to announce
it.
4.0.98 (4/1/04):
Added methods for wholesale checking off of items in both the FundsJournal
and PartsProcess environments. In both areas, new users would sometimes be
busy adding new records, without realizing further processes as needed to bring
such records to completion. Wholesale checkoff methods allow them to
cleanup old stuff without having to go back in time and actually process items
that are in the past regardless.
4.0.97 (3/31/04):
Added model # search in archived PartsProcess form per request from Judy at
Express Service. Now you can search for parts request items from the past
based on the model number involved.
Reacted to balance of emailed error messages as had accumulated in last month
and on which we'd got behind.
4.0.96 (3/29/04):
Had received reports of Callsheets inexplicably bouncing from one user's desk
to another's. Had no idea what was causing it, but finally found and fixed
the cause.
Finessed work as done some weeks ago to prevent carriage return in
description of work done as part of PostVisitReport, which had interfered with
full importing of such descriptions into a FinishedForm. It turned out
some people wanted to still be able to insert carriage returns, so we gave back
the ability, but with warning as to later effect in FinishedForm.
Responded to numerous error messages as had been email-forwarded over last
month.
4.0.95 (3/19/04):
Fixed flaw that caused "Stop statement encountered error" in Commissions
report. Fixed flaw that caused additions to KPI claims files to
erroneously claim the previous content was not in the correct format.
4.0.94 (3/18/04):
Found that if you ran a series of WageReports from the F11 form without
exiting the form between each such report, reports other than the first often
had erroneous itemized entries (though totals were still accurate); corrected.
Also found that if you specified a date range that included the present day, at
a time when the employee being reported upon had not yet checked out, the
employee's name would not print on the report; corrected.
Fixed flaw in hidden utility that changes InvoiceNumbers on already-created
jobs.
4.0.93 (3/15/04):
Modified Recall-Report,-Key-Word-Method so that it now captures
text-sets as inserted to a Callsheet/JobRecord via the oriented-for-recall
method of CstmrDbase insertion (stupidly, there was previously no coordination
between that method of insertion and what that Recall-Report looked for, to
determine if a recall had occurred; that's now fixed).
Modified reminder on creating a job with a manually-added street, regarding
need to sort-in added streets. Now the reminder comes up only once-every
fifth such addition, rather than on every one.
Overhauled WipAlert system so that if you have a far-in-advance appointment
pending (i.e., exceeding the grace period as set for the 'Currently Scheduled'
status), the system will now refrain from creating a WipAlert for such a
condition, even if the number of days since any action on the job exceeds the
applicable grace period.
Addressed a number of problems in the TimeClock system. Specifically:
(1) corrected defect that allowed fault if you included date range for report
that exceeded most recent entries; (2) corrected defect that resulted in
person's name not appearing at top of printed report if the person was listed in
the Settings form as a technician rather than office person; and (3) made system
check on apparent Clock-In action to be sure there'd been a previous clock-out
(and react appropriately if not).
Added Asko and Gaggeneau to list of makes as recognized in
FinishedForm-Electronic-Claims-Transmission.
Corrected defect as connected to feature that allows indicating items used
from stock when those items are not yet in the MasterPartsPlan. It turned
out that when you'd entered such a part and you later imported the underlying
JobRecord into a non-warranty FinishedForm, the system would sometimes insert an
erroneous price. That's now corrected, plus the system will assume a 100
percent markup for such context.
Also found that if, when describing work done in the
PostVisitReport-Type2,
if the user hit Enter on the keyboard between words to create a new line, that
interfered with full importation of relevant text to the FinishedForm.
Corrected.
Found that if the password had not yet been sent and you cancelled an
appointment and indicated the job was also terminated, you couldn't gracefully
back out; corrected.
Responded to a few of the error message as email-forwarded in last three
weeks (hope to get to others very soon; sorry for the delay).
4.0.92 (2/16/04):
Found a flaw in the system that fresh-indexes the CstmrDatabase (first flaw
found there in years). If on a billed job the Customer section had
no text in the address box, and if the billed customer was not listed as
a HighVolumeClient in the QuickEntryTemplates, the system would end up indexing
that blank address line. Same thing would go for a blank telephone number
in the same circumstance. These blank entries in the index would, in some
circumstances, subsequently interfere with the code strategy that's used for
instantaneous searching, causing that code strategy to erroneously report false
negatives, even though the target string was indeed in the list.
Corrected.
Fixed a couple of problems as introduced (by yesterday's release) in the
Electronic Claims area (CEASA improperly appeared in place of NARDA, and
ServiceBenchWebDirect option was non-responsive).
4.0.91 (2/15/04):
Major overhaul in area of Electronic Claims Processing, particularly as
connected with the Canadian CEASA form (a counterpart to NARDA).
Previously, we'd only done some first-rough-draft level work to make the various
claim formats work from that context. Now we've done serious, detailed
work there. Also, notes and addressed a few small imperfections as
connected with translating the various electronic formats from NARDA.
Responded to miscellaneous error messages as email forwarded during previous
week.
4.0.90 (2/11/04):
Drum roll please . . . Yes, it's true. Finally created an automated
export of financial accounting information to QuickBooks! Many of you have
asked for this for a long time. It's done (at least in its initial
incarnation; we expect some initial tweaking and augmentation will occur as the
first users begin implementing it). To access the feature, just run a
SalesReport from the F11 form for the period for which you want to export
accounting info to QuickBooks. Specify the monitor as the report location.
When the report displays, you'll see there's a new button labeled 'Export to
QuickBooks'. Click on it and follow the prompts.
Significantly upgraded QuickEntry Templates and their relation to filling-in
the FinishedForm, particularly the NARDA as associated with warranty claims.
In particular, added a field in the QuickEntry to indicate whether the client
is TaxExempt. This will now be the standard basis for controlling whether
the tax amounts are auto-filled for you in the FinishedForms. Previously,
the system simply excluded tax if it was the NARDA form selected (assuming
warranty, and therefore no tax) and filled-in taxes if other forms. We
learned this was not always helpful, because NARDAs are also used for contract
service on behalf of manufacturers, which is taxable. So now, based on
what you set in the client's QuickEntry template, you can independently specify.
Also added a field for the servicer's account number with the parts
distributor from whom most parts, for a given warranty-client manufacturer, are
most often purchased. If this field in the QuickEntry is filled in, that
number will fill-in for you in the correct place of the NARDA.
Corrected a flaw when JobRecord info imports to NARDA in FinishedForm where,
if a space did not exist between last name comma then first, the system picked
the second letter of the first name to use as an initial.
Added warning re unsaved SalesEntry when user escapes from one offered via
integrated link from FinishedForm.
Learned that if you were in FinishedForm, typed an InvoiceNumber to load, and
the system couldn't find the number, it stupidly withdrew the box into which to
type a new number; corrected.
4.0.89 (2/8/04):
For some time we've known the Sales Summary reporting machinery could somehow
get in a mode that produced an obviously erroneous result. We did not know
what sequence of operations got it into that mode, and hence had not been able
to fix. Howell (at Mr. Appliance of NW Arkansas) figured it out for us.
The effect can be reproduced (if you try it prior to this update) simply by
first doing an Accounts Receivable report from the F11 form, then doing the
Sales Summary without leaving the form. It's now corrected.
Fixed recently broken link to JobRecord (via right-click) from WipAlert/Supervisor
Callsheets.
On behalf of Dave at DBH, made it so you don't have to have the
Immediate-Call-In option turned on to have end-times auto-fill for you in the
PostVisitReport (when auto-linking there from the DispatchMap), and addressed
Error 91 as had occurred when rapidly paging through current JobRecords in the
F7 form.
Responded to miscellaneous error messages as email-forwarded during previous
week.
4.0.88, (2/2/04):
Added ability to view PreAndPartPaysJournal page-by-page.
Removed what had been some special Maytag-only boxes in the NARDA
Finished-Form. Adapted code so Maytag claims will now use same boxes as
other makes.
4.0.87 (2/1/04):
In response to several requests, I added significant new capability in the
JobsPerusal form (Shift-F7). First, you can now add the criteria of
applicable Technician (i.e., which one was most recently on the job) and
applicable Department to further limit the specific JobRecords culled for you
(previously the only display criteria was by the Status category that
each JobRecord was in). Second, you can now print a summary of all the
JobRecords that meet whatever criteria you setup (in addition, in other words,
to visually perusing through those JobRecords on-screen, as had previously been
the only capability).
As another cool new feature (per request from Don at Dockstaders), added
ability to change sequence of jobs (i.e., "re-sequence") from their graphic
references within the DispatchMap. Heretofore, of course, re-sequencing
had to be done from the list area (typically via drag-and-drop).
Now, if you right-click from an appointment's small-rectangular graphic
reference, you'll see a mini-list of that tech's roster. The item you
clicked-on will be on all caps. Just click anywhere else in the list
where you want that item moved to in sequence. (Please note we're using an
action here, right-clicking on an appointment's graphic reference, that had
been used to toggle the tech-assignment status between Tentative and
Definite; that function is now accessed by using Ctrl/Left-Click).
Also in connection with this DispatchMap work, I added a new option that
allows you to automatically toggle on or off blocking-status in regard to
auto-sequencing, as connected with any particular appointment. In other
words, suppose you have an 8-12 appointment that you want to sequence after a
9-1. Without anything to prevent it, ServiceDesk (via the normal auto-sort
feature) will put it right back in front. Among the methods to prevent
this, it's long been the case that you could add an exclamation symbol as the
fourth work in the appointment's reference. That tells the auto-sorter to
leave that particular appointment where it's at. But historically, you had
to add or remove that character manually, via editing in the F6 form. Now
you can do it via simple click-action in the DispatchMap itself. Just do a
Shift/Left-Click on an appointment's graphic reference. You can do
it again to toggle back into normal mode.
Based on report from Adam at Freds, found that still further work was needed
in regard to having the UnitInfo-List-Boxes match what's typed by user when the
target entry in the list consists of more than a single word; completed.
Also based on report from Adam, found that flaw had crept into the
Callback/Recall-Report--Key-Word-Method, which resulted in under-tallying of
recalls; corrected.
Found that with 10-days-ago revision of button lineup in FinishedForm, boxes
failed to empty out between successive loading of records; corrected.
Responded to miscellaneous error messages as email-forwarded in last week.
4.0.86 (1/27/04):
Uploaded a newly revised and current Manual.
More Unintended Consequences:
Learned that work I'd recently done to reverse the sequence of CstmrDbase
listings (was oldest to newest, changed to newest to oldest) had caused still
more problems. Corrected. In fact, I expect this correction to
finally eliminate, once and for all, the occasional corruption that some of you
sometimes experienced in the CstmrDbase index set.
Learned that work I'd done overhauling the button arrangement in the
FinishedForms had caused trouble with the PointOfSale Link. Corrected.
In the "simple flaw" department (not unintended consequences) learned from
Tina at Texan Appliance that if you selected multiple quantities when printing a
batch of invoices for a tech's route from the DispatchMap, the multiples would
apply only to the first in the series. Corrected.
4.0.85 (1/25/04):
Fixed tiny flaw as associated with last overhaul of button arrangement in
FinishedForm (the LoadItem button failed to scroll).
Found that auto-integration to SalesEnter from FinishedForm context would
erroneously link to the SalesEntry even if a sale had already been entered --
if the form was loaded with pre-existing edits rather than via a fresh
import; corrected.
Again changed nomenclature for the Ctrl-F10 environment (where you
plan items to be maintained in inventory). This form was once called
the StockList form (after all, it's where you list the items you want to
maintain in "stock"), then it went to something else (I now forget what) and
most recently was called the MasterPartsDescription (since it "describes" what
you want to stock). Through all these changes, the function has remained
constant. The problem has been new users often finding it difficult to
conceptualize that this environment is not where actual items of
inventory are tracked (that's the F10 form); that it's simply where the grand
strategy of what to stock is laid out. I've repeatedly felt the
nomenclature was part of what confused people, but for some reason I've had the
dickens of a time arriving at a simple phrase that would do better.
Hopefully this last effort will succeed. We're now calling the form that's
used here the InventoryPlanner, and the resulting list that's produced
the MasterPartsPlan.
Responded to various error messages as forwarded in last week, making
miscellaneous small corrections. While in the process (and to my own
significant surprise), I personally noticed what seemed to me rather large flaw,
that has evidently been there a very long time, without anyone bringing it to my
attention. It concerns the use of spaces in the UnitInfo lists.
First I found that when wanting to make a new entry in the Types list there, I
couldn't add a space at the end of one word to begin a new and separate word.
Upon fixing that, I further found that if I was typing in a word that matched a
single-word item already in the list, I couldn't type further to get a match to
a two-word item, also in the list, where the first of the two words was the same
(the actual example: I had both "RANGE" and "RANGE HOOD" in the list, and found
that upon typing RANGE the system would not let me type further to get RANGE
HOOD). Corrected.
4.0.84 (1/21/04):
Overhauled button arrangement in FinishedForm, improving conditions regarding
when visible and/or enabled. Among other things, it's now possible to
print a blank Generic or Custom FinishedForm.
Fixed flaw as discovered by Perry at A1 Maytag where, in the UnitInfo, if you
searched by model number and selected a model for which no items were attached,
the system would erroneously indicate attachments that, in fact, did not exist.
Added note for when using CstmrDbase in ViewBackups mode, explaining that
results in such context might not be as expected in normal view.
Revised criteria in PartsProcess system for 'In Need of Pricing By Manager'
display mode. It's not more appropriately liberal.
4.0.83 (1/18/04):
Modest overhaul of code that inserts historical entry to JobHistory when an
appointment is deleted. Now the system takes into account whether user
added any information to notes when invited, and alters text accordingly; also
explicitly notes if, where appointment coincided with a cancelled job, user did
not follow through with password-protected option simultaneously write to
SalesJournal as a -0- sale.
One of the functions in the FinishedForm context is that ServiceDesk reads
through a JobRecord's history section, and pulls the particular strings of text
that describe work the tech actually did on the job. It then places such
text into the 'Description of Work Done' section of a FinishedForm. Since
computers have no real intelligence, this system depends on such descriptions
fitting within a fairly narrow format, as should naturally result when
such text is inserted via a PostVisitReport. In the last few months I'd
had some reports indicating that some such text strings were failing to be
properly inserted to a FinishedForm. I knew in such instances there had to
be something about about the formatting of these particular entries that ended
up being different, such that the program code failed to see the expected
pattern. Camela at Shelton's forwarded me a specific of example of text
that had not been inserted as expected to a FinishedForm, and I was finally able
to ascertain the reason. It turns out that, in a PostVisitReport, users
may sometimes enter the date of a tech's visit manually. If, when doing
so, they did not use the normal ServiceDesk-appointment format to signify the
date (i.e., "21 FRI" or "10/21 FRI"), it led to the problem. Essentially,
where a date is inputted by ServiceDesk itself (generally based on the
appointment), it would always go in as two groupings of characters (otherwise
known here as "words") -- where, for example, "10/21" is the first word and
"FRI" is the second. When a user puts in the date, by contrast, they're
likely do it as 10/21/03, which obviously is a single word. The latter
messed up ServiceDesk's effort to extract the wanted entry, because that effort
is based on its counting the first several words in each entry, and seeing if
words in certain ordinal positions are the kind of words as expected for
a work-that-the-tech-did-at-the-household kind of entry. In solution, I've
now modified the code to make the system automatically change a user-inputted
date into the expected format.
The law of unintended consequences forever rears its ugly head.
Discovered another another "broken widget" resulting from the change, from about
two-and-a-half weeks ago, which reversed the sequence of displayed jobs in
CstmrDbase displays (again, it had been oldest-to-newest, it's now
newest-to-oldest). The Recall/Callback Report, Key-Word Method also got
broke in consequence. It's now fixed.
4.0.82 (1/14/04):
Discovered that revision from two weeks ago, which reversed sequence of
displayed jobs in CstmrDbase displays (had been from oldest-to-newest, it's now
from newest-to-oldest), resulted in double entries there after the CstmrDbase
indexes went through a standard updating routine. Corrected.
4.0.81 (1/13/04):
No new features. Worked on a few error messages that had been
email-forwarded. In particular, addressed a weakness that had permitted a
number of Permission Denied errors (in the OpenCallsheetFile procedure) on large
networks. My best guess is those events will be dramatically reduced, if
not eliminated entirely.
4.0.80 (1/9/04):
Added an option, when printing invoices for a tech's roster of jobs from the
DispatchMap, which allows you to specify printing only where it's a new
job (this assumes, basically, you're re-using previously printed tickets where
appointments involve going back out on jobs where the tech has already been
there).
Added still another check-off option in the DispatchMap. Walter at
Express Service told us it's his company's practice to call customers the
evening or morning before each appointment to confirm the customer's
expectation. He wanted a check-off in the DispatchMap to show this had
been done. It's now available via a Shift/Ctrl-Click on the
appointment's list reference (under the tech's name) in the DispatchMap.
The symbol by which the system denotes that check-off (as you'll see) is a
simple hyphen (i.e., '-').
Repaired fault, evidently introduced within last few weeks, that had
destroyed option in printing FinishedForms that omitted constituent amounts
leading to total.
Worked on compatibility with Maytag claims from Ceasa form (used by
Canadians).
4.0.79 (1/7/04):
Added a great deal of finessing to the recently-added PartsPickList feature.
Previously, an ordered item had to show a check-in date (from the PartsProcess
context) to display in the printout. Now ordered items will display
regardless, with specifics regarding their status (such as "On Will Call at
Johnstone", etc.). Also improved organization and readability.
Significant improvements in PointOfSale (POS) capabilities (though we're
still far from where we need to be). Added ability when in FinishedForm
(and in POS context) to directly (i.e., from within that form) enter funds
received (look for new button at bottom). Also made it so when you
auto-integrate from there to the SalesEntry, the auto-filled entry line will put
"OF" (for office) in the Technician field. And allowed for distinguishing
in this context between parts sold and merchandise sold (since we have some
clients selling actual appliance via our still limited POS capabilities).
To designate that any listed line-item in the FinishedForm is merchandise,
include an asterisk in either the PartNumber or Description field. When
compiling information to go into your auto-filled SalesEntry, the system will
look for that, make the distinction, and fill-in the MerchandiseSold and
PartsSold fields accordingly.
Worked on speed problem when doing searches within the PartsProcess archive.
While super fast in Win98 level systems, we'd found these searches were
abysmally slow in WinXP level machines. Tweaked the code for maximum
efficiency and achieved a substantial improvement (it's now about twice as
fast), though we're not really to the bottom of why this particular function is
so slow in XP machines.
4.0.78 (1/4/04):
I finally created a Dealer/Serialized-Inventory module -- Yahoo! It's
actually a separate little application, but designed to integrate well with
ServiceDesk. It uses the same database as the UnitInfo system, just adds
several new fields as needed in the dealer-inventory context (e.g., new or used,
distributor from whom purchased, date when you purchased it, flooring company if
any, amount you paid, suggested retail, minimum retail, color, etc.). This
is Version 1.0 and is minimal in that it has no capabilities beyond allowing you
to maintain your fundamental inventory data, and to very powerfully and
conveniently access and analyze it. It employs a very simple interface
(same basic structure as Windows Explorer or Outlook) that makes almost any form
of analysis or search so simple it's hard to imagine how simple until you see
how it works. You want to see everything you have in a particular color?
No problem. Or of a particular type (e.g., all refrigerators)? No
problem. Or of a particular make, or with paper held by a particular
flooring company, etc., etc., etc? Any possible query is instant and,
again, more simple than you can imagine until seeing the setup. It's main
weakness at this point is that, as Version 1.0, it lacks integration with any
POS (point of sale) function, meaning there's no direct link from the data to
your POS system. You still have to fill-in your merchandise sales info
manually as you make a sale, then (as a separate action), remove the item from
your inventory list. That of course will be changed -- hopefully in the
not-too-distant future. The nice point of present integration is that, for
all items brought into inventory via this new system, the info is equally
accessible from within ServiceDesk via its UnitInfo system -- so there's never a
need for separate entry of information there, when the data later becomes
significant to service. By the way, Version 1.0 is selling for $199 (if
you try it and find it's not worthwhile to you, we'll refund that). As
capabilities are added, the price will go up, with credit to earlier purchasers
for what they already spent.
At the request of Dave at All American, added a new option in the list of
dispatch methods as accessed from the DispatchMap (list that comes up when you
click on a tech's name at the top of his list of jobs). This new option
provides a "Pick-List" of parts as ordered for the job -- to help you (or the
tech) know what to gather before he heads out on his set of jobs.
Numerous small fixes, including (1) Made it so mouse works in connection with
Shift/Click on F12-command-button-equivalent (as part of new direct access to
UnitInfo form); (2) Added clarifying message when wrong password is entered upon
deleting appointment/closing JobRecord; (3) Learned from Perry at A1 Maytag that
if you made a SalesEntry via automatic link while printing from a FinishedForm,
then went to print again in same FinishedForm session, the system failed to
recognize you'd already done the SalesEntry and inappropriately offered to do it
again; corrected; and (4) a bunch of specific fixes/finesses in reaction to
error messages that had been email-forwarded in last week or so.
4.0.77 (12/28/03):
In regard to the UnitInfo form, made it so you can access the form via
keyboard command (Shift-F12). Until now, it had only been
accessible via mouse action. One improvement with this method is that,
because the system is not assuming you may want to create a new record or attach
an existing one to a Callsheet or JobRecord, it begins with the most record
already loaded. Also found that recent work that had corrected an
occasional mis-loading of ListBoxes in the form caused fault in new system where
no records had yet been created; corrected.
For those who are using the option to reverse the normal
customer/location/bill-to-party assumptions, made it so the specification of
reversal now has effect in the FinishedForms-Custom context (in addition having
effect when printing to the standard up-front invoice, where it had all along).
On the basis of requests from a few people, I reversed the sequence by
which job references are displayed in the various CstmrDbase listings (i.e., the
listings that come up while you're typing target text into a Callsheet or into
the F12 form). Until now, the sequence was from oldest-to-newest,
which meant newer listings (under any given match) were displayed below older
ones. This made it so sometimes (when there were a lot of matches) you had
to scroll down into the list to find the newer ones (or perhaps newest one) that
you were interested in. If there too many matches, the new item of
interest might not even make it into the list. Now, with the sequence
reversed, the listing will be from newest-to-oldest. This means the
newest items (in which you'll more likely to be interested) will be right at the
top. You will need to go to the the ArchivedJobRecords form
(Ctrl-F7) form and there run the MakeNewIndexes routine to affect this
change.
Enhanced printout of special order parts fax request. Enlarged printing
of part number (had received complaints that with poor fax quality, the smaller
size was sometimes hard to read), added reference to customer's name on each
item.
Significant re-work of data that imports data for fill-in of FinishedForms,
particularly in regard to actions associated with the Ceasa form (used by
Canadian servicers). One improvement, applicable to all, is that the
imported description of work done will now exclude the parenthesized reference
to the person who took the PostVisitReport (when that reference was added
several weeks ago to historical notations as created in consequence of
PostVisitReports, I'd failed to anticipate that it would be included needlessly
to such imported summaries of work done, absent the just-done modification that
now prevents it.
4.0.75 and 4.0.76 (12/26/03):
Miscellaneous details for specific clients.
4.0.74 (12/23/03):
Made revision in code that reads archived JobRecords. It now watches
for a corrupted record and automatically repairs if found.
4.0.73 (12/22/03):
Flashing/Blinking Jobs when technician may be late! Very cool
new feature. If you're using (and have turned on) the Immediate Call-In
option, the system will now continuously review each current day's schedule, as
the clock winds forward, checking to be sure that each tech is keeping up within
his roster of jobs. If it appears he's threatening to be late on any
particular job, the references for that job (list and graphic) will begin
flashing, to bring the hazard to your attention within the office (I'll soon
upload a new revision of the manual that details the formula that's used to
determine the flashing threshhold that's used for each job, but assome examples,
a 9-12 appointment would start flashing if the tech had not called in his
arrival by 10:00; a 9-10 appointment if he'd not called in by 9:24; a 9-5 if
he'd not called in by 3:10, etc.).
Responded to miscellaneous error messages that had been email-forwarded in
last week, including one that numerous users encountered (File already open)
when attempting to print dunning letters (it was something I recently broke; now
it's fixed). Added option in MakeMailingList utility to specify Comma- or
Tab-delimited files. Added check for an improperly embedded \sd folder on
ServiceDesk startup (as can happen if an update is unzipped to inappropriately
specified target on the server).
4.0.72 (12/12/03):
Learned that purchase invoice numbers from stocking parts were not importing
to the NARDA; corrected. Learned of just-introduced bug that was
creating fault when archiving AccountsReceivable; corrected. Finessed a
couple of issues connected with setting DispatchMap-based invoice printing
defaults and other printing from DispatchMap.
4.0.71 (12/11/03):
Learned of an unintended consequence from work of a couple of weeks ago that
added capability to recognize multiple UIS attachments in archived
JobRecords. It had made it so multiple attachments would sometimes
show erroneously for current JobRecords as displayed from a CstmrDbase
search context; corrected. Similarly learned of another unintended
consequence stemming from recent work in FundsJournal to assure display of
non-categorized entry, which had made it so unintended entries displayed in some
contexts; corrected.
4.0.70 (12/10/03):
Added an export feature oriented toward inclusion of information as might be
needed if you need a list of recent jobs as the basis for calling customers for
a Quality of Service kind of survey. This was added to what was formerly
the MakeMailingList form. Now, since it has this different kind of
export as an option, we're calling it the ExportCustomerData form.
Corrected small bug that was created in consequence of the last update that
caused an error when trying to print detailed summaries of a tech's work roster
from the DispatchMap.
Overhauled SpUpdater utilities (both the one that updates ServiceDesk from
other computers in the network and the one that does so from the website).
If you replace your existing copies of these utilities, you'll now see the full
text that informs of update status when doing it in the local network, and
you'll no longer need to wait for ServiceDesk to disappear out of the background
before clicking on the UnZip button when doing an update off the website.
But there is a complication, as regards securing the update on these two little
utilities, as follows: (1) The SystemUpdater.exe utility, which copies a
ServiceDesk update across the network, needs to be installed at each station.
When you use it to update across the network, it updates ServiceDesk, but not
itself. Thus, if you want it updated, you must do so by separate means.
(2) The ServiceDeskUpdater.exe utility, which manages an update off the website,
also is installed at each station. It can manage an update on all the
files that are included in the SdUpdate folder that's downloaded of the website,
but if a an copy of itself is included in that file, it will interfere with the
UnZip process, since it is itself running when that happens; thus it you want it
update, it also needs to be by separate means. For this reason, if you
want to update these two files (the improvement are a little bit nice, but not
by any means dramatic or critical), you need to log into the downloads page
manually to do it (open the download entitled "UpdaterUtilities"), and do it
separately at each station where you want the improvement.
Also update the Finished Form Formats (similarly available for manual
download off the ServiceDesk downloads page). The Custom form that's
included now is setup to perfectly mirror the up-front invoice that was
formatted for your system when first shipped (assuming you purchased your
package within the last 1.5 years, which is about the period we've been doing
that). Even if you're an older client, if you want a Custom form that's
much improved, you can use this. If you want underlying graphic to go with
it (so that the whole form prints onto previously blank paper), let us know.
Newer users will already have this graphic.
4.0.69 (12/8/03):
Now that the list of dispatch and related options in the DispatchMap are more
organized and categorized, I felt free to add still another option. This
one I wanted to do for a long while, because I knew it would not take tons of
work, and it has a high "gee wiz" factor -- but I never could find anyone who'd
indicate they'd be ready to use it, once I made it, so I couldn't justify
spending the time, with other things people were anxious for. Finally,
however, Steve at Priority told me he'd love to have this ability, so now it's
there. What am I talking about? ServiceDesk will now export any
tech's route in a format that can easily be imported into Streets & Trips, Map'N
Go, or other electronic mapping software. Thus, equipped with an
appropriately setup PDA or laptop computer, any technician can receive
turn-by-turn instructions from one job to the next. If you include a GPS
in the setup, you can even make the software "speak" audible directions as turns
come up ("Turn right on 43rd in 200 yards"). Very cool. I hope
several of you use it.
Per request from Steve and Greg and Gulgrens, I finally got major sharing
protections built into the various inventory-related functions. If you did
not know, not every environment in ServiceDesk is carefully coded to assure that
if two users are simultaneously working in that area, their various saves do not
conflict and cause trouble. It requires a whole lot of extra coding work,
in any area, to make it impossible for simultaneous work by different users to
cause trouble. That work was done some time back in all the areas where it
seems likely that multiple users might be simultaneously working (e.g.,
Callsheets, JobRecords, ScheduleList, AccountsReceivable, etc.), but it had not
been in regard to the various files involved with inventory work. At
Gulgrens, they found they needed it, so protections there have now been added.
Discovered that if you're using a fixed sales tax rate and wanted to edit an
entry in the SalesJournal to any amount otherwise (such as, for example, if it
was a tax-exempt sale), the system would not save that edit; corrected.
4.0.68 (12/7/03):
Major overhaul of the various dispatch-transmission methods as available from
within the DispatchMap. Improvements are in three areas:
1. In the last couple of years, I've repeatedly added to these options
(as available when you click on a technician's name at the head of his list of
jobs). These additions have generally been in response to specific
requests, with the result that we now have a broad and well-rounded set of
options there (i.e., print, email, page, etc., with actual invoices, detailed
info or abbreviated, etc.). As the list of these options has grown, I had
simply added each new one into the list, until it had reached the point where
all the various options were so varied that even I got confused in trying to
remember, from the list, which was which. What was needed was some
organization and categorization in this options list, which has now been
achieved.
2. In the last year or so, a few users have requested that each
dispatched transmission include an on-its-face notation indicating whether the
scheduled visit is the first on the job, or if it's a return visit to complete.
This was needed to tip-off technicians to the fact that, typically in such
situations, they needed to be bringing an ordered part with them on such visits.
To accommodate this tip-off, I've now added an additional snippet of text to
each relevant transmission method which indicates the quantity of previous
visits on the involved job. For those particular transmission methods that
allow sufficient space, the system will now further include text describing the
work actually done on previous visits.
3. Also in the last year I've encountered a few clients who do not want
to print invoices as a JobRecord is created (which is, of course, the more
typical practice). Instead, they want to have no paper until actually
dispatching the job, at which point they print the set of invoices as assigned
to each particular tech. Some time back I accommodated this practice by
adding a "Print Invoices" option as one of the dispatch-transmission methods
available from within the DispatchMap. But then, recently, I learned that
Jeff at All Household was taking this "no-paper-to-shuffle-in-the-office" thing
a step further. Not wanting to manage pieces of paper as returned by a
tech after his first visit, then get the same paper back into his hands as he
departs for a second visit, Jeff was printing brand new invoices with each
dispatch -- whether the dispatch was on a new job or returning on a pre-existing
one. Only problem was, it was the standard "up-front" kind of invoice each
time, and thus nothing showed on it to indicate previous work done, parts used
and/or ordered, etc. Jeff had the idea that if the system would
automatically select FinishedForms (instead of standard up-front type tickets)
in this kind of invoice-printing-to-do-the-dispatch context (on those particular
jobs where there'd been previous visits), it would meet his needs much more
perfectly. So that's what we've now made possible.
If you want to use this option, you can set it up from the DispatchMap's
contextual command summary (right-click in any empty space of the
DispatchMap to bring it up; under 'Dispatch Methods' click on the item
labeled 'Set default for FinishedForms in lieu of new invoice'). In
regard to this capability, you might want to remember (as explained in regard to
a previous update), it's now easy for you to setup the 'Custom' FinishedForm to
use exactly the same format as does the up-front invoice setup we initially
provided with your system (call if you have questions on this).
4.0.66 (12/4/03):
Made it so UIS-attachments can now be added and/or deleted from within
Archived JobRecords (formerly could not be done from that context). At
the same time as I was doing this work, I noticed that multiple UIS
attachments had not been made to display there (as they do from Current
JobRecords) or to be accessible (that is, any attachment past the first one).
This was also addressed.
Learned from Steve at Priority that recent work adding new options when
indicating parts used via PostVisitReport-Type2 had partly broken the old
capability, to advance-specify that a part was pulled from a different source
than the servicing technician's truck. When in this mode (and since those
recent added features), the system was failing to deduct the used item from
inventory; corrected.
4.0.64 (11/20/03):
Finally discovered what had been causing intermittent but frequent
frustrations for Gena at Cagles. Periodically, when she created a new UIS,
the system would claim that a Make or Type was not yet in the list, even though
it was; corrected -- finally. Responded to miscellaneous error messages as
email-forwarded during preceding few days.
4.0.63 (11/19/03):
For veteran users this will probably not mean much, but you may recall
encountering frustrations when first learning to use the SalesEnter form.
I've now added a contextual clue box, that explicitly informs you of the item of
text that should be inputted at each comma position. This will make it
much easier for new people, just learning, and may be slightly handy for
veterans too.
Corrected defect that was causing system to inappropriately complain about a
missing MyLogo.BMP file when selecting the Generic FinishedForm.
Further refined new accounting improvements as regards pre- and part-pays on
jobs (in particular, dealt with logical flaw as concerned pre-pays, discovered
during initial use). Placed warning for user when attempting to
inappropriately enter funds received from a completed JobRecord. Thought
I'd already fixed a problem stemming from added option, from about a month ago,
to specify default order instruction status in PartsProcess; based on call from
Jeff at All-Household, discovered the fix wasn't adequate; corrected. With
Steve at Priority Appliance, found a situation in the Funds form that could
result in an unchecked item that failed to display for checkoff, preventing the
CurrentAreaPartition from being moved; corrected. Modified InventoryForm
so that the JournalOfTransfers now explicitly reads the invoice number on which
any particular part was sold.
4.0.62 (11/17/03):
Further refinements in regard to last work as involved with various aspects
of accounting. In particular, significantly improved display of new line
items in SalesReport, and added still another new line item which reports the
Net Cash Inflow for reported period (accounting implicitly for all
adjustments, including net of pre-pays up or down, net of part-pays up or down,
net of EDAs up or down, net of discounts granted, net of lost funds, etc.).
In response to Dave at DBH, refined the new on-the-fly purchase/use stock
part feature in the PostVisitReport-Type2 form. In particular, Dave
discovered that when prompted to indicate the vendor from whom an item was
purchased, you could accidentally abort the sequence when attempting to use your
keyboard rather than mouse. Made the selection now fully keyboard
accessible, and prevented the accidental abort.
Also overhauled error message that results in a Permission Denied situation.
This is not really an error at all on ServiceDesk's part, just its honest
response to a problem in the system where Windows will not grant needed file
access. However, because the message was framed as an error message, it
create the opposite impression in user's minds. That is now changed.
4.0.61 (11/16/03):
Introduced beta-response to long-term deficiency in system's ability to
report comprehensively on changes in AccountsReceivable over time. All
along, the system has had the ability to take an accurate snapshot of the
overall A/R condition -- at any point in time (i.e., A/R Aging, etc.) And
all along, the system could accurately account for how much total A/Rs increased
or decreased over a period of time -- if considering the face values only.
In other words, when tallying transactions over time as affecting A/Rs, the
system looked only at face totals on the receivables and did not account for how
partial payments affected the true, net value of transactions occurring
over time (again, we retained the ability to do accurate snapshots, just
couldn't show a movie, so to speak, demonstrating precisely how the total net
situation changed over time, when adding in the effect of partial payments).
This has now been addressed. We're calling the work a "beta-response"
because we want to see it work accurately in the field before announcing its
perfection. In addition, the system now provides an accounting of amounts
pre-paid on jobs not yet closed (the information was always there, we just
didn't provide an explicit report on it). And it explicitly reports on the
net cash flows as connected with movements to and from EDA accounts. All
these refined and new figures are now part of the standard SalesReport.
Please note however that the first two improvements rely on a new underlying
file, and reports that include any period prior to your update to this revision
will not accurately reflect the new capabilities.
4.0.60 (11/13/03):
Alerted by Nils at Andersson that new feature that allows simultaneous
check-in of parts and usage was recording in fashion that made importation into
FinishedForm fail to include vendor invoice number; corrected. Finally
nailed down problem that had occasionally caused frustration for new users on
initial setup, when they didn't follow expected sequence in first saving local
settings, then net-wide settings, and system locked up. Dealt with one
minor error per email forwarded item from Freds.
4.0.59 (11/10/03):
At behest of Beth at A1, investigated accuracy of A/R Aging Report.
Found that the newly added, face-value section of the report failed to exclude
not-yet archived, but fully-paid receivables from the tally -- which in certain
circumstances could result in failure to balance, between two such reports, with
net A/R changes indicated in a Sales Report covering the identical intervening
period. Corrected.
4.0.58 (11/10/03):
In the PostVisitReport-Type2, completed the enhanced system for handling
input of items used from stock in the situation where an item used is not found
in the servicing tech's inventory. Now all potential avenues, for dealing
with this, are fully functional -- whether to indicate after-the-fact that part
items were actually from a different in-stock source, or to make a stock
correction "on-the-fly," or to indicate that a stock-listed item was purchased
from a vendor and then immediately used (thus indicating, in essence, a
simultaneous check-in and check-out of stock, and again "on-the-fly.").
Learned from Kathy at Allied that feature in Departmentalization system that
allows you to change a JobRecord's assignment would not work where there was no
previous department assigned. Corrected.
Responded to numerous email-forwarded error messages, as received during
previous few days.
4.0.57 (11/5/03):
Extensive work on problem as intermittently encountered by Metro where
occasionally JobRecords would be created under duplicate invoice numbers (and
sporadically reported elsewhere). I believe it's very probable the problem
is absolutely fixed. Added new feature, at behest of Scott at MoKan, for
TimeClock Log-in and Log-out as situated for persons other than logged into
current desk (Shift-F2). Reacted to numerous error messages are received
via forwarded email in last several days.
4.0.56 (11/4/03):
On suggestion from Adam at Fred's, augmented last revision's work in regard
to enhancements of the DispatchMap's check-off system. Now the system will
allow you to visually distinguish, on-screen, between those PostVisitReported
appointments where the job was completed and those that still involve further
work. Job's on which the PostVisitReport was made and the job is
completed will show a heart symbol. Also, made it so a PostVisitReport
that's made by other than the tech will include initials of the office person
who did the report.
On notice from Dave at DBH, discovered a flaw in initiating the
PostVisitReport-Type2 where, in spite of displaying the desired JobRecord, the
system nevertheless recorded it's information to the wrong JobRecord (and would
connect inappropriately to UIS records, etc.). Basically, if you first
located the JobRecord on which you were making the report by doing a name search in
the F7 form, then (with just the right timing) hit Shift-Alt/F7 to bring up the
PostVisitReport, the latter would internally set an internally variable, used
to keep track of the invoice number being reported on, wrongly. It's now
corrected.
4.0.55 (11/2/03):
Major overhaul of the DispatchMap's Check Off / Status features.
Previously there was a single action/symbol to indicate the tech's arrival
and/or completion on the job (thus leaving the signification ambiguous in terms
of which particular status it actually meant). Now we've separated the
functions, so you can independently indicate both the tech's arrival and
departure from a job. Also made it so that whichever you indicate (if any)
the system logs it, and will input such arrival and/or end times into the
PostVisitReport for you (even if you're not using the Immediate-Call-In method
for your PostVisitReports). Also improved the graphic indications of
JobStatus (i.e., whether DispatchedToTech, TechHasArrived, TechHasFinished or
PostVisitReportCompleted). Also, if you are using the Immediate-Call-In
method for PostVisitReports, you are now free to initiate the report from any
available context (while still retaining benefits of that method), instead of
only via QuickLink from the DispatchMap. I suggest checking the
DispatchMap's contextual command summary (right-click on any empty space in the
map) under 'Change Check-Off Status' for a summary of the newly current
check-off methods.
4.0.54 (10/31/03):
In UnitInfo form, allowed for more than 16 characters in the SerialNumber
field. However, this change is not fully automatic. If you find
yourself needing more than 16 characters and you're already using a version of
the UnitInfo.MDB file that's in the 16-limit format, you'll need to email me a
copy of the file so I can convert it to the new 20-limit version.
4.0.50 10/15/03:
Added ability to use stocking parts "on-the-fly". In other words,
suppose you've picked up a part at a supplier and then immediately used it.
Formerly, if indicating this usage through the PostVisitReport, you had to
first check in the part via the F10 form. Now, from within the
PostVisitReport from (New Method), you can indicate you both purchased and used
the part, in one operation. This also facilitates using the inventory
system, for new users, before it's otherwise setup. In other words, you no
longer have to create your MasterPartsDescription and check items into
inventory, before you can indicate that items were used out of inventory.
Basically, when you indicate use of a stock item, and that item's not yet in the
list, the system queries you for the information about its source and cost,
etc., as needed to record the usage -- as though it had been in the list.
Also took some preliminary steps toward augmented related abilities in this
area, though further work remains to be done.
4.0.49 10/14/03:
Learned from Gena at Cagles of occasional unhandled errors when linking to
FundsEntry from PostVisitReport-New, and when integrating directly to
SalesEntry; installed error traps to address. Further learned of
occasional failure when creating UnitInfo sheets where system erroneously claims
that a selected Type or Make was not already in the list. Though unable
presently to determine the cause, I made some changes in the underlying code
that I hope in the future will prevent such occurrences.
In regard to the integrated SmartParts capability, added two new features:
(1) a pseudo-hyperlink capability in regard to parts cross-references (just
click on a cross reference and the system automatically takes you to the full
listing; you can click on its cross references and explore further, etc.); (2)
there's now an integrated email option for when you fail to find the model or
part you are seeking (just click on the mail button and the system will initiate
an email to the appropriate department Rossware, bringing the matter to our
attention).
4.0.47 10/8/03:
Added an option to Archived-Callsheet to allow
direct printing of its image.
4.0.46 10/7/03:
Added mouse-based panning to the DispatchMap (simply move the mouse pointer
to the extreme edge of the screen, watch it change to a navigation pointer, and
click).
4.0.44 10/4/03:
Made it so if you're using the Windows XP desktop theme (with taller, rounded
title bars), and if you simultaneously have your screen resolution set at a
level higher than 1024 X 768, the system will note the same, and adjust its
Window height taller to fully accommodate the XP theme. Also, you can use
any of the large-font themes now, under the same circumstances (i.e., you've got
a higher resolution to make the necessary vertical space on your screen).
Addressed two bugs in response to messages email-forwarded by Gena at Cagles.
She got a Type Mismatch error at step 1 in the frmPrintClaims.cmdPrint_Click
procedure. I may not have got to the bottom of this problem yet, but have
put in new code to make it so on any future occurrence, the resulting message
will provide more information, which should finally be sufficient to nail it.
Also addressed an error message as email-forwarded by Laurie at Alpha
Company. It was an Error 70 (Permission Denied) in the
frmWipReview.CompactFile procedure. I've been fighting similar errors for
some time (all related to trying to get other computers to release a file so the
operating one can do particular operations with it). In this instance I
did a major review of related procedures, and a significant amount of
overhauling. Hopefully, I made some significant headway.